After teaching 400 middle school students over the course of 7 years, I sometimes compose letters to middle school parents in my head. Especially when it’s a family’s oldest child who’s starting middle school, it can be just as scary for the parents as for the kid. It’s confusing. How much input do you offer your kid? How much do you let them struggle before you step in? How do you support them emotionally, socially, academically, athletically? And, where school is involved, how hands-on or -off should you be?
Here’s one of the letters I’ve been composing in my head to those first-time middle school parents. I hope it’s helpful.
Dear New-to-Middle-School Parent,
I’m your kid’s new swim teacher. Okay, not really. Really I’m her new English teacher. But bear with me on the swim teacher analogy for a bit.
I know how to swim and I know you do, too. The thing I offer your kid is that I also know how to teach kids to swim. You might actually be awesome at that, too, but I know that you decided to entrust me with this awesome job. Thank you so much. Now I’m going to ask you for your faith.
If I’m teaching your kid to swim and you jump in with swimmies every time I let go, your kid will remain safe, but she will not learn how to swim. She has to struggle for a moment in order to figure out how to kick her feet and propel herself forward.
During the struggle, I know you’re scared that she’s going to sink. There’s no doubt that you love your kid in a way I couldn’t imagine, but I care for her, too. Beyond that, it’s a matter of personal pride and integrity for me to ensure that she graduates my swim class with flying colors. For a million reasons, there’s no way I would let her drown. I know the right moment to put my arms under her and buoy her up, and the right way to do it so that she still learns the stroke. Swimmies will keep her afloat, but they won’t prepare her for the Olympic-size pool of going off to college, or the ocean of real life problems.
Besides, I can tell you from experience that sometimes you might think she’s drowning when she actually just caught a mouthful of water. That F on a quiz or even that D on her middle school report card? That’s not drowning. That’s an unfortunate, ill-timed gulp. I tried to help her avoid it, but she wasn’t ready to do it on her own. And believe it or not, this natural consequence will become part of her progress. If you float her every time these little hiccups come along (by doing bits of her projects, by making excuses for her mistakes to help her avoid consequences, by keeping up with her assignments for her), she won’t feel the discomfort that results from a low grade and she might not develop the intrinsic motivation to keep afloat.
Don’t worry. I know what real drowning looks like, and I’m watching her like a hawk. It’s not “sink or swim” with me. If I can tell your kid’s not swimming, I have more lessons — and more creative lessons — to help her figure it out. I have strategies to navigate a lot of the obstacles that might come up. Some of these strategies might even involve you getting in the pool in certain ways (contacting a tutor, regulating homework time and space, helping your child use their planner at home.) If my strategies aren’t enough, I have an awesome professional community and resources to help me find new ones. But if you’re under the water propping her up, I won’t notice that she’s struggling and I won’t know she needs this wealth of resources. That’s when she could get to high school without crucial skills.

Another thing to remember is that I know what level a 12-year-old usually swims at. I’ve gotten worried emails from parents who are professional writers — er, swimmers — wondering why their child couldn’t swim as well as they could. I’ve had parents watch the Olympic swimmers on TV (or other, particularly talented swimmers in their kid’s class) and afterwards come down on their kids for their perceived inadequacies. Even parents who admit to knowing very little about swimming sometimes heavily assist their kids in learning to swim because they feel like their kids might be behind. This is another place I ask for your faith.
Wherever your child is, I will meet her. I will push her just enough for growth, but I will also know when to stop. I won’t try to make your novice swimmer into an Olympian in a year because that’s not what her brain is built for. Instead, I’ll support her as she adds a few key skills and a lot of awareness and sensitivity about the craft of writing — er, swimming — each year. If you’re at home admonishing her because she doesn’t know the butterfly stroke (which is too advanced for her right now); or worse, if you try to teach her the butterfly stroke when she is missing foundational skills; OR WORSE, if you climb into the pool, pretend you’re her, and DO THE BUTTERFLY STROKE FOR HER . . . well, you’re hurting her process. (Believe it or not, I have had absolutely wonderful, well-intentioned parents write portions of students’ papers for them. They didn’t seem to realize that that made it impossible for me to know what skills their students still needed to be taught.)
We’ll get to the butterfly stroke. We’ll get there. And we’ll get there in what I hope is a beautiful, interesting, organic, engaging, authentic way. That’s my goal anyway. Every year I work hard to get better at that, because being a swim teacher isn’t a job to me, but a calling. So I ask you to trust the process.

That doesn’t mean to butt out of the process altogether. I need you. You know your kid better than I do, and you see her at home, where she might express things she’s too embarrassed or proud or shy or determined or distracted to express to me. What I need from you is communication: your intimate understanding of this creature you’ve entrusted me with.
It doesn’t help to strap swimmies onto your kid when she struggles, but it does help for you to tell me, “She’s not feeling good about this skill at home, so I’m going to encourage her to come to you for extra help.” It doesn’t help for you to swim your child’s laps for her, but it does help for you to say, “For some reason she’s spending hours practicing this skill at home. Is it supposed to take her this long?” I don’t even mind you asking, “Why do you teach the stroke this way?” I’m both proud of my pedagogy and flexible with it: I would love to explain it to you and discuss how to modify it to best suit your child. There’s never too much communication between us, and I never resent your emails. What I see when your name pops up in my inbox is that you love your kid and want to partner with me (and by the way, even if your name doesn’t pop up in my inbox, I still know that!)
The bottom line is that we both care about her success. As you move into a stage where you let go a little more, let her struggle a little more, let her manage her own time and work a little more, please remember that I’m right beside her and watching for what she needs. And I will remember that you have loved this little one for over a decade now, that everything you say and do springs from that, and that you know her best. She’ll be zooming off the high-dive before we’re both through.
Love,
The Swim Teacher
P.S. Sadly, not all teachers are great. You have to be the judge about whether or not this letter applies in your situation. Of course, don’t be afraid to advocate for your kid if she ends up with a teacher who doesn’t serve her needs.
* * *
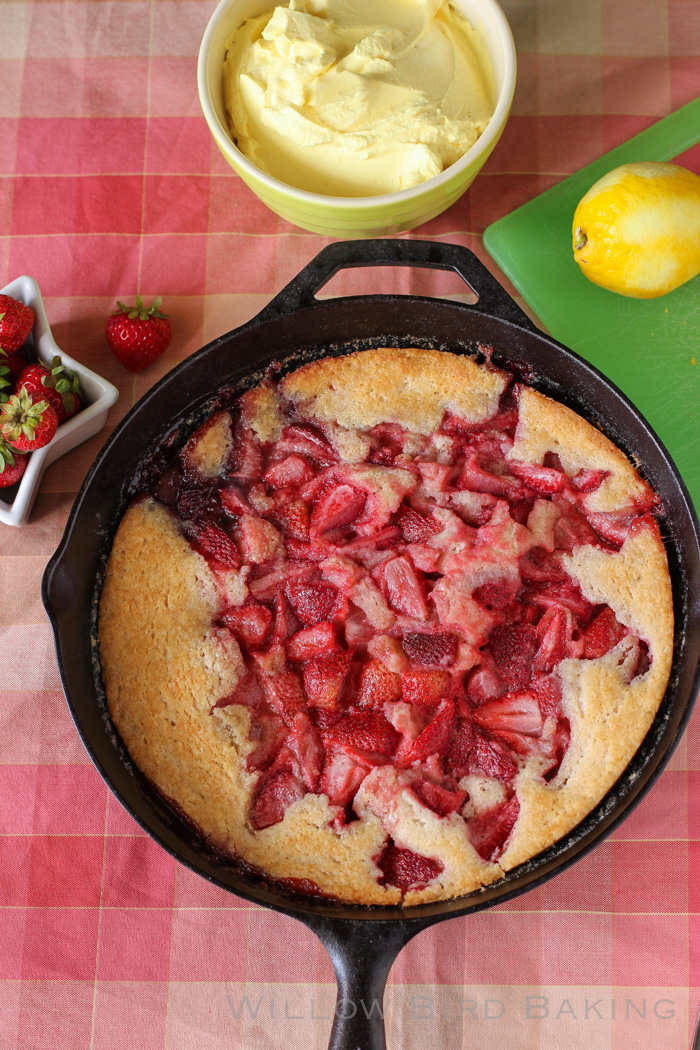
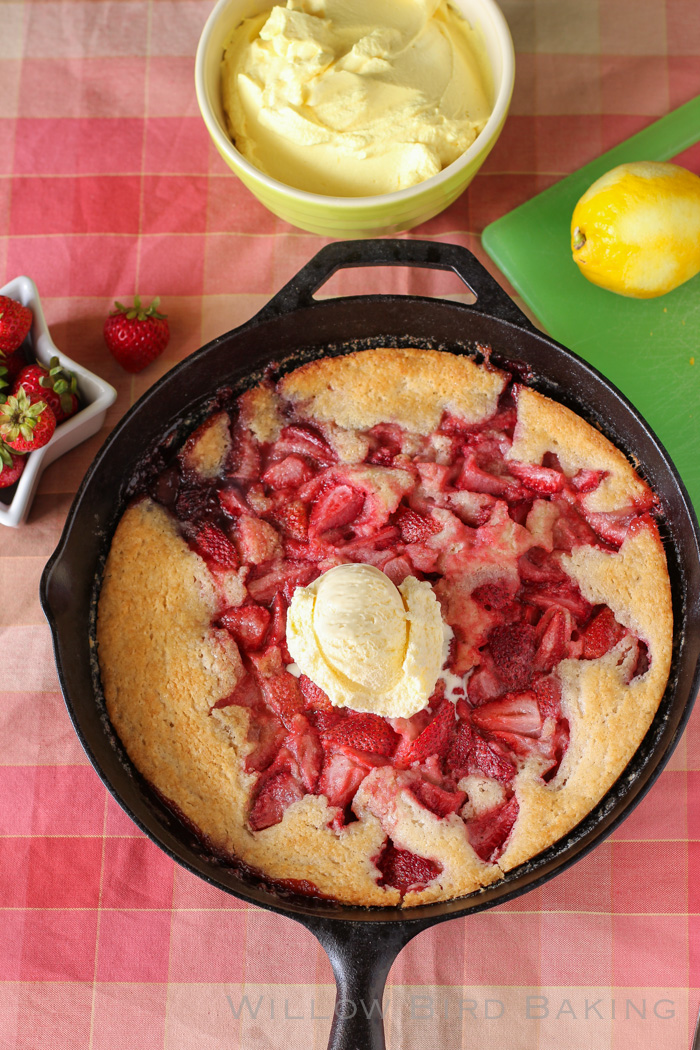
This strawberry cobbler is the latest summer treat I whipped up. It’s so easy you won’t believe it: 15 minutes of prep, 35 minutes in the oven, and just a few minutes until it’s devoured. I decided to add vanilla bean ice cream and a huge mountain of bright lemon cream to complement the gorgeous roasted strawberry flavor. Enjoy!
Parents: I’d love to hear from you. What letter would you write to your children’s teachers?
One year ago: Refreshing, Tart Lemon Granita with Fresh Berries
Two years ago: Thyme Orange Cranberry Shortbread Cookies
Three years ago: Easy, Cheap DIY Party Pennant Banner
Four years ago: Chocolate Pavlovas with Chocolate Mascarpone Mousse
Strawberry Cobbler with Lemon Cream
Recipe by: Willow Bird Baking
Yield: 8 servings
A quick, easy, tender Strawberry Cobbler with Lemon Cream. Such a delicious summer treat! Eat it right out of the skillet for a special 4th of July treat.
Cobbler Ingredients:
1 cup flour
1 cup plus 3 tablespoons sugar, divided
Dash of salt
2 teaspoons baking powder
1/2 teaspoon cinnamon
1 cup milk
1/2 cup (1 stick) butter
2 cups whole strawberries
2 cups quartered strawberries
Lemon Cream Ingredients:
2 cups heavy cream
6 tablespoons powdered sugar
zest of 1 lemon
1 teaspoon lemon extract
1/4 teaspoon yellow food coloring (optional)
Directions:
Preheat the oven to 350 degrees F. Put the stick of butter into a 12-inch cast iron skillet in the preheating oven to melt.
In a medium saucepan, mix 3 tablespoons sugar, 2 cups whole strawberries, and and 1/4 cup water. Cook them over medium-high heat until the berries burst and release their juices and the mixture begins to thicken, about 8-10 minutes. I mush the strawberries throughout the cook time to speed up the process. Pour this mixture through a fine mesh strainer and discard the pulp, letting the strained strawberry juice cool (I stuck it in the fridge).
Remove the skillet and melted butter from the oven. In a large bowl, whisk together flour, sugar, salt, baking powder, and cinnamon. Pour the milk into the dry ingredients and mix until the lumps are gone (the batter will be very liquid) and then pour this batter over top of the melted butter.
Gently mix the quartered strawberries with the strained, mostly cooled strawberry juice. Pour this juicy fruit around the top of the batter. Do NOT stir this — just let it fall where it falls! Bake the cobbler for 35-40 minutes or until golden brown and almost set.
To make the lemon cream, put heavy cream into the bowl of a mixer and begin beating on medium until the cream starts to thicken slightly (chilling your cream, bowl, and beaters first will speed the process up). Add powdered sugar, most of the lemon zest (saving some for the topping), lemon extract, and yellow food coloring. Turn the mixer up to high and whip cream to stiff peaks. Serve cobbler warm with a big scoop of vanilla bean ice cream and another big scoop of lemon cream. I like to eat it right out of the skillet, because I’m classy.

