lemon

Milnot Cheesecake Cheesecake

The world lost a firecracker just a few days before Christmas. My Great Grandma Thelma passed away at 99 years old, but her spirit can’t be extinguished.

Grandma was as comfortable with a gun and a dog as she was in a dress and pearls. As if to match her personality, her hair remained a shocking shade of red right up until the last few years of her life, when soft white took over. The lines on her face deepened and multiplied over time, no doubt spurred on by belly laughs and smiles.

She was a home to those who needed a home, a laugh to those who needed a laugh, and a light to all of us.


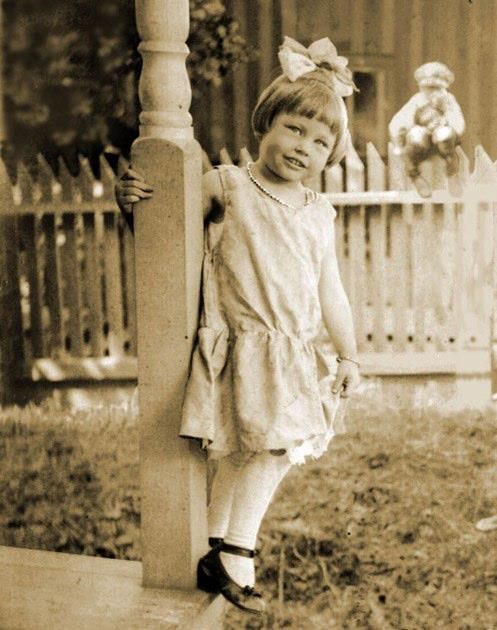
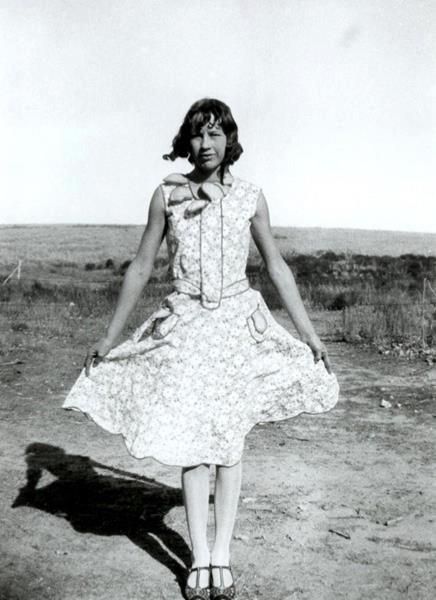
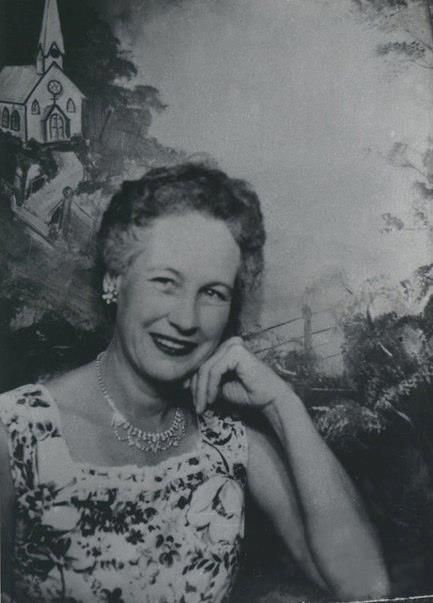
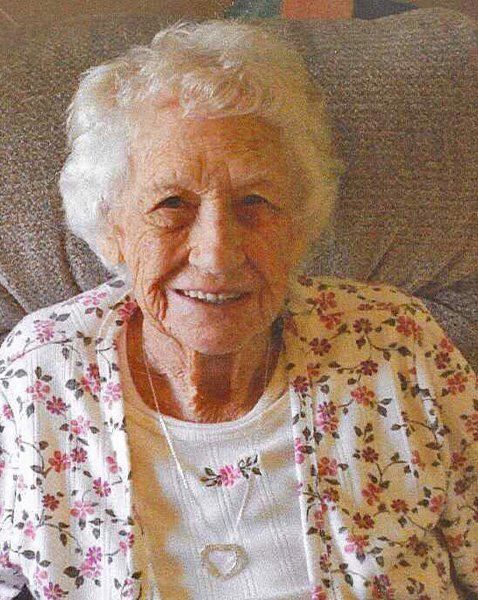
Grandma Thelma through the years.

My mom, who was very close to her grandma and lived with her for awhile growing up, got to travel to Missouri to attend her funeral. Person after person stood up and reflected how Grandma had touched their lives. Mom says she couldn’t hold it together enough to talk about her Grandma then, but when she returned home, she sat down with my dad and began the task of capturing Nettie Thelma Logsden in words.

I can’t think of a better way to introduce you to this wonderful woman than to share Mom’s list with you. So without further ado, here are Life Lessons from Grandma Thelma. Some of them are funny, some of them are profound, some of them are downright suspect. But they’re all thoroughly Thelma.

1. Work hard. People are counting on you.

2. Turtles will always return to one spot. Best to paint your initials on their shells (hot pink paint will work) to identify them later.

3. Outhouses also look great painted hot pink!

4. Bacon grease, duck eggs, and bread soaked in grease make healthy dog food.

5. Spoons, Yahtzee, Rummy, and Skip Bo are great fun!

6. Cold beer and peanuts taste exceptionally good after mowing the lawn.

7. A bite of peanut butter will take the beer smell away (in case someone drives up)!

8. Empty your own “potty.”

9. A straw hat pulled way down will keep your hair from blowing in the wind while driving.

10. Empty bottles and doll heads are keepers!

11. Everything is a keeper!

12. Enjoy the silly things in life: Furbies, Billy Bass, Rockin’ Santas, et cetera.

13. Flour with weevils is fine; just sift them out and it’ll be good as new!

14. If the dog was good enough to tree something (even at 3 a.m.), it’s our duty to go shoot it!

15. If you are old enough to reach the pedal, you are old enough to drive.

16. If something is on sale, buy 10. Even if it’s bubble bath and you don’t have a bathroom. You’ll use it someday.

17. Under the bed is a great place to store all the Cokes you bought on sale.

18. Rock hunting is fun (especially hunting for shiny ones. Or round ones. Or flat ones. Or arrow heads. Well, pretty much ANY rock!)

19. Don’t do anything until the supper dishes are done. You’ll hate coming back to do them later.

20. Fishing, hunting, camping are all fun when done with family.

21. Annie Over is a wonderful game, but it’s hard to find a place to play!

22. Guitar, banjo, harmonica, and piano are all fun to play, and you can teach yourself!

23. Staying up late (even all night) is okay.

24. You can tie a string around a lizard’s tail and pin it to your shirt and it will wiggle. Beetles with strings tied to their leg are great fun, too. (Julie’s note: WHAT?! Really, Grandma?! Do not try this at home, y’all.)

25. You can drive better and faster if you hunch over the steering wheel. (Don’t forget the straw hat!)

26. The fish in Peggy’s lake like to eat chicken fat.

27. When you stir your gravy, put your whole body into it.

28. You don’t really ever need lunch.

29. Take people in if they need a place to stay.

30. Aunt Jaquie’s house is a great place to wash your hair, do laundry, or just hang out.

31. Certain plant leaves are good for making “frog tongues.”

32. Sleeping is better with a small pillow between your knees, a fan on, and a big swig of mineral “oral” before bed. (A True Confessions magazine helps, too.)

33. An electric skillet makes great fried chicken. (Or pork steaks!)

34. Waffles are great with white corn syrup and real butter.

35. Never talk bad about anyone. (Never THINK bad about anyone.)

36. Store-bought frozen cream pies are great!

37. Churn your own butter and drink the buttermilk.

38. Writing on the “tunnel” walls is fun.

39. A whole lot of kids can fit into one car on “$1.00 night” at Pine Hill Drive-In.

40. Grandkids are special!

41. Great grandkids are special!

42. Great, great, grandkids are special!

43. Milnot Cheesecake is very easy and tasty.

I may not agree with Grandma Thelma on every detail (I throw away my doll heads, personally. And OH MY GOSH, no live animals are pinned to clothing on my watch), but she’s struck plenty of truth here. She lived a bright, full, strong life, and treated every person who walked into that life with love and respect. I’m glad the world had her for 99 years.

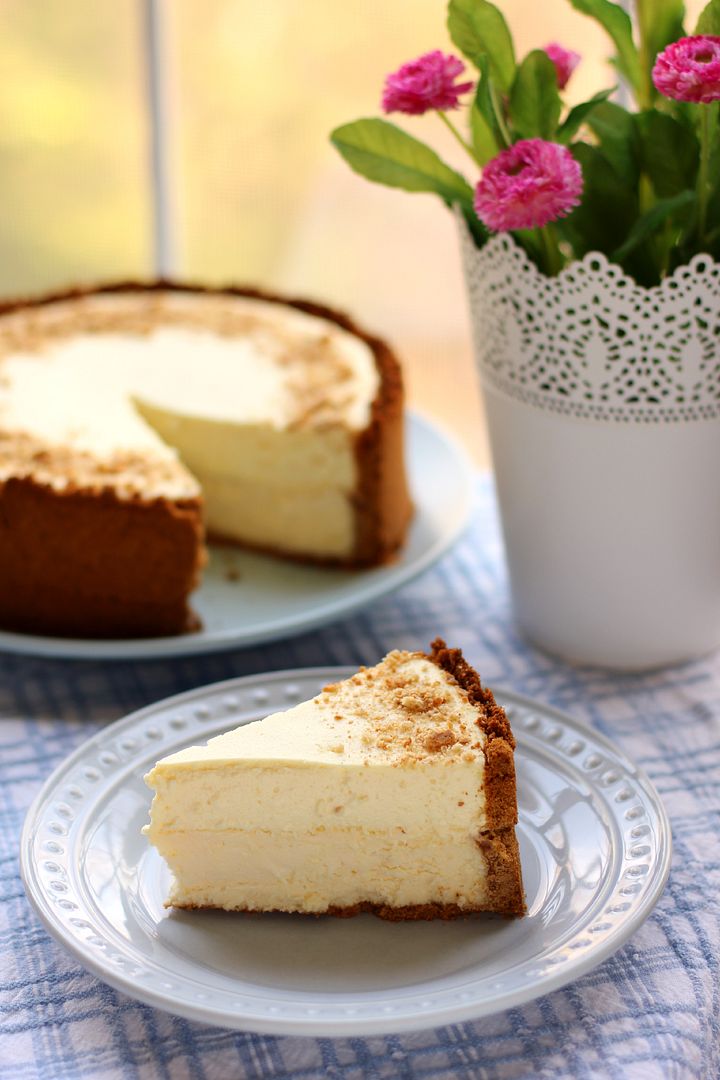
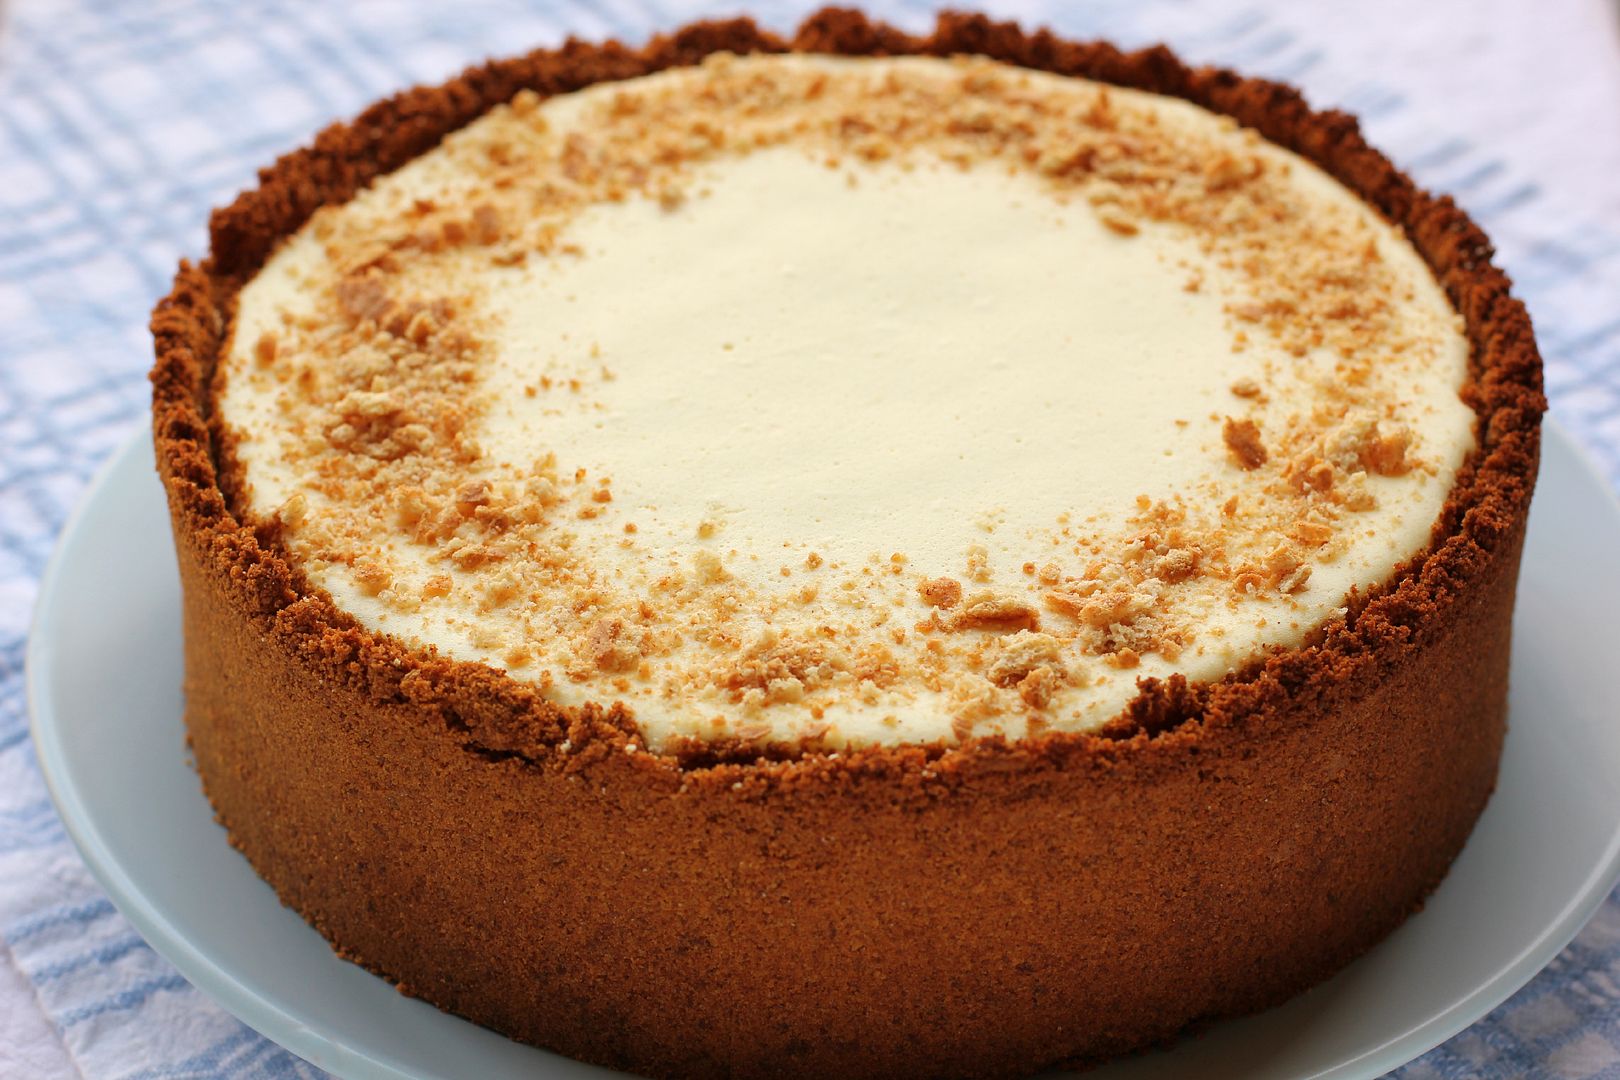
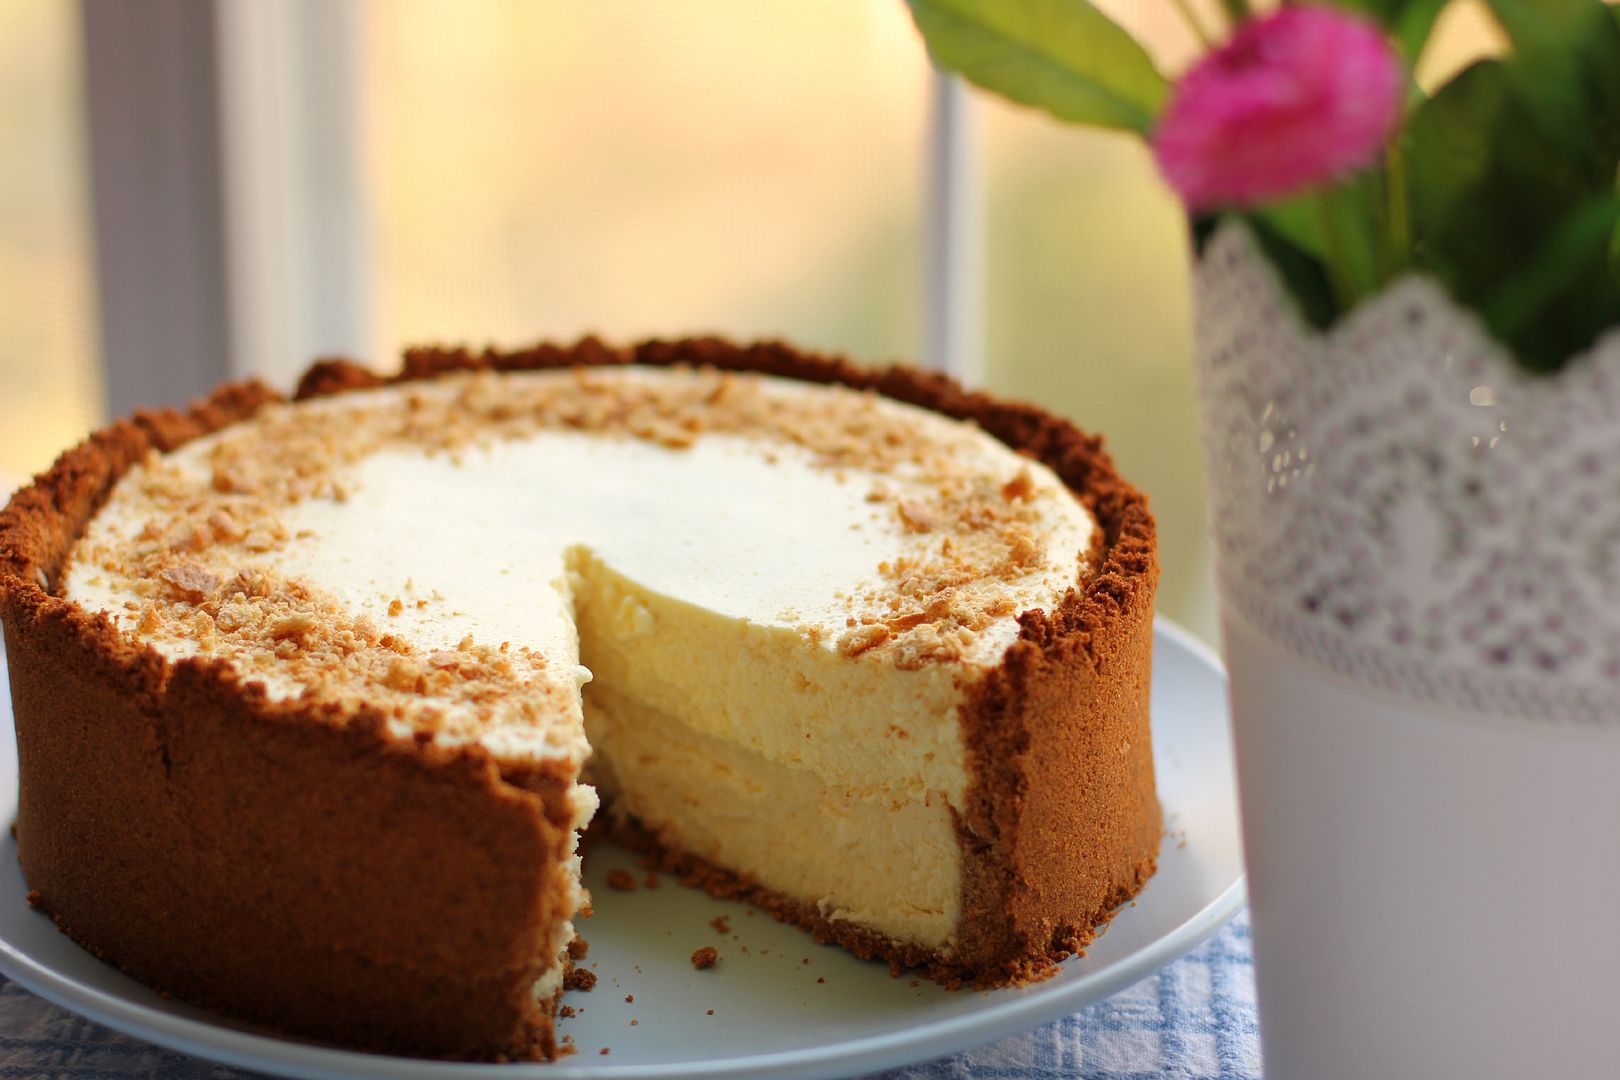
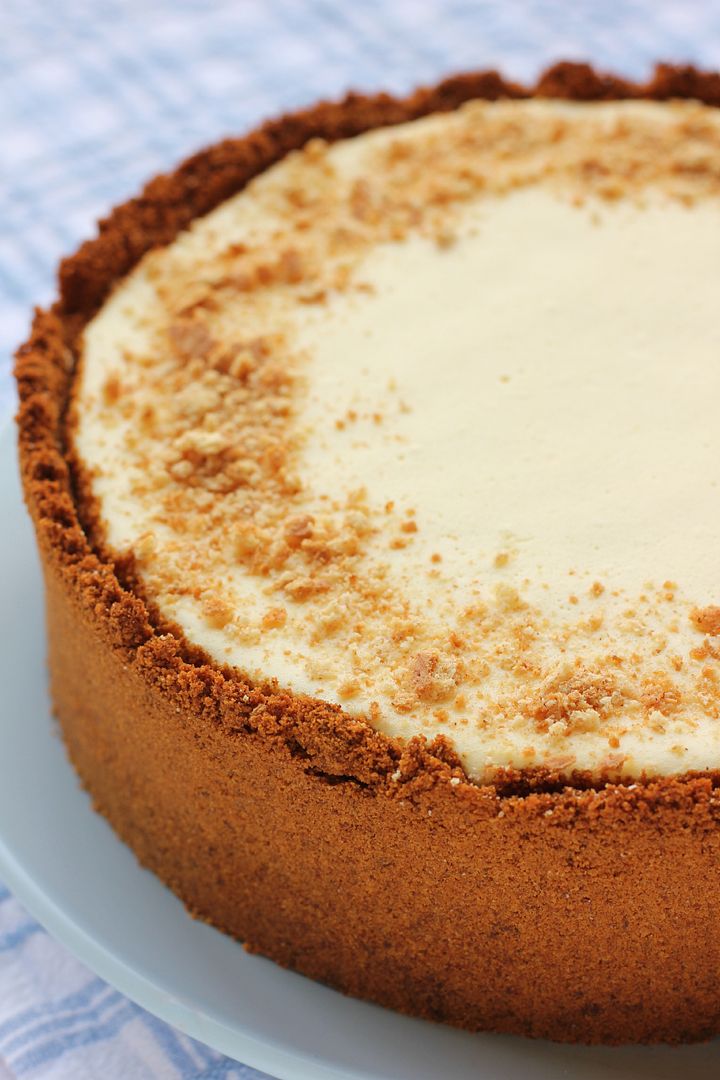
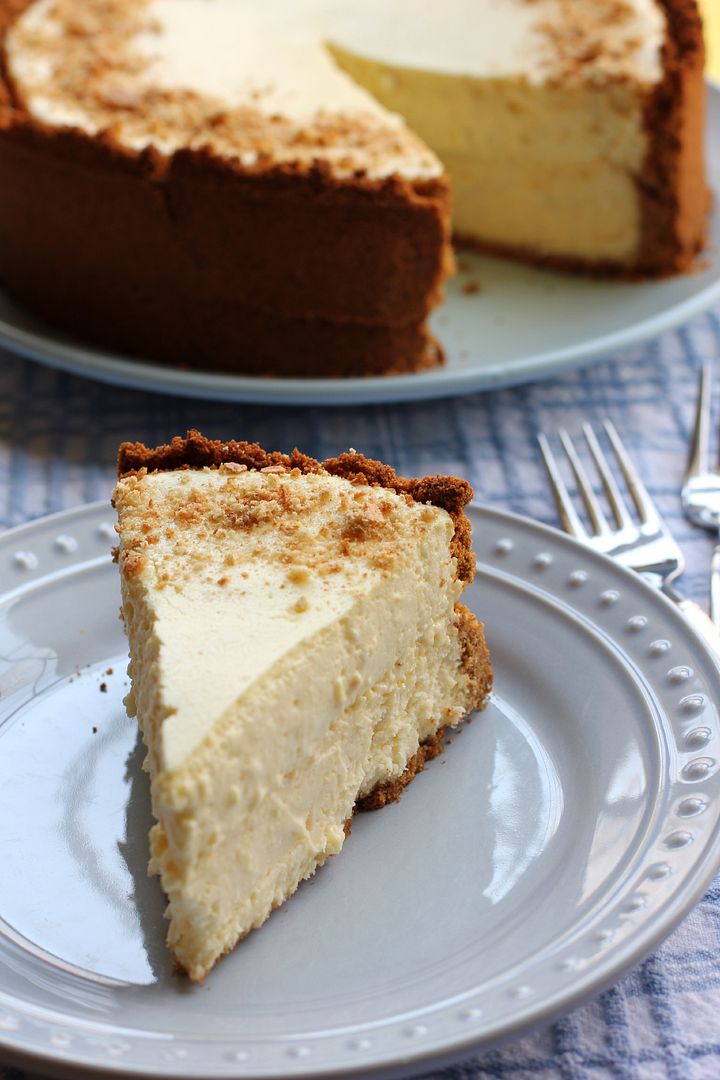
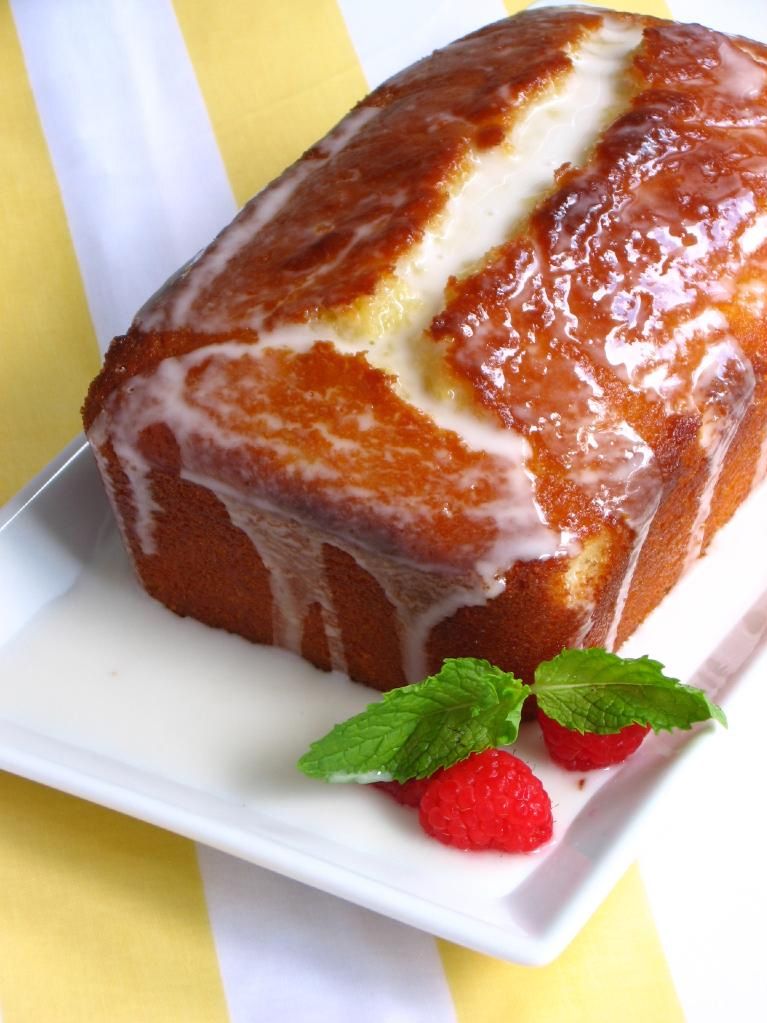
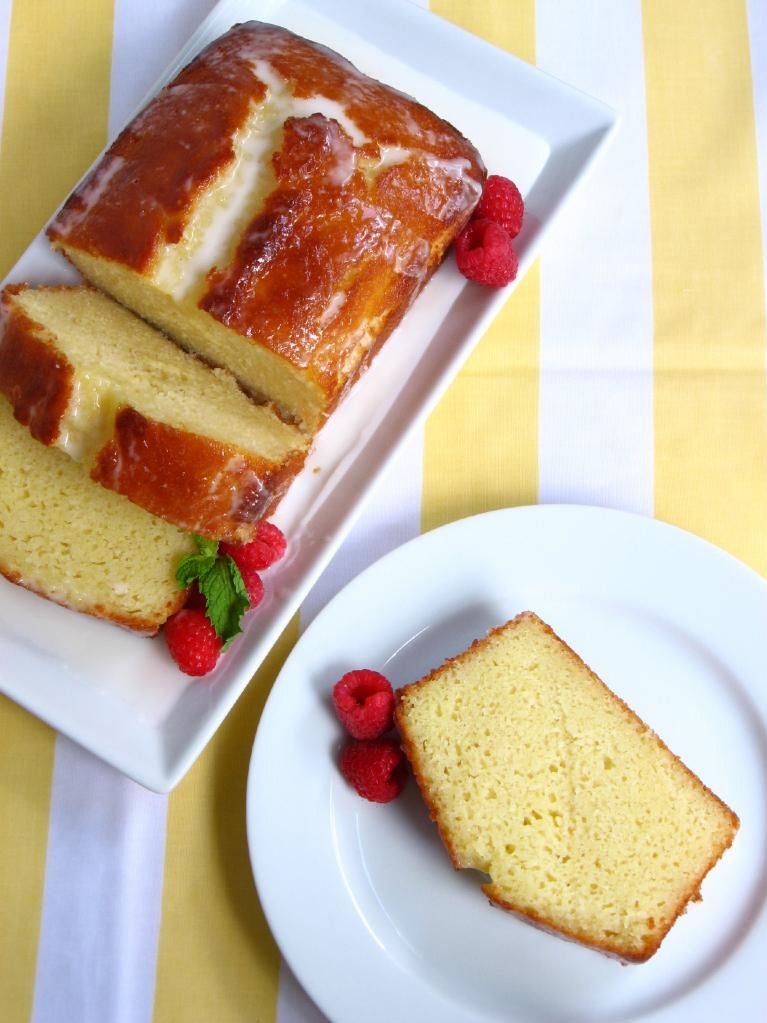
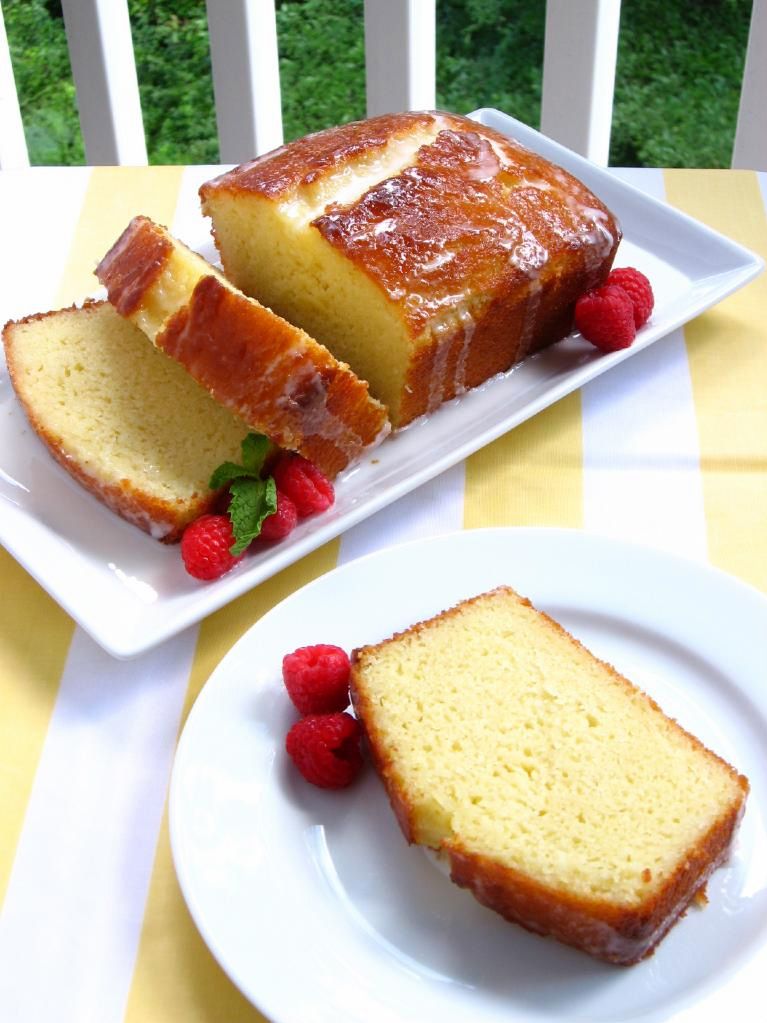
One thing she was certainly right about is Milnot Cheesecake. It’s an old no-bake recipe named after Milnot, an evaporated milk substitute. The Milnot or evaporated milk whips into a whipped cream consistency. When combined with cream cheese and a package of lemon Jell-O gelatin, it creates a light, lemony cloud of mousse. Grandma Thelma used to wake up on occasion and declare, “I think I’ll make a Milnot cheesecake.”

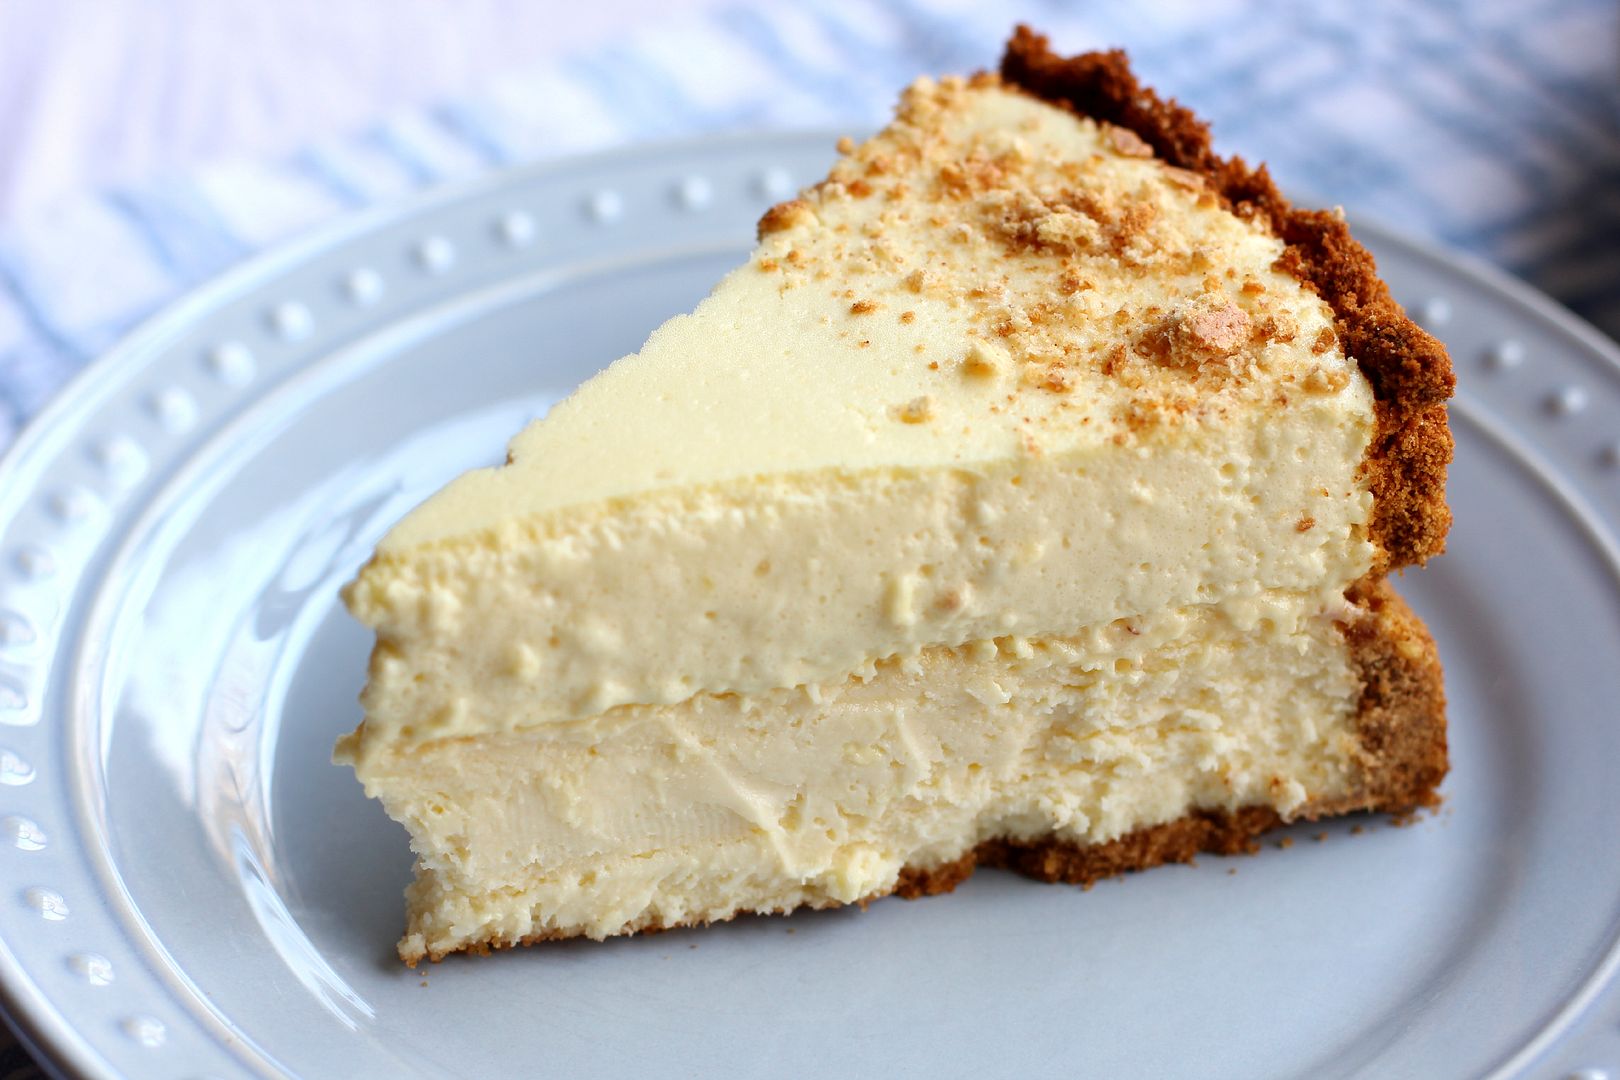
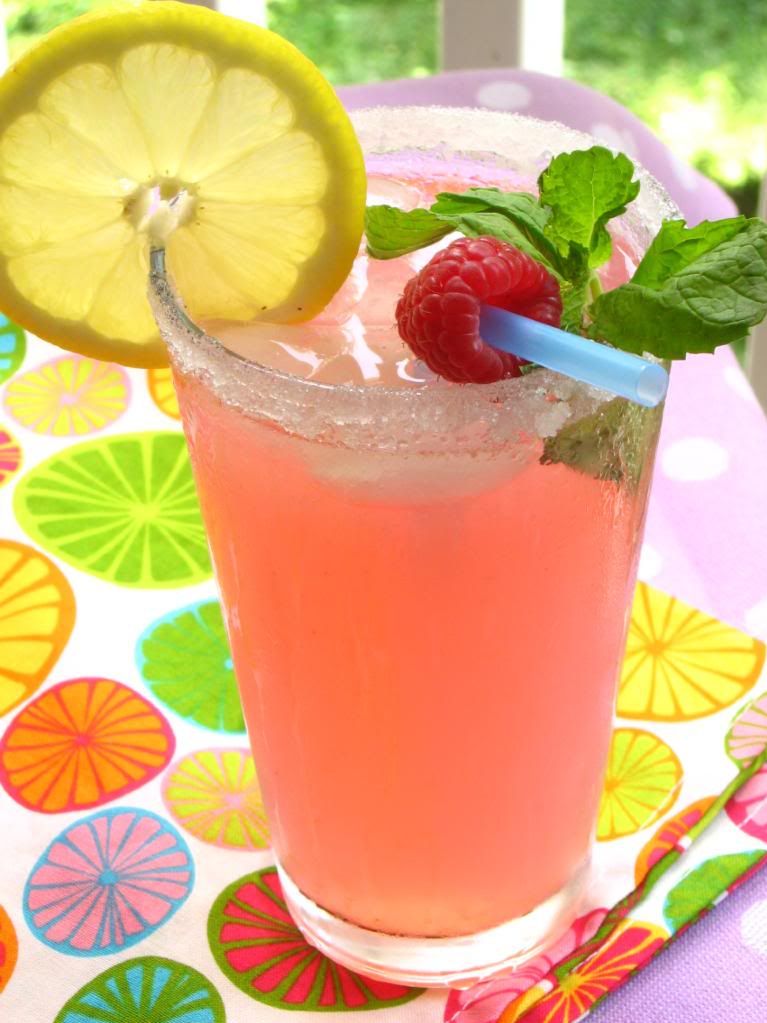
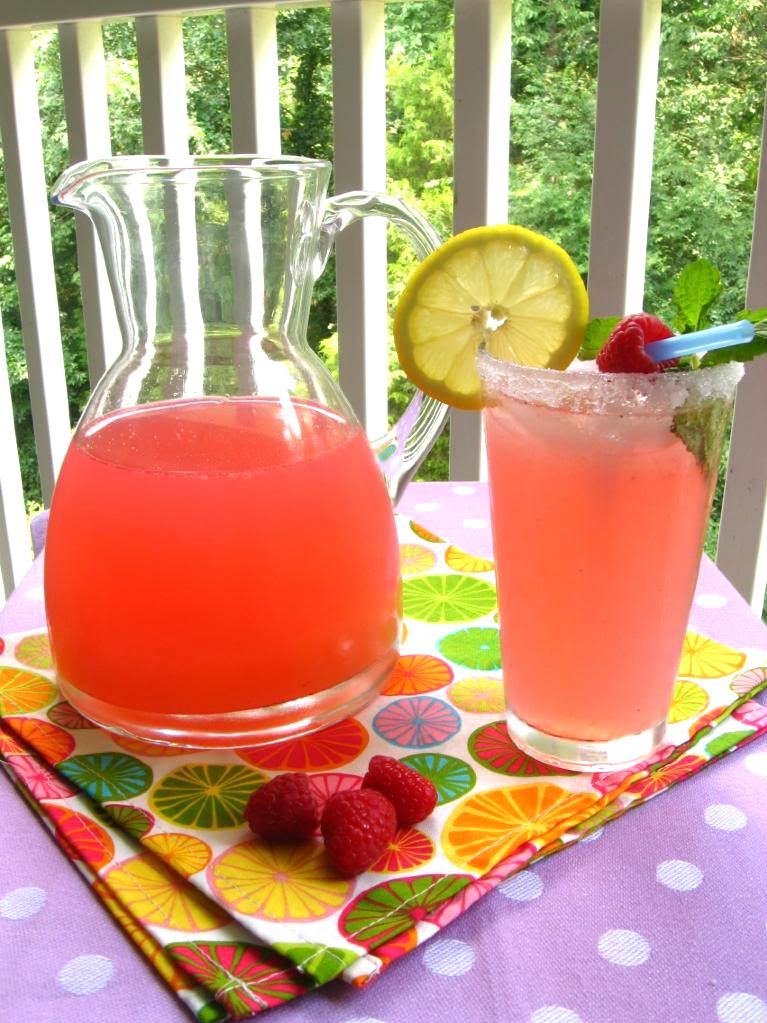
But the title of this essay isn’t a mistake. The dessert pictured here isn’t a Milnot Cheesecake. It’s a Milnot Cheesecake Cheesecake.

Never content to leave well enough alone, I decided to stack a layer of Milnot Cheesecake on top of a layer of creamy, thick regular cheesecake. This double-layered dessert has a mixture of textures and a light, airy flavor that would make Grandma Thelma proud. The recipe might look a little fiddly — and true, it isn’t a dessert you can whip up in a few minutes — but it can be broken up over a few days into very manageable pieces.

In honor of Grandma Thelma, have a slice! (Then go finish your supper dishes. You aren’t going to want to come back to those later.)

Milnot Cheesecake Cheesecake


Recipe by: Willow Bird Baking, using an age-old recipe for Milnot Cheesecake found on Recipes for Laughter
Yield: serves 8-10

This recipe is a twist on the classic, no-bake Milnot Cheesecake. A layer of fluffy, delicious Milnot cheesecake sits like a delicate lemon cloud over a rich layer of traditional cheesecake. A cinnamon graham cracker crust encircles the whole shebang. See the note on scheduling below to break this recipe into a few manageable parts.

Cheesecake Ingredients:
3 (8 ounce) packages cream cheese, at room temperature
1 cup granulated sugar
1 1/2 tablespoons all-purpose flour
2 teaspoons vanilla extract
3 large eggs
2 heaping cups graham cracker crumbs (I use the cinnamon kind)
6 tablespoons butter

Milnot Cheesecake Topping Ingredients:
1/2 small package of lemon Jell-o gelatin mix (this will be 3 tablespoons and 1/4 teaspoon of the powder)
1/2 cup boiling water
8 ounces (1 package) of cream cheese, at room temperature
2 tablespoons and 2 teaspoons sugar
1/2 teaspoon vanilla
a few drops yellow food coloring, optional
1/2 of a 12-ounce can Milnot or evaporated milk, chilled (this will be about 3/4 cup)
crumbled graham cracker crumbs for decorationg

Directions:
Notes: Cheesecakes are simple and super customizable. New to cheesecake making? Watch my 6 minute Cheesecake Video Tutorial for visual assistance! This recipe can be divided up over several days. You can make the cheesecake one day and chill it overnight, make and add the Milnot cheesecake topping the next day, and serve on day 3!

Make the cheesecake: Preheat the oven to 350 degrees F. Lightly grease a springform cheesecake pan. Combine the cookie crumbs and melted butter in a small bowl. Toss with a fork to moisten all of the crumbs. Using a flat-sided glass, press into an even layer covering the bottom and sides of your cheesecake pan (you want it to be tall — try to get to about 2.5-3 inches high — and a little thicker than for your usual cheesecake; maybe 1/4 inch thick so it won’t crumble). Bake the crust for about 6 minutes and let it cool as you make your cheesecake filling.

In a large bowl, beat the cream cheese and sugar on medium-high speed until well blended. Beat in the flour. Add in the vanilla and beat until well incorporated, scraping down the sides of the bowl as needed. Beat in the eggs one at a time, scraping down the bowl between each addition. Pour the filling into your crust.

Bake until the top is lightly browned, puffed and cracked at the edges, and the center moves only very slightly when the pan is lightly shaken (about 40 minutes). Check while baking periodically and put a pie shield (or strips of foil) around the top of your pan to protect the crust edges if they’re getting too dark. Just don’t let the shield/foil touch the crust — it’s delicate and might crumble.

When you pull the cheesecake out, you can use a sharp knife to score a circle around the top of the cheesecake about an inch inside the crust so that as it cools and chills/sinks, it won’t pull the crust in too much. Don’t worry if the circle you cut isn’t pretty, because you won’t be able to see it in the finished product! Let cheesecake cool completely on a wire rack before chilling it in the fridge for at least 3 hours.

Make Milnot Cheesecake Topping: Dissolve Jell-o in boiling water and chill in the refrigerator until slightly thickened, about 25 minutes. Meanwhile, cream the cream cheese, sugar, food coloring, and vanilla in a large bowl. Beat the chilled Jell-o into the cream cheese mixture until completely combined and smooth.

In a large chilled bowl, whip the chilled Milnot with a chilled beater until it forms stiff peaks. Stir about 1/3 of the Milnot mixture into the cream cheese mixture to lighten it up. Then gently fold the rest of the whipped Milnot in until the mixture is uniform in color and completely combined. Pour Milnot filling evenly onto your cheesecake (you will use most of it but not quite all — pour the remainder into a separate dish and cover with graham cracker crumbs. Chill it to make a separate “individual” cheesecake dessert!). Garnish your cheesecake with graham cracker crumbs. Chill the cake for 8 hours. Keep refrigerated and serve chilled.

If you liked this post, please:
Subscribe to Willow Bird Baking
Follow Willow Bird Baking on Twitter
Follow Willow Bird Baking on Facebook
Give this post a thumbs up on StumbleUpon
Pin It


Shareother ways to share this post with friends

Lemon Berry Crumble Breakup Bars

This is a hard story to write — hard enough that it’s taken me almost two months to even attempt it. I still feel raw about it, and I still don’t know how to address the situation head-on. So I’ll just muddle through it the best way I can.

On November 28, Mike and I broke up. It was a cold day, and I dropped him off at the train station so he could head back to Raleigh. Watching him close the door and walk into the station was like watching a movie, except that it wasn’t fiction. I knew we were about to travel a rocky road, but there was no way to switch off the television, no credits to roll — just the aftermath to clean up as best we could.

4,237 days (or 11 years, 7 months, and 5 days) earlier, I had just turned 15 years old. I was sitting in my room, looking out the window, and talking to Mike on the phone. He had something to ask me, but was obviously nervous: “If I were to ask you . . . something . . . what would you say?”

I helped him get to the point. Yes, I want to be your girlfriend. I couldn’t have imagined at that moment where the next 12 years would take us. Who knows when they’re 15 that they’re embarking on something monumental?

Over the years, our relationship brought us trials, for sure.

It also brought me through high school. Sometimes I’d leave school and drive straight to his apartment to watch Star Trek and eat Hamburger Helper (my early attempts at “cooking for him”).

It took me to college, coming home to see him every weekend. It took me off to the coast to study marine zoogeography for a semester — I remember the strain of distance, calling every night on my newly acquired cell phone, and his visit out to Atlantic Beach to see me.

Our relationship saw me through my first teaching job, a tumultuous experience for me. In the first hopeful, idealistic days before I began, he came and painted every single one of my lab tables a deep green to cover the graffiti. Later in the year, when my administration decided to switch my classroom and everything went wrong, my clean tables were mixed in with others and his hard work was lost. He was still there, though, helping me pack up boxes and carry them down the hallway to my new room.

The relationship also saw me through my year as a research technician and, finally, to my position at Woodlawn, the wonderful school where I now teach.

It saw Mike through college at UNCC. He rocketed through in 3 years with nearly perfect grades. It also saw him move his life three hours north to a new city this past fall to begin graduate school at NC State. It saw us through celebrations, new beginnings, and difficult endings. I wouldn’t trade a single day.

These Berry Crumble Bars were actually made at the very tail end of summer and are one of the only dishes I ever photographed at Mike’s apartment in Raleigh. I brought them up to share with him and my little brother, who is an undergraduate at NC State. The bars are buttery, crumbly, slightly lemony, and bright — almost cobbleresque, and perfect with a scoop of vanilla bean ice cream.

The original recipe used only blueberries, but throwing in other berries or even combining berries is an easy way to create multiple varieties of crumble bars; I settled on blueberry and raspberry. Mike and I probably ate a billion of them over the course of my visit. I had a way of encouraging him to have dessert after every meal. I’m sure you’re not surprised.

So what do you say at the end of a story about a breakup? I think in this case, thank you. Thank you, Mike, for being who you are, and for 12 wonderful years. Thank you, God, for the promise that all things are working together for good for me (Romans 8:28). Thank you, friends and family and lovely readers, for your support during a rough time. Here’s to weathering loss and embracing the future — and to dessert!

Lemon Berry Crumble Breakup Bars


Recipe by: Adapted from My Baking Addiction
Yields: 9 raspberry bars and 9 blueberry bars

Ingredients:
1 cup white sugar
1 teaspoon baking powder
3 cups all-purpose flour
1 cup unsalted butter
1 egg
1 teaspoon pure vanilla extract
1/2 teaspoon kosher salt
2 teaspoons lemon juice
2 cups fresh or frozen blueberries
2 cups fresh or frozen raspberries
1/2 cup white sugar
3 teaspoons cornstarch

Directions:
Preheat the oven to 375 degrees F (190 degrees C). Line a 9×13 inch pan with parchment paper and spray with nonstick cooking spray. Stir together 1 cup sugar, 3 cups flour, salt, and baking powder in a medium bowl. In a separate, small bowl, beat together the egg, lemon juice, and vanilla. Using a pastry cutter or food processor, cut the butter and egg mixture into the flour to form a crumbly dough. Press half of dough evenly into prepared pan.

In two additional bowls, mix together 1/4 cup sugar and 1 1/2 teaspoons cornstarch. Gently mix blueberries into one bowl and raspberries into the other. Sprinkle berries evenly over pressed dough — I did half the pan with blueberries and half with raspberries, but you could alternate or even mix the berries if you’d rather. Crumble the rest of the dough over top of the berries. Bake in preheated oven for 45 minutes or until slightly brown. Cool completely (and even chilling a little helps to ensure they’ll hold together) before cutting into squares. These bars are fun because you can have two different flavors (blueberry and raspberry) or cut your bars such that you have a combination of both berries.

If you liked this post, please:
Subscribe to Willow Bird Baking
Follow Willow Bird Baking on Twitter
Follow Willow Bird Baking on Facebook
Give this post a thumbs up on StumbleUpon


ShareOther ways to share this post with friends!

Secret Garden Recipe: Two Exquisite Tea Sandwiches

When I was little, I didn’t lust after coins or stamps or postcards or anything particularly, ah, collectible. Instead, I coveted tiny things. When my mother would head to torturous craft stores to pick up sewing supplies, the dollhouse aisle was a haven. Package after package boasted teensy soda bottles, itty bitty magazines (with readable headlines!), miniature lamps, pint-sized armoires, and on and on. I always tried to pick a particularly adorable item to ask Mom for, but then I’d realize with a measure of disgust that I didn’t really know what I’d do with a set of tiny kitchen utensils. At any rate, miniatures have always had my heart.

Maybe I am secretly a gnome.

One sort of miniature that did frequently end up coming home with me was tea sets. I sought them out everywhere I went — toy stores, souvenir shops, craft stores, department stores, gas stations. You’d be surprised where you can find tea sets. I had medium sets, tiny sets, super-ultra-tiny sets. There were teapots with elegant designs, cutesy designs, holiday designs, and even one where every dish was shaped like a flower.

Despite my plethora of tea sets, I never once sat down and had tea. I displayed them, fiddled with them, and every now and then acted out a sad little version of a teddy bear tea party, but I don’t think a drop of tea or a crumb of a crumpet ever touched a single dish. What a shame, because there are very few food events more classy and sweet than a tea party.

For my sister’s Secret Garden Party, I remedied the situation. It was a tea party to the extreme, complete with a colorful tablecloth, Mom’s best china, some sweet decor, and the most important part: an elaborate spread of indulgent finger foods. These savory, delicate finger sandwiches were one of the biggest hits on the table.

Cucumber Tea Sandwiches


Recipe by: Great Party Recipes
Yields: about 40 finger sandwiches

Ingredients:
1 large cucumber, peeled and sliced very thinly
3/4 cup butter, room temperature so it’s soft and spreadable
2 teaspoons minced fresh garlic
20 pieces thin-sliced bread with crusts removed
1 tablespoon lemon juice
1 tablespoon olive oil
Salt
Pepper to taste

Directions:
Place the cucumber slices in a colander, lightly salt them, and let them drain for 1-2 hours to remove some of the moisture.

Combine the soft butter and garlic in a bowl and spread onto one side of each slice of bread. In a separate bowl, stir together lemon juice, olive oil, and pepper. Place the cucumber slices into this mixture and toss to coat them well. On each of 10 slices of bread, arrange overlapping cucumber slices. Top with remaining 10 slices and quarter. Serve immediately.

Classic Cucumber Tea Sandwiches were cool, buttery, and satisfyingly crisp. Providing the perfect complement was the salty, bold flavor of Smoked Salmon Tea Sandwiches with a kick of paprika. Both sandwiches were devoured (daintily, of course) in between scones, croissants, and lemonade.

Smoked Salmon Tea Sandwiches


Recipe by: Great Party Recipes
Yields: about 40 finger sandwiches

Ingredients:
1 cup cream cheese, room temperature so it’s soft and spreadable
20 slices bread, thin-sliced with crusts removed
1/2 cup capers
12 ounces thin-sliced smoked salmon
lemon juice
Pepper to taste
mayonnaise (optional)
paprika (optional)

Directions:
Spread cream cheese on each slice of bread (one side only) and dot with capers (I liked quite a few capers). Arrange the smoked salmon on 10 bread slices, with a squeeze of lemon juice on each. Pepper generously (to taste), top with remaining 10 bread slices, and quarter (using a serrated knife). Brush long side of each tea sandwich with mayonnaise very lightly and dip into paprika to coat. Tap to remove excess paprika. Serve immediately.

Don’t repeat my childhood mistake of overlooking the tea party. Whether it’s for a gardenful of guests, a roomful of family, or a handful of (conveniently disinterested) stuffed animals, whip up some of these simple tea sandwiches. With minimal kitchen time and a short ingredient list, they provide a ton of pinky-pointing deliciousness. How about you? What’s your favorite tea party friendly dish? Scones, croissants, muffins, pastries, petit fours? Or are you a savory tea sandwich person yourself?

If you liked this post, please:
Subscribe to Willow Bird Baking
Follow Willow Bird Baking on Twitter
Follow Willow Bird Baking on Facebook
Give this post a thumbs up on StumbleUpon


ShareOther ways to share this post with friends!

Ina Garten’s Lemon Loaf Cake and Raffaldini Vineyards

So what have you been up to this summer? As you know, up until this past weekend, I had not fulfilled my summer quota of fun sunshiney activities — no beach, no pool, no picnic. With school looming ahead of me (teacher meetings start tomorrow), something had to be done. Quickly.

My friend Vada saved the day (er, the season?). We Jazzercise together and she invited me to join her and a group of her fun friends for a road trip. It was her friend Lori’s birthday and they were headed to Raffaldini Vineyards in Ronda, NC.

When she first suggested it, I wasn’t sure. I don’t drink, so what would I do at a vineyard? Would I end up counting grapes in the corner as everyone else played wine pong (that’s what they do at vineyards, right)? As it turns out, though, Vada doesn’t drink either, and she was certain it would still be fun. I’m up for fun! I told her to count me in.


Vada and Luca

I’m so glad I went, because it was fun. Turns out, vineyards are beautiful — or at least Raffaldini Vineyards certainly were! We drove about an hour out of Charlotte and suddenly it felt like we were in Italy. Vada’s friend Luca, our resident Italian, agreed that it reminded him of home — a nice stamp of authenticity. As promised, fun ensued.

First, we ate a lovely picnic on an outdoor patio overlooking the vineyards and mountains in the distance. The vineyards offered a whole menu of food you could purchase on-site, but I brought a little packed lunch to save money. I also brought this bright, summery Lemon Loaf Cake, which was moist and traveled so well. Vada, who is an absolutely extraordinary cake decorator, brought cupcakes along. We had quite a feast!

After our picnic, we took a brief tour of the vineyard, learning about the soil, growing practices, and types of grapes grown. While others enjoyed a wine tasting, Vada and I took a walk around the grounds and had a photo shoot. Finally, we took a tour of the winery and learned how the wines were made. It was so informative — not being a drinker, I tend to think of grapes as the basis of jelly and “tannin” as something you do at the beach. I learned a lot! The best part? The entire day only cost me $8 — and that included buying a bottled water on-site.


Vada’s gorgeous cupcakes and the quick Lemon Loaf Cake packed for traveling!

This one little day trip kind of made my summer! It was filled with sweet people, good food, beautiful surroundings. How about you? Does one event or activity this summer stand out as your favorite?

You can relive part of my end of summer fun by making this quick, simple loaf cake for yourself. It has a tangy, drenched lemon flavor that will help you kiss the summer days farewell.

5 from 1 reviews
Ina Garten's Lemon Loaf Cake
 
Prep time
Cook time
Total time
 
A delicious, tangy, easy lemon loaf cake. Be careful not to overbake!
Author:
Serves: 6
Ingredients
Cake Ingredients:
  • 1 1/2 cups all-purpose flour
  • 2 teaspoons baking powder
  • 1/2 teaspoons kosher salt
  • 1 cup plain whole-milk yogurt or sour cream
  • 1 1/3 cups sugar, divided
  • 3 eggs
  • 2 teaspoons grated lemon zest or 2 teaspoons lemon extract
  • 1/2 teaspoons pure vanilla extract
  • 1/2 cup vegetable oil
  • 1/3 cup freshly squeezed lemon juice
Glaze Ingredients:
  • 1 cup powdered sugar
  • 2 tablespoons freshly squeezed lemon juice
Instructions
  1. Preheat the oven to 350 degrees F. Grease an 8 1/2 x 4 1/4 x 2 1/2-inch loaf pan (I use Wilton’s Cake Release). Line the bottom with parchment paper and butter and flour the entire pan.
  2. Sift the flour, baking powder, and salt together into a medium bowl. In a large bowl, whisk together yogurt, 1 cup of the sugar, eggs, lemon zest or extract, and vanilla. Slowly add the dry ingredients into the wet, whisking to combine (I did this in 2-3 additions). Use a rubber spatula to fold the vegetable oil into the batter until it’s fully incorporated. Pour into the prepared pan and bake for about 50 minutes, or until a cake tester stuck in the center of the loaf comes out clean.
  3. While the cake is baking, combine the 1/3 cup lemon juice and remaining 1/3 cup sugar in a small saucepan over medium heat and cook until the sugar dissolves and the mixture is clear. Set aside.
  4. When the cake is done, allow it to cool in the pan for 10 minutes before removing it and placing it on a baking rack over a sheet pan. Use a cake tester, wooden skewer, or toothpick to carefully pierce holes throughout the cake (I used a toothpick so the holes wouldn’t be too obvious, but a skewer might have made deeper holes in the cake, allowing more syrup to get through). While the cake is still warm, pour the lemon-sugar mixture over the cake and allow it to soak in. Cool completely.
  5. In a small bowl, combine the powdered sugar and lemon juice, whisking to form a smooth glaze. Pour over the cake. Slice and serve with fresh berries, whipped cream, or ice cream.


Secret Garden Recipe: Sparkling Raspberry Lemonade

Dear Summer,

I know I haven’t always treated you the way you deserve to be treated. There were plenty of days this summer when I slept through the best part of the morning. I only went out for ice cream one time, and that was after nightfall. I didn’t get to the beach or the pool even once. I never accomplished the picnic I’d planned in the mountains.

Listen, Summer, I know that being a teacher makes this even harder to excuse. I, better than anyone else (besides my students, maybe), should know the value of a great summer. I should have played in sprinklers. I should have driven around town with a slushy in one hand (and hopefully the steering wheel in the other). I should have gone on at least a couple of spontaneous road trips. Trust me, I know.

Give me some credit, though, Summer. I did almost exclusively wear a rotation of 3 sundresses all summer long. I stopped wearing clothes with finicky washing/drying directions to facilitate my summer laziness. I stocked up on dollar store flip flops and barely wore a legitimate shoe the entire season — except for that one time I wore my sassy heels. I started watching some of the horrible reality television that I’m embarrassed to talk about. I met my friend Beth for Indian, and just the other day, met my friend Andrea for sushi.

I filled up my hummingbird feeder! Not with raspberry lemonade, true, but I think the hummingbirds were plenty happy with sugar-water.


Changing up garnishes!

And I didn’t just flit around, either — I also used you, precious Summer, to be productive in ways I love. I planned a Secret Garden surprise party for my sister, for which I made this gorgeous lemonade. I blogged and blogged and blogged. I wrote the syllabus for the new cooking classes I’m teaching this fall. I diligently kept up with Top Chef.

Wait, watching Top Chef counts as productive, right?


Aw, a few raspberries in the pitcher look so nice. Maybe I should have added a lemon slice or two, too?

Summer, even though I’ve made some mistakes, it’s obvious that I care about you. I’m begging you, pleading with you — stay just a little longer. I’ll make amends; I’ll make sparkling raspberry lemonade. I’ll sit on the balcony with little Byrd, sippin’ this tart, fruity, sweet summertime beverage, just like I’m supposed to. Pretty please?

Love,
Julie

Sparkling Raspberry Lemonade


Recipe by: Adapted from Sunset
Yields: about 5 1/2 cups of lemonade

Ingredients:
1 1/2 cup raspberries, washed and patted dry
2/3 cup sugar
1 cup lemon juice
1 1/2 cup sparkling water
2 1/2 cups water*

Directions:
Mash raspberries with sugar in a small bowl and let stand for 10 minutes. Press this mixture through a fine mesh strainer into a pitcher and discard the seeds. Add lemon juice, sparkling water, and water, stirring to combine. Taste and add more sugar if desired. Dip each serving glass’s rim into lemon juice and then into sugar. Serve lemonade in these glasses with ice, and garnish with raspberries, mint, pretty straws, lemon slices, etc. as desired.

*NOTE: I am so lame. I fiddled with the original amount of liquid in the recipe and of course didn’t write down the changes I made. This is my best guess as to how much water and sparkling water I added, based on memory, but you can always fiddle with the ratio of ingredients after tasting.

And, because I would be frustrated if someone mentioned their sassy heels on a blog without showing me a picture:

If you liked this post, please:
Subscribe to Willow Bird Baking
Follow Willow Bird Baking on Twitter
Follow Willow Bird Baking on Facebook
Give this post a thumbs up on StumbleUpon


ShareOther ways to share this post with friends!

1 6 7 8 9 10