holiday

Willow Bird Baking’s Top 12 Recipes of 2012

Last year I tried to wax a little cheerful about 2011, but I was really ready to move on. I had no idea that 2012 would bring some of the happiest times and some of the hardest times of my life to date. To say I’m ready to move on from this year is an understatement, and yet I know there are friends and even strangers who have had a much harder year than I’ve had. I also know that even my hardest times are part of a story God is weaving around me, and I thank Him for His faithfulness and sovereignty over everything that has happened this year. Never once did I ever walk alone.

How can we make 2013 the best year of our lives so far? I wonder if I can persuade you, while making your New Year’s resolutions, to make living with empathy a goal. I’m going to try it: in everything I do and every way I interact with others, I’m going to try and make a sincere effort to see their point of view, to imagine myself in their shoes.

My other resolutions? Focusing on scripture each day, continuing my newfound enjoyment of exercise. But I think living with empathy is what actually has the potential to change me.

To conclude a wonderful year on Willow Bird Baking — a year in which I have so appreciated befriending you and all of our lovely discussions — here are the top 12 recipes from ’12.

12. Gooey Butter Strawberry Shortcake
11. “Magic” Chocolate, Coconut, and Pecan Pastry Braid
10. Caramelized Banana Upside-Down Coconut Cake & Coconut Whipped Cream
9. Buttery Coconut & Almond Morning Buns


8. German Chocolate Cheesecake
7. Milnot Cheesecake Cheesecake
6. Tres Leches Coconut Cake Trifle
5. Chocolatey Red Velvet Pull-Apart Bread with Cream Cheese Glaze


4. Chocolate & Coconut Cream Pie Bars
3. Red Velvet Cheesecake-Stuffed Cake Balls
2. Brownie-Bottom Coconut Chocolate Cream Cake


And the top Willow Bird Baking recipe of 2012 is . . .

1. Gooey Chocolate Skillet Cake Ice Cream Sundae!

Happy New Year!

Brown Butter Gooey Butter Spice Cake with Sparkling Cranberries and Cream

Well. It’s hard to know what to say.

As a teacher, I can tell you that we all have our private plans. Schools have bigger, more systemic plans, but we have private plans. Plans about throwing furniture, plans about overturning tables, plans about barring windows, plans about protecting. “What would I do if–?” has crossed all of our minds. To know that on Friday, some teachers had to put their own plans into action, the strategies they’d woven in the private depths of their imagination —

Well. It’s hard to know what to say. It’s hard to know how to say thank you, I’m sorry, I can’t believe it, what can I do?, and why?, and all of the other things we can’t put language to.

Since I don’t know how to say all of that, I’ll do what I do know how to do. I’ll tell you a story.

* * *

My first experience with teaching was as a student teacher in a summer school in inner-city Atlanta. To say that that was a rough way to start would be an understatement. My students came from home environments in which abuse and poverty were everyday realities. I had a class full of 8th grade girls whose personalities and needs varied considerably.

One girl inexplicably hated me with her entire being and made this clear during most of our interactions.

One girl vacillated between quiet anger and reluctant compliance.

One was realistic, practical, and blunt — qualities she had perhaps honed after having her own baby. She was ready to get on with getting educated and had no time to waste with silliness.

One girl, Marion, was a quiet preacher’s daughter. She barely said a thing throughout the month I taught the class.

Here I was, a middle-class white girl straight out of college. Sure, I could barely afford a suitable teaching outfit at the time, but standing in that classroom, I knew that my students knew hardship in a way that I didn’t understand.

There are many stories I want to tell you about what transpired — about the day the girl touched my hair wistfully, about the day I left my classroom in tears, about the day I bought the girls the wrong kind of cookies, about the day an administrator yelled at me and an entire bevy of those sweet girls unexpectedly stood up for me. But today I want to skip right to the end: the day they took the reading test that would determine whether or not they could continue on to high school.

We had been through a lot together to get to that moment, so I felt very close to the girls. But I saw something in them that day I hadn’t seen before: straight-up fear. It surprised me to see them huddling in the classroom, nervous about the test that they felt was deciding their future. I set to the task of encouraging, supporting, calming. I didn’t know it at the time, but I see now that I was already a teacher in my heart.

I’ll never forget the moment that my co-teachers and I looked over and saw every girl — even the one who hated my guts and, ostensibly, the guts of the world — standing around Marion. She had brought in her father’s absolutely enormous, worn Bible and was holding it in the center of the circle. Every girl had her hand resting on one edge of the well-loved book, her head bowed, and her eyes closed. Some lips moved along with Marion as she prayed aloud over them all. The overarching theme of her plea was, “God, please, please let us pass this test.”

You’re going to hate this, but despite the prayers, the extra #2 pencils, and the most heartfelt teaching I could muster, Marion didn’t pass her test. She came to me upon receiving her scores and asked if I would please write the school system and ask them to promote her, something I gladly did. She had more trouble with tests and test anxiety than she did with reading — a problem many students around the country face each year. But I’m not sure what they ultimately decided.

What Marion and her sweet classmates showed me that day — and really every day they showed up to class and earnestly put their pencils to paper — is faith. Can we have faith after things have gone wrong (tragically, devastatingly wrong)? I know one thing: it won’t be a reasonable faith. It will have to be the unreasoning, innocent faith of a child. One who just believes things can be okay again somehow, some way.

One year ago: Gingersnap Cheesecake Stuffed Snickerdoodles
Two years ago: Magic Bars
Three years ago: Oreo Truffle Snowmen

And another Gooey Butter Cake adaptation you might love: Gooey Butter Strawberry Shortcake

Brown Butter Gooey Butter Spice Cake with Sparkling Cranberries and Cream


Recipe by: Willow Bird Baking with sparkling cranberries adapted from Bakers Royale
Yield: serves 4-6

If you love Gooey Butter Cake, here’s a delicious holiday adaptation (with apologies to St. Louis). This Gooey Butter SPICE cake has the wonderful, warm flavors of cinnamon, nutmeg, cloves, brown butter, dates, and toasted pecans. It’s adorned with spiked cream and pretty sparkling cranberries. Enjoy it straight out of the skillet by a big fire, please!

Crust Ingredients:
1 cup cake flour
3 tablespoons granulated sugar
1/3 cup butter, cold

Filling Ingredients:
1 1/4 cups granulated sugar
3/4 cup (1 1/2 sticks) butter, softened
1 egg
1 cup all-purpose flour
2/3 cup minus 2 tablespoons evaporated milk
2 tablespoons brandy
1/4 cup light corn syrup
1 teaspoon vanilla
1 teaspoons cinnamon
1/2 teaspoon nutmeg
1/4 teaspoon ground cloves
1/2 cup chopped dates
1 cup chopped toasted pecans (to toast, bake at 350 degrees F, tossing occasionally, for 4-6 minutes)
powdered sugar

Sparkling Cranberry Topping Ingredients:
1/3 cup granulated sugar
1/3 cup water
2 cups fresh cranberries, room temperature
1 1/2 cups granulated sugar (some coarse sugar if you have it, and some regular, for rolling)
2 cups heavy whipping cream (with a glug of brandy mixed in, optional)

Directions:
NOTE: If you don’t have a skillet, I believe you can bake this in a greased 9-inch square baking dish (I’d use a glass one if you have it, and check it early and often. Remove when there’s some jiggle left.) Let us know how it goes if you try it this way for all the other skilletless people!

Prepare the sparkling cranberries: Cook the 1/3 cup granulated sugar and 1/3 cup water together over medium-high heat until simmering (not boiling). Remove from the heat and let cool a couple of minutes so cranberries won’t burst. Pour in cranberries and mix to coat them. Spread the cranberries out on a cooling rack using a slotted spoon and let them dry for an hour, spreading them out as much as possible. Roll the cranberries in small batches in the coarse sugar first, and then in the regular granulated sugar to finish coating. Allow the cranberries to dry in a clean area at least 1 more hour. I prepared these the night before and let them dry, very lightly covered, overnight.

Brown the butter for your gooey butter cake filling: Put the 1 1/2 sticks of butter in a saucepan over medium heat. Melt it and heat until the butter begins to brown. Begin swirling so it will cook evenly. Brown it to a dark amber and then pour it out into a shallow dish. Stick this in the freezer to firm up a bit. When firm, set it out to soften slightly while you make the gooey butter cake crust.

Make the crust: Preheat oven to 350 degrees. Whisk together cake flour and sugar in a medium bowl. Cut in the 1/3 cup butter with a pastry cutter or two knives until the mixture resembles fine crumbs and starts to cling together. Press the mixture into the bottom (this step is a lot harder than it sounds, but be patient and use the back of a spoon to help spread/press the mixture down. I also stuck mine in the fridge for a bit to make the butter less sticky) and up the sides of a 10-inch cast iron skillet.

Make the filling: In a small bowl, whisk together the flour, cinnamon, cloves, and nutmeg. In a separate large bowl, cream together the butter and sugar until fluffy and pale yellow (about 2-3 minutes). Mix in the egg until just combined. Alternate adding the flour mixture and evaporated milk, mixing after each addition. Mix in the corn syrup, brandy, pecans, dates, and vanilla. Pour the filling into the crust and sprinkle the top with powdered sugar.

Bake and assemble the cake: Bake for 25 to 35 minutes or until cake is nearly set (mine was probably ready around 30). Some jiggle is fine — do not overcook! It’ll finish setting up as it cools. Let it cool in pan for 2 hours. In the meantime, beat heavy cream to stiff peaks (with a glug of brandy if you’d like). Pile heaps of freshly whipped cream into the center of your cooled, set gooey butter cake, garnish with a few sparkling cranberries, and serve.

If you liked this post, please:
Subscribe to Willow Bird Baking
Follow Willow Bird Baking on Twitter
Follow Willow Bird Baking on Facebook

Moist Fluffy Coconut Cake

The first time we saw her years ago, we were sure she was pregnant. She was just so round and lumpy. We laughed at the rhythmic harmonic motion of her belly, which nearly swished across the ground with each step. Despite her interesting mechanics, her movement was relatively agile and quick — perks of being feline, I guess. She was next to us in a flash, headbutting our legs and hoping for a nice ear rub.

Mike was ready to ignore her persistence and hurry into the restaurant — our breath hung in the air, a visible testament to the frigid temperatures — but I was predictably smitten. Her gray fur was thick against winter’s chill and my fingertips, and her wide face reminded me of a chipmunk trying to manage two mouthfuls of food in one mouth. In short, as I cooed over and over while stroking her, she was sooo-oo-ooo cuuuuute.

And so fat! And so sweet! And so fluffy!


speaking of fluffy…

I promised myself that if she were still prowling about after dinner, I’d scoop her up and take her to a vet. With that resolution easing my mind, Mike and I finally sat down to heaping dishfuls of fragrant red curry with hunks of pineapple and duck and — my favorite — a plate of colorful Pad Thai garnished with peanuts, bean sprouts, julienned carrots, and a wedge of lime. As we ate, I glanced out the window periodically for our new friend, but quickly lost sight of her.

Sure enough, when we came back out of the restaurant, she was nowhere to be found. We left the restaurant stuffed but catless and a little disappointed (well, let’s be honest. Mike was probably relieved.)

This past August, years after spotting the Thai Cat, as I’ve taken to calling her, I moved to a little apartment close to that same Thai restaurant. One warm night I tugged on my favorite orange dress and Mike and I strolled the few blocks to the restaurant to grab dinner. As we approached the door, who do you suppose we should meet but the Thai Cat herself! At this point, we learned two things about her:

1. She had not been pregnant (unless cats stay pregnant for three years) but was just exceptionally rotund.

2. She did, in fact, have owners — in a manner of speaking.

This second point became apparent because of the ornate red collar she wore, with green accents and a jingle bell. Another clue was a shelter we found secreted away behind a thicket comprised of potted plants: a little house filled with blankets, a dish of food and water. Our chubby friend had been adopted by the Thai family who owns the restaurant!

And by the looks of it, she’d been feasting on quite the array of roast duck and chicken herself. No wonder she’s a pudge.

The Thai Cat doesn’t have too much to do with a Coconut Cake (though no doubt she’d make short work of a slice) besides reminding me of the importance of a home. Her home and family is a bit unusual for sure — no couch and tons of interesting strangers — but she’s happy as a plump little plum.

My home’s felt unusual for years. Once I wasn’t living with my parents anymore and was instead bouncing around from college dorm to makeshift apartments, hopping between roommates and loneliness, I started to feel a little like dropping my own self off at an animal rescue (“Free to a good home, preferably with a ready-made family, or at least cable.”) Lately, though I love my new apartment, that desire for home and family — of some sort — has been in the back of my mind. I’m willing to wait for God to put the pieces together for me.

In the meantime, I’ll make Coconut Cake, a fluffy, moist symbol of home and family if there ever was one. A friend of Mike’s family recently recalled making one for her son year after year: painstakingly grating the fresh coconut, reserving the water to soak the layers, stacking the cake, slathering on the 7-minute frosting. It’s a labor of love — a gift you present to someone, much like a red collar with green accents and a tiny jingle bell, to say, “You belong here.”

What represents home and family to you?

One year ago: Winter Breakfast Chili Over Eggs in Sourdough Bowls
Two years ago: Magic Bars
Three years ago: Cinnamon Roll Cookies

Moist Fluffy Coconut Cake


Recipe by: adapted slightly from SAVEUR’s associate food editor Ben Mims’s grandmother, Jane Newson
Yield: 10-12 servings

What can I say? It’s like eating clouds. Coconutty, billowy, moist, delectable clouds. Actually, I think after having 8 (give or take a few) slices of this amazing coconut cake, clouds would be sorely disappointing.

Cake Ingredients:
16 tablespoon unsalted butter, softened
2 1/2 cups cake flour, sifted
1 teaspoon baking soda
1 teaspoon kosher salt
3/4 cup buttermilk
1/4 cup coconut milk
1 tablespoon vanilla extract
2 cups sugar
5 eggs

Frosting Ingredients:
4 egg whites
1/2 teaspoon cream of tartar
2 1/4 cups sugar
1/4 cup light corn syrup
1 teaspoon kosher salt
2 teaspoons vanilla extract
1/2 cup water
3/4 cup fresh coconut water
3 cups freshly grated coconut

Directions:
Note: This frosting isn’t supposed to keep too well, so it’s best to frost the cake the day it’s being served. However, to spread out the work, you can make the layers in advance. Really, I should also admit that we ate this cake for days after I made it and it stayed delicious, so while I’m sure it’s best to eat it the day you frost it, I wouldn’t toss the leftovers (if there are any, that is.)

Make the cake: Preheat the oven to 350 degrees F. Grease two 9″ cake pans (I use Wilton’s Cake Release), line with parchment paper rounds, and grease the parchment paper as well. In a medium bowl, whisk together flour, baking soda, and salt. In a separate small bowl (or measuring cup), whisk together buttermilk, coconut milk, and vanilla. Finally, in a large bowl, cream together the butter and sugar until pale, light yellow, and fluffy, about 2-3 minutes. Add in the eggs one at a time, mixing well after each egg. Alternate adding the dry ingredients and buttermilk mixture with the mixer on low speed before increasing the speed to high and beating for a few seconds to smooth out the batter.

Pour the batter evenly into the two prepared cake pans, bang on the counter to remove air bubbles, and smooth the tops with a spatula. Bake until a toothpick comes out with just a few moist crumbs, about 30-35 minutes. Let the cakes cool in the pans for about 20 minutes before turning them out onto a rack to cool completely. Wrap the cake layers and freeze until firm to make them easier to manage (at least 30 minutes). Once firm, use a large serrated knife to carefully cut each cake layer in half horizontally to create four layers. Rewrap and refreeze these layers until you’re ready to assemble the cake.

Make the frosting: In the bowl of a stand mixer, use the whisk attachment to beat the egg whites and cream of tartar together until soft peaks form. Let this sit while you boil the sugar, syrup, salt, and water together in a saucepan over high heat. Stir to dissolve the sugar and cook until a candy thermometer reads 250 degrees F, about 4-5 minutes. With the mixer on medium speed, drizzle in the hot syrup and add vanilla extract. Turn the mixer to high speed and beat until the frosting has stiff peaks and is only slightly warm, about 3 minutes.

Assemble the cake: Place one cake layer onto a platter or cake decorating turntable. Drizzle 3 tablespoons of coconut water over the cake layer and spread it around. Spoon about 1 1/4 cups of the frosting onto this layer and spread it thick, letting it spill a bit over the edges all around. Top with 1/2 cup of grated coconut. Continue layering cake layer, coconut water drizzle, frosting, and coconut. On top of the cake, drizzle the last 3 tablespoons of coconut water before covering the whole top and sides of cake with the remaining frosting. Spread it thick and billowy and use a cupped hand to lightly press grated coconut all over the surface of the cake — it’ll hide any frosting imperfections! Store cake in the fridge. Serve either chilled or after letting it sit out for about 20-30 minutes to take the chill off.

Rosemary Thumbprints with Clementine Curd and The Day I Went to Ina Garten’s Cookie Swap (What?!)

Um. I may or may not have gone to a Cookie Swap at Ina Garten’s House.

And photos and recipes from this cookie swap may or may not have just been published in Ladies’ Home Journal.


This totally happened.

It may or may not have been one of the coolest things that’s ever happened to me (it was.)

Enough fangirling, though. I know what you really want to know — the nitty gritty details! For the gorgeous photos and recipes, you need the magazine itself (look for Ina on the cover — it’s on newstands now), but I’ll be your go-to source for those gossipy behind-the-scenes details. Such as:

1. No really, Ina Garten is one of the sweetest, most hospitable people on the planet. She wasn’t a diva in any sense; rather, she made us all feel very welcome and appreciated. When she took a bite of my cookie, I admitted that I was totally starstruck, saying, “This is a life moment.” She laughed and told me about one of her life moments: when Meryl Streep tasted one of her dishes. She’s so down-to-earth, y’all.

2. No, we didn’t see Jeffrey — I so wanted him to come in and give Ina a big smooch like he does on Barefoot Contessa.

3. Ina’s breakfast indulgence? Oatmeal. Seriously! She says people are always disappointed to learn that that’s her biggest vice.

4. I found this out while eating breakfast with her before the cookie swap at her favorite restaurant, The 1770 House, which kind of blows my mind. Is this my life? Did that actually happen?!

5. Her yard is just as beautiful as it is on the show — and her garden is a sight to behold! As we were walking through it, the photographer pinched off a plump strawberry and ate it.

6. Speaking of our fancy schmancy photog, Quentin Bacon, we had a great conversation about celebrity chefs and pavlova (he’s an Aussie) on the bus to the Hamptons. He got a text message from Curtis Stone en route inviting him to a party. No biggie. I offered to attend in his stead, which for some reason was only met with laughter.

7. His last name’s BACON. Of course he gets invited to celebrity parties.

8. Joy the Baker and I caught a pedicab in NYC to a restaurant and couldn’t decide if we were having a load of fun or about to die. It was like a roller coaster that twisted in and out of oncoming traffic. Then we were way overcharged. Call it a bonding experience.

9. I took random photos of people kissing in Central Park. I hope they didn’t notice.

10. Ina Garten’s hair stylist has been doing her hair since before she was the Barefoot Contessa. I asked her if she ever felt starstruck and she shrugged and said, “She’s always been Ina to me.” How must that feel?!

11. The folks of Ladies’ Home Journal are a seriously fun bunch to be around. Our conversations ranged from food blogs to sex to religion and everywhere in between on our ride to the Hamptons.

12. The bus driver became my good buddy and NYC tour guide when I got carsick and moved to sit up front with him. Shout out to Alex!

13. Ina is even more beautiful in person — those freckles! She’s also petite — we took off our shoes for pictures with her.

14. Yes, of course I peeked in her pantry. It’s just what you’d expect: nice local products, a few items from her own product line, and tons of gorgeous dishes, all neatly arranged. We may or may not have also peeked in the freezer. Yes, she really does keep chicken stock in there! We lusted a bit after her beautiful kitchen.

As an aside, perhaps I don’t get invited to more celebrity parties because I peek in people’s pantries. Just a thought.

15. Cookie swaps that include Chandon Rosé and festive boxes spread across a gorgeous table dressed for winter are the best sort of cookie swaps.

16. You should buy Ina’s latest cookbook, Foolproof, which I was fortunate enough to receive a copy of. While it’s full of new recipes (including a mustard flank steak I already promised to make for Mike), it’s typical Barefoot Contessa: classic, elegant, and simple. You’ll love it. I read it like a novel before bed!

17. While I’m spendin’ your money, please pick up a copy of Ladies’ Home Journal — I really want them to feel how much we love reading about blogs and bloggers, and companies feel the love through sales! I’ve already bought several copies myself. LHJ is one of the few magazines really embracing food blogs and pioneering how they can work together with print media. Love that!

18. Want to see more of the article now? Here is the interview with Ina and here are all the fantastic cookie recipes! My cookies are Rosemary Thumbprints with Clementine Curd, and they’re seriously delicious.

19. I had the privilege of attending the cookie swap with some other lovely bloggers including Deb from Smitten Kitchen, Lisa from Homesick Texan, Clara from Channeling Contessa, Joy from Joy the Baker, and Zoë from Zoë Bakes. These ladies are amazing and so much fun.

20. Finally, I want you to get a chance to have the same wonderful experience with Ina that I had. LHJ is currently holding a contest called the World’s Biggest Cookie Swap. You can get details to enter and hopefully win a chance to have lunch with Ina here.

Thank you to Ina for your hospitality, and to Ladies’ Home Journal for the experience!

(Photos by Quentin Bacon. Used with permission.)

Brown Butter Pumpkin Cake Cheesecake with Salted Caramel

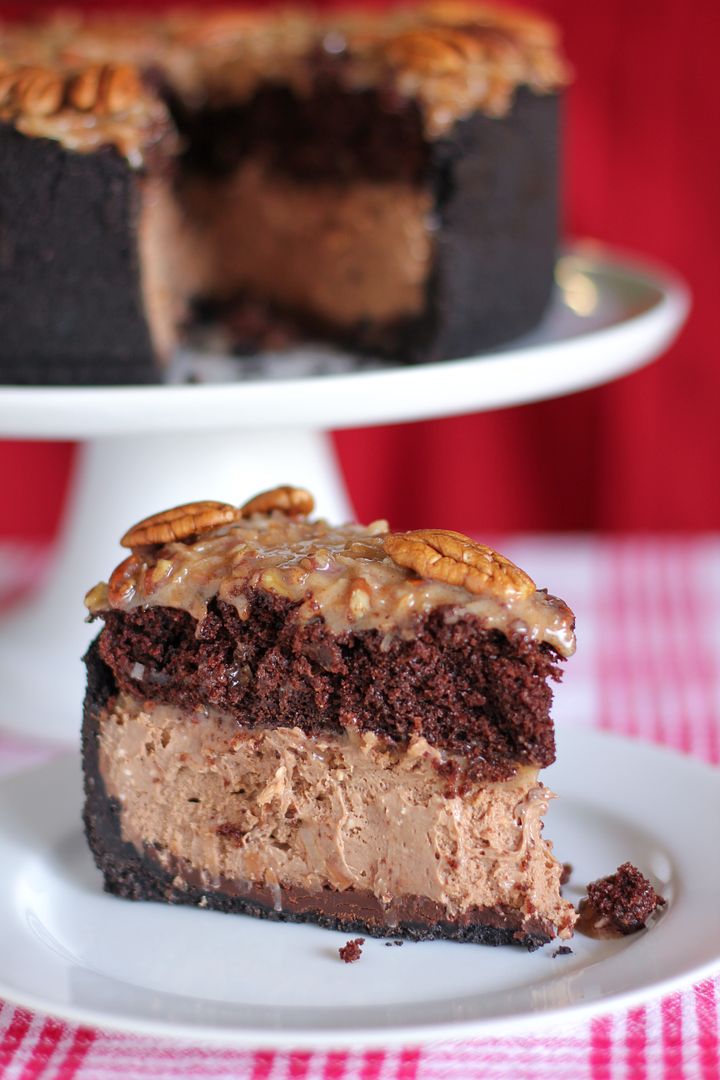
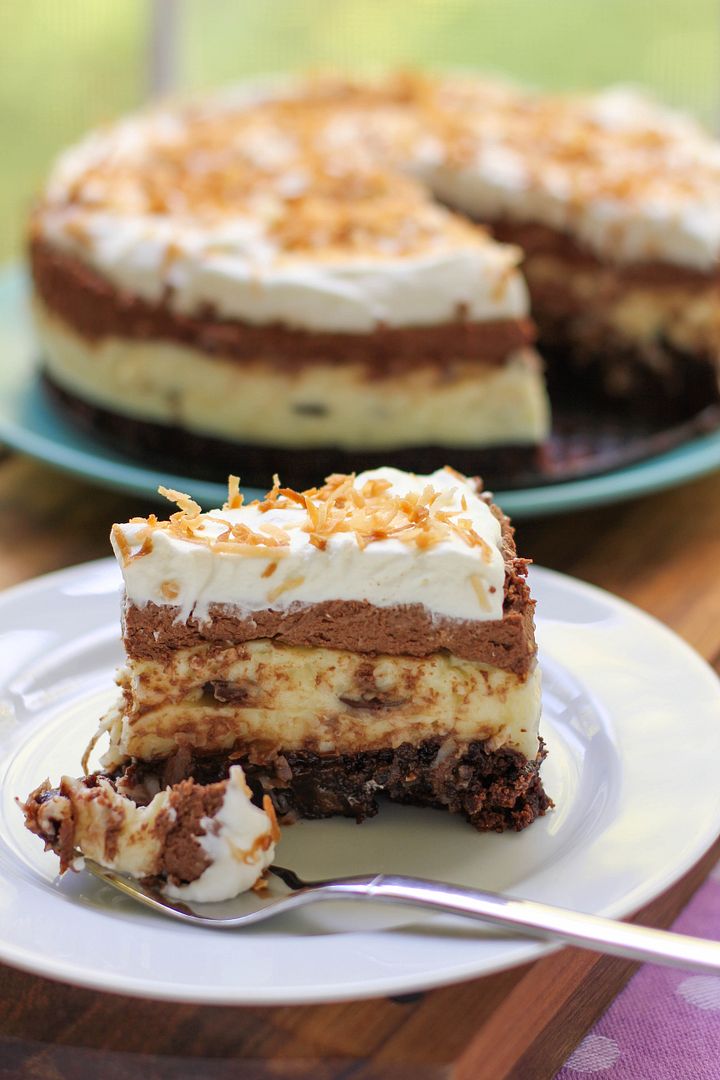
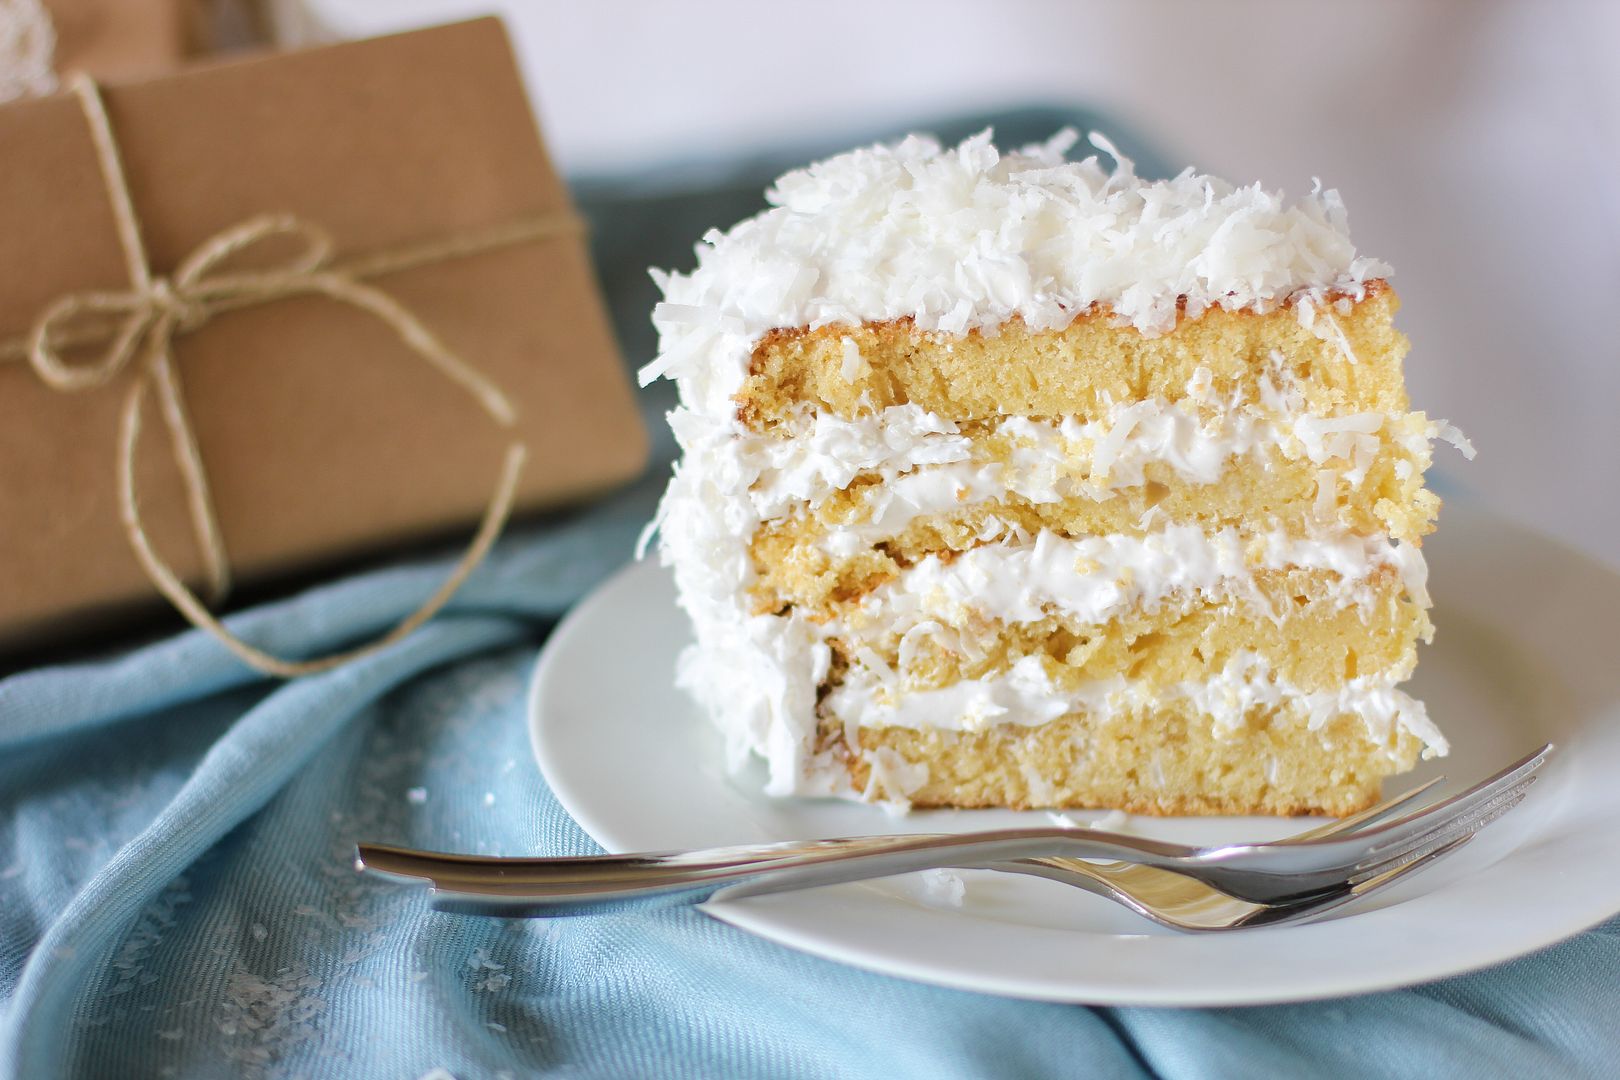
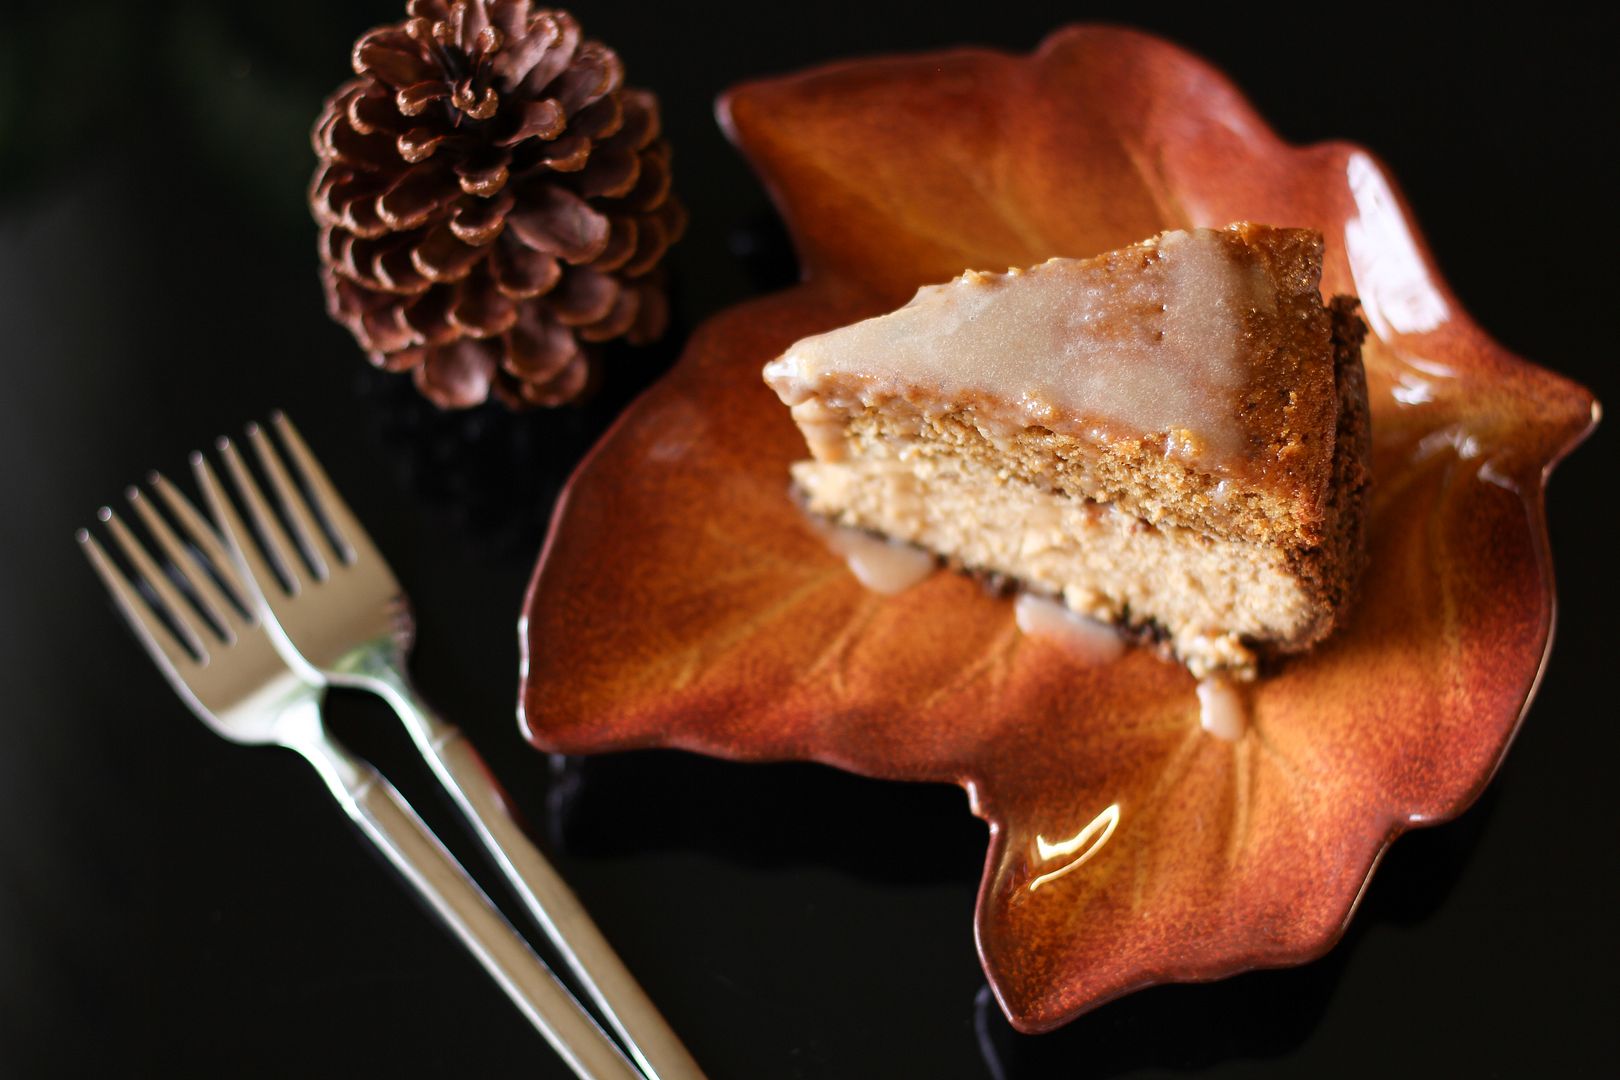
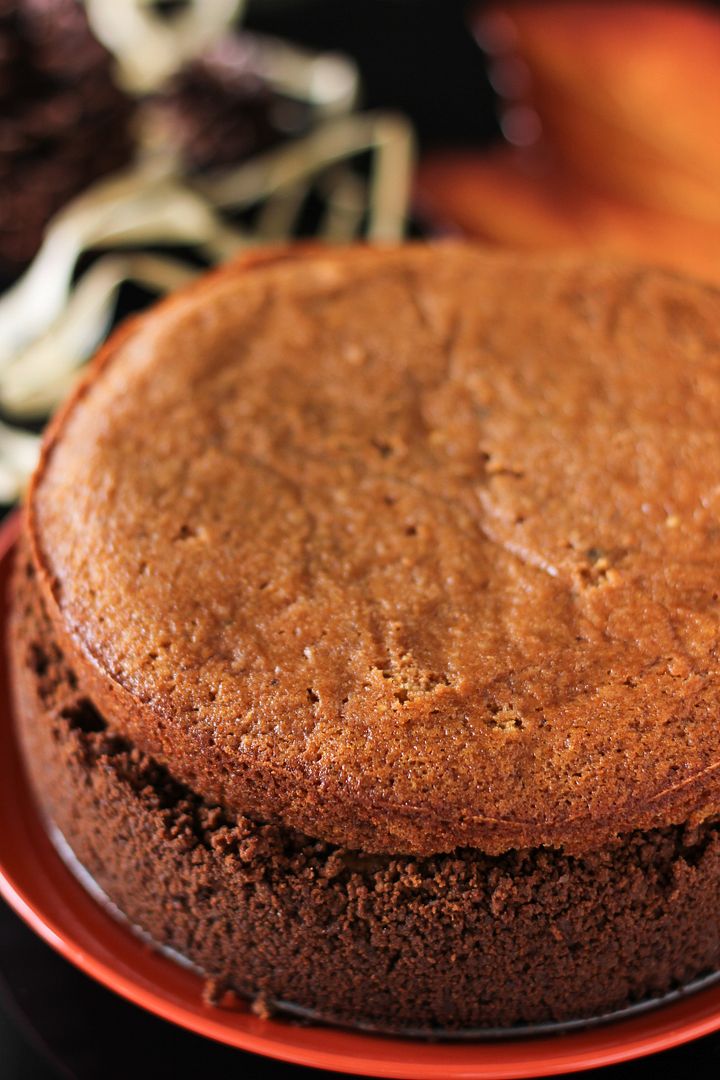
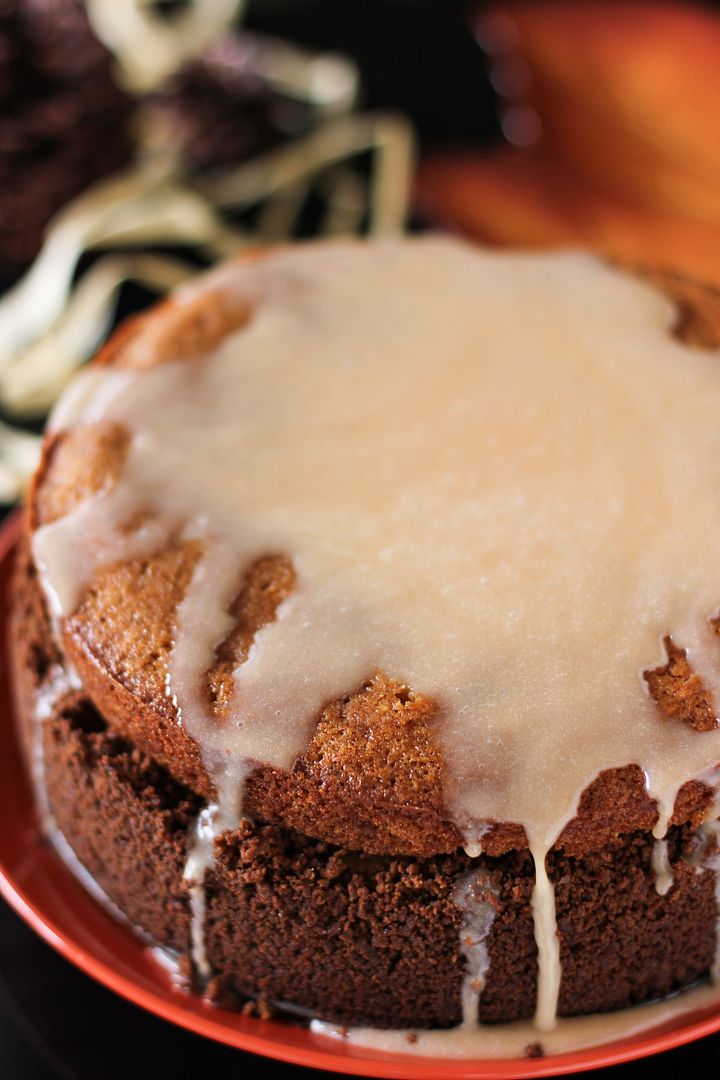
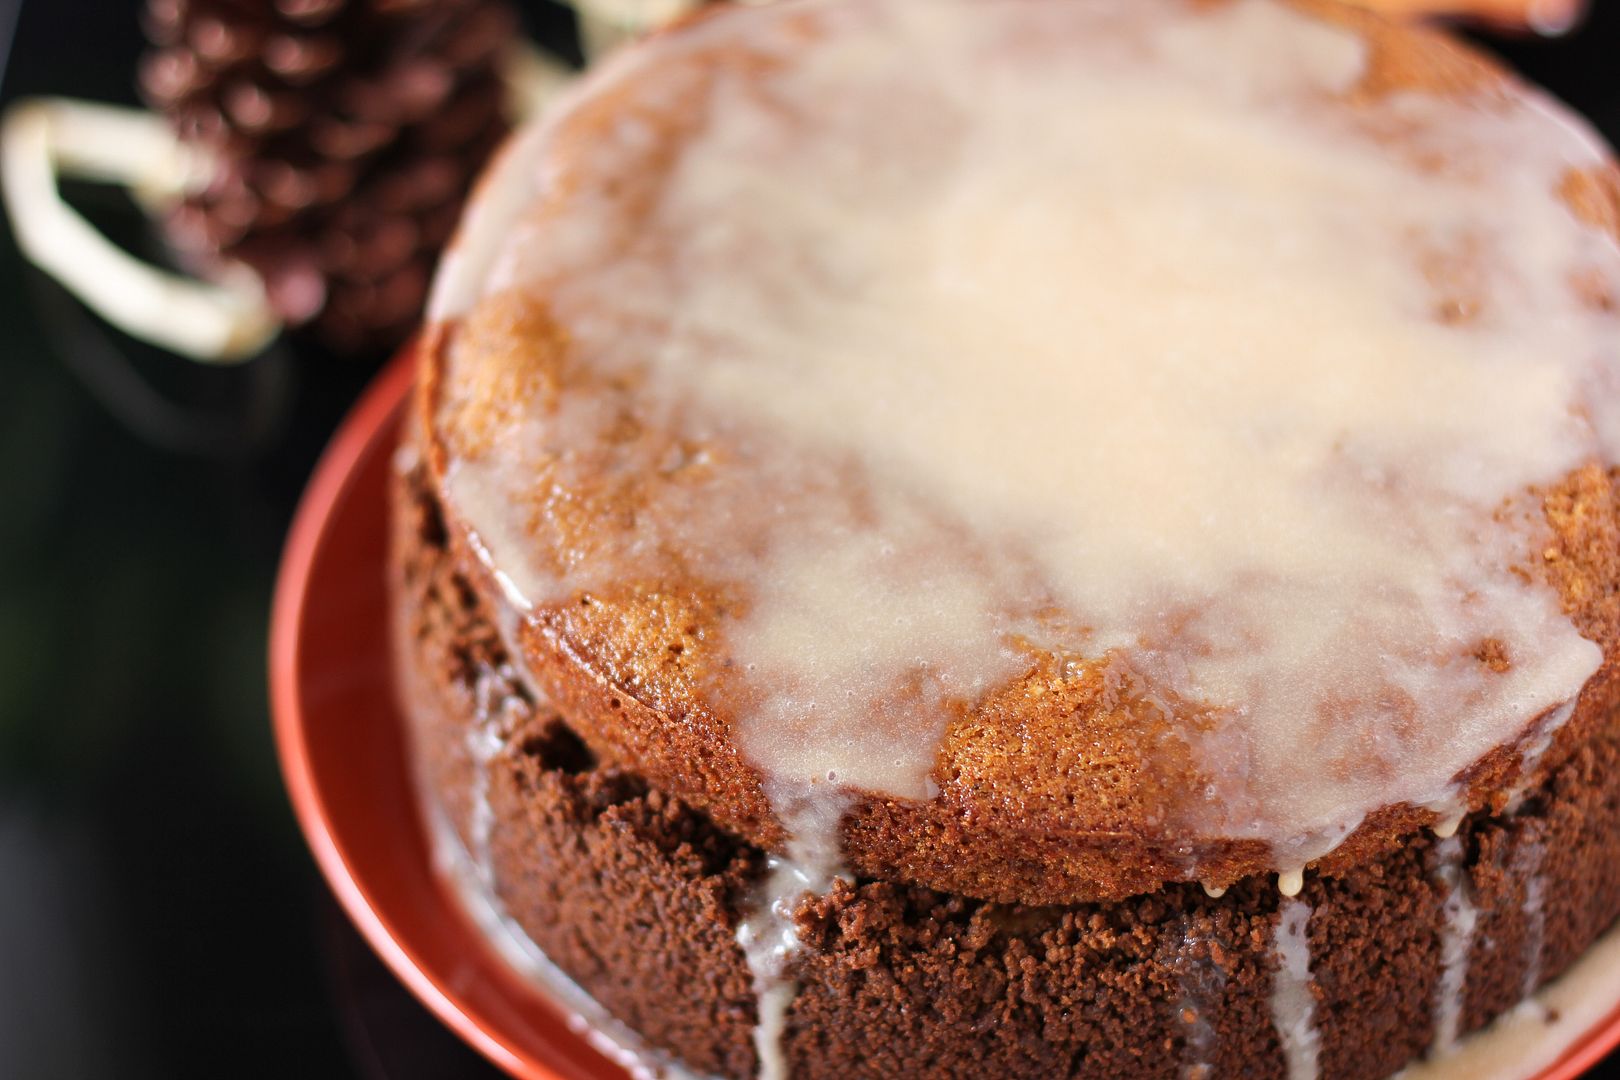
Um, this is a humble-looking cake.

That’s a polite way of saying, “Look, I know this cake is ugly.” It’s brown cake on a brown cheesecake with some brown caramel drizzled on top. It has holes where I poked it with a toothpick. It’s kinda crooked. Whatever. That’s okay.

I’ve been thinking about ugliness and prettiness a lot lately. I teach 7th graders, and the issue comes up often with them. Sometimes they explicitly address it, but more often, I see girls meticulously adjusting their hair in a window, rolling their shorts up a little shorter than their parents would allow, reapplying perfume and lip gloss in the hallway, making passing comments about the importance of mascara to their friends, and joining in a group gripe session about what shoes they can and cannot wear at school. The pull to be pretty is incredibly strong.

These are not those teenage girls you see in movies, either — those vain, flighty girls who have never seen the inside of a novel. They aren’t stereotypes. These girls are brilliant, fun, athletic, witty, strong, independent. They’re all those great things — and they still feel the pressure. Does my body look like everyone else’s? Do my clothes seem stylish? Do I need to wear makeup? Does my outfit look all right? Even as they’re boldly marching to their own drum, they’re hearing the one that TV shows, movies, magazines, and the millions of sexualized images contained therein beat for them every day. The one that says: “You don’t look quite right. You should buy something to fix the problem.”

(Before we go on, I should warn you that the rest of this post could be triggering to those with eating disorders.)

I’ve never been a man, so I can’t speak for them. But as a woman, I can tell you that there’s a naked, humiliated discomfort that creeps up through your chest sometimes when you look around a room. It’s cold and withering. Suddenly you want to wiggle your pants a little lower, adjust your shirt, slick your tongue across your dry lips, smooth any frizzies in your hair, suck in your tummy, push your shoulders back.

As we get older, we practice resisting the serpentine siren song of self-hatred. We engage in positive self-talk. We tell ourselves that strong is the new skinny. We decide to think of food as fuel, not an emotional tool. We support body-positive advertising campaigns. We stop counting calories or weighing ourselves if those things present a problem. We try to resist fashion trends that perpetuate the cycle of objectification (even though “everyone’s wearing them!” — sigh). We do this for ourselves and for our daughters, hoping that they grow up with a mindset of self-love and a measure of comfort with their own bodies.

But it’s still hard. And from what I remember and what I hear, it can be even harder for adolescents.

I won’t harp on this next point. It’s not some dramatic reveal; it’s my life. It’s a fact about me, just like it’s a fact that I love my dog and would drive miles out of my way for a fountain Coke Zero. It just happens to be a fact I don’t particularly relish discussing. I’ve thought about telling you for months — every time someone asks, “How do you stay fit eating all that cake?” — and now I’m just going to, because there’s no shame in saying what I’m about to say: I’ve struggled with disordered eating since high school. My mindset about food and my body has never been healthy — and there’s a gap between my self-image and my physical reality that causes a lot of emotional distress for me. Lady Gaga just acknowledged this same thing to destroy the shame and stigma attached to the issue, and to blow the issue wide open.

I’ve obviously known about my own issues for years (and addressed it in appropriate ways), but hearing the occasional student discussing calorie counts, hearing about people who have been targeted because of their weight, hearing a student say the really scary F-word, and seeing the body-anxiety people are admitting to on Lady Gaga’s website makes me realize: it’s time to get angry (this article contains some offensive language).

I’m angry that anyone decided they could turn my physical appearance into an emotional game to earn more money. I’m angry that they create illusions to manipulate us (slathering heavy makeup onto rail-thin girls; pouring them into tiny clothing; sexualizing them and emphasizing their body parts as objects for consumption; contorting them into the shapes of inanimate objects; photographing them; airbrushing them into oblivion; and slapping their photos across roadways, shopping malls, televisions, movie screens, magazines, and the internet). I’m angry that they target us — they target older women (aren’t you tired of those wrinkles?), they target fat women (don’t you want to smooth out your body shape?), they target thin women (don’t you want a push-up bra?), they target young women (here are the newest, skinniest skinny jeans), they target moms (when will you get back to your pre-pregnancy jeans?). I’m angry that while we’re telling our 12- and 13-year-old girls how fantastic and smart and capable they are, they’re hearing from dozens of other sources that they’re not good enough.

But anger can be productive. Angry girls can stop buying products made by companies who try to hurt them. They can say, “My body was not created to for the sole purpose of looking sexy for others,” and wear the clothes that make them happy and comfortable. They can decide to focus on the food that fuels them well and the exercise that energizes them, not the number on the scale. They can politely refute peers who try to convince them they should be worrying about clothes, makeup, and being attractive. They can enjoy fashion choices as tools for expression and not for marketing themselves. When they’re angry, they have the strength of their indignation supporting them when they say, “This has gotta stop. This will stop with me!”

(P.S. Here’s a pretty awesome example of a girl who said just that (strong language).)

* * *

It’s kind of problematic to talk about health, weight, and body image on a blog where I post decadent desserts every week, so I wanted to take a moment to tell you what I think about eating. Not those disordered thoughts that sometimes hold me back, but the wholesome thoughts I trust. My ideal — one that I am spotty about conforming to for lots of reasons — is that you should eat, mostly, to fuel your body with healthy, humanely-produced food. Eating should be about positive provision for yourself, not about negative restrictions. Sweets, however — especially particularly decadent ones like this cake — should be an every-now-and-then treat, one that you refuse to deny yourself, but also one that you don’t let enslave you.

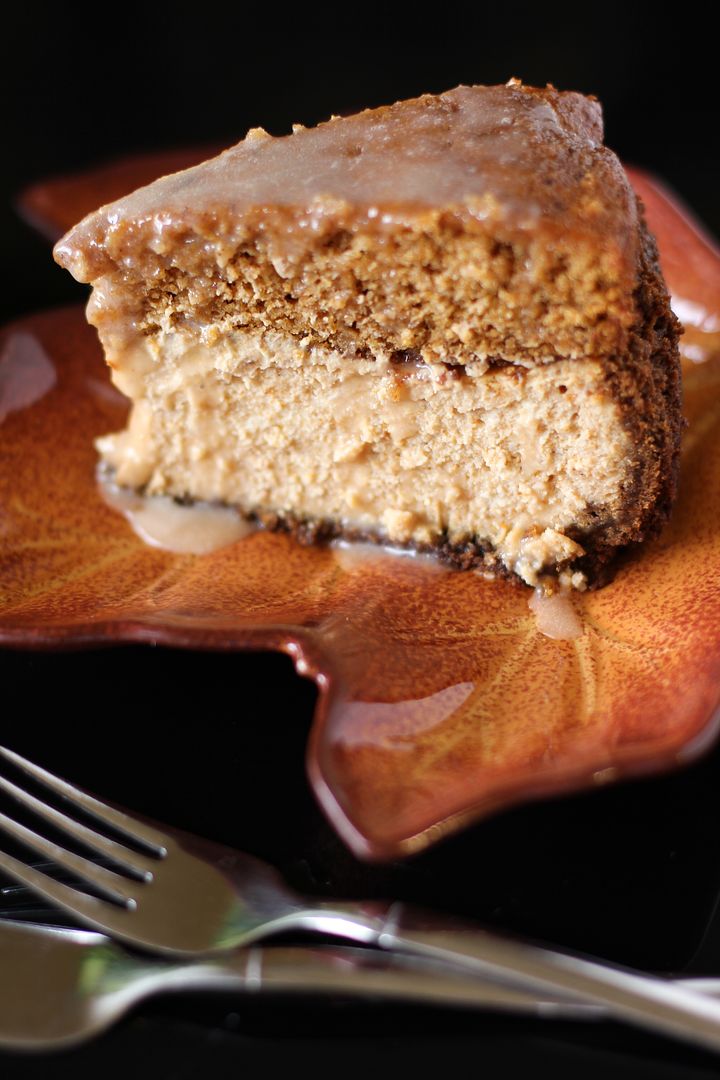
When you’re looking for one of those every-now-and-then treats, this cake is the perfect choice. What it lacks in, ahem, visual appeal, it makes up for tenfold in taste. The brown butter pumpkin cake layer is nutty, spiced, and delicious atop the smooth, sweet pumpkin cheesecake. A gorgeous salted caramel sauce is poured on each slice just before serving.

What is your food philosophy? How do you boost your own self-confidence in the face of all the industries trying to tear it down for profit?

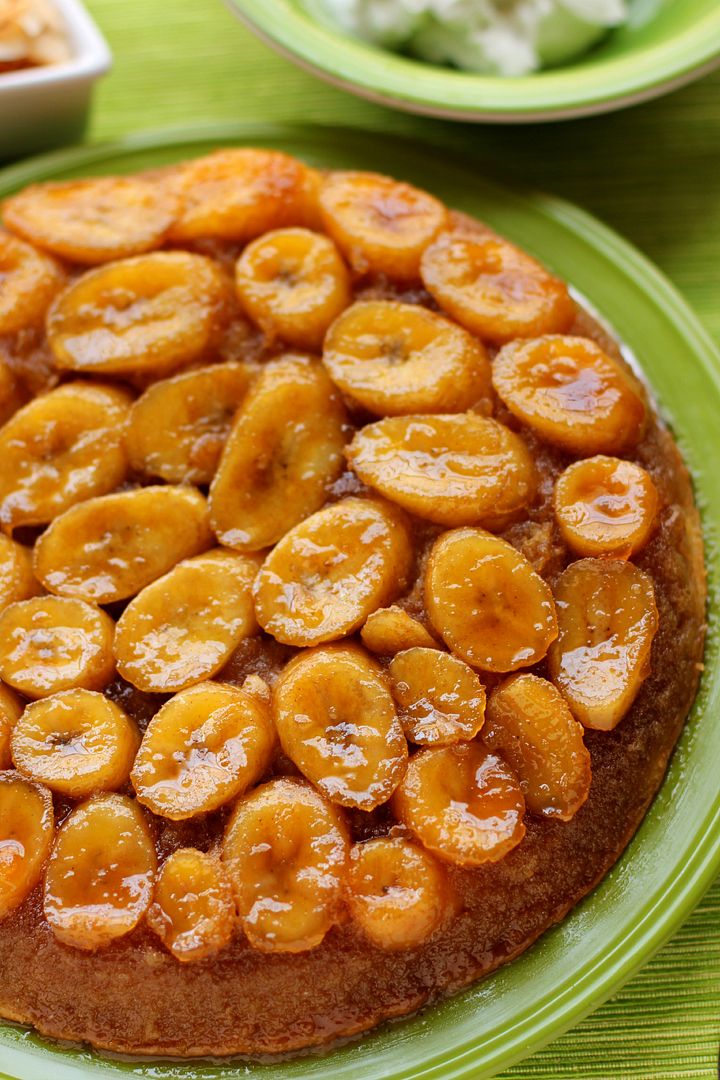
One year ago: Pumpkin Cheesecake Stuffed Snickerdoodles
Two years ago: Blueberry Stuffed French Toast Bowls
Three years ago: Best Ever Cream Cheese Pound Cake with Easy Caramel Frosting and Spiced Apples

Brown Butter Pumpkin Cake Cheesecake with Salted Caramel


Recipe by: Willow Bird Baking, with a pumpkin cake layer adapted from Fine Cooking, salted caramel from Martha Stewart, and a cheesecake adapted from Betty Crocker
Yield: 10-12 servings

Pumpkin cheesecake alone is delicious, and even moreso if it’s settled into a gingersnap crust. But top that cheesecake with a layer of brown butter pumpkin cheesecake (and then drizzle on some salted caramel for good measure) and you have yourself a downright masterpiece. This cake would be perfect for Thanksgiving!

Browned Butter Pumpkin Cake Ingredients:
3/4 cup pumpkin puree
3/8 cup (6 tablespoons) unsalted butter
1 cup unbleached all-purpose flour
3/4 teaspoon baking soda
3/4 teaspoon ground cinnamon
1/2 teaspoon ground ginger
pinch table salt
1/8 teaspoon ground cloves
3/4 cup granulated sugar
1/3 cup firmly packed light brown sugar
1 large egg
2 tablespoons and 2 teaspoons buttermilk

Pumpkin Cheesecake Ingredients:
3 cups gingersnap cookie crumbs (this was about 45 cookies for me)
1/2 cup and 2 tablespoons butter
pinch of table salt
3 tablespoons all-purpose flour
1/2 teaspoon cinnamon
1/2 teaspoon ground ginger
1/2 teaspoon nutmeg
1/8 teaspoon ground cloves
2 tablespoons brandy, if desired
1 1/3 cup pumpkin puree
3 packages (8 ounces each) cream cheese, softened
3/4 cup packed brown sugar
1/2 cup granulated sugar
3 eggs

Salted Caramel Sauce Ingredients:
3/4 cup sugar
1/8 (2 tablespoons) cup water
1/2 cup heavy cream
1/8 cup (2 tablespoons) creme fraiche or sour cream
1/4 teaspoon pure vanilla extract
Pinch of coarse salt

Directions:
To make browned butter pumpkin cake: Preheat oven to 350 degrees F. Grease one 9-inch cake pans very thoroughly Cut a parchment round to fit in the bottom and then grease that too. Melt the butter in a saucepan over medium heat and cook it, swirling occasionally, until it’s golden brown with a nutty aroma, around 4 minutes. Remove it from heat and pour it into a bowl to cool for about 15 minutes.

Whisk or sift together flour, baking soda, cinnamon, ginger, salt, and cloves in a small bowl. In a separate, large bowl, whisk together 3/4 cup of pumpkin puree, granulated sugar, brown sugar, egg, and buttermilk until well combined. Use a spatula to stir in the dry ingredients until just combined, and then whisk in the browned butter. Pour batter evenly into prepared cake pans.

Bake the cake until a toothpick inserted in the center comes out with just a few moist crumbs, around 28 minutes. Turn the oven down to 325 degrees F to prepare it for the cheesecake. Let cake cool in their pan until mostly cool before turning it out onto wax paper to wrap and freeze. Freeze at least 30 minutes or until firm.

Make the cheesecake crust: Place the gingersnap cookie crumbs and salt in a small bowl. Melt the butter in a saucepan over medium heat and cook it, swirling occasionally, until it’s golden brown with a nutty aroma, around 4 minutes. Remove it from heat and pour it over the cookie crumbs. Toss with a fork to moisten all of the crumbs. Press into a thin layer covering the bottom and sides of the springform pan (at least 3 inches up the sides). It’s hard to get the crust up that high, but keep pressing the crumbs up from the bottom with a smooth-sided glass (twisting the glass as you do so, so the crumbs don’t stick) and working them around — you’ll want it that high to hold the cake layer. Patience helps with this step. Bake the crust for about 8 minutes.

Make the cheesecake: In a small bowl, mix the flour, pumpkin pie spice, brandy, and pumpkin and set this aside. In the bowl of a mixer, mix cream cheese, brown sugar, and regular sugar until well blended and creamy. Add the eggs one at a time, mixing between each, and continue mixing until combined. Add the pumpkin mixture and continue mixing until combined. Pour mixture into prepared crust and smooth the top with a spatula.

Bake for 1 hour 15 minutes to 1 hour 25 minutes or until center of cake is almost set. The top may crack, but it doesn’t particularly matter, since you’ll be covering it anyway. When it’s ready, turn the oven off and leave the door open at least 4 inches. Let the cheesecake sit in the oven for 30 minutes. Place the cheesecake on a wire rack to fully cool. When almost cool, place it in refrigerator to chill.

Make caramel sauce: Prepare an ice-water bath. Heat sugar and water in a medium saucepan over medium-high heat until mixture boils and sugar dissolves, washing down sides of pan often with a wet pastry brush to prevent crystals from forming. Reduce heat to medium, and cook until sugar turns dark amber (about 345 degrees on a candy thermometer), 5 to 7 minutes more. Immediately remove from heat, and carefully whisk in 1/2 cup cream. Return to medium heat, and cook until sugar melts completely and mixture boils.

Remove from heat, and pour into a bowl set in ice-water bath. Let caramel cool, stirring often, for 10 minutes. Stir in creme fraiche, vanilla, and salt. Cover and refrigerate until you’re ready to use it.

Assemble the cake: Smear a layer of caramel sauce on top of the cheesecake and carefully place your pumpkin cake layer on top. Pour the rest of the salted caramel on top of the cake layer. Chill for at least 3 hours before serving. Top with toasted pecans.

If you liked this post, please:
Subscribe to Willow Bird Baking
Follow Willow Bird Baking on Twitter
Follow Willow Bird Baking on Facebook

1 10 11 12 13 14 16