cheese

Hasselback Sweet Potatoes with Orange Rosemary Butter & Goat Cheese

In light of Willow Bird Baking’s Cooking Hard Stuff Challenge, I’ll be sharing some tips for tackling new or challenging recipes throughout the month of March. If you haven’t signed on for the challenge yet, make sure you read about it and join in the fun.

My first bit of advice about how to Cook Hard Stuff (or really, how to cook anything at all) is going to seem half obvious and half new agey, but it’s important enough to harp on a bit.

Cooking Hard Stuff Tip #1: Read and visualize the recipe.

Once upon a time, I treated a recipe like a labyrinth. I started at the beginning without any knowledge of what was ahead, putting one foot in front of the other and hoping I eventually reached the other side.

It was exciting, for sure. Suddenly, I’d need a cup of sugar. I’d dig around in the cabinet for a bit, do some measuring, and accomplish that task. Then, bam! I’d need a stick of butter. I’d scrounge around in the fridge to see if I had one. The pitfalls of this technique are pretty obvious: sometimes you’re out of sugar, or your butter needed to be set out to soften hours ago, or the pan you need is soaking in the sink with last night’s baked ziti caked all over it.

It only took a few such missteps to start reading recipes, but even then, I just “read” them. Skimming did the trick most of the time. Finally, a few mid-recipe trips to the grocery store made me realize that a cursory scan of a recipe wasn’t going to cut it either.

When I say you should read through your recipe, I mean you should grab a pencil, sit down with the recipe, and really read it. Make grocery lists based on the ingredients. Make a schedule for your prep work so things like softening butter don’t sneak up on you. Sketch a plan for how to set up your workspace for finicky or time sensitive recipes so you won’t have to stop and rummage through the pantry.

These things take a little time. You might sit with your recipe for 15 or 20 minutes planning. I can say from experience, though, that the time and angst you’ll save as you breeze through your recipe is worth the few minutes of preparation.

Once you’ve given a recipe a thorough reading and made any helpful notes, you need to sit down and visualize the steps of the recipe. Literally, sit there and picture yourself doing each step. Maybe this is starting to sound a little like a yoga class, but mentally walking through a recipe is one of the most important things I do to ensure my success. It’s during this exercise that I realize what order the prep work is best completed in, what techniques I’m unfamiliar with and might need to read more about, and what kitchen tools I should use in order to maximize my efficiency and minimize my workload.

Thinking through the recipe a few times also makes me feel like I’ve practiced the steps I’m about to tackle, which boosts my confidence and leads to better results in the kitchen.

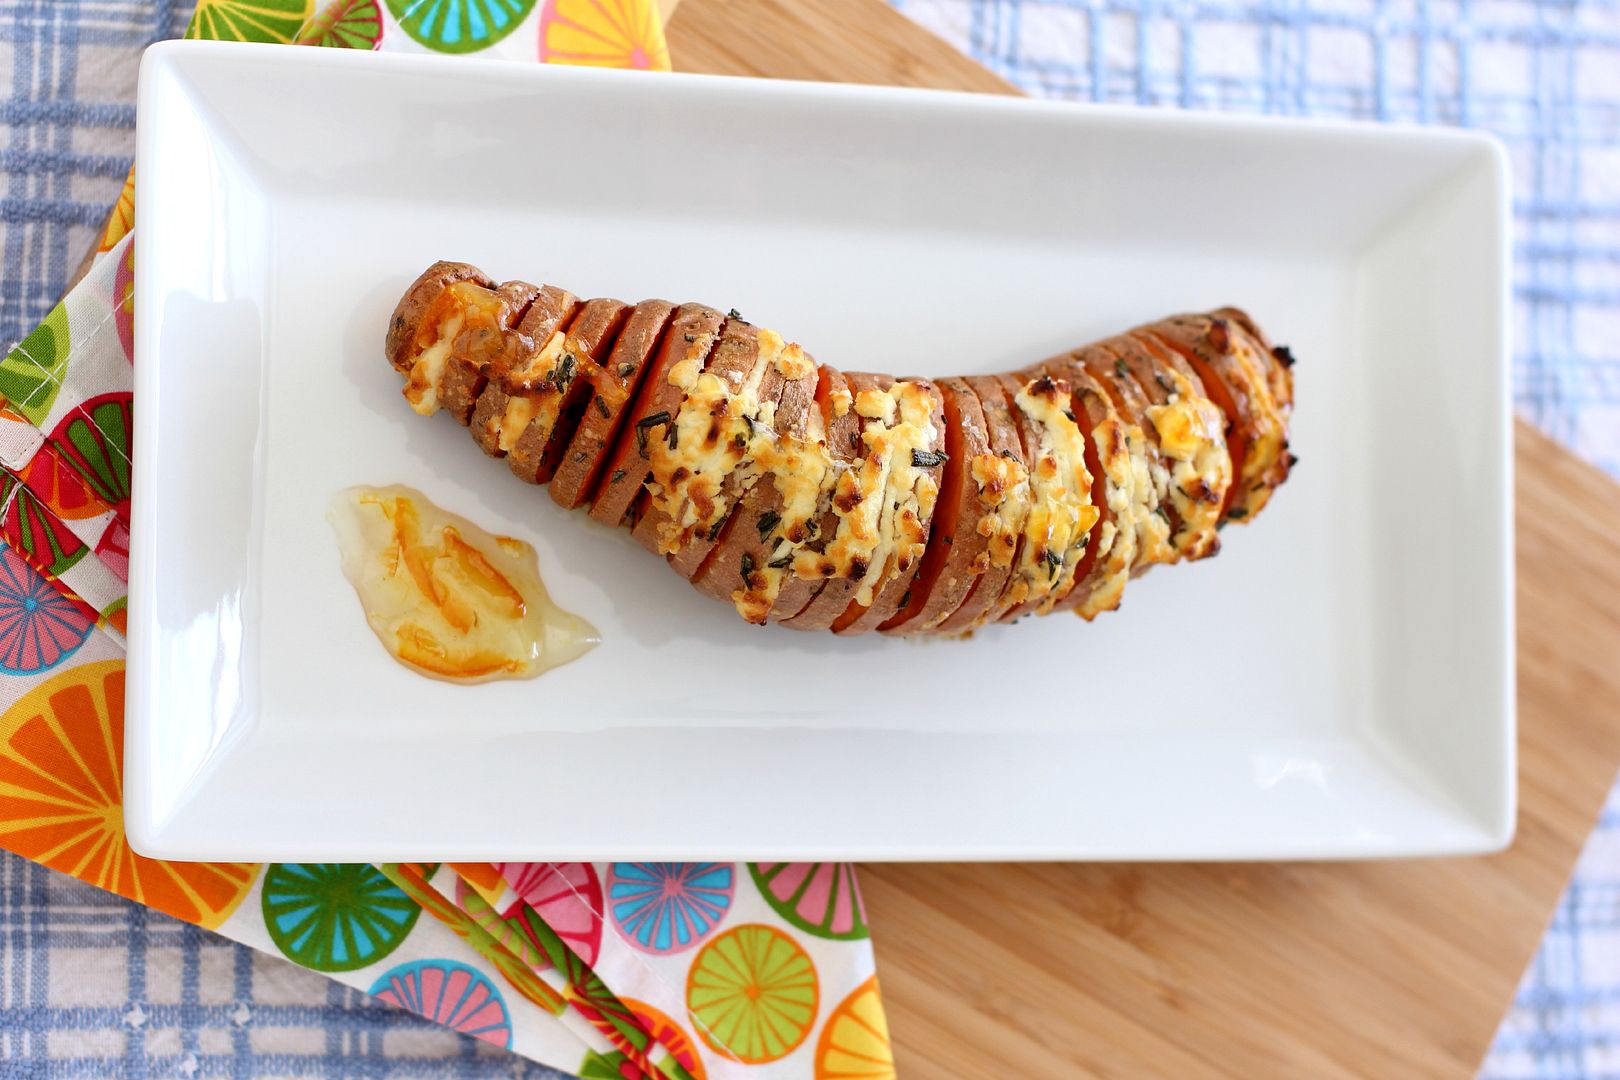
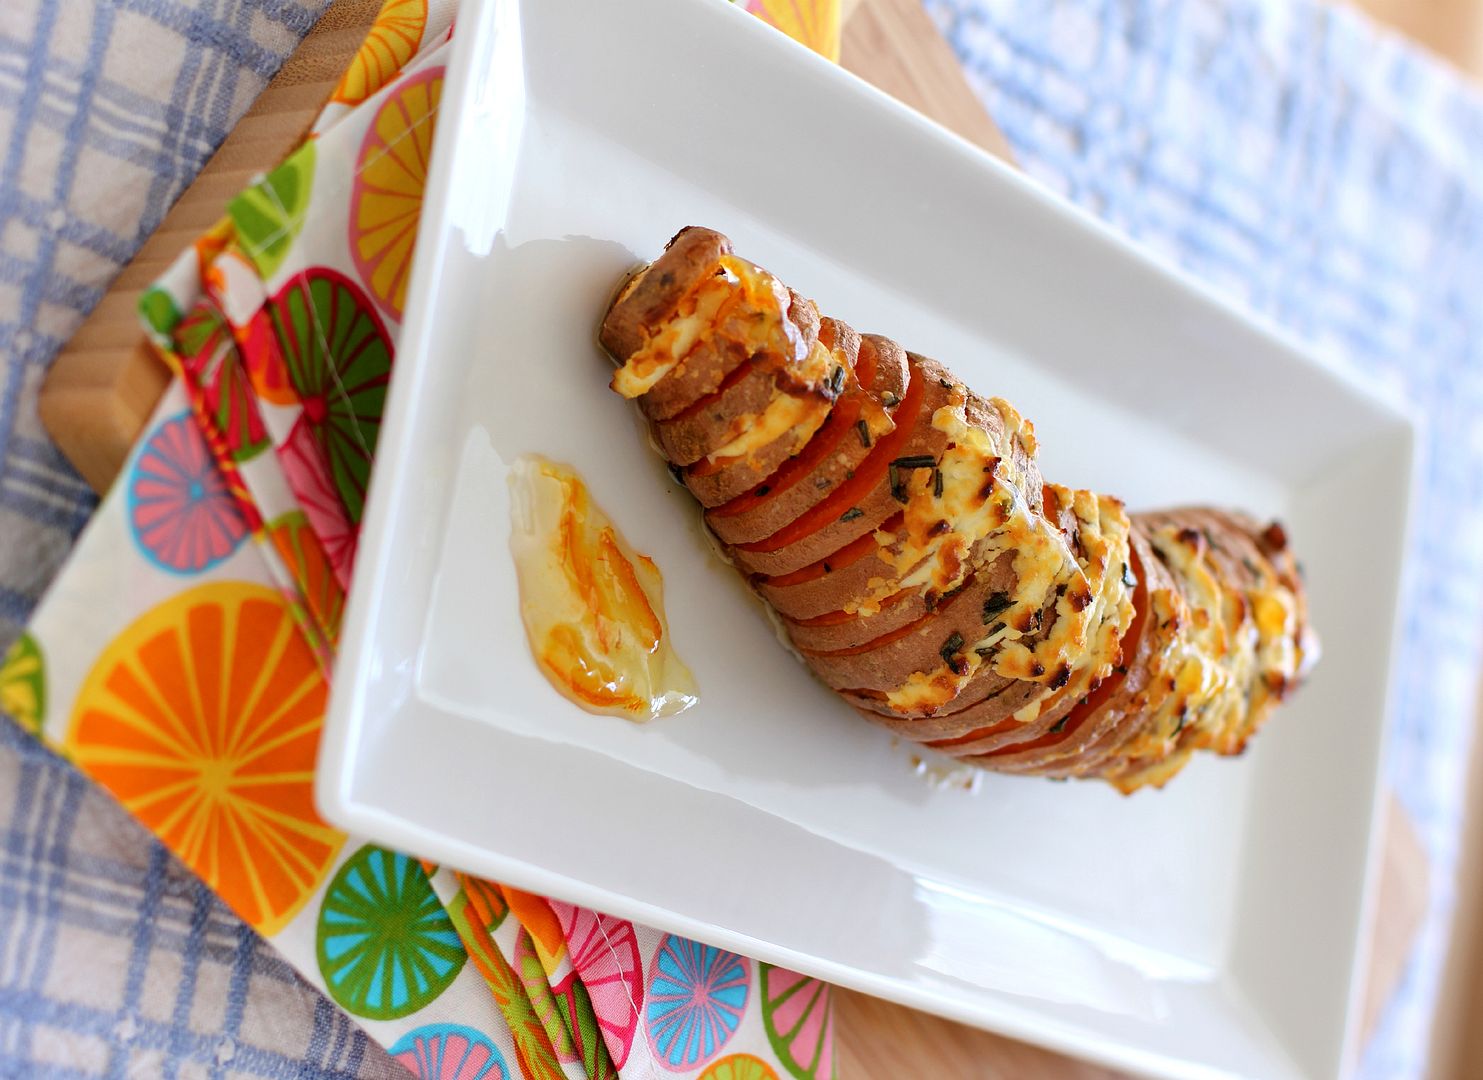
These Hasselback Sweet Potatoes aren’t Hard Stuff; they’re actually pretty simple to prepare and boast a gorgeous flavor profile. But having never made Hasselback potatoes before, you better believe I was reading around online, comparing various recipes, and making a prep list for myself. After this bit of preparation, the dish practically flew together.

As I hoped, the orange rosemary butter, goat cheese, and smidge of warm orange marmalade glaze worked perfectly with the sweet potato to create a bold savory side dish. Do a little reading and a little visualization (and maybe even some yoga?) and then make yourself some sweet taters.

What tips for Cooking Hard Stuff would you offer other readers?

Hasselback Sweet Potatoes with Orange Rosemary Butter & Goat Cheese


Recipe by: Willow Bird Baking, inspired by A Cozy Kitchen’s Hasselback Potatoes
Yield: 2 sweet potatoes, 2-4 servings

These sweet potatoes are stuffed with delicate orange rosemary butter and goat cheese and drizzled with a touch of warm orange marmalade when they’re fresh from the oven. The result is a savory side dish with a hint of sweetness and a ton of bright flavor. Don’t fret if the butter and cheese needs to be smooshed into each slit in the potato and ends up a little messy — the finished product will be gorgeous.

Ingredients:
2 sweet potatoes, scrubbed clean
4 tablespoons butter, softened
1 tablespoon rosemary leaves, finely chopped
1/2 teaspoon orange extract
1/2 teaspoon orange zest (optional)
3/4 teaspoon honey
4 ounces goat cheese
1/4 teaspoons kosher salt (plus more for salting butter to taste)
1 tablespoon olive oil
1 tablespoon orange marmalade

Directions:
Make the Rosemary Orange Butter: Mix softened butter, orange extract, orange zest, finely chopped rosemary, and honey until well combined. Add salt to taste. Spoon butter onto a square of wax paper and gently form into a log. Wrap the log and place it in the freezer to firm up completely.

Prepare potatoes: Preheat the oven to 400 degrees F and cover a baking sheet with foil. Place a wooden spoon handle on either side of your potato and slice thin slices into it, allowing the spoon handles to stop your knife before you cut all the way through. Slice your cold butter into thin slices and stuff a sliver into every other slit in your potato. Stuff goat cheese into the other slits (some goat cheese will smear out onto the top of your potato and form a topping of sorts). Place the potatoes on the prepared baking sheet, drizzle each potato with 1/2 tablespoon of oil, and sprinkle with kosher salt.

Bake the potatoes at 400 degrees F for 45 minutes or until fork tender. Check halfway through and tent with foil if the goat cheese is beginning to brown too much. Remove the potatoes from the oven after baking and heat the orange marmalade in a small, microwave safe prep bowl for about 15 seconds. Drizzle half over each potato and serve immediately.

P.S. This dish will be entered in the North Carolina Sweet Potato Commission‘s No More ‘Mallows Recipe Contest. I love me some sweet tater and marshmallow casserole, but I also love that sweet potatoes pack a lot of savory potential.

See all the Cooking Hard Stuff Tips:
The Cooking Hard Stuff Challenge
Tip #1: Read and visualize the recipe.
Tip #2: Mise en place.
Tip #3: Make a schedule.
Tip #4: Try, try, try again — or share your success

If you liked this post, please:
Subscribe to Willow Bird Baking
Follow Willow Bird Baking on Twitter
Follow Willow Bird Baking on Facebook
Give this post a thumbs up on StumbleUpon
Pin It

Brie En Croute with Figs & Rosemary

It’s Ash Wednesday, a mournful first footfall along a path that winds through fasting, repentance, and even death on its way to climactic, exuberant rebirth. Some Baptist churches observe Lent, the season of sacrifice that begins today, but others — including my own — don’t. I started observing it personally in college, though, because I appreciated the symbolism: the 40ish days of Lent recognize the 40 days of fasting and prayer Jesus endured in the wilderness in preparation for laying down His life as a sacrifice for our sins.

During Lent, people choose something to give up in recognition of Christ’s self-denial. The first year I participated, I gave up sweets. Perhaps that seems harsh considering I now write a baking blog dominated by decadent desserts, but I actually thought I was starting off easy. I wasn’t a huge fan of desserts at the time. I sometimes joke that my 40-day abstinence must have created a continuously combusting passion for cake in the depths of my soul, because afterwards, I was ravenous for sugar (and have been ever since).

In subsequent years I would give up meat (easy), computer usage (a little harder), and caffeine (ridiculously difficult).

Those 40 days without soda almost did me in. I know it’s absurd — Christ gave up everything and I had trouble giving up a beverage — but I really did struggle. For some reason, drinking lots of water makes me feel parched instead of hydrated. I was thirsty all the time, my throat was sore, my lips were dry, and yet — to put it delicately — I still needed more bathroom breaks than a teacher could possibly squeeze into the day. The worst part, though, was how absolutely exhausted I was all the time. Apparently I run mostly on caffeine.

This year I’m giving up a few different things. I’ve developed something of a chain-drinking problem with Diet Sunkist at school, so I’m abstaining from that entirely. I’m also giving up time on the internet: I’ve given myself just a sliver of time to check Facebook and Pinterest and my Google Reader each evening.

It’s just a couple of small things — enough to create a background discomfort that reminds me that my freedom came at a steep cost.

This Brie En Croute with Figs & Rosemary might be better suited to Fat Tuesday (emphasis on the “fat”) than Ash Wednesday, but it’s not Sunkist or Facebook, so right now it’s fine by me! In fact, it’s more than fine; it’s fantastic. It’s a warm, heavenly mess of gooey and sweet and buttery and crisp — and since it’s simple to put together but comes out looking fancy, it’d be perfect for a party or nice dinner.

Or as a personal snack. At parties, I usually eat a few crackerfuls of brie and then politely leave the cheese plate to other folks. Turns out when you’re an adult and can make all sorts of bad food decisions with reckless abandon, you can eat the entire wheel of brie by yourself (though, given that I felt decidedly gross after doing so, perhaps I shouldn’t recommend it). Here’s to moderation!

Do you observe Lent? If so, what are you giving up?

Brie En Croute with Figs & Rosemary


Recipe by: Willow Bird Baking
Yield: This recipe would probably serve about 5-6 people at a party.

My favorite recipes are easy, pretty, and delicious, and this one fits the bill. Brie baked inside of puff pastry is already a gooey, buttery masterpiece, but adding sweet figs and some rosemary to the mix creates a fantastic flavor profile.

Ingredients:
1 sheet of frozen puff pastry, thawed (or make your own!)
1 8-ounce wheel of brie (rind on)
1/4 cup fig jam or preserves
1/4 cup chopped dried figs
1 1/2 tablespoons roughly chopped fresh rosemary
1 egg
1 tablespoon water

Directions:
Preheat oven to 425 degrees F. In a small bowl, mix jam, chopped figs, and rosemary. Set this in the fridge until you’re ready to use it.

Gently roll out the sheet of puff pastry on a lightly floured surface just enough to smooth out the seams and thin it a bit. Spoon your jam mixture into a small circle (about the size of your brie wheel) in the center of the pastry sheet and place your brie on top of it snugly. Carefully pull the puff pastry sheet up around the brie, cutting off any excess (I use a clean pair of kitchen scissors) and pressing the pastry to seal it together at the top. Use a pastry brush to dust off the excess flour.

Place the covered brie seam side down on a baking sheet covered with parchment paper or a silicon baking mat. Use scraps to decorate your brie, if you wish (you can use a wet finger to moisten the dough slightly and “glue” them on). Whisk egg and water together in a small bowl and use a pastry brush to apply this egg wash to the whole surface of the pastry . Bake this wheel at 425 degrees F for 18-25 minutes, or until it’s good and golden brown (if you have decorations on top, check it early and often to see if you need to cover them with foil, because they’ll darken quicker than the rest of the wheel). After removing your wheel from the oven, let it sit for 15 minutes if you like it very melty and about 20-25 minutes if you like an average melt (as pictured above). Then serve with toast or crackers.

If you liked this post, please:
Subscribe to Willow Bird Baking
Follow Willow Bird Baking on Twitter
Follow Willow Bird Baking on Facebook
Give this post a thumbs up on StumbleUpon
Pin It


Shareother ways to share this post with friends

Poppy Seed Ham & Swiss Slider Melts

When Mike was in middle school, his friend Chris decided they needed superhero names. Giving each other superhero names is apparently what adolescent boys were doing when I thought they might be writing me love letters. Oh.

Chris named himself Whopper Man and, inspired by the Dr. Perky soda Mike brought for lunch every day, he dubbed Mike Generics Man.

Even all those years ago, when Mike was in 7th grade and I was in 3rd (okay, well that makes it sound creepy), we were meant for each other — because I’m totally Generics Woman.

Don’t try to tell me that name brand yellow mustard tastes any different than store brand yellow mustard. Or that table salt needs to be produced by a certain company. I do love local and/or quirky and/or artisan products, but at the grocery store, I’d say about 90% of the products I buy are generic. And in case you haven’t noticed, I eat well.

In fact, I’m always a little surprised (but not judgey; don’t be judgey, y’all) to see someone grab the name brand can of tomatoes, or the name brand box of tissues. I’m sure they have their reasons — maybe they were raised in a home where only name brand items were used, maybe they like a flavor or scent that doesn’t have a generic equivalent, or maybe they’ve had a bad experience with the generics at some point — but all I can think of is how many extra dollars they’re shelling out.

Who knows, maybe this is what crazy coupon ladies (a title I use with the utmost affection) think when they look at my cart, right? Don’t I know if I’d just buy 18 more dish soaps, it would actually be cheaper than buying just 2?

Despite my penchant for buying cheap, there are some things that I’ve come to realize you shouldn’t skimp on. I don’t care how cheap the generic brand is. I don’t care how similar it looks to the real thing. For some things, no substitution will do. For instance:

1. Laundry detergent. I spend a bajillion dollars buying fancy schmancy “darks only” laundry detergent to try and save my clothes. I still keenly remember the time when, years ago, ONE WASH with the wrong detergent ruined an awesome pair of jeans. Then again, I have some superhuman knack for ruining clothing, so maybe I did something wrong. Maybe my superhero name should be What Happened To My Sweater Woman.

2. Toilet Paper. Everyone’s had that awkward moment where they realize they bought the 1-ply. Enough said.

3. Hair color. In fact, don’t even buy name brand hair color. Go to the flippin’ salon and PAY SOMEONE WHO KNOWS WHAT THEY’RE DOING. And don’t try to get away with going to the cheapie hair school salon, either.

Trust me on this. You’re either going to end up platinum hooker blonde because your mother leaves the dye in too long (thanks, Mom, for those memories) or you’ll end up with striped hair. Intentional stripes can be cute. Inadvertent stripes are not.

4. Coke. This one brings back fond memories of the time Mike tried to prove to me that I couldn’t differentiate between generic and regular Coke Zero. We did a blind taste test — well, sort of, except that I didn’t even have to taste anything. As soon as the cup got within a foot of my face, I could smell the difference. I think he was pretty impressed (or was that the facial expression for disgusted?) There’s just nothing like the real thing, y’all.

5. Paper towels. I do actually buy generic paper towels, but I kind of hate them. They’re so flimsy that they rip in half when you’re trying to pull them off the roll. How many more times will this happen before I suck it up and spend an extra 50 cents? Only time will tell.

6. Shampoo. I sound like I swallowed a commercial, but my hair really does feel silkier and more manageable with a quality shampoo. I go through a predictable cycle: I’ll get tired of spending so much money, decide to purchase generic shampoo, lament my decision after every shower for a month, and then re-decide to exclusively purchase name brand shampoos.

7. MAYONNAISE. This, much like the timeless debate about rolling the toilet paper over or under, can cause quite the firestorm, as we found out on Willow Bird Baking’s Facebook wall. Listen, I’m all about supporting your unique personalities and tastes. I love you just the way you are. But just to be clear, there is only one appropriate brand of mayonnaise: Hellmann’s, also known as Best Foods.

Now, pardon me while I sign out of my email and hide under my desk to avoid the inevitable mayonnaise fallout.

Unfortunately, the original version of this recipe for Poppy Seed Ham & Swiss Slider Melts called for Miracle Whip. Let’s just say if my superhero name were Mayonnaise Girl, Miracle Whip would be my arch nemesis. I hate the stuff. I still remember sitting at a friend’s house as a child and tasting it for the first time. I had to seriously evaluate whether or not I could bear to finish my sandwich.

Despite my fierce mayonnaise loyalty, I thought perhaps this time around I should stick to the recipe and use the Miracle Whip. What if that awful Miracle Whippy flavor was somehow crucial for the final product? With more than a little shame, I purchased a tiny jar of it just in case.

It was a short lived “just in case.” All it took a microscopic taste of that stuff upon arriving home to remember how much I hate it. I promptly threw it out of the recipe altogether. Turns out I do have some sense.

I’m happy to report that when slathered with the right sort of mayonnaise, stuffed with melty Swiss and honey ham, and smothered in a tangy butter sauce, these sliders really were the bee’s knees. They’re so easy to throw together, but come out of the oven gooey and comforting. And lest I totally offend a portion of my readers, I should add that (sigh) you can use Miracle Whip on them if you really want to. I’ll just look the other way.

Do you roll the toilet paper over or under? And (be gentle!) what’s your preferred mayonnaise?

Poppy Seed Ham & Swiss Slider Melts


Recipe by: slightly adapted from The Girl Who Ate Everything
Yield: 24 sliders

These gooey, cheesy, delicious sliders have all the makings of the perfect recipe: they’re easy to make, fun to eat, and so, so good. They seems to inspire some sweet nostalgia, too — several people who ate them mentioned that they remembered this meal from their childhood! Just make sure to use tasty ham and Swiss cheese — and of course, good mayonnaise!

Ingredients:
24 good white dinner rolls (I like Hawaiian or potato rolls)
mayonnaise for spreading (or half mayonnaise and half Miracle Whip whisked together, if you must!)
24 pieces good honey ham
24 slices Swiss cheese
1/2 cup butter, melted
1 tablespoon poppy seeds
1 1/2 tablespoons yellow mustard
1 tablespoon minced onion
1/2 teaspoon Worcestershire sauce

Directions:
Preheat oven to 350 degrees F and lightly spray a baking dish with cooking spray. Split each roll and spread on a nice layer of mayonnaise (I love mayonnaise on melts, so my layer was thick). Stuff each roll with a slice of ham and the slice of Swiss cheese (I tore larger slices into fourths to make them fit and then poked all four pieces into each roll). Pack these stuffed rolls in close together in a large baking dish.

In a small bowl, whisk together the melted butter, poppy seeds, mustard, onion, and Worcestershire sauce. Pour this sauce evenly over all the sandwiches until they’re all coated (the original recipe notes that you don’t have to use all the sauce, but I did — maybe my rolls were bigger.) Let these sit for around 10 minutes until the butter starts to set up. Cover your baking dish with foil and bake the sliders for 12-15 minutes or until nice and melty. Uncover and bake them for 2 minutes more to toast up the tops. Serve warm and gooey from the oven.

If you liked this post, please:
Subscribe to Willow Bird Baking
Follow Willow Bird Baking on Twitter
Follow Willow Bird Baking on Facebook
Give this post a thumbs up on StumbleUpon
Pin It

Cheeseburger Bāozi (Steamed Cheeseburger Stuffed Buns)

Right or straight? Go straight, go straight, go straight — Ahhh, man. Right.

My frantic inner dialogue seemed to have very little to do with the car’s trajectory as my dad drove us away from church each week. If we turned right, we were on our way home to make a reasonable lunch in our small galley kitchen. If we went straight, though, we were on our way to those beautiful golden arches, where I would order a #4 off the combo menu and immediately begin stuffing hot fries into my face. Later, at home, I would crunch into the crispy chicken sandwich slathered with mayonnaise and topped with crisp lettuce — the crisper the better!

(Funny side story: I first ordered a #4 because of my obsessive compulsive love of the number 4 — stop looking at me like that — and it just so happened I also really enjoyed the meal.)

Those after-church trips to the drive-thru window are one of my earliest memories of fast food, but I’ve always enjoyed it. I can’t imagine ever being one of those people who crinkles their nose in disgust at the mention of fast food. Okay, it’s fatty and chemically. But let’s be honest: that stuff is good.

Beef & cheddars! Curly fries! Chicken biscuits! Those weird little hand pies! McCrunchy Deluxes! Okay, I made that one up. Anyway, the point is, yum.

Don’t get me wrong; I hardly ever eat it anymore. Despite how it may seem, I make careful food choices and only indulge in “bad for you” food in moderation. I eat healthy soups and veggies and oatmeal during the week. I drive determinedly past every single Arby’s. I order only a fountain drink at Chick-Fil-A, turning pointedly away from the menu full of nuggety goodness. You’re probably the same way. So I have a present for you:

Faux Fast Food.

Instead of grabbing a burger at the drive-thru, why not make a drive-thru worthy meal where you control the ingredients and nutrition stats? How about some cute little cheeseburger steamed buns, complete with burger dipping sauce? I’ve been dreaming of this recipe since I saw Julia’s vegan Big Mac Steamed Buns over at her fantastic blog, No Face Plate. Granted, this meal will take a little longer than zipping by for a couple of bacon cheeseburgers, but it’s also a lot of fun to make. If you have the luxury of some time, a few ingredients, and a sense of humor, I think you’ll really enjoy it.


Comparing two different bao doughs — look how much fluffier the one on the right is! That’s the one in the recipe below.

I did some legwork and experimenting and found you the fluffiest bao dough (look at the difference in the above comparison!) Grab your favorite burger recipe and adapt it to yield 12 mini patties. Make sure they’re well-seasoned, stick ’em in your bao dough, and steam ’em up! I can imagine kids would be over the moon for these little “burger pouches.” Enjoy!

How do you feel about fast food?

Cheeseburger Bāozi (Steamed Cheeseburger Stuffed Buns)


Recipe by: Willow Bird Baking with bun recipe adapted from Rasa Malaysia and burger sauce adapted from America’s Test Kitchen. This recipe inspired by Julia’s vegan Big Mac Steamed Buns at No Face Plate.
Yield: 12 buns

Sure, you could make burgers and put ’em on a regular bun. But why would you do that when you could stick them in these slightly sweet, cloudlike steamed buns? I love steamed buns more than is probably reasonable, so I’m in the process of stuffing anything and everything into them. This recipe takes a well-seasoned burger patty and some toppings and makes them portable, delicious, and fun. Make sure to start with a great burger recipe, because it’ll be the main flavor in your dish.

Bun Ingredients:
8 grams active dry yeast
160 milliliters lukewarm water
½ teaspoon white vinegar
280 grams low-protein flour (Hong Kong Flour or Cake Flour)
100 grams wheat or potato starch (I used potato)
100 grams icing sugar
30 grams shortening
10 grams baking powder
10 milliliters cold water
sesame seeds

your favorite cheeseburger recipe, made into mini patties (may I suggest this one?)
cheese slices
Roma tomato slices

Optional Burger Sauce Ingredients:
2 tablespoons mayonnaise
1 tablespoon ketchup
1/2 teaspoon sweet pickle relish
1/2 teaspoons sugar
1/2 teaspoon white vinegar
1/4 teaspoon ground black pepper

Directions:
NOTES: I measured the bun ingredients by weight for accuracy. You can convert them to imperial measures using an online calculator, but I’d use weights if you can.

Make burgers: Prepare your favorite burger recipe (adapted to yield about 12 mini patties), making each mini patty about 1-2 inches in diameter. Make sure your burgers are tasty and well-seasoned, because they’ll be the main flavor in this dish! Go ahead and cook your patties according to your burger recipe, placing cheese on near the end.

Make bāozi: Sift together the flour, wheat or potato starch, and powdered sugar into a mixing bowl. Make a well in the center and gently combine the yeast, vinegar, and warm water in the well. Let this sit and proof for around 10 minutes before slowly mixing in the surrounding flour mixture bit by bit, forming a dough. Add in the shortening and then knead (on a KitchenAid mixer at about speed 4-6, knead for about 4 minutes; by hand, knead for about 10 minutes) until the dough is smooth and elastic. It shouldn’t be sticky to the touch.

Transfer the dough to a bowl lightly coated with vegetable oil. Cover it with a damp cloth and place it somewhere warm to rise (I always put mine into an oven that has been warmed for a few minutes and then left open to drop to just above room temperature) for 30 minutes. I never noticed too much rise, so don’t worry if it doesn’t seem like a huge difference.

After 30 minutes, dissolve the baking powder completely in the water and sprinkle this mixture over the bao dough. Knead it in to fully combine it (I used the dough to mop up any of the mixture that was still on the bowl and kneaded it in well — an uneven distribution of baking powder can cause discoloration of your buns). Recover the dough and let it rest for 10 more minutes.

Fill and shape your buns: Turn the dough out onto wax paper and pat it into an even width. Use a dough cutter or sharp knife to divide it into 12 roughly equal sections. Take one section and gently roll it out to about 1/4 inch thick with a rolling pin (I keep the sections I’m not working with covered with a damp cloth so they don’t dry out.) Holding the dough in your non-dominant hand, place a mini burger patty, a slice of cheese, and a slice of tomato in the center and carefully pleat the edges of the dough together at the top, turning the bun as you work, until it is fully closed (see this video for a demonstration of to shape the buns). Place each bun on a square of wax or parchment paper. Brush the top lightly with water and sprinkle on sesame seeds.

Steam your buns: Preheat your steamer by boiling water and a teaspoon of vinegar over medium-high heat in a saucepan with your steamer on top (here’s a photo of how your steamer setup should look). Preheating the steamer ensures your buns will fully rise. Once it’s steaming, place buns in each tier (being careful not to crowd them), spray them with a bit of water (this help ensure a smooth surface), and close the steamer. Cook for 12 minutes without opening the lid. Remove the buns to a cooling rack to let them cool slightly.

Make burger sauce: Mix all sauce ingredients together. Serve buns warm with burger sauce, or ketchup and mustard.

If you liked this post, please:
Subscribe to Willow Bird Baking
Follow Willow Bird Baking on Twitter
Follow Willow Bird Baking on Facebook
Give this post a thumbs up on StumbleUpon
Pin It


Shareother ways to share this post with friends

Super Bowl Munchies from Willow Bird Baking

I love football, but I don’t have cable (or, uh, a television), so I never get to watch it. This is especially sad because one of my sisters is a Carolina Panthers cheerleader; I have to wait for people to post clips on Facebook to see her cheer! (She was even — sorry, proud sister moment — chosen to cheer at the Pro Bowl, so you may have seen her rocking out in Hawaii recently! I’ll post a photo from the Pro Bowl on Willow Bird Baking’s Facebook page for you to see.)

This year, the Super Bowl is going to be a fun exception to my football famine, because my Sunday school class is having a party. I’ve promised to bring lots of goodies (even though I still haven’t decided which team to pull for — suggestions?)

If you’re still planning your menu, here are some winning ideas:

1. Three Safe-to-Eat Cookie Doughs: Chocolate Chip, Sugar, and Cake Batter!
2. Quick and Easy Beer Bread (great for grilled cheeses!)
3. Gooey Cookies & Cream Bars
4. Easy Sopapilla Pumpkin Cheesecake Bars


5. Deep Fried Cake Batter Cookie Dough
6. Oreo or Red Velvet Truffles
7. Deep Dish Pizza Cupfakes
8. Southern Pimento Cheese with Lavash Crackers


9. Soft Pretzel Dogs (like Auntie Anne’s!)
10. Cake Batter Cookie Dough Truffles
11. Lemon Blueberry Cheesecake Squares
12. Chili-Lime Roasted Chickpeas


13. Easy Taco Stuffed Crescent Rolls
14. Fancy Roast Beef Sliders


If you liked this post, please:
Subscribe to Willow Bird Baking
Follow Willow Bird Baking on Twitter
Follow Willow Bird Baking on Facebook
Give this post a thumbs up on StumbleUpon
Pin It


ShareOther ways to share this post with friends!

1 7 8 9 10 11 16