My mom trudged through four years of college with four kids to earn her nursing degree (and graduated magna cum laude, she will promptly — and repeatedly — inform you).
Her job as a nurse left her with little time or energy to spend on being an extraordinary entertainer, something she’s always had an innate talent for. One day as a small girl, though, I went to forage in the kitchen and found her frantically frying doughnuts.

There was literally a multi-tiered tower of doughnuts on the kitchen table. There were more doughnuts bouncing around in hot oil on the stove. There were pale, puffy rings on the counter waiting for their turn in the stock pot.
And then there was little Julie in the middle of the madness — and I was all about eating some doughnuts.
Mom immediately shattered my doughnut devouring dreams, though, explaining that her friends from work were on their way to discuss some adultish, worky things, and that the doughnuts were for them. I had thoughts of launching an all-out siege à la Hyperbole and a Half, but managed to control myself.
When the ladies arrived, Mom was somehow curled and coiffed, standing in a clean kitchen, and wearing a cute outfit. The tower of doughnuts beckoned enthusiastically from the table as she invited each of her friends to sit and poured them coffee. I watched in eager anticipation, certain they were about to notice the doughnuts and react with appropriate awe.
But they didn’t.
No worries. My mom would offer them the doughnuts in a moment, and they were probably just waiting on that polite social cue to reveal their utter amazement. Sure enough, she gestured toward one of tiers resplendent with multicolored rings, saying, “Would you like a doughnut?” But the unthinkable happened.
“Oh, no thanks.”

That’s right. Those ladies did not eat a single doughnut. They were dieting, or they weren’t hungry, or some such something.
My mom carried on warm conversation, refilling their coffee like nothing had happened. Like fresh homemade doughnuts just appeared on her kitchen table any old day! Like she hadn’t just spent literally hours making them from scratch!
At 7 or 8 years old, I was not so deft a hostess. I sort of wanted to grab one of those ladies by both shoulders and give her a good shaking, screaming, “SHE MADE YOU HOMEMADE DOUGHNUTS, WOMAN!” I had seen Mom’s hours of hard work, and I was heartbroken for her.

The ladies left before too long, having accomplished their adulty, workish business, and the doughnuts still sat undisturbed on the table. I could tell Mom was sad about it, despite my assurances that I would both eat and enjoy every last one.
Seriously, who turns down a homemade doughnut?! In fact, who turns down ANY version of a yeast doughnut?! (Those cakey things are another story altogether; you’ll have to forgive my obvious bias.)
Indeed, Mike’s mom told me a story years ago about when she was in school. She and her friends would wait for the “Hot Doughnuts Now” sign to come on at the nearby Krispy Kreme, drive over, and eat a dozen doughnuts each. That’s the power of a yeast doughnut. (And youthful metabolism).

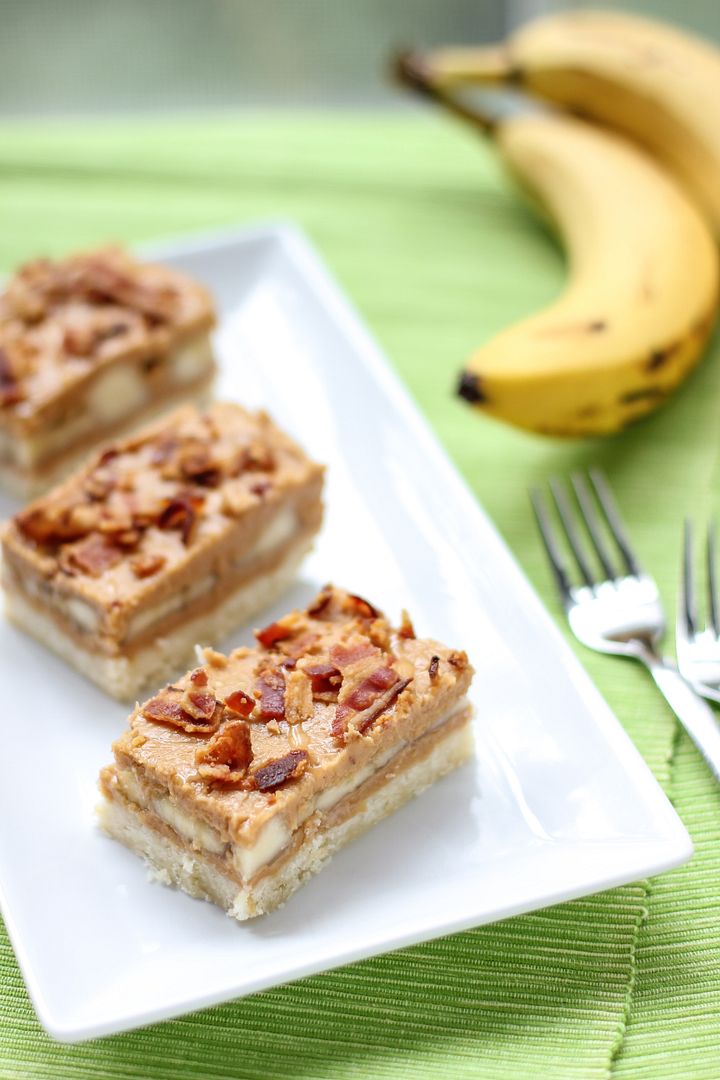
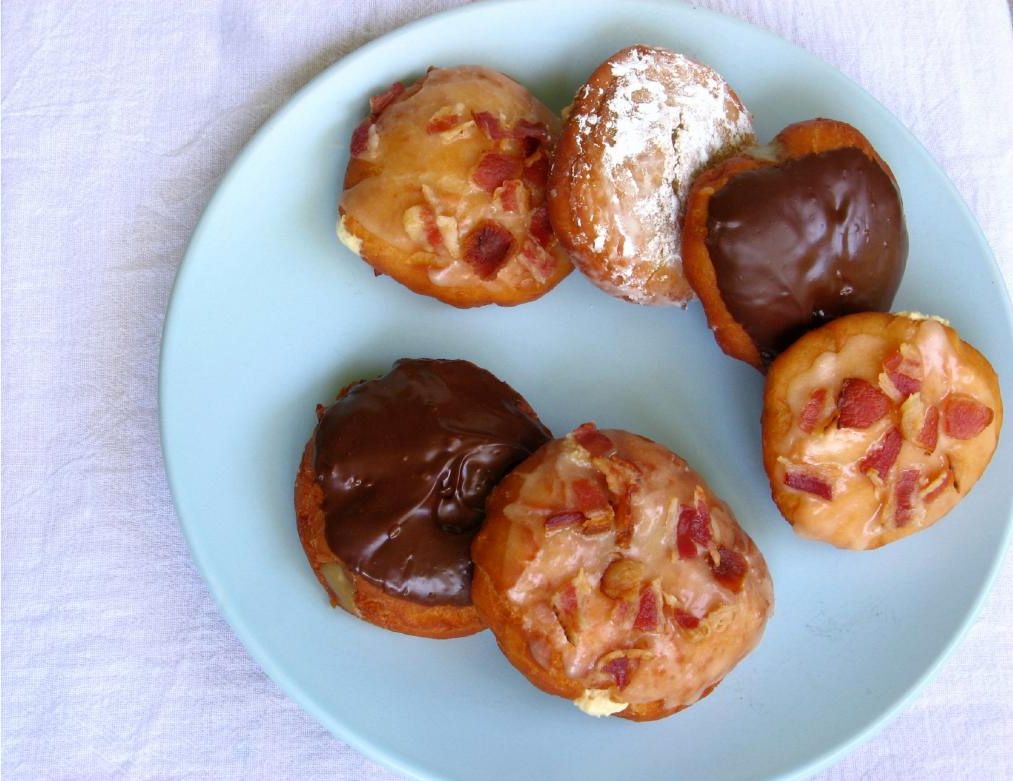
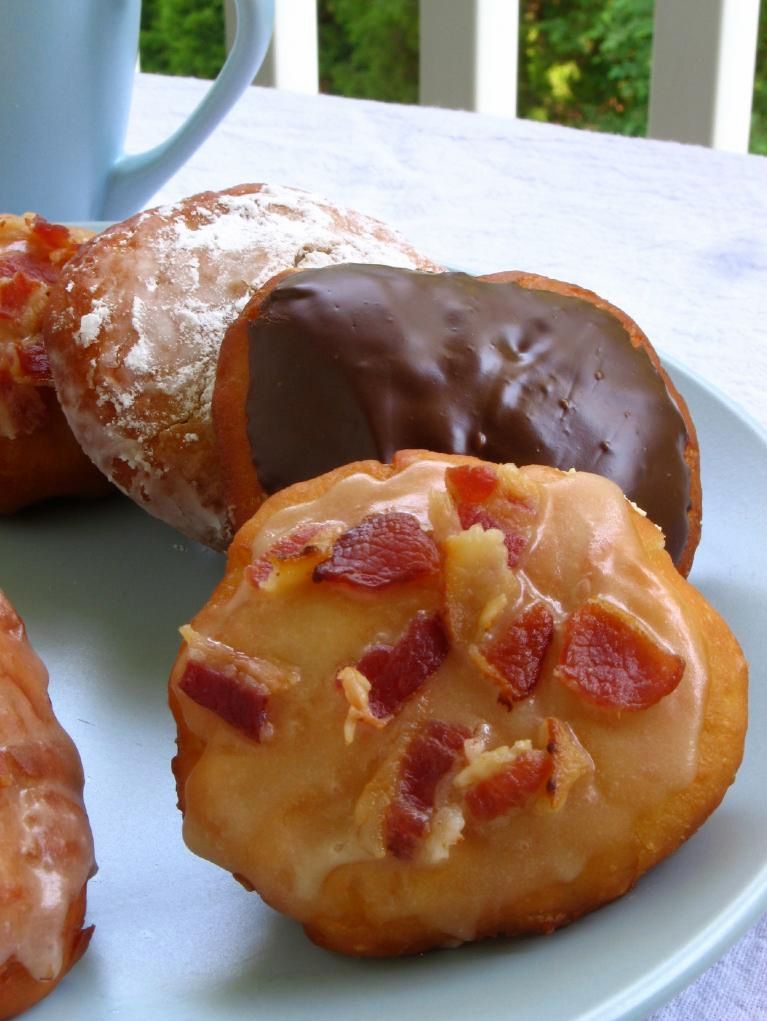
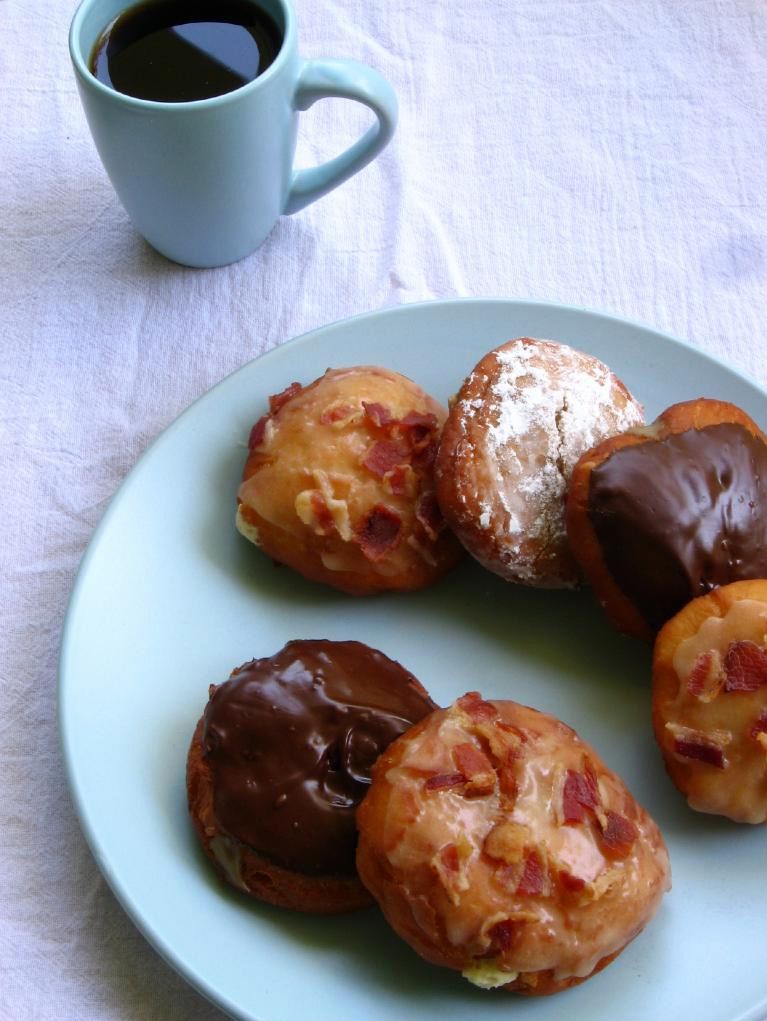
Well, in honor of my mother and doughnut lovers everywhere, I made a variety of filled doughnuts last weekend. I’m still tweaking my super secret version — and will share it soon, along with a great little trick for using yeast dough scraps — but this flavor combination I found on Cherry Tea Cakes had me immediately intrigued. Maple Bacon Doughnuts!
They don’t just sound amazing; they are amazing! And even though it may seem like a trendy flavor combination, these are not simply novelty doughnuts — they taste flippin’ awesome. They’re pillows of salty-sweet, doughnut-pancake, breakfast-dessert heaven. I feel like I should be confused, but I’m not. I just want another one.
While we’re talking doughnuts, we might as well jump in the fray: Are you a cake doughnut or yeast doughnut person?
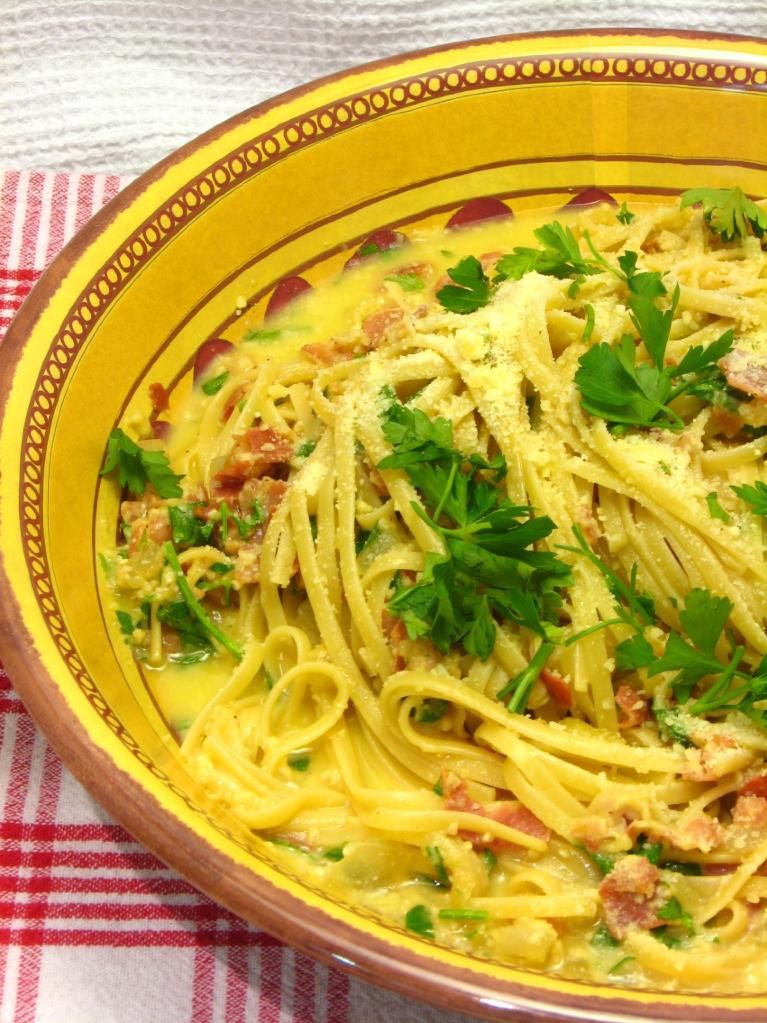
Maple Bacon Doughnuts
Recipe by: Adapted from Cherry Tea Cakes
Yield: about 12 3-inch doughnuts
Doughnut Ingredients:
1 0.25-ounce package yeast
2 tablespoons hot water, roughly 110 degrees in temperature
3/4 cups milk, scalded (heated to a slight simmer-not a boil) and cooled
1/4 cup sugar
1/2 teaspoon kosher salt
1 egg
2 tablespoons and 2 teaspoons shortening
2 1/2 cups all-purpose flour
vegetable oil for frying
Maple Mousse Filling Ingredients:
1/2 cup pure maple syrup
2 large egg yolks
1 1/4 teaspoon unflavored gelatin
3/4 cup whipping cream
Maple Glaze Ingredients:
2 tablespoons plus 2 teaspoons bacon grease/melted butter
1 cups powdered sugar
5-6 tablespoons maple syrup
about 1/2 pound bacon, for topping
Directions: Make the doughnut dough: Dissolve the yeast in warm water in the bowl of your stand mixer, and then let it sit for about 5 minutes. The yeast should foam to show that it’s active. Beat in milk, sugar, salt, eggs, shortening, and 1 cup flour (scraping down bowl when needed). Beat on medium speed for 2 minutes to fully combine. Mix in remaining flour completely. Cover this dough and let it rise in a draft-free place (I warm my oven for a few seconds on 200 degrees just to get the chill out — make sure it’s not hot! — and then put my dough in there to rise) until doubled, about 50-60 minutes.
Make the Maple Mousse: While the dough is rising, bring maple syrup to a boil over medium-high heat. In a separate bowl, whisk together egg yolks. Pour about 1/4 cup of the hot maple syrup into the egg yolks, whisking constantly, to temper them and be sure they won’t cook from the heat. Then whisk the egg yolks into the maple syrup. Whisk constantly until the mixture reaches about 170 degrees F on a candy thermometer. In a separate bowl, measure out 1/4 cup of the whipping cream and sprinkle the gelatin over it to soften. Let it sit for about 5 minutes before mixing a couple of tablespoons of the warm syrup mixture in and stirring to dissolve the gelatin. You can heat for 10 seconds at a time, stirring between each, to ensure the gelatin is dissolved. Whisk this mixture into the syrup mixture, and then whisk it occasionally for the next hour while it cools.
Beat the remaining cream to soft peaks. Stir about a third of it into your now-cool maple syrup mixture to lighten it, and then gently fold the remaining cream into it. Refrigerate for at least an hour while you complete the rest of the components.
Make your doughnuts: Flour a surface well and turn your doughnut dough out onto it, flouring the dough as well. Gently roll the dough out to 1/2-inch thick and cut into solid rounds with a 3-inch cooking cutter. Place each round on a baking sheet and let these rise until doubled, about 30-45 minutes. About 25 minutes into their rise time, start heating your oil in a heavy, deep stock pot to 350 degrees F on a candy/fry thermometer.
Cook bacon topping: Preheat oven to 400 degrees (only once your doughnuts aren’t in there rising!) Cover a baking sheet with aluminum foil and lay your bacon slices out side by side. Bake for 15-20 minutes or until crisp. Remove bacon to a paper towel lined plate, reserving the bacon grease in a small bowl. When cool, crumble bacon up.
Fry your doughnuts: Gently lower 2-3 doughnuts at a time into hot oil with a slotted spoon. Fry about 1 minute on each side or until golden brown. Remove to a paper towel lined plate to drain.
Make the Maple Bacon Glaze: Add enough melted butter to your bacon grease to make it 2 tablespoons and 2 teaspoons worth. Whisk this together with the confectioner’s sugar until combined. Add maple syrup one tablespoon at a time until you reach desired consistency. Set aside.
Assemble doughnuts: Use a chopstick or butter knife to poke into each doughnut and “sweep” gently to create a pocket. Pipe mousse into each doughnut using a piping bag. Then dip them in the glaze and sprinkle cooked bacon on top. Best eaten the same day.
If you liked this post, please:
–Subscribe to Willow Bird Baking
–Follow Willow Bird Baking on Twitter
–Follow Willow Bird Baking on Facebook
–Give this post a thumbs up on StumbleUpon
 Other ways to share this post with friends!