Pumpkin Spice Pull-Apart Bread with Butter Rum Glaze

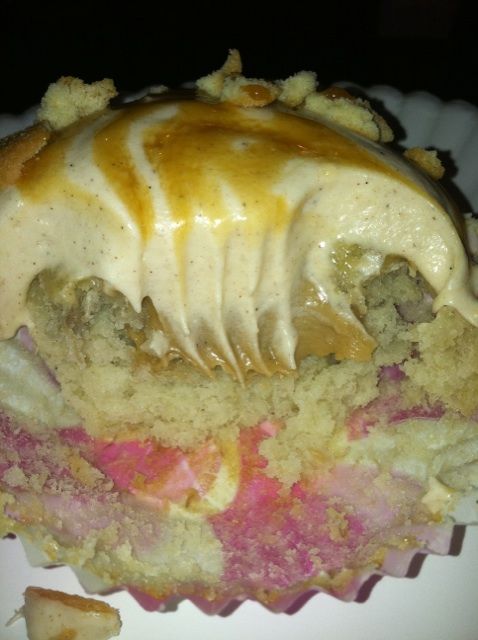
So I’m currently joining the rest of the blogosphere in doing a happy dance and singing, “Pumpkinnnnnnnn!”

Before I gush about this Pumpkin Spice Pull-Apart Bread, though, I have to tell you about my other Pumpkin: my little pumpkin-wumpkin fluffypants.


…no fluffypants, here.

Pets make people weird. One day you’re a normal, reasonable adult that people can take seriously. Then you get a pet.

Suddenly you’re schnookie-wookums-ing, buying them furniture that is bigger and more expensive than your own, dressing them up in Santa hats for the annual Christmas card, and giving them their own theme posts on your blog (Caturday is the best day!)

I’ve been a little weird from the beginning, so when I got my pets (Byrd the toy poodle and Squirt the red eared slider), all bets were off. Sure enough, a couple of years ago I got this idea. You’re going to make fun of me, so let’s just get this over with.

I decided to, um, commission a painting of my pets.


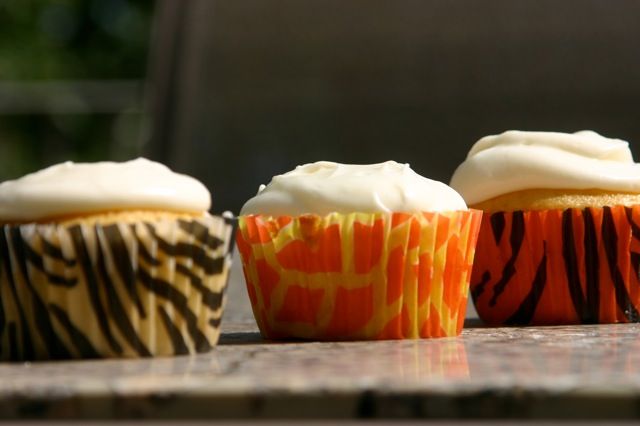
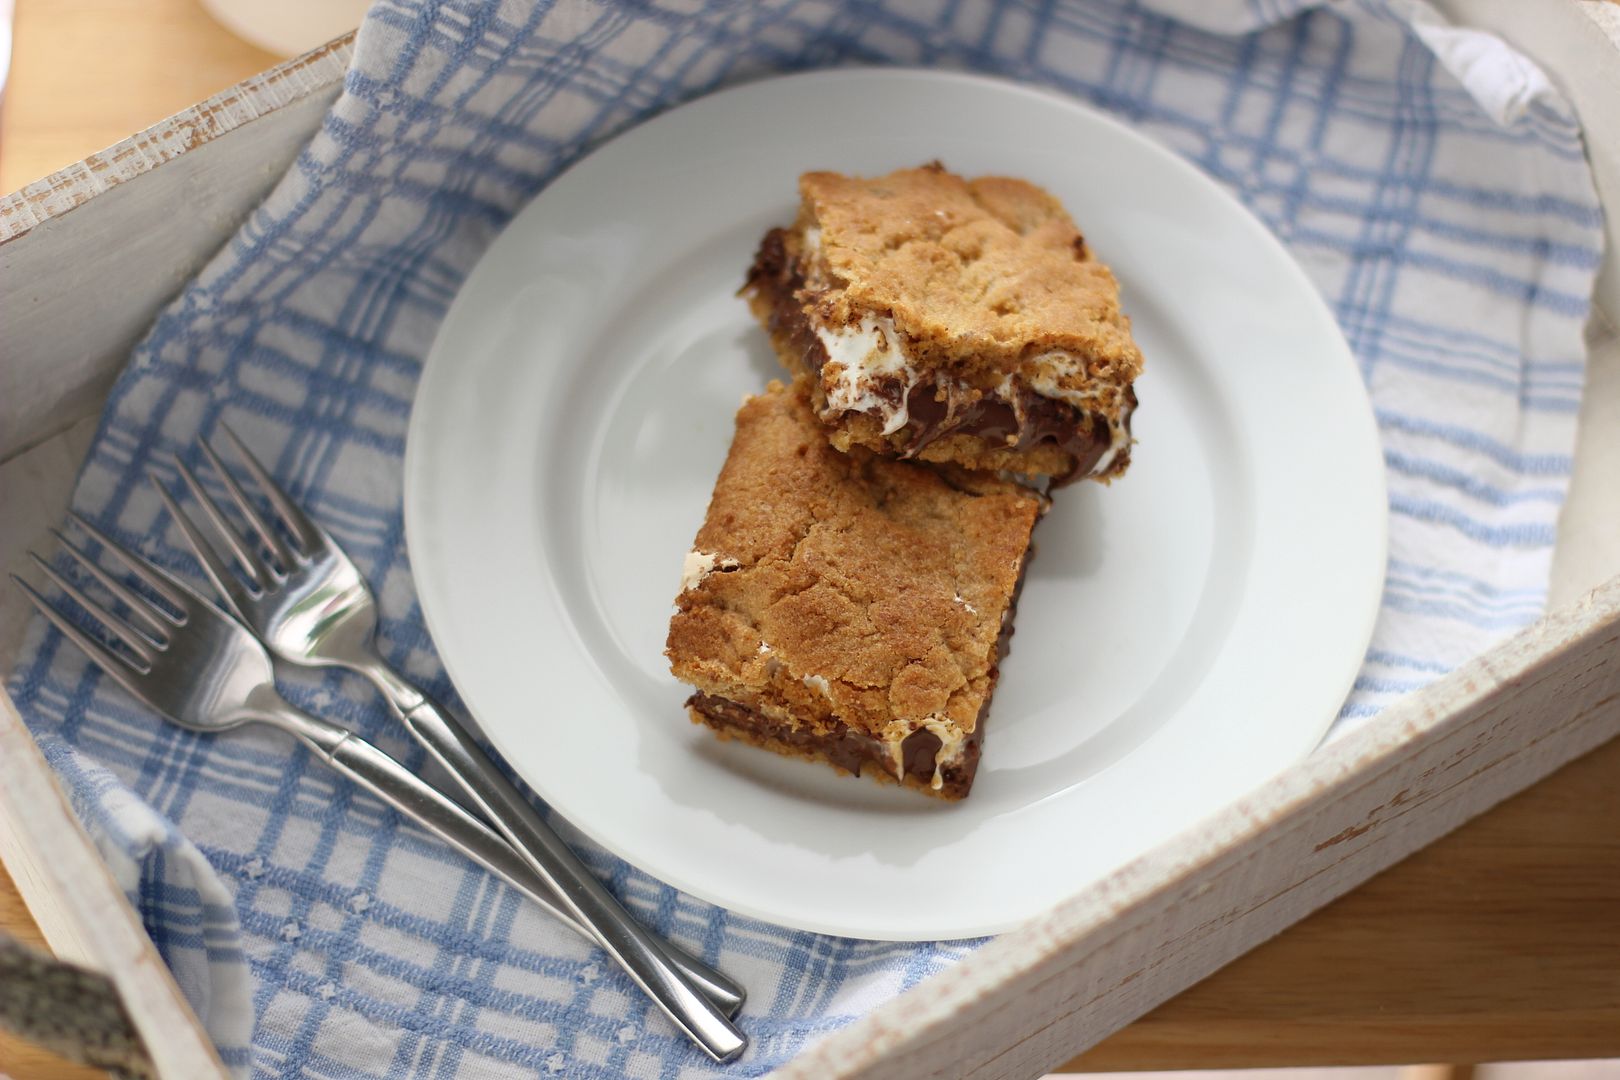
Here’s that pull-apart bread again to distract you from what I just said.

I would try to defend myself, but I know plenty of you are in the process of making a birthday cake for your cat or buying your dog one of these right now. You don’t have even a millimeter of room to talk. Ha!

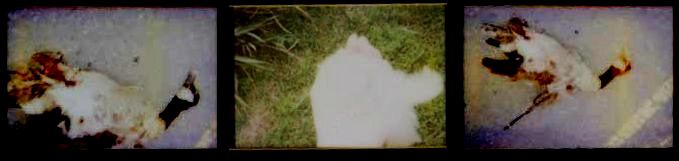
Anyway, the painting was going to be an ironic interpretation of Grant Wood’s American Gothic. It would have the same surreal quality, but look something like this:


Don’t worry, Squirt’s happy. He always frowns.

The painting unfortunately never came to fruition, but I got an email a couple of weeks ago that revived the dream. It was from Easy Canvas Prints, a company that transforms pictures to canvas. They asked if I might like to create a canvas from one of my photos and write up a review.

I often turn down product reviews because they don’t fit my vision for Willow Bird Baking (I could talk for hours about my philosophy on blog-brand relations and the role of bloggers in journalism and integrity, etc., but I’ll spare you). But when I’m asked to review a product I’m genuinely excited about, I have no problem giving it an honest try.


I want to give this an honest try, too. Or a dozen honest tries.

Easy Canvas Photos offered me a free small canvas print or a discount on a larger one to review. I chose to get a larger one and, though I seriously considered printing a big ol’ cheesecake on it, decided to finally create that pet portrait. Thankfully, my new camera had just been ordered and Byrd had a grooming appointment scheduled. Once she was coiffed, we had a little photo shoot.

Some of the photos were, um, less than canvas-worthy:


Really, Byrd? Really?!

We finally got a good one, though, and ordering my canvas took literally minutes. Once you choose a canvas size, you upload your photo. The site determines if it’s high enough quality for the canvas so you don’t have to wonder. You then choose how to have the canvas wrapped (you can get a solid color on the sides of the canvas, or let the image wrap around the edges — I chose the latter). And just like that, your work of art is finished.

When my canvas arrived in the mail, I was overjoyed with it. It’s high quality and downright adorable. If I weren’t just about as poor as a pile of dirt (and if I had infinite patience) I would put a bowtie on Squirt and take a billion photos (“FLIPPIN’ HOLD STILL AND WILL YOU GET YOUR HEAD OUT OF YOUR SHELL!!”) to make one of him, too. Maybe someday.

Want to see how it turned out?


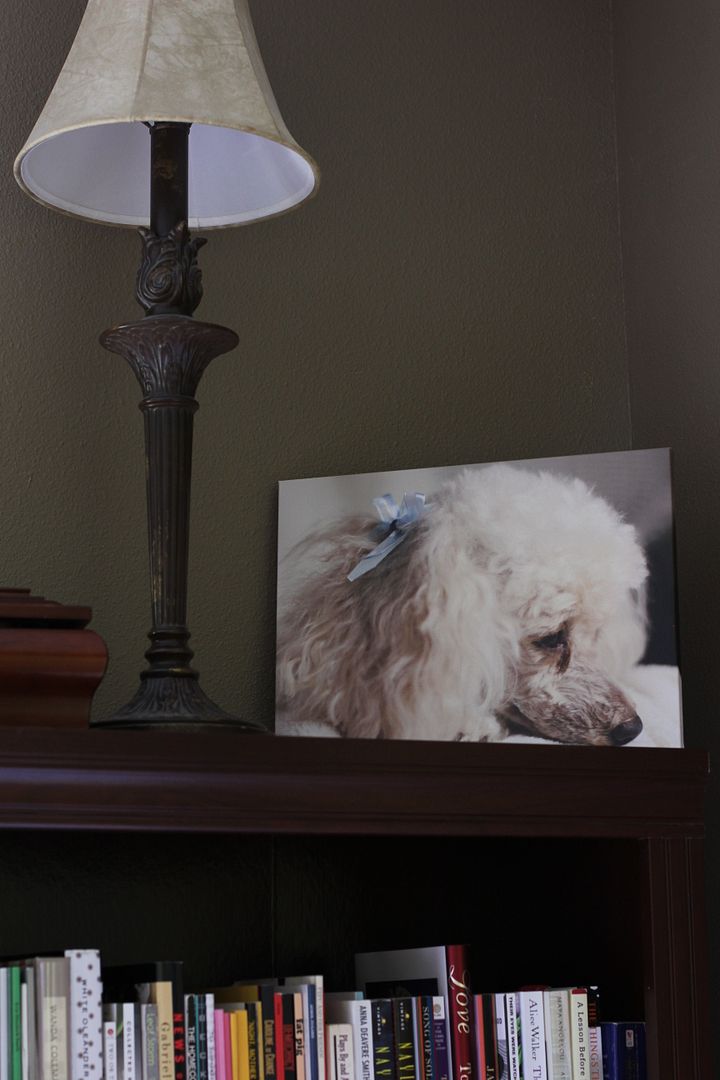
Awwww. Sweet haircut thanks to Tami at the Dog Salon.

In short, my experience with Easy Canvas Prints was a great one. It was an easy process with reasonable prices and a lovely result. I think you should go immortalize your pumpkin-wumpkin, too.

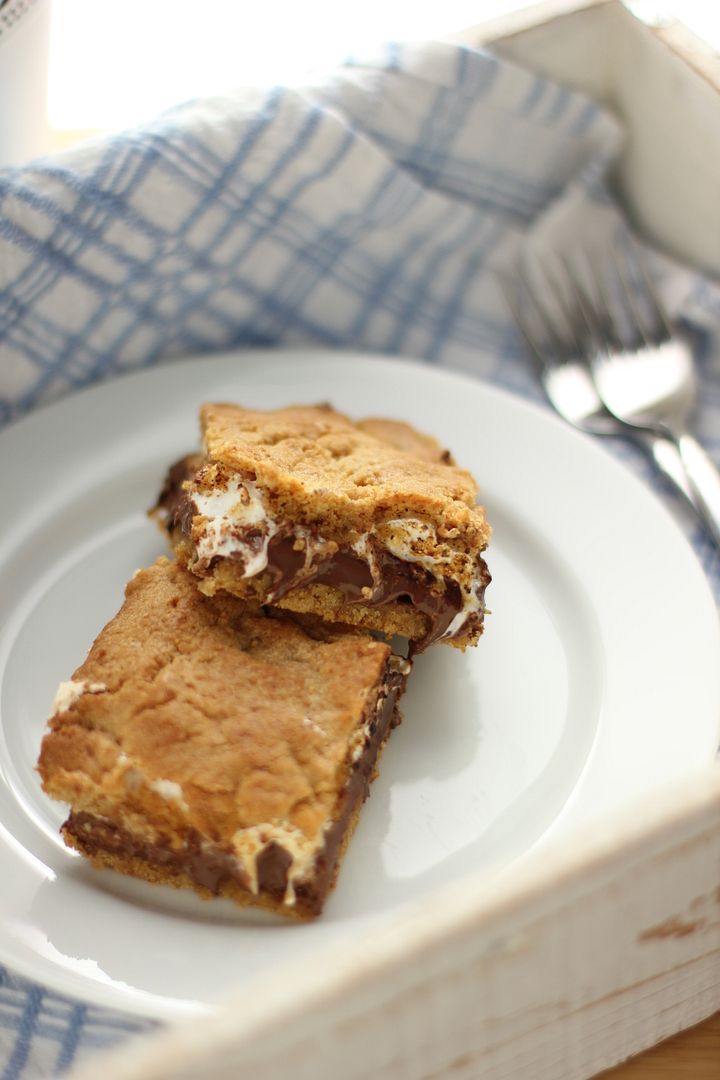
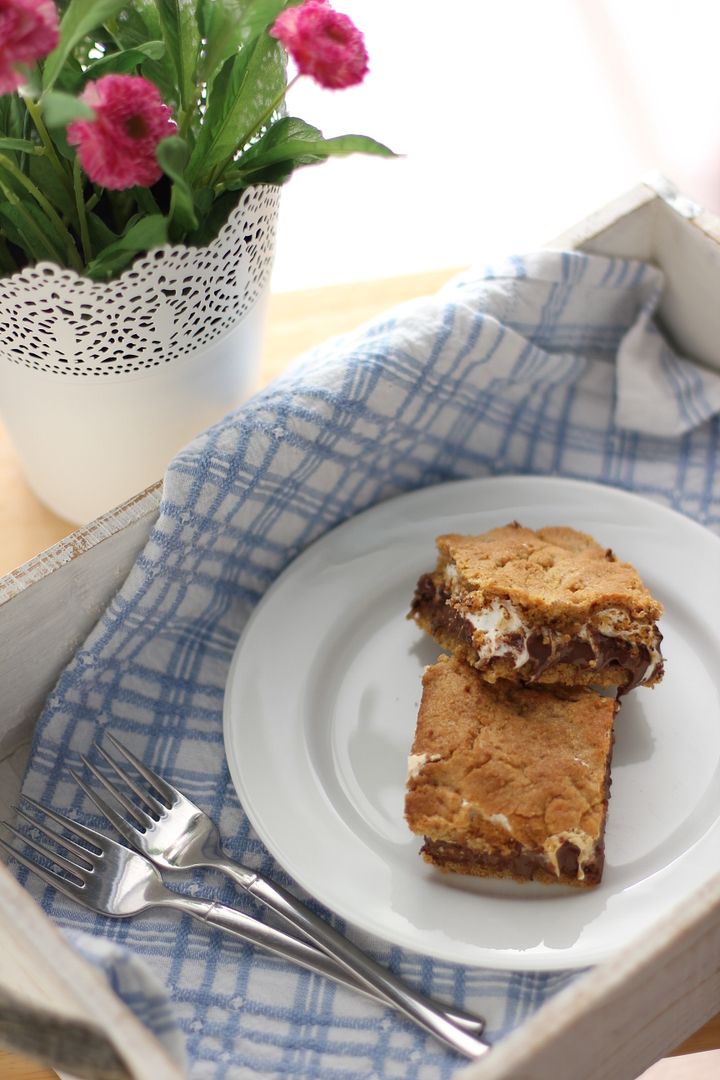
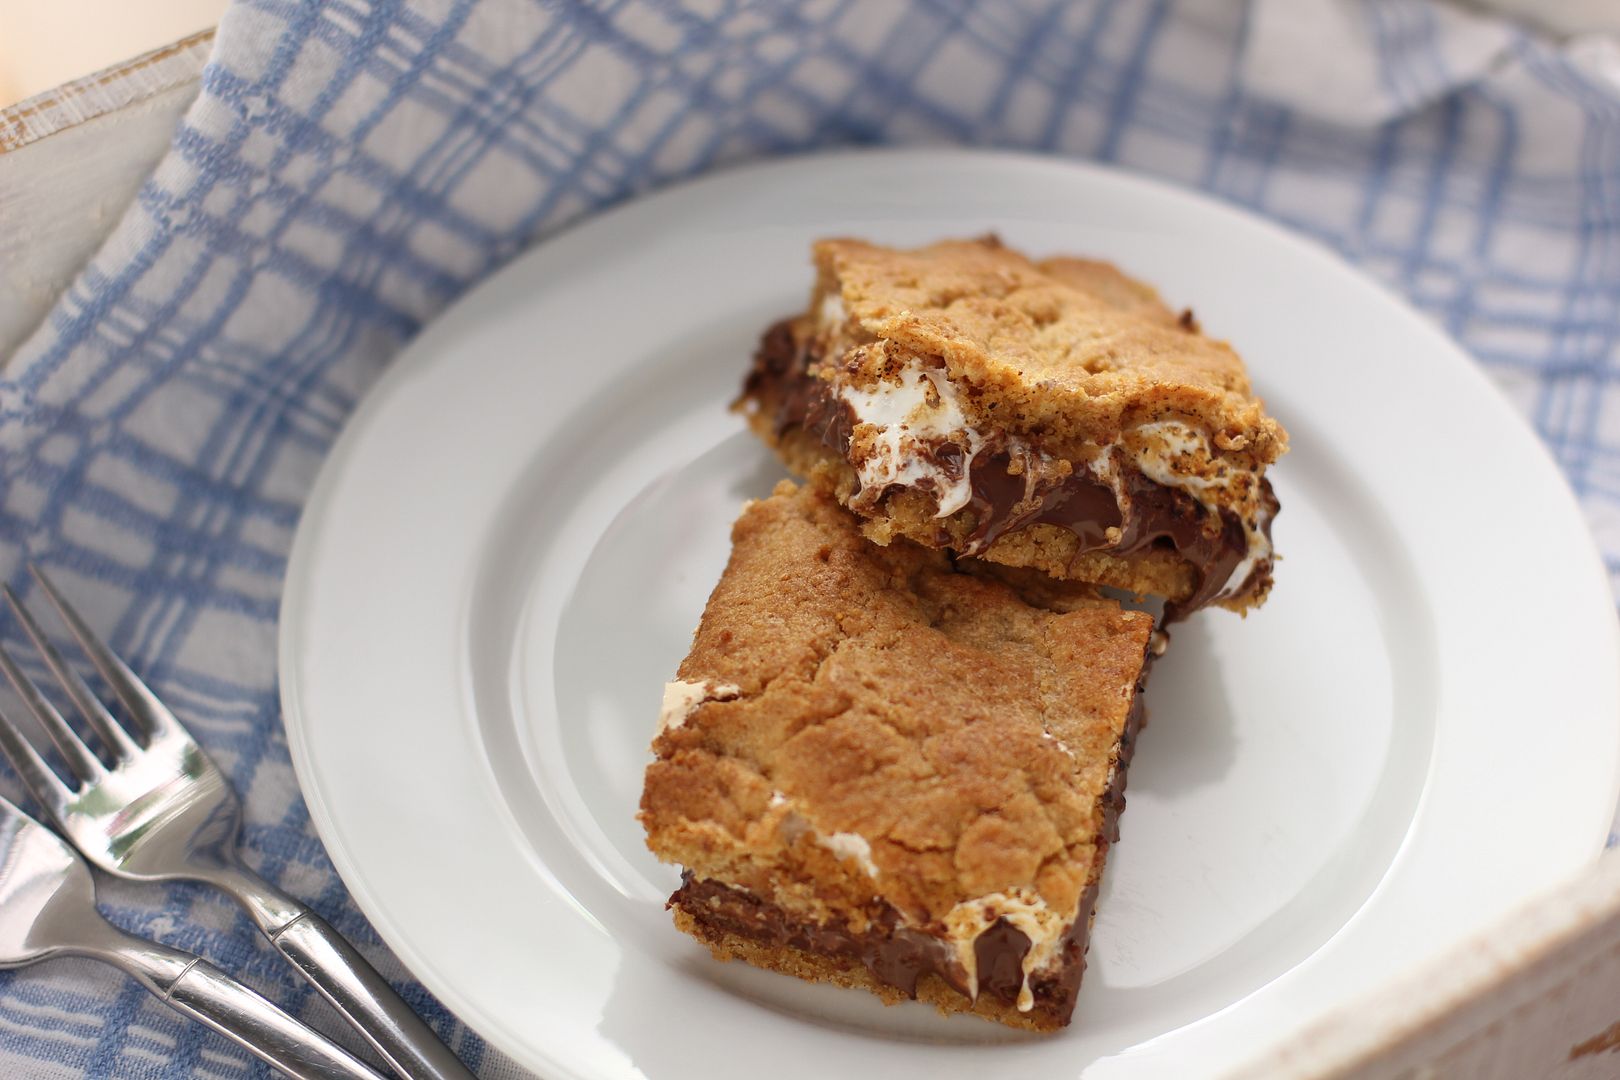
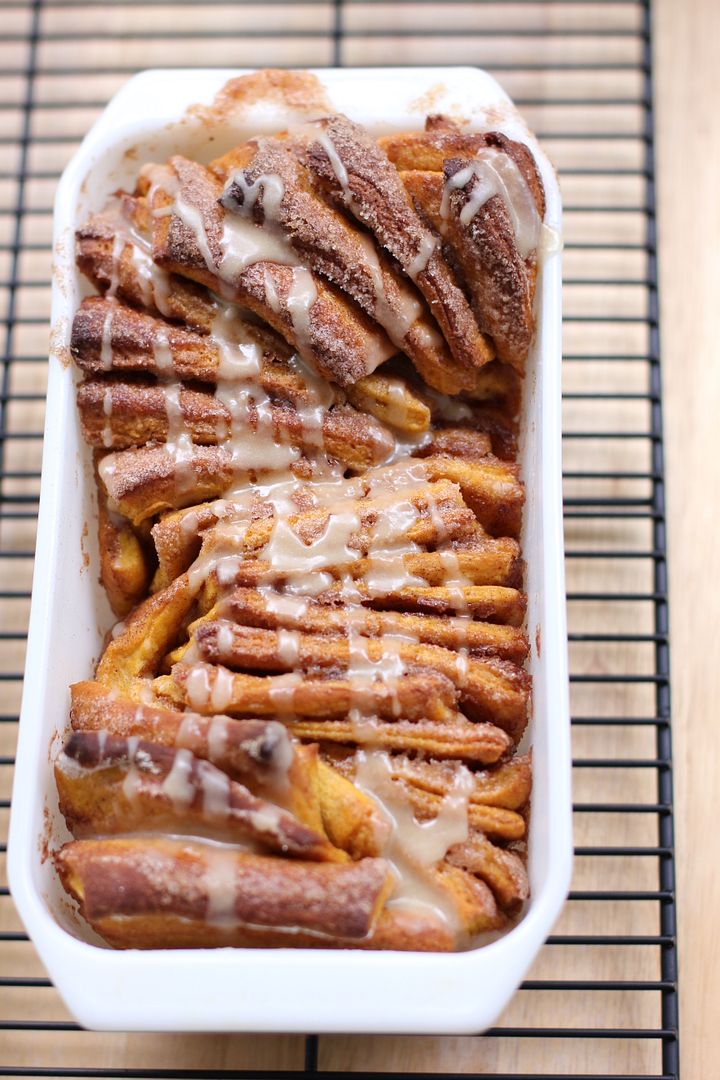
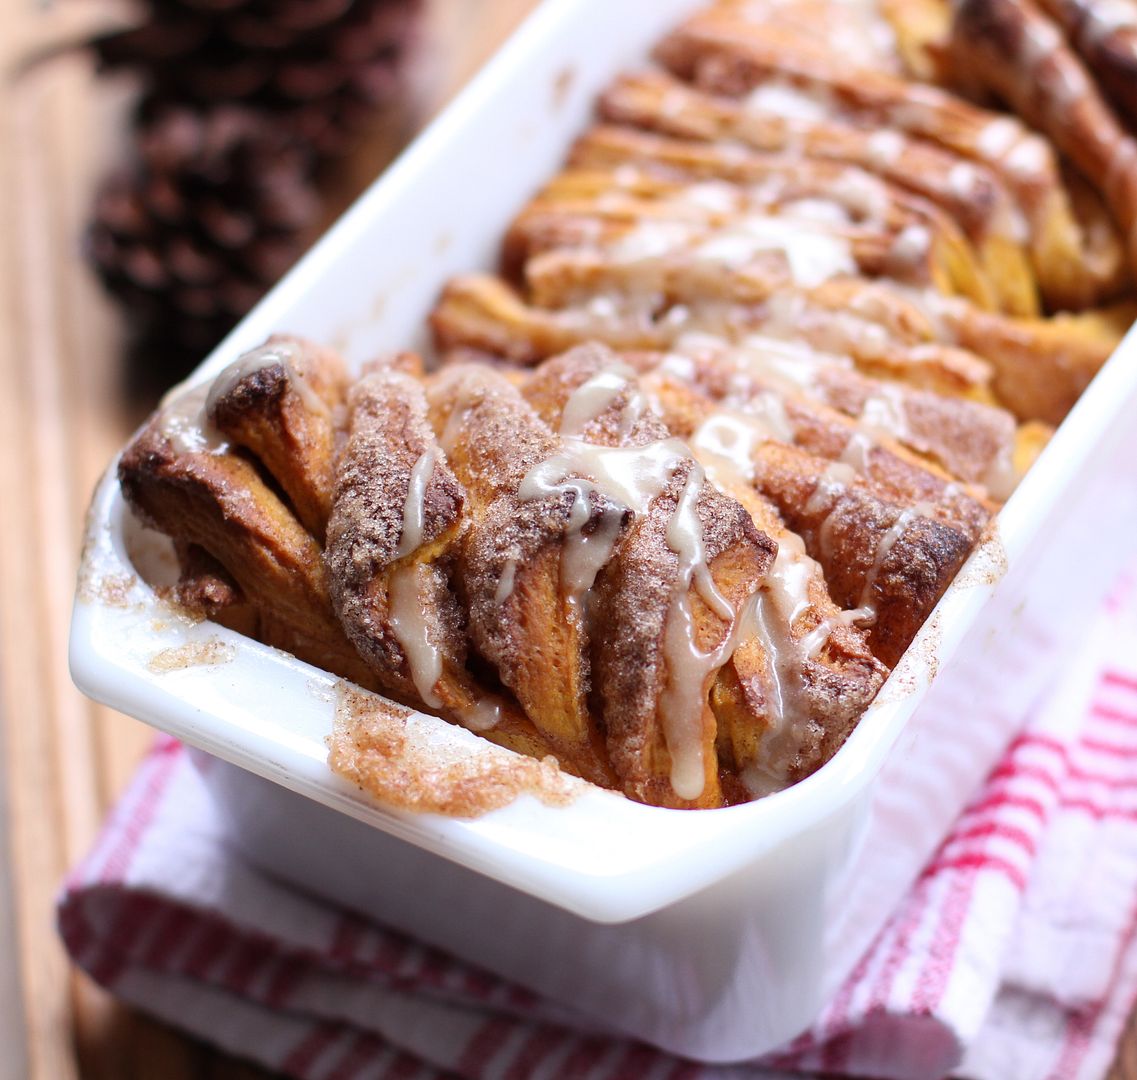
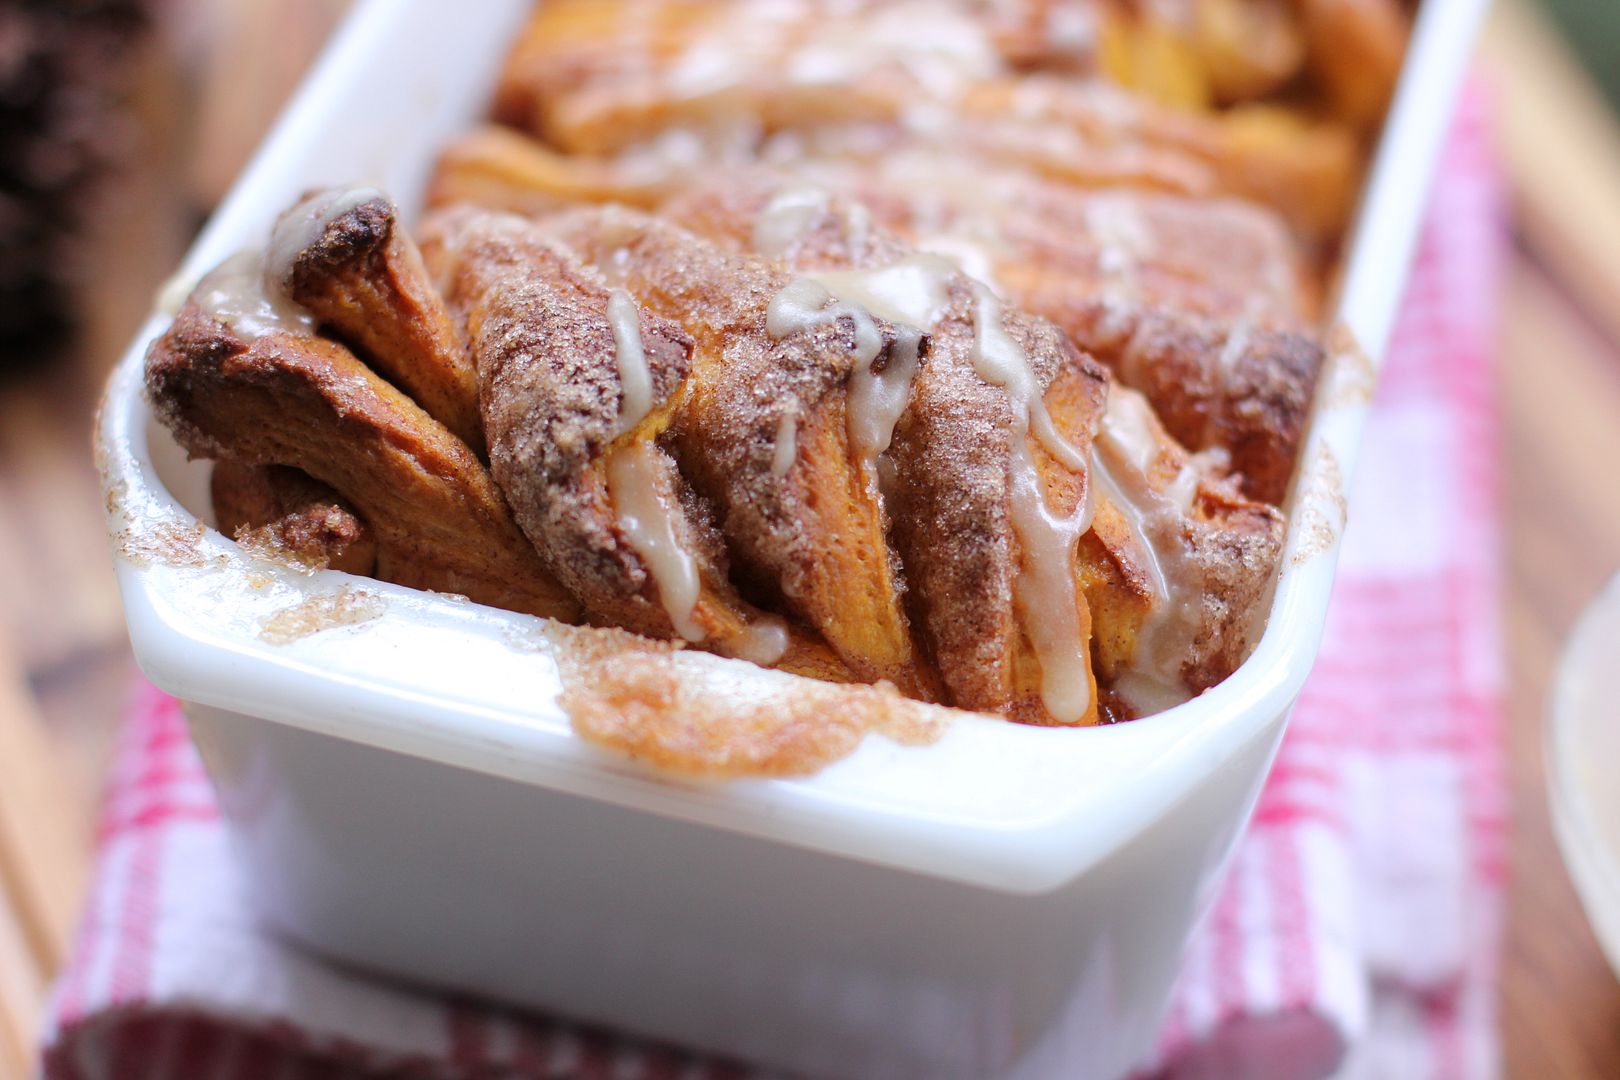
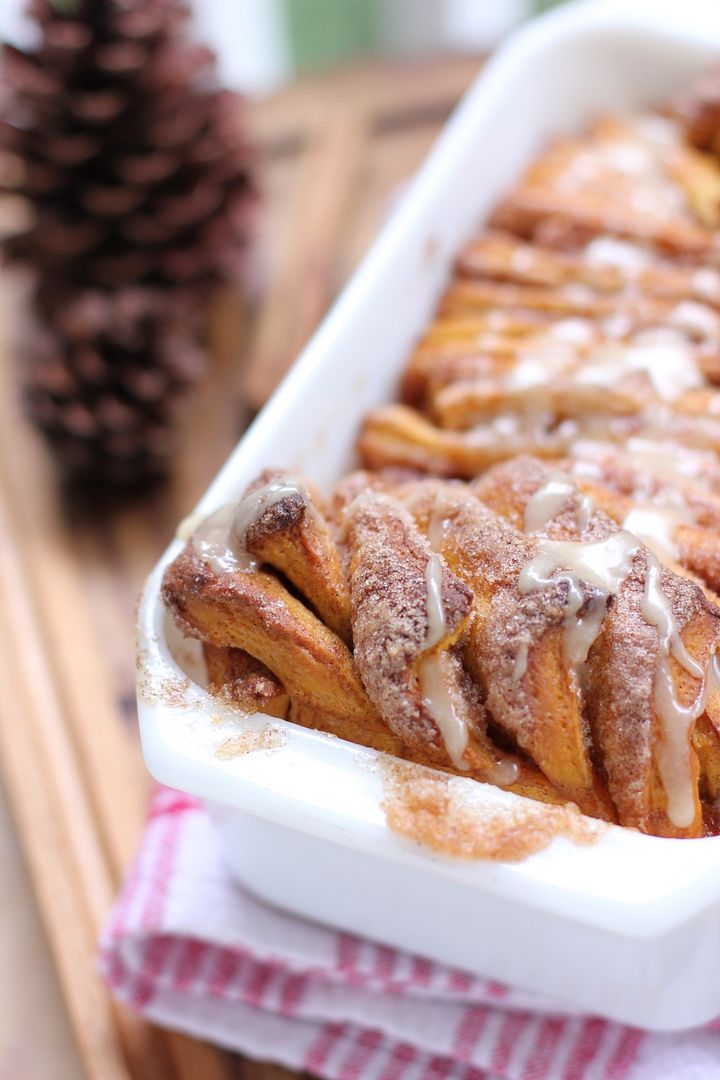
Now about that other pumpkin — Pumpkin Spice Pull-Apart Bread! Hopefully you’ve seen this lovely loaf being rebaked and reposted around other blogs, but Willow Bird Baking is the home of the original recipe. I cobbled it together from pumpkin yeast dough and cinnamon pull-apart bread recipes and had no idea if it would be the right texture or even come together at all. I’m so glad I had the courage to experiment, though, because it was phenomenal.

The aroma of yeast dough alone was enough to make it a success, but the sweet autumn flavors were the real victory. The buttery rum glaze complemented the mild pumpkin and cinnamon spice of the warm, tender yeast dough. The recipe takes a bit of time, but most of that is waiting for dough to rise — and of course the taste more than makes up for every minute of work.

Okay, spill it: What silly things have you done for your pets?

Pumpkin Spice Pull-Apart Bread with Butter Rum Glaze


Recipe by: Willow Bird Baking, adapted from All Recipes, Joy the Baker, and Pumpkin Tart
Yields: one loaf, about 8 servings
Prep Time: (including dough rising) about 3 hours

This sticky, sweet pumpkin pull-apart loaf is irresistible. It’s made from layers of fluffy pumpkin yeast dough coated with browned butter, cinnamon, sugar, and nutmeg. Let it cool until it has just a hint of warmth left, drizzle on some glaze, and enjoy — preferably with the windows open to let in a crisp autumn breeze. Oh, and by the way, this recipe makes use of a stand mixer fitted with a dough hook, but there’s no reason you can’t knead this dough by hand. It’ll just take a little longer (and a little more elbow grease).

Pumpkin Pull-Apart Bread Ingredients:
1/2 cup milk
3/4 cup pumpkin puree
1/4 cup white sugar
2 tablespoons unsalted butter
1 teaspoon salt
2 1/4 teaspoons (1 envelope) active dry yeast
2 1/2 cups bread flour

Filling Ingredients:
1 cup granulated sugar
2 teaspoons ground cinnamon
1/2 teaspoon fresh ground nutmeg
2 tablespoons unsalted butter

Butter Rum Glaze Ingredients:
2 tablespoons unsalted butter
1/8 cup brown sugar
1 tablespoon plus 1 1/2 teaspoons milk
1/2 cup powdered sugar
1/4 teaspoon rum (the original recipe called for extract, which I found too strong)

Directions:
Make the pull-apart bread dough: Grease and flour a loaf pan and set aside. In a saucepan over medium-high heat, brown the 2 tablespoons of butter. Let it bubble and foam and when you see it start to brown, stir it so that it browns evenly. When it’s the color of dark honey, remove it from the heat and pour it into a large heat-safe mixer bowl to cool. In the same saucepan over medium-low heat, warm the milk until it bubbles. Remove it from the heat and pour it into the bowl with the butter. Let these cool until they’re about 100-110 degrees F (use a candy thermometer to check). Set the saucepan aside for another use later. I use the same one throughout the entire recipe; why do more dishes?

Stir the sugar and yeast into the milk/butter mixture and let it sit for about 10 minutes to proof (it should foam; if it doesn’t, discard it and try again with new yeast). Stir in pumpkin, salt, and 1 cup flour. If you haven’t already, fit your mixer with a dough hook. Add the rest of the flour 1/2 cup at a time, stirring between each addition. When the dough is combined, knead on low speed with a dough hook until smooth and elastic (about 4 minutes with a mixer).

Place the dough in a greased bowl and cover it with a damp cloth. Let it rise in a warm place for about an hour until it doubles in size (After it rises, you can put it in the fridge overnight to use it in the morning, but let it sit out for half an hour before rolling if you do.)

Make the filling: While the dough is rising, whisk the sugar, cinnamon, and nutmeg together in a small bowl. Toward the end of the rising time, melt the 2 tablespoons of butter for the filling in the saucepan over medium-high heat and brown it as directed above. Put it in a small heat-safe bowl to cool for use later.

Shape and bake pull-apart bread: Knead a sprinkling of flour (about 1 tablespoon) into the dough, deflating it, and recover it. Let it sit to relax for 5 minutes. Flour a large work surface and turn your rested dough out onto it. Roll it out to a 20 inch long and 12 inch wide rectangle, lifting corners periodically to make sure it’s not sticking. If it seems to be snapping back, cover it with your damp towel and let it rest for 5 minutes before continuing (I had to do this twice during the process).

Spread the browned butter over the surface of the dough with a pastry brush and then sprinkle the sugar mixture over the top, patting it down to ensure it mostly sticks. Joy the Baker encourages you to use it all even though it seems like a ton, but I admit I got squeamish at the amount and only used most. It was fine despite my nerves. Go ahead and pile it on.

With the long edge of the rectangle toward you, cut it into 6 strips (do this by cutting the rectangle in half, then cutting each half into equal thirds. I used a pizza cutter). Stack these strips on top of one another and cut the resulting stack into 6 even portions (again, cut it in half, and then cut the halves into equal thirds). Place these portions one at a time into your greased loaf pan, pressing them up against each other to fit them all in. Cover the pan with your damp cloth and place it in a warm place for 30-45 minutes to double in size.

While dough rises, preheat oven to 350 degrees F (or 325 if you have a glass loaf dish instead of a metal pan). When it’s risen, place the loaf in the center of the oven and bake for 30-35 minutes until dark golden brown on top (if you take it out at light golden brown, it’s liable to be raw in the middle, so let it get good and dark). Cool for 20-30 minutes on a cooling rack in the loaf pan while you make the glaze.

Make the glaze: In your saucepan, bring the butter, milk, and brown sugar to a boil over medium-high heat. Remove it from heat, add the powdered sugar and rum, and whisk it to a smooth consistency.

Assemble and serve: Use a butter knife to loosen all sides of the bread from the loaf pan and gently turn it out onto a plate. Place another plate on top and flip it to turn it right side up. Drizzle glaze over top. Serve each piece slightly warm with a drizzle of glaze.

Easy Canvas Prints offered me a discount on the canvas I ordered and asked for an honest review. My opinions are unvarnished and never influenced by products or discounts provided.

If you liked this post, please:
Subscribe to Willow Bird Baking
Follow Willow Bird Baking on Twitter
Follow Willow Bird Baking on Facebook
Give this post a thumbs up on StumbleUpon


ShareOther ways to share this post with friends!

Gooey Cookies & Cream Bars

On top of a sheet of felt-and-glitter tabletop snow, wooden blades were spinning, propelled by steam from tiny candles. Below the windmill but carved from the same light wood, tiny German townspeople busied themselves preparing for a wooden winter. I stood there for a few minutes, watching the delicate dance of the Christmas Pyramid: wood and fire, fuel and hunger.

It was my first visit to Mike’s great-aunts’ house, and thankfully, I was just in time to see their earnest and intricate Christmas display. Rose and Martha had been adding to their holiday collection over the course of many years and many travels, and their home now good-naturedly bore its heavy load of cheer.

Along with the Christmas Pyramid, a yuletide scene adorned every available surface in the house. The sturdy 1950s countertop in the kitchen boasted a full Christmas village. Warm orange lights glowed from miniature, snowy-silled windows. Plastic children, round with winter wool and red-nosed beneath fur caps, constructed snowmen in the yard. Figurines of all shapes and sizes skated on a mirrored glass pond thanks to tiny unseen magnets. And, in my favorite tableau, kids posed with St. Nick before a toy camera that gave a CLICK-FLASH! every few seconds as if snapping their photo.

The entire house was busy with whirring, chirruping, chiming, ringing. Understated carols rung out at regular intervals from mysterious origins. I would turn my head to find the source only to see a Christmas train, a Christmas snowman, a Christmas door hanging, a pudgy Christmas Santa statue, lights, bells, snow — Christmas chaos!

Imagine yourself as a child. Imagine that one day you really did get to step through your mirror, like you’d always dreamed might be possible. All it took was a little shimmy, a heel click or two, maybe a wink, and you were finally allowed to flow right through the glass. Imagine that when you stepped in, you stepped straight into a world of candy and jolly Santas and benevolent holiday rabbits and secret gardens and fairies and talking animals.

The joy of this house was that same joy. Walking into the door of this house was like walking into a fantastic place you knew existed somewhere, but could never seem to find as a child.

If the house was a Christmas fairyland, Rose and Martha were the magnificent queens of the domain. Martha was lovely, humble, and meticulous, welcoming and distributing presents. And Rose was mischievous, adventurous, and excited, whispering sly comments and shaking gifts. Together, what a pair.

They weren’t just wonderful on Christmas, either, and not just the first time I met them. We would celebrate their birthdays together at a boisterous gathering at Trio, one of their favorite restaurants. Folks from far and wide would turn up and share stories of the things they’d accomplished.

Both were teachers that poured out their time and energy for their students. Rose spent 11 years in night school to earn her degree in History. She then spent several more years learning about computers as she taught, creating a computer lab for her elementary school students. Rose and Martha traveled around the world together, sometimes preferring a foreign country, and sometimes heading to Chetola, a beloved spot in the North Carolina mountains, instead.

It was hard to believe things could ever be difficult for Rose. It seemed impossible that her pure fire-engine gumption couldn’t propel her through just about anything, including health problems and age and, good grief, probably a wall of fire and a mountain of steel at that.

She did slow down, though. At one point she broke a bone and had to recover in a nursing home, and I remember going to see her and realizing her gumption was willing, but her body demanded rest. When you see a pillar of strength and realize it’s fragile, it shakes you. Your whole frame of reference starts to bend just a bit.

Rose’s bone slowly healed. She went home and continue living her beautiful life. We went to dinner and a basketball game with her and Martha months later — her beloved UNCC 49ers — and though she had grown more frail, we could still see the spark of her heart.

This past Saturday, though, just hours before Mike was planning on visiting her, Rose passed away. The book of Greek myths he planned to take and read to her still sits where I tucked it quietly away once I heard. There’s nothing I can say to fully eulogize this sort of burning life. I wish, instead, you could’ve heard Martha’s strong voice at Rose’s funeral singing Amazing Grace with unexpected verve.

And I hope that Rose feels just now as if she’s stepped, finally, through a looking glass. I hope the real presence of Christ is stronger even than the joy of a billion Christmas wonderlands on a billion countertops. I hope she feels like, finally, she’s home.

Gooey Cookies & Cream Bars


Recipe by: Willow Bird Baking, inspired by S’mores Bars
Yield: About 12 bars

I made these Gooey Cookies & Cream Bars as a treat for Mike, ditching a previous plan involving pumpkin (which he’s not fond of). I’m so glad I did. They’re rich and heavenly, crunchy and gooey, and altogether full of warm niceness for a cool autumn day. Apart from tasting amazing, they’re super quick and simple — something I value more and more lately. Heat up one or two of these and enjoy them with some cold milk.

Ingredients:
1/2 cup butter, room temperature
1/2 cup plus 2 tablespoons sugar
1 large egg
1 teaspoon vanilla extract
1 1/3 cups all-purpose flour
3/4 cup chocolate sandwich cookie crumbs (i.e. crumbs of about 10 Oreos)
1 teaspoon baking powder
1/4 teaspoon salt
2 king-sized Cookies ‘n Cream candy bars (e.g. Hershey’s)*
1 1/2 cups marshmallow creme
*can substitute a regular white chocolate bar if these are unavailable where you live!

Directions:
Preheat the oven to 350°F. Grease an 8-inch square baking pan and create a foil sling: tear off 4, 16-inch long pieces of aluminum foil and fold them in half. Situate two side-by-side in the pan, covering the bottom of the pan to the edge (they will overlap). Situate the other two strips in the same manner, but perpendicular to the first. The overhanging foil of the sling will make it easy to remove the bars from the pan after baking and cooling. Grease the foil as well.

Cream the butter and sugar together in a large bowl until fluffy and pale yellow (2-3 minutes). Beat in the egg and vanilla. In a small, separate bowl, whisk together the flour, cookie crumbs, baking powder and salt. Add the dry ingredients to the butter mixture and mix until just combined. Divide the dough roughly in half, placing half the dough in your prepared pan and the other half in the fridge to chill until you’re ready for it.

Use the back of a spoon sprayed with cooking spray and to press and spread the dough in the pan until it covers the bottom of the pan in an even layer. Place the Cookies ‘n Cream bars side by side over the dough (if they fit; if not, break them and arrange) such that you have a full single layer of chocolate (about 1/4 inch thick). Glop on marshmallow creme and use a greased offset spatula to spread it evenly across the candy bars. Take the remaining dough out of the fridge and place it on top of the marshmallow layer (to do so, take a small handful at a time and flatten it into a “shingle” in greased fingertips. Lay these side by side over the top. They’re a little sticky so it takes some fiddling, but just clean your fingers off if the dough starts sticking to them too much and continue).

Bake for 25 to 30 minutes or until lightly browned. Let cool completely in pan before gently using the overhang of the foil sling to lift the bars out of the pan and place them on a cutting board to slice. When ready to serve, heat each bar in the microwave for about 25-30 seconds. Store extras in an airtight container. Enjoy!

If you liked this post, please:
Subscribe to Willow Bird Baking
Follow Willow Bird Baking on Twitter
Follow Willow Bird Baking on Facebook
Give this post a thumbs up on StumbleUpon


ShareOther ways to share this post with friends!

Presenting . . . Your Amazing Cupcakes!

Well, color me impressed. One month ago I issued a challenge here on Willow Bird Baking. Because I know how inspiring it can be to create your own dish, I asked you to come up with a fun cupcake combination all your own.

Some of these fantastic bakers were mamas baking with their kids (Sarah let her son, Jonathan, help out) while some of them were kids themselves (Erica’s in 7th grade this year). Some of them went the decadent route — chocolate, peanut butter, and beer, oh dear! — while some of them stayed bright and fruity — summery strawberries, blackberries, and citrus. Across the board, though, the one thing you all have in common is kitchen creativity. You came up with plans for a fantastic dessert for your family and friends, and you made it happen! Now it’s time to show off your handiwork!


Faygie the Fantastic

Faygie Made: Chocolate Cupcakes with Guinness-Chocolate Pudding and Caramel Buttercream
Comments:“I had a lot of fun doing this challenge! It took a while to find a combination that was not only unique, but also complemented each other well. The chocolate cupcake recipe is fantastic. The pudding was also very good, […] and I really thought that the caramel buttercream complemented the chocolate and Guinness really well. Because it is a Swiss meringue buttercream, it’s not too sweet (even with the large amount I piped on). I brought these to a friend’s birthday party and they were a huge hit!” (see more on her blog!)


Just look at those mountains of delicious frosting! These sound so rich and decadent.


LeAndra the Lovely

LeAndra Made: Banana and Choco-Banana Cupcakes with Peanut Butter(cream) Filling and Marshmallow Buttercream Frosting
Comments:“Thank you for hosting this cupcake challenge. I’m really looking forward to seeing everyone’s creations. I baked banana cupcakes with peanut butter buttercream filling and marshmallow buttercream icing. The baking itself went well, but I was concerned the banana cake and the peanut butter filling were too similar in coloring. So, I mixed some cocoa powder into the remaining batter for chocolate-banana cupcakes.” (see more of her fun cupcakes on her blog!)


Peanut butter, banana, and marshmallow sound like a match made in fluffernutter heaven. Yum!


Erica the Energetic

Erica Made: Yellow Cupcakes with Lemon Filling and Orange Icing
Comments:Erica is my youngest challenge entrant this time around — she just started 7th grade (in my class)! Aren’t these citrusy cupcakes adorable? Way to go, Erica!


Erica came straight out of my cupcake camp this summer and completed the cupcake challenge! So impressive!


Corisa the Creative

Corisa Made: Tandy Kake Cupcakes
Comments: “I made a ‘Tandy Kake’ cupcake, because Tandy Kake is one of my most loved desserts. I enjoy the combination of peanut butter and chocolate a whole lot! I started with a butter cake and filled it with Ina Garten’s peanut butter frosting. Then I topped it off with a simple chocolate frosting! Thanks so much for this opportunity. I’m so excited to see all the fabulous cupcakes!”


It doesn’t get better than peanut butter and chocolate. I want about 5 of these!


Sophia the Sophisticated

Sophia Made: Butterbeer Cupcakes
Comments: Sophia took two of my cooking classes last year — we had so much fun! She says, “I made the Butterbeer cupcakes. They were awesome! I used some techniques that I learned in your class when I made them, so that was great! They tasted a lot like cream soda and butterscotch (surprise!) I had so much fun! I don’t think I would have been able to make them as well if it hadn’t been for your cooking class…so thanks again.” Aww, what a sweet thing to say. Those kids were naturals in the kitchen, though!


I love butterscotch, and these cute cupcakes make me want to drive my broom straight to Harry Potter world in Florida, licking my fingers all the way.


Diana the Daring

Diana Made: Chocolate-Covered Banana Cupcakes
Comments: “I’m sending you my creation, a Chocolate-Covered Banana Cupcake. I was inspired by our trip to King’s Island (an amusement park in Cincinnati, Ohio) this summer. This was a fun challenge. Thanks for putting it together.”


These are so gorgeous, and I love that they’re a play off such a classic dessert.


Annie the Artistic

Annie Made: Red Velvet Cupcakes with Chocolate Monograms
Comments: “I love reading your blog for inspiration! Here’s a link to my red velvet cupcake with monograms recipe. It was quite a disaster the first two times — the recipe I had didn’t specify to add the vinegar and baking soda together before putting them in the mixture and, as I’m sure you know, red velvet cupcakes are a little tricky! Anyways, it was an overall success and the knitting ladies loved it.” Way to try, try, try again, Annie! (see more on her blog)


The monograms make these red velvet cupcakes unique and special.


Sarah the Sensational

Sarah Made: Champagne Cupcakes with Strawberry Puree Filling and Strawberry Buttercream
Comments: “I modified this Paula Deen recipe because my husband is crazy and doesn’t like peaches. I made a strawberry version.”


I love all things strawberry, and these cupcakes look like heaven. Look at the cute frosting squiggles!


Susan the Sweet

Susan Made: Blackberry Merlot Cupcakes
Comments: “This is my Blackberry Merlot Cupcake!
It’s a dark chocolate cupcake with blackberry preserve filling and a country buttercream made with a fresh blackberry & Merlot reduction. I came up with it when my niece was trying to decide which vice — chocolate, cake, or wine — to partake in. I decided to come up with a way for her to have all three at once!”
(see more on her website)


These sound so decadent and delicious — what a way to “have your cake and eat it too!


Erin the Elegant

Erin Made: Boston Creme Pie Cupcakes
Comments: “I couldn’t help but join in the fun and bake a cupcake! I’m an avid reader of your site and am always inspired to bake after looking at the delicious food you’ve made. Thanks for the opportunity to create something new! I baked a yummy Boston Creme Pie Cupcake with vanilla cake, vanilla cream filling, and dark chocolate ganache topping. To really make the cupcake shine, I added macaroon coconut as a garnish on top of the ganache.” (see more on her blog)


These came out so cute, and I love the addition of coconut! This is the perfect way to eat Boston creme pie — in adorable single portions.


Cathy and Kevin the Courageous

Erin Made: Bananas Foster Cupcakes
Comments: “We made Bananas Foster cupcakes! We used a banana cake recipe, caramel filling, and a cinnamon-madagascar bourbon vanilla bean cream cheese frosting (long enough for you?) topped with vanilla wafer crumbs and butterscotch caramel sauce. These babies were to die for!! (Not for the faint of heart-if you don’t like rich banana-y goodness these are not for you!) Thanks for a great challenge to make us come up with these goodies; we will be making these again.” (see more on their blog)


All I can say is oh my goodness, yum. I need to try these!


As always, I’ve been totally inspired by you — thank you for plunging in and taking the cupcake challenge! If you didn’t get to join in this time around, don’t worry — there are always more WBB challenges coming up to build your kitchen confidence.

If you liked this post, please:
Subscribe to Willow Bird Baking
Follow Willow Bird Baking on Twitter
Follow Willow Bird Baking on Facebook
Give this post a thumbs up on StumbleUpon


ShareOther ways to share this post with friends!

Gooey S’mores Bars

GUESS WHAT I JUST BOUGHT. Can you guess?! First, let me tell you a story. Maybe I’ll drop some hints here and there . . .

I got my first camera in high school. It was a Polaroid I-Zone, and I had no idea how cool it was. It took grainy, gorgeous photos full of unintentional auras and printed them instantly on adhesive-backed paper. You’ll have to forgive my poetic heart for the example below — a triptych (am I allowed to call it that?) of a goose that had been hit by a car. The middle frame is my hand full of its oversaturated feathers. Morbid, I know, but isn’t it pretty?

My next camera was a little Kodak film camera. I carried it everywhere with me, hoping to capture some gritty reality. I took photos of the outcast crowd at my high school (I wasn’t cool enough to fit in, even with them), of my feet, of neon lights. I filled rolls of film and convinced my parents to get them developed only to find, again and again, that my photos weren’t this or this or this. They were flat snapshots.

I gave up.

Fast forward to food blogging. I’m a baker and I’m a writer, so food blogging suits me nicely. But, I told everyone who asked, I am not a photographer.

Photography was the red-headed stepchild (what’s so bad about one of those, anyway?) of Willow Bird Baking. It was an ill-behaved upstart of a stepchild at that — one that I often had to drag along behind me as it kicked its tiny mismatched-stocking feet.

Since WBB’s inception in June 2009, I’ve used a Canon PowerShot A540 to shoot all of my photos. That faithful little point-and-shoot was powerful, don’t get me wrong, but the fiddling that went in to my hours-long photo shoots was extremely stressful. I shot in manual mode and it went something like this:

Make food for hours. Style food. Wait until the perfect time of day. Go out onto the balcony to freeze and/or sweat. Set up my camera on its tripod. Set all camera settings: manual mode, white balance, macro mode, exposure time, self-timer. Hold up white boards to bounce light in crazy directions. Change all settings repeatedly, taking photos with varying exposures, camera angles, and lighting setups. Run into the apartment to upload the photos every 50 or so snaps to see if I’m on the right track, usually to find that ALL of the photos were out of focus. Hours and hundreds of photos later, drag myself inside and clean up. Go through the hundreds of photos looking for the 6 or 7 acceptable ones. Edit them. Write my post.

Even while I loved my camera (so much so that I decided I’d stick with Canon whenever I upgraded), it’s not hard to see why photography stressed me out. There was a teensy (and sometimes nonexistent) yield for all the sweat I put into it.

When Willow Bird Baking was featured recently in the Davidson Journal, Meg Kimmel was kind enough to mention my “burgeoning skills as a food photographer.” They even printed my photo of my Coffee Cookie Dough Fudge Cheesecake for good measure. But oh, did I have a love-hate relationship with photography.

That is, until now.

Have you guessed yet? I think I set you up pretty well, and hopefully the photos were helpful hints. I bought a new camera!

A Canon Rebel T2i with a 50mm f/1.4 lens, to be exact. By no means did the camera make me an instant photographer extraordinaire, but when I styled and photographed these Gooey S’mores Bars (inside! with air conditioning!), I marveled at how fun and exciting and creative it felt!

I wasn’t doing acrobatics to get an acceptable shot in 100 degree heat — the camera was doing more than its fair share of work! I wasn’t forcing the photos — I was making artistic decisions! I wasn’t fretting and uploading a dozen times to check my shots — I was contentedly fiddling with various camera settings and enjoying the results! For the first time in years, I think I’ve almost recaptured the joy of snapping a photo with that old Polaroid I-Zone and sticking it in my poetry notebook surrounded by walls of messy handwriting.

. . . Almost.

P.S. Will you look at the number of exclamation points in that last paragraph? I must be in love.

P.S. 2 There’s just over a week left in the Willow Bird Baking Cupcake Challenge! Bake your creation and email photos to juruble ‘at’ gmail.com by Wednesday, September 7, 2011. I’ll feature your cupcake on WBB! Find more details and some cupcake inspiration here.

Gooey S’mores Bars


Recipe by: Adapted from Lovin’ From the Oven
Yield: 9-12 bars depending on your appetite

These Gooey S’mores Bars were more than worthy of being the first dish snapped by my new camera. They combine a chewy, graham cracker-flavored base with melty marshmallow creme and a hearty dose of chocolate. I heated each bar in the microwave for 25 seconds and then used a kitchen torch to toast the sides before serving, resulting in the perfect s’more flavor. Don’t worry if you don’t have the torch, though — they’d be delicious without.

Ingredients:
1/2 cup butter, room temperature
1/4 cup brown sugar
1/2 cup sugar
1 large egg
1 teaspoon vanilla extract
1 1/3 cups all-purpose flour
3/4 cup graham cracker crumbs
1 teaspoon baking powder
1/4 teaspoon salt
2 king-sized milk chocolate bars (e.g. Hershey’s)
1 1/2 cups marshmallow creme/fluff

Directions:
Preheat the oven to 350°F. Grease an 8-inch square baking pan and create a foil sling: tear off 4, 16-inch long pieces of aluminum foil and fold them in half. Situate two side-by-side in the pan, covering the bottom of the pan to the edge (they will overlap). Situate the other two strips in the same manner, but perpendicular to the first. The overhanging foil of the sling will make it easy to remove the bars from the pan after baking and cooling. Grease the foil as well.

Cream the butter and sugar together in a large bowl until fluffy and pale yellow. Beat in the egg and vanilla. In a small, separate bowl, whisk together the flour, graham cracker crumbs, baking powder and salt. Add the dry ingredients to the butter mixture and mix until just combined. Divide the dough roughly in half.

Press half of the dough (using clean fingers is easiest) into the pan. Place the chocolate bars side by side (if they fit; if not, break them and arrange) over the dough such that you have a full single layer of chocolate (about 1/4 inch thick). Glop on marshmallow creme and use a greased offset spatula to spread it evenly across the chocolate. Place the remaining dough on top (to do so, take a small handful at a time and flatten it into a “shingle,” laying these side by side over the top). Bake for 25 to 30 minutes or until lightly browned. Let cool completely in pan before gently using the overhang of the foil sling to lift the bars out of the pan and place them on a cutting board to slice.

When ready to serve, heat each bar in the microwave for about 25-30 seconds and use a kitchen torch to lightly “toast” the exposed marshmallow (optional). Enjoy!

If you liked this post, please:
Subscribe to Willow Bird Baking
Follow Willow Bird Baking on Twitter
Follow Willow Bird Baking on Facebook
Give this post a thumbs up on StumbleUpon


ShareOther ways to share this post with friends!

Fauxstess Cupcakes

I recently saw a letter written by an experienced teacher to his first-year-teacher self, and it reminded me of all the times I’ve thought, “I wish I’d known this when I started teaching.” Tomorrow is my last teacher workday before the students come back on Monday. What better time than the beginning of a new school year to write my own letter to my past self? So here it goes.

Dear Julie of 2006 (or as you’re about to be known, Ms. Ruble!),

It’s the night before the first day of school. I know you’re scared. I would tell you to get a good night’s rest, but to be honest, you’re not going to sleep much tonight. It doesn’t matter, though. Well-rested or not, you’re about to meet around 150 students who will change your life forever.

You’ll meet D, who you’ll admire for his sense of humor and his dance moves, and who will ask you all year when you’re going to let his beloved mother do your hair. You’ll meet L, who will stand up in class and scream in your face, but who needs you to forgive her and love her about as much as she needs air. You’ll meet H and P, who you will never reach. You’ll meet M, who seems impervious but who will shed surprising tears when you speak to her in anger. You’ll meet D, whose artwork will take your breath away.

You’ll meet K, and Julie . . . K will break your heart. Nothing you do will rescue that little boy from his situation. What can I say? This is going to be a tough year. But you can make it one of the most important years of your life.

You don’t lack fervor. I’m not going to tell you to be fervent. You are meticulous. I’m not going to tell you to perfect your classroom management systems. You are fretting about how students will learn science. I’m not going to advise you on unit plans. I’ve been teaching for 3.5 years now and I’m not an expert, but I’m going to tell you the things I wish you’d known.

1. Teach your students to learn. There are so many standards and concepts that you’ll literally try to pack a new topic in every day this year. I know you can drag the kids along at that pace — you’re good at making things happen — but maybe you shouldn’t. You’re trying to cram little bits of application into a full day of lecturing, and that’s not really how they’re going to learn. Put the importance of teaching them every tiny fact about your subject matter into perspective.

Instead, present new information and then find resources, projects, labs, and other experiences that allow them to apply the information themselves. Let them take ownership in their learning and enjoy the process. Give them more time to read and problem-solve together. Let them come up with creative ways to study. They don’t need to remember every step of the rock cycle for the rest of their lives, but they do need to know how to gather and process information.

I know it will take too long. I know you’ll end up not being able to cover everything. But if they come out of your class with the ability to be a curious, driven learner, that’s more important than all the Earth science facts you could give them.

2. Be humble and open to new ideas. This is a lesson you’ve learned, but that you need to continue to wholeheartedly embrace. We all tend to grow up feeling like we have a good handle on how the world works. In a way, deep down, we believe we know everything and can do everything. Teachers especially can develop a superiority complex when they run their classroom well and start to have great ideas. Rather than being a vessel that accepts and pours out in equal measure, they become a faucet, spewing a thick, opaque blanket of know-it-all over their colleagues.

Apart from alienating the people who can be your greatest allies, you miss out on so much when you think you know everything. Remind yourself constantly that some of your most exciting moments in the classroom have come from trying someone else’s ideas, even when they were outside of your comfort zone. Remind yourself that others are competent professionals, too — indeed, when you move on to a different school after this year, you will be surrounded by some of the most intelligent, innovative people you’ve ever met. Remind yourself that it’s okay to ask for help.

Finally, teach your students that they don’t know everything, either. Model humility, and place them in situations that challenge their worldview.

3. Be an advocate for yourself so that you can be an advocate for your students. You’ve been lectured endlessly on being flexible, rolling with the punches, and sucking up the pain. Those things are important sometimes. But what no one’s told you yet, and what you really need to know to survive this year (and I’m not just being dramatic), is this: you are a valuable professional, and you do not have to let people take advantage of you.

You’re the sweet, young, impressionable, flexible new teacher and this year, others will try to steamroll you to further their own interests. Even if they have their students’ needs in mind, it is not okay for them to hurt you and your class. If someone tells you you have to do something unreasonable, say no. If someone tells you you have to do something that hurts your class, say no. If the administration says they won’t assist you, don’t stop insisting. This isn’t a crusade or a mission for which you have to allow yourself to be victimized. It’s your job — and it’s important for you and your students that you are treated professionally.

4. Let yourself fail, and teach your students that failing doesn’t make you a failure. You are a perfectionist, but masterfully handling dozens of unpredictable, unique children is kind of like orchestrating a synchronized swimming team . . . made up of cats. Some lessons and classroom management plans are going to flop. Someone is going to steal the popcorn you brought in as a reward for the students. Someone is going to cut every one of your students’ bean plants in half. You are going to be unnecessarily harsh to a student and regret it.

Show your students that it’s okay to make a mistake by owning your mistakes. Show them that it’s okay to apologize by apologizing to them. Show them that it’s okay to be disappointed in yourself while still loving yourself — that you can pick yourself up and move on.

There are kids who make a mistake and add it to a list in their brains called, “Reasons I Don’t Deserve to be Loved.” Show them that there’s nothing they can do to make themselves failures as long as they keep moving forward. Tell them to expect “excellence, not perfection,” as one of my coworkers said in a meeting today, and to forgive themselves when they miss the mark.

5. Most importantly, Julie, love your students. I know you think you understand how crucial this is, but you will lose sight of it. You will immerse yourself in creating classroom structure, creating lessons, developing systems. You will prioritize academic achievement without realizing that having a loving, secure environment is the bedrock on which achievement is built.

Your students may not remember the different kinds of earthquake faults, but they’ll remember that they had a 6th grade teacher who loved them. They’ll remember that even when they misbehaved, there was someone in their lives who would not give up on them. They will be changed by the fact that you listened to their ideas and treated them like valuable human beings. Stop and let yourself interact with them in a personal way that lets them know you care about them.

That’s all for now — no words of wisdom on how to organize your files or balance housework and schoolwork, because you’ll figure all of that out. You’re going to be great. And even when you’re not, you’re going to change lives and be changed. Thank God for a job where you can say that!

Love and #2 pencils,
Ms. Ruble of 2011

Fauxstess Cupcakes


Recipe by: Adapted from Annie’s Eats and Hershey’s
Yields: about 15 cupcakes

These “Fauxstess” Cupcakes are homemade knock-offs of the Hostess Cupcakes that might’ve shown up in your lunch boxes during your childhood. They were adorable additions to my elementary school throwback picnic. The tender chocolate cake is filled with a marshmallowy cream and topped with rich ganache. Apart from being cute, these things are seriously easy to make and seriously delicious!

Cupcake Ingredients:
1 cups sugar
7/8 cup all-purpose flour
3/8 cup HERSHEY’S Cocoa
3/4 teaspoon baking powder
3/4 teaspoons baking soda
1/2 teaspoon salt
1 egg
1/2 cup milk
1/4 cup vegetable oil
1 teaspoon vanilla extract
1/2 cup boiling water

Filling Ingredients:
9 tablespoon unsalted butter, softened
2 1/4 cups confectioners’ sugar
1 1/8 cup Marshmallow Fluff
2 tablespoons plus 1 3/4 teaspoon heavy cream

Ganache Ingredients:
3/4 cups heavy cream
5 ounces bittersweet chocolate chips (I love Ghirardelli’s 60% cacao chips)
5 ounces semisweet chocolate chips

Directions:
Make the cupcakes: Preheat oven to 350°F. Line two muffin pans with cupcake liners. In a large bowl, whisk together the sugar, flour, cocoa, baking powder, baking soda and salt in large bowl. Add the eggs, milk, oil, and vanilla. Beat this mixture medium speed for 2 minutes. Stir in boiling water (this will make the batter thin). Fill each well about 2/3 full of batter (be careful to not to overfill them — these cupcakes always bake up a little wonky for me, and if you overfill them, they can overflow the pan). Bake 20 to 25 minutes (I check them early and often, starting around the 15 minute mark) or until a toothpick inserted into the center of a cupcake comes out with just a few moist crumbs. Cool completely.

Make the filling: Beat the butter, confectioners’ sugar, marshmallow fluff and 2 1/4 tablespoons (I eyeballed this measurement) of the heavy cream together until fluffy. Transfer all but 3/4 cup of this mixture into a pastry bag with a narrow tip. Add the remaining 1 1/2 teaspoon of cream to the remaining 3/4 cup of the mixture and beat until smooth. Cover this and save it for decorating the top of the cupcakes later.

Make the ganache: Place the chocolate in a medium bowl. Bring the cream to a simmer in a medium saucepan (or heat it for a couple of minutes in the microwave, keeping a watch that it doesn’t boil. Pour the hot cream over the chocolate and let stand 1-2 minutes. Whisk in small circles until a smooth ganache forms.

Assemble the cupcakes: Insert the tip of the pastry bag full of cream into the bottom of each cupcake and gently squeeze cream out into the cake. It’s hard to tell how much to squeeze and for how long, but I tried to squeeze as much as possible without bursting the cupcake, and to the point where a small bead of the cream poked out of the bottom when I removed the pastry tip (I then scraped off the excess). Dip the top of each cupcake into the ganache (or, if they don’t rise above the cupcake paper, you can gently spoon the ganache on and spread it with the back of a spoon). Grab the reserved filling mixture with the extra cream and use a pastry bag with a small tip (or a plastic zip bag with a small corner cut off) to pipe curls across the top of each cupcake. Refrigerate the cupcakes to set the frosting. Serve immediately or store in an airtight container in the refrigerator.

P.S. Are you thinking up your own filled cupcake for the Willow Bird Baking Cupcake Challenge? Bake your creation and email photos to juruble ‘at’ gmail.com by Wednesday, September 7, 2011. I’ll feature your cupcake on WBB! Find more details and some cupcake inspiration here.

If you liked this post, please:
Subscribe to Willow Bird Baking
Follow Willow Bird Baking on Twitter
Follow Willow Bird Baking on Facebook
Give this post a thumbs up on StumbleUpon


ShareOther ways to share this post with friends!

1 85 86 87 88 89 127