
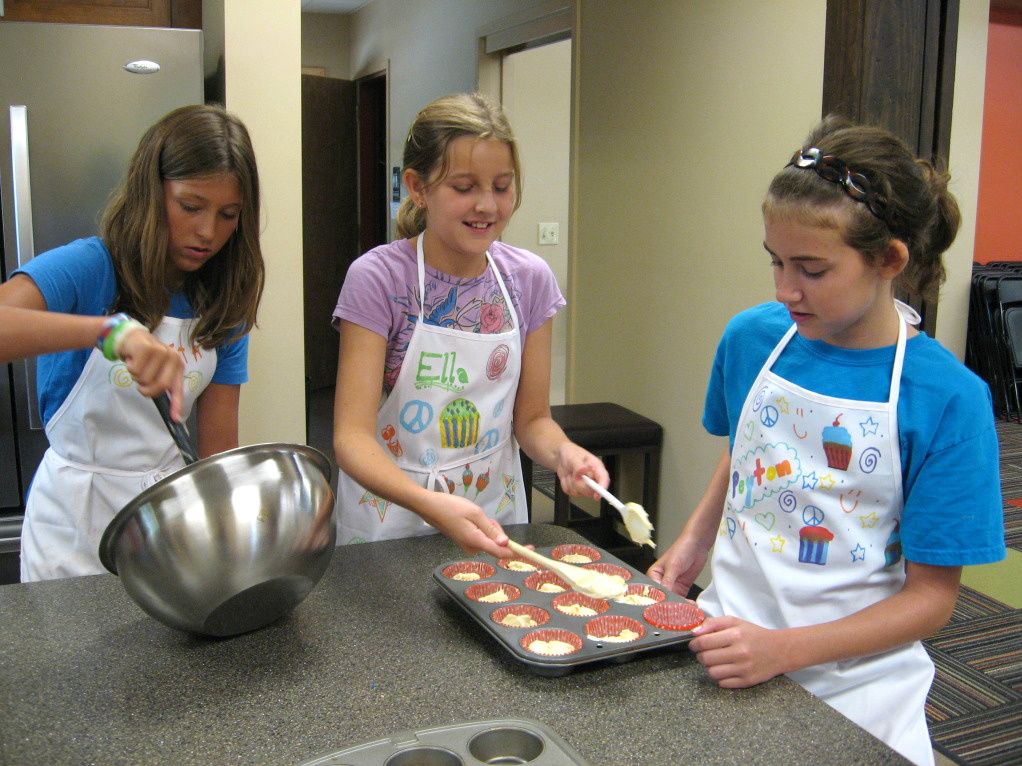
It’s Cupcake Week on Willow Bird Baking! Cupcake Capers was a 5-day summer camp I conducted last week wherein 5 middle school girls learned to bake, fill, and frost cupcakes. We eschewed pedestrian cupcake flavors in favor of creative combinations that I now get to share with you! Every day this week I’ll be posting fun memories and recipes from Cupcake Camp.

Day 2 of Cupcake Capers was all about learning to measure ingredients. I set out materials to make vanilla mousse and chocolate buttercream, as well as piles of tools: measuring cups, measuring spoons, liquid measuring cups, and one mysterious table knife.
While the girls listened with rapt attention (okay, they might have been eyeing the sugar and twitching a bit), I explained how to use each tool. When we came to the knife, there were some good guesses about its use in measuring — stabbing your neighbor when she tries to steal the vanilla, measuring butter, etc. I believe it was Meticulous Mary Rood and Energetic Erica who stumbled on its role in measuring flour “and other fluffy stuff,” as I like to say: leveling.
There are debates, believe it or not, about how to measure stuff. The Home Economics classes of your youth probably taught you to spoon ingredients into a measuring cup and then use a table knife to level them. Some folks, though, have resorted to just scooping and leveling. Still others swear by the most accurate and consistent method, measuring everything by weight with a kitchen scale. So I guess I’ll open myself up to major criticism and go ahead and tell you: I cheat. I don’t do any of those. And what’s more, I taught the campers to cheat, too.
See, the point of spooning an ingredient into a measuring cup is to ensure that it’s the right density to measure (i.e., that it’s not packed). This is also why kitchen scales are most accurate — they eliminate the variation caused by how densely an ingredient settles into the measuring cup. But both of those methods are too tedious for me, and my primary goal in the kitchen is to enjoy and challenge myself — not to bore and frustrate myself. My secondary goal is to make impressive, delicious food. My little “cheat” consistently accomplishes both of my goals, so I’m happy with it, even if some foodies would scoff.
I fluff-and-scoop. If you’ve ever watched Barefoot Contessa, you might have seen Ina Garten do it (see, I’m in good company). When measuring flour, for instance, I stick my measuring cup into the canister and “fluff” the flour with it a few times to ensure that it’s not packed. I then lightly scoop a heaping amount into the cup and level it with a table knife. This way the ingredient has an appropriate density in my measuring cup, but I don’t have to fiddle with a kitchen scale or spoon.
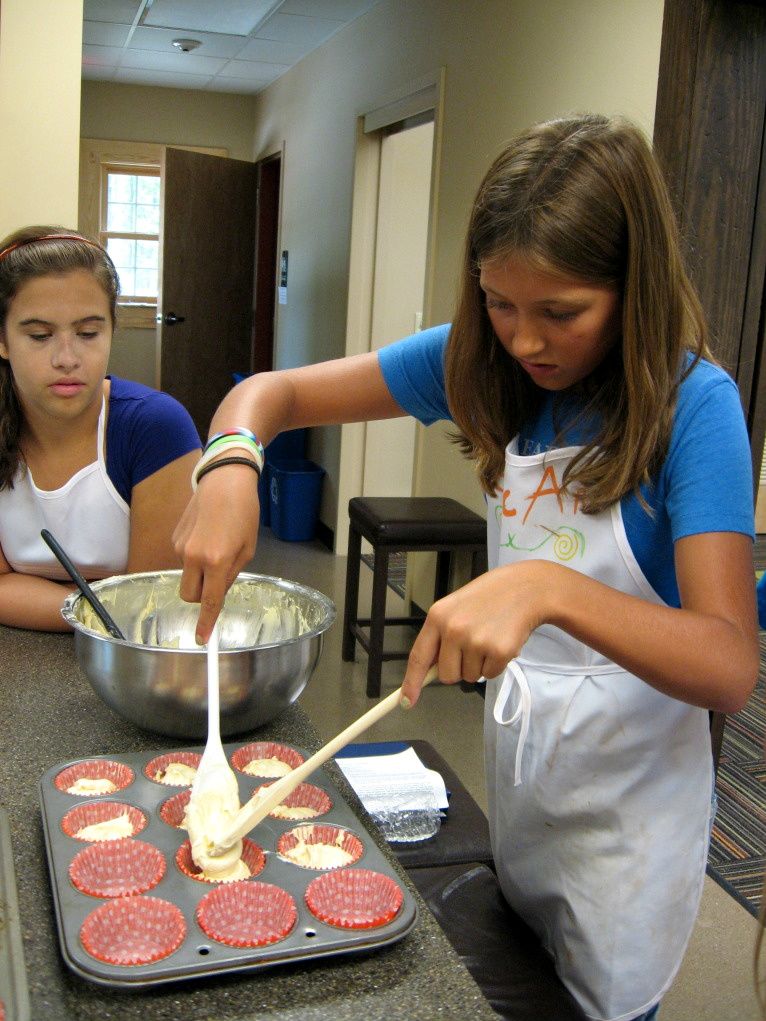
After our measuring lesson, the campers completed the mise-en-place for the chocolate frosting and mousse and set to work making both. I have to tell you about this easy, delicious mousse. It’s kind of a cheat too, actually. Maybe this post should be subtitled, “Ways to Cheat at Cupcake Camp.” The mousse takes advantage of the gelatin in instant pudding mixes, which is activated by agitation, to thicken what would otherwise be a simple whipped cream.
All you do is pick your favorite pudding mix (that’s part of the reason I love it — you can have chocolate, pistachio, butterscotch, cheesecake, white chocolate, banana cream, coconut, etc., etc., etc. mousse in a matter of minutes) and stick it in a bowl with a cup of milk and a cup of cream. You whip the mixture to soft peaks just as you would if you were making regular whipped cream. The pudding mix will thicken it beyond that to a moussey texture perfect for filling cupcakes (or layer cakes — just pipe a border of frosting around the outer edge of your layer before you add it so it doesn’t squish out).
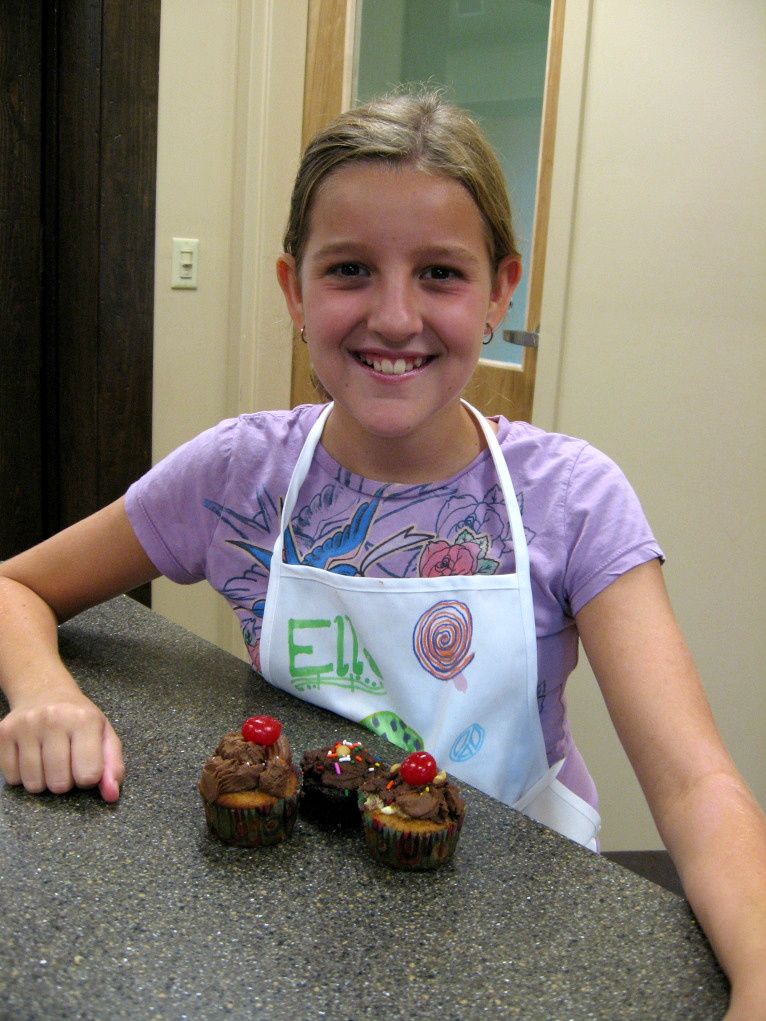
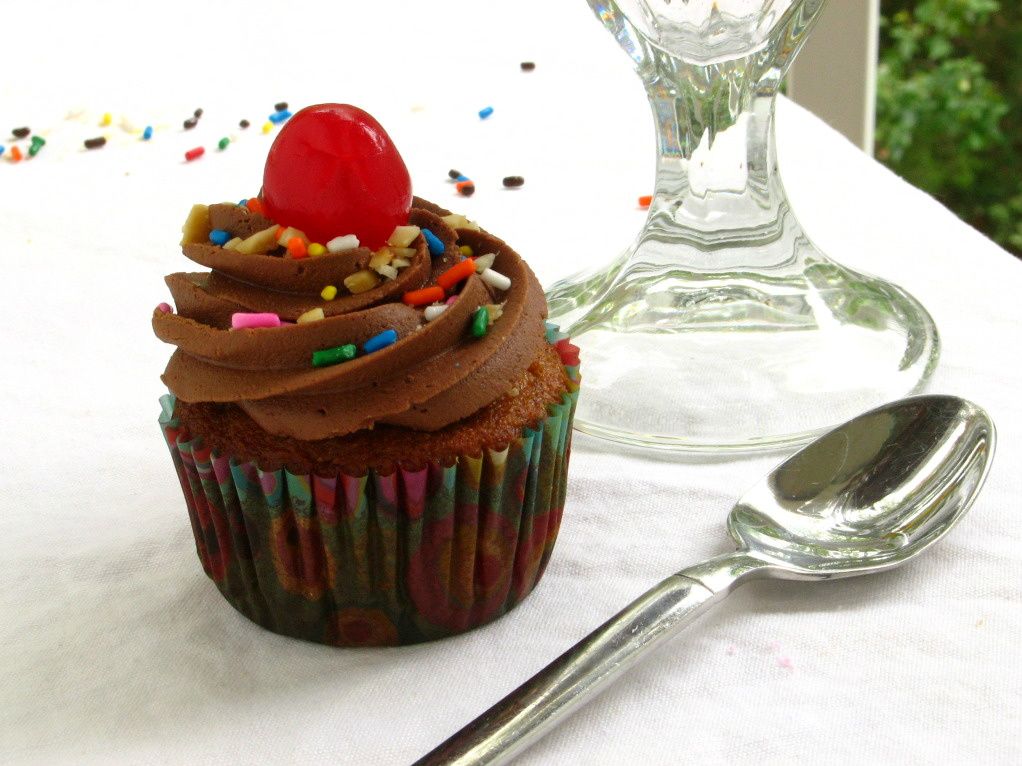
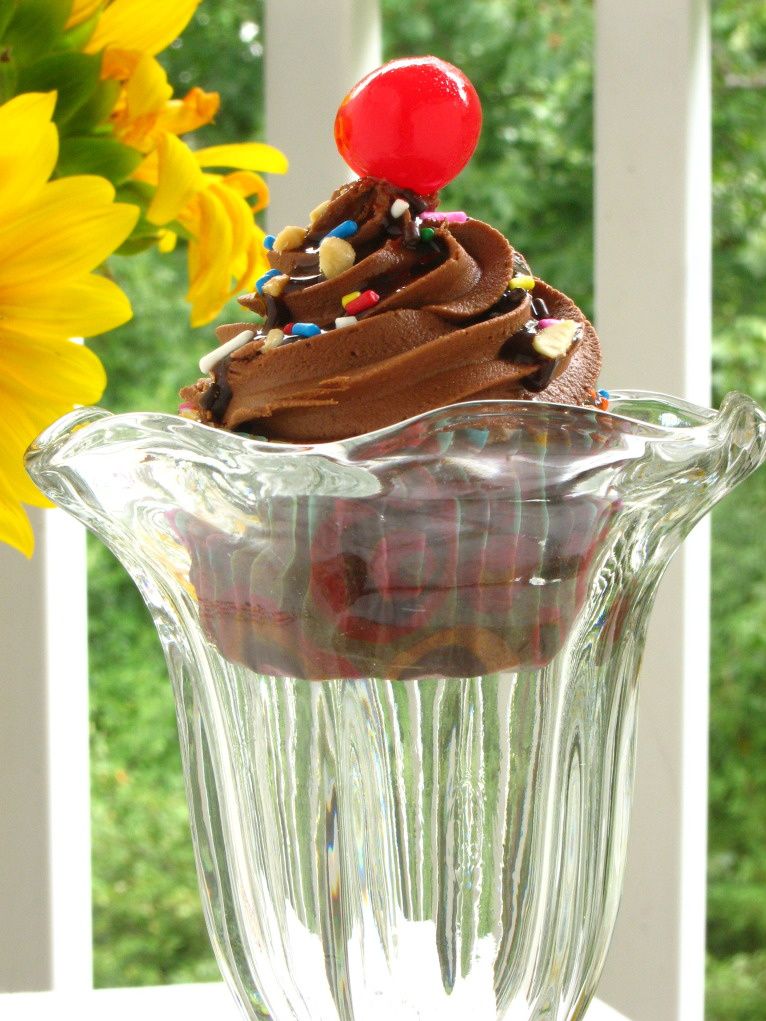
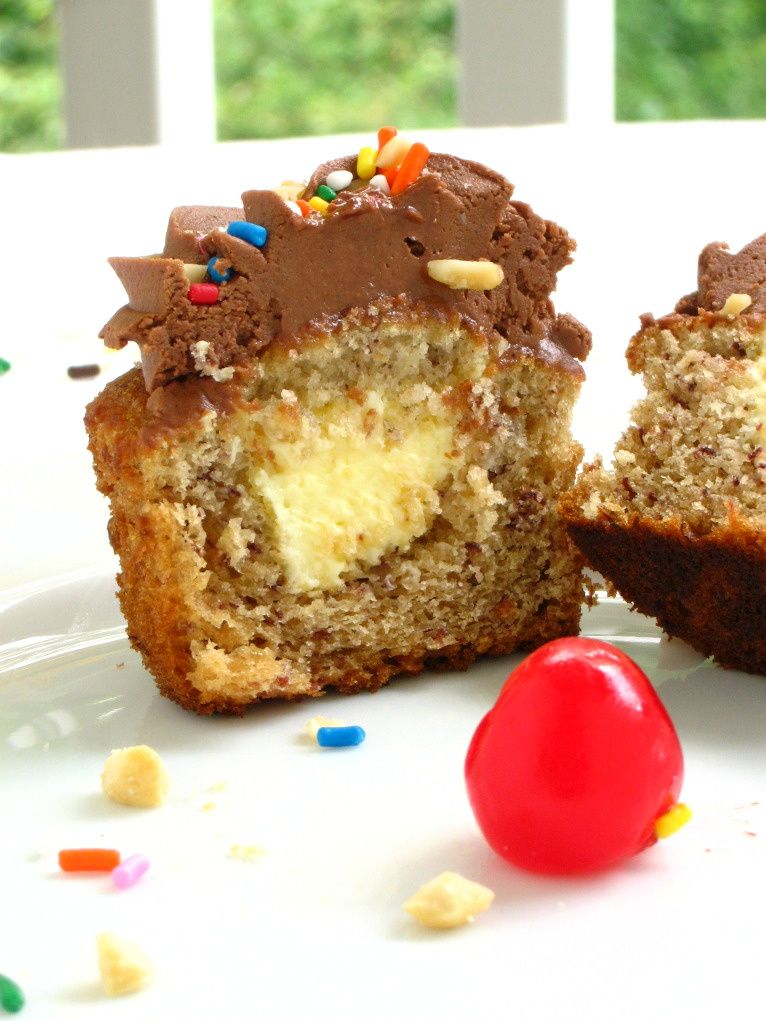
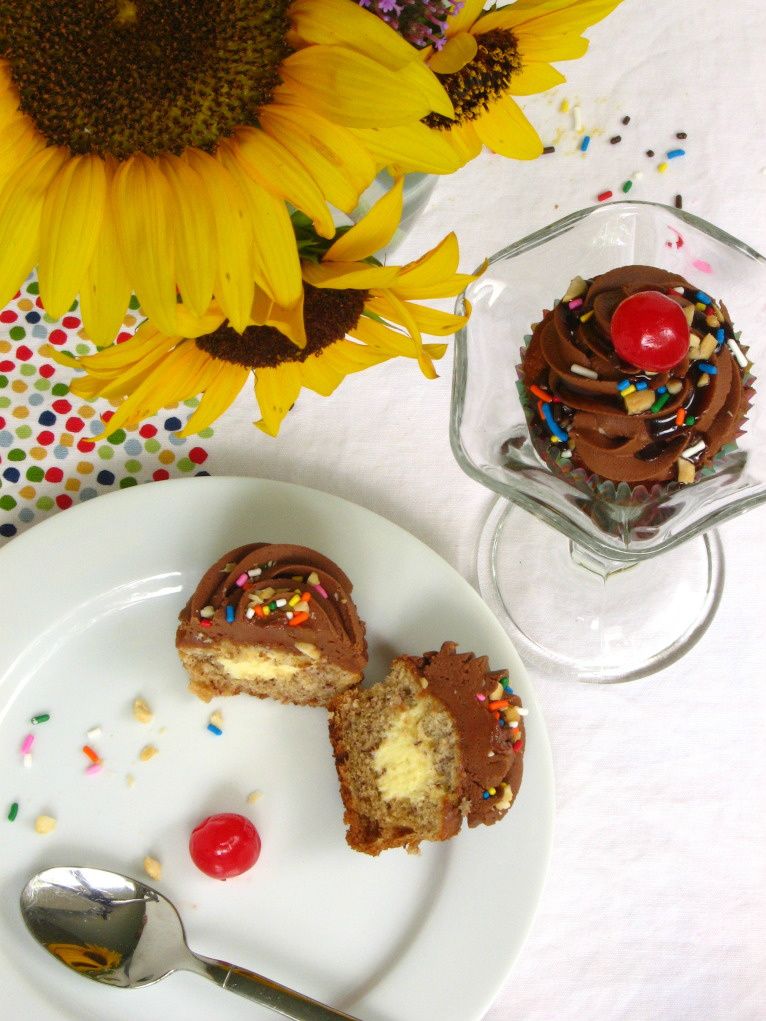
After measuring and moussing, we made Banana Split Cupcakes, which are moist banana cupcakes filled with vanilla mousse and topped with chocolate buttercream, chocolate sauce, peanuts, sprinkles, and a cherry.
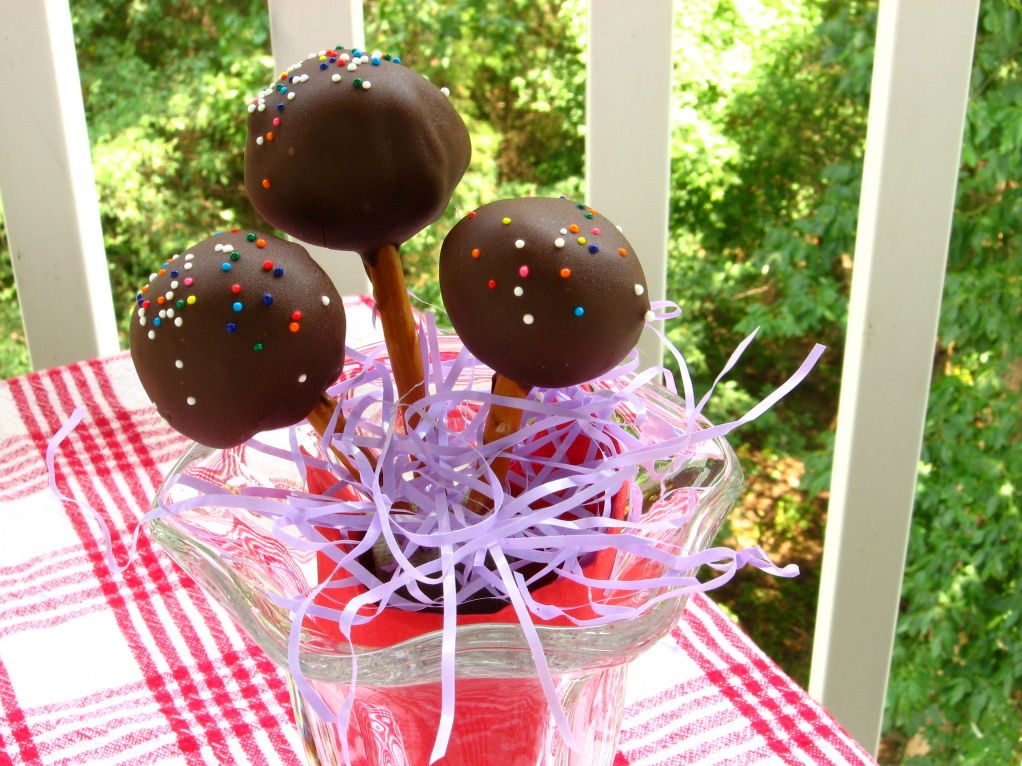
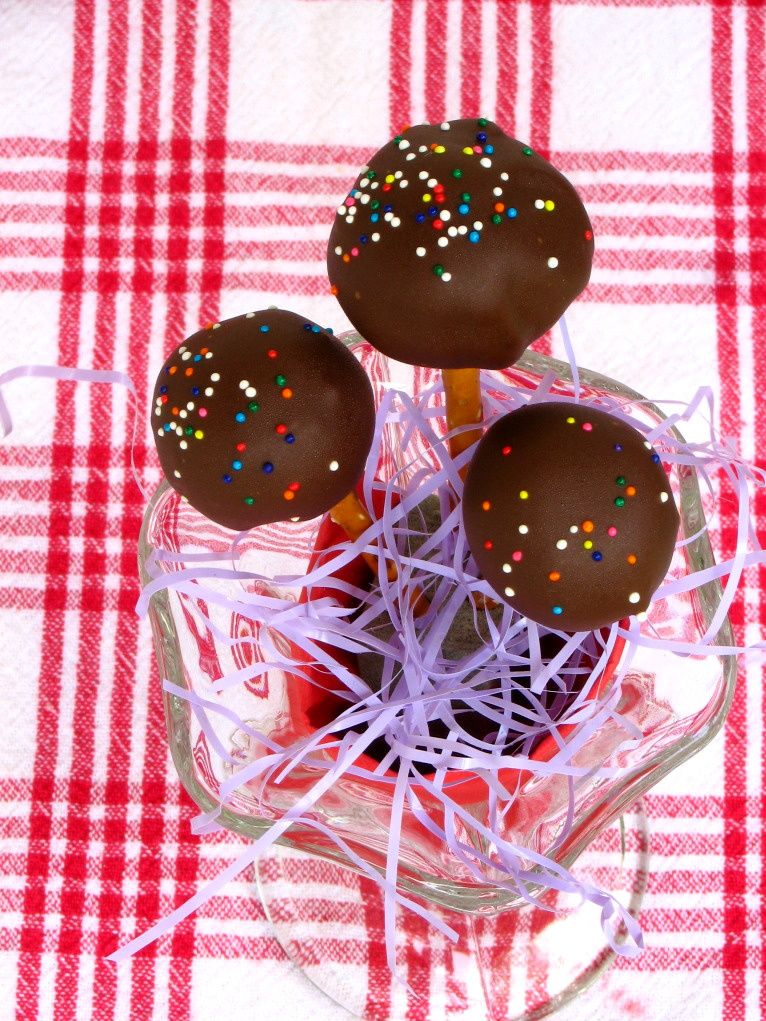
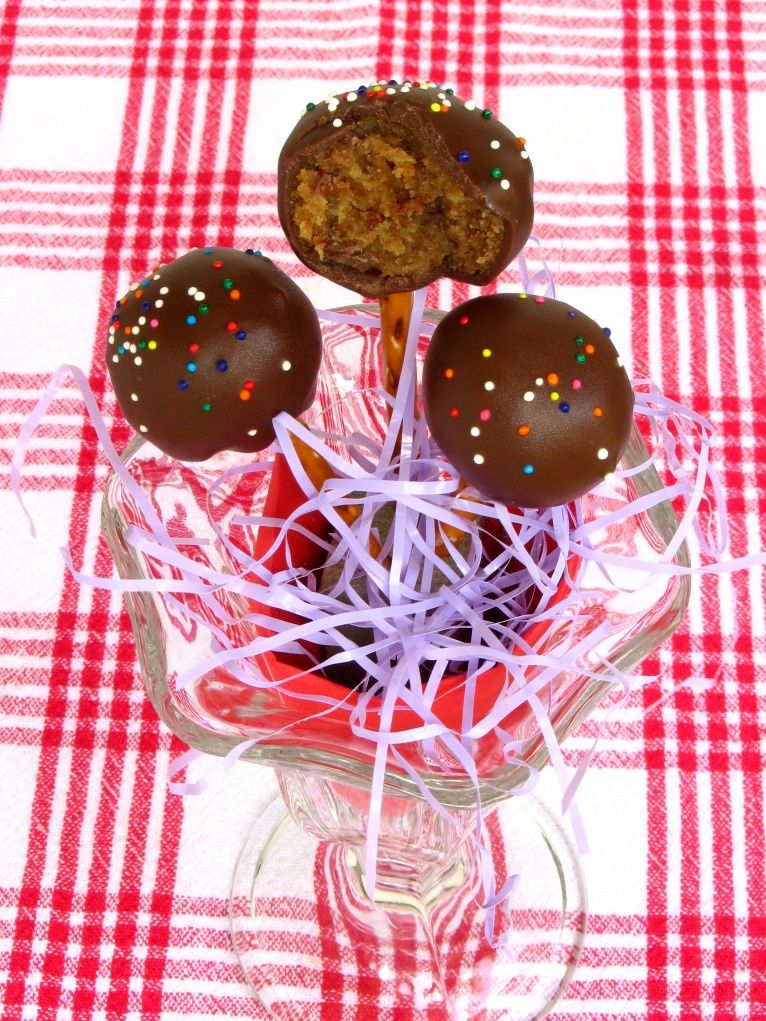
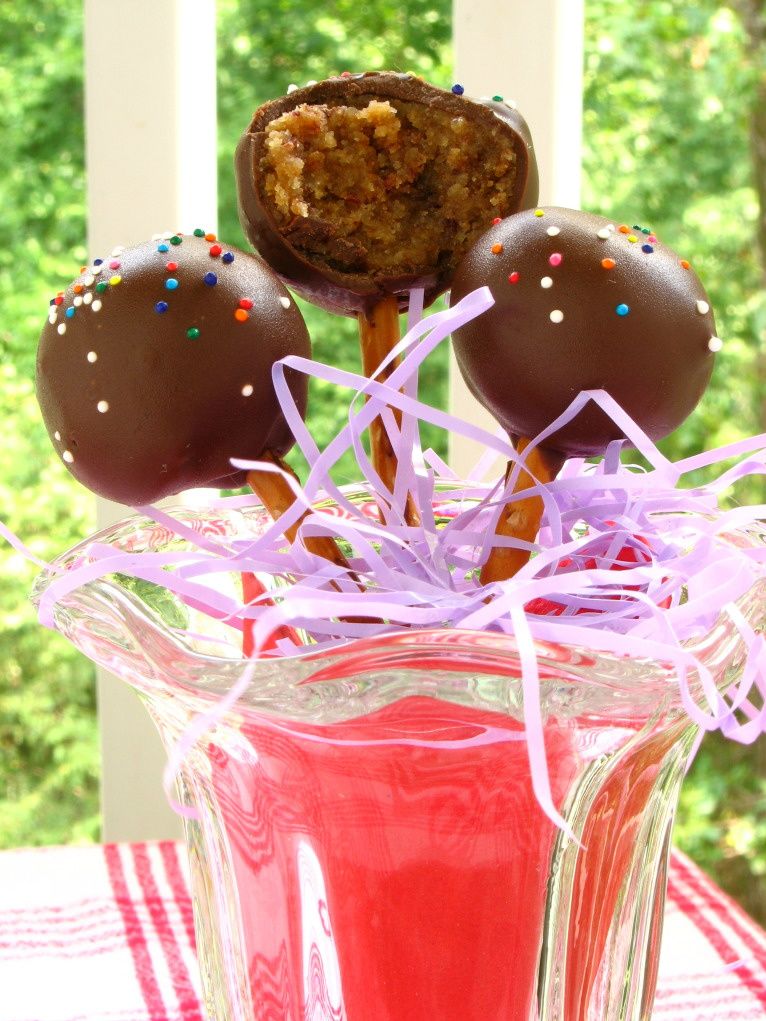
Since we had extra cupcakes, we also made Banana Split Cake Pops by crumbling the banana cake, mixing it with a simple cream cheese frosting, rolling it into balls, chilling them overnight, and dipping them in melted chocolate candy coating. These were so simple, and I almost liked them better than the cupcakes themselves! Instructions for how to make both are included below.
How do you measure dry ingredients?
Banana Split Cupcakes
Recipe by: Willow Bird Baking, adapted from Piggly-Wiggly and Wilton
Yields: 18-24 cupcakes
Cupcake Ingredients:
1 1/2 cups all-purpose flour
1 tsp baking soda
1/4 tsp salt
1 stick unsalted butter at room temp
1 cup sugar
1 tsp pure vanilla extract
1 large egg, preferably at room temp
~2 very ripe bananas, mashed
1/2 cup sour cream or plain yogurt
Mousse Ingredients:
1 cup milk
1 cup heavy cream
1 (4 serving) package vanilla Instant Pudding Mix (not Cook & Serve)
Frosting Ingredients:
1/2 cup solid vegetable shortening
1/2 cup (1 stick) butter, softened
3/4 cup cocoa
1 teaspoon clear vanilla extract
4 cups sifted confectioners’ sugar (approximately 1 lb.)
3-4 tablespoons milk
peanuts, chopped
sprinkles
chocolate sauce
maraschino cherries
Directions:
*Note: This recipe makes twice as much mousse as you need for filling the cupcakes. If you want to use half the pudding pack and save the rest for later, just measure it out and do so. Or use the extra mousse for another project (you know, like eating it with a spoon).
Make cupcakes: Line two muffin tins with paper liners. Preheat oven to 350°F. In a medium bowl, whisk the flour, baking soda and salt together. In a separate, large bowl, beat the butter until creamy. Add the sugar and beat at medium speed until pale and fluffy. Beat in the vanilla, then add the eggs, one at a time, beating for about 1 minute after each egg goes in. Reduce the mixer speed to low and mix in the bananas.
Mix in half the dry ingredients (the mixture may look curdled — just keep mixing), followed by all the sour cream and finally, the rest of the flour mixture. Fill each well of your prepared pan about 1/2 to 2/3 of the way full and rap the pan on the counter to remove bubbles from the batter and smooth the top.
Bake for 25 to 30 minutes, or until a toothpick inserted deep into the center of the cakes comes out clean. Transfer the pan to a rack and cool for 10 minutes before unmolding on the rack. Let cool completely.
Make mousse: To make the vanilla mousse, combine milk, cream, and pudding mix in a medium bowl. Beat with a mixer until you reach soft peaks, or a thick whipped cream consistency (this takes a few minutes). Refrigerate mousse until you’re ready to use it.
Make frosting: To make the frosting, cream shortening and butter together in a large bowl. Mix in cocoa and vanilla. Add in the sugar one cup at a time while beating on medium speed and scraping down the sides of the bowl often. Add milk and beat until the frosting is light and fluffy. Cover the bowl with a damp cloth until ready to use.
Assemble cupcakes: To fill the cupcakes, use the Cone Method: cut an upside-down cone out of the top of each one. Cut off the tip of the cone (and eat it, if you wish) leaving just the “lid.” Fill the cavity with mousse using a piping bag or zip-top bag with the corner cut off, and then replace the “lid” to give you a relatively smooth surface to frost. Use a piping bag or zip-top bag to pipe on the frosting. Top cupcakes with chocolate sauce, peanuts, sprinkles, and a cherry.
Banana Split Cupcakes
Recipe by: Willow Bird Baking, adapted from Piggly-Wiggly
Yields: probably around 40-50 cake pops
Cupcake Ingredients:
1 1/2 cups all-purpose flour
1 tsp baking soda
1/4 tsp salt
1 stick unsalted butter at room temp
1 cup sugar
1 tsp pure vanilla extract
1 large egg, preferably at room temp
~2 very ripe bananas, mashed
1/2 cup sour cream or plain yogurt
Cream Cheese Frosting Ingredients:
1/2 cup (1 stick) butter, softened
1 (8-ounce) package cream cheese, softened
1 teaspoon vanilla
4 cups confectioners’ sugar
Other Cake Pop Ingredients:
pretzel sticks
chocolate candy melts or candy bark (I use CandiQuik)
sprinkles
Directions:
*NOTE: We made our cake pops with leftover cupcakes, so I’m printing instructions for making them with cupcakes here. I’m not sure how this recipe would work if you tried baking this as a cake to save liners, so I don’t want to recommend that, but let me know if you try it.
Make cupcakes: Line two muffin tins with paper liners. Preheat oven to 350°F. In a medium bowl, whisk the flour, baking soda and salt together. In a separate, large bowl, beat the butter until creamy. Add the sugar and beat at medium speed until pale and fluffy. Beat in the vanilla, then add the eggs, one at a time, beating for about 1 minute after each egg goes in. Reduce the mixer speed to low and mix in the bananas.
Mix in half the dry ingredients (the mixture may look curdled — just keep mixing), followed by all the sour cream and finally, the rest of the flour mixture. Fill each well of your prepared pan about 1/2 to 2/3 of the way full and rap the pan on the counter to remove bubbles from the batter and smooth the top.
Bake for 25 to 30 minutes, or until a toothpick inserted deep into the center of the cakes comes out clean. Transfer the pan to a rack and cool for 10 minutes before unmolding on the rack. Let cool completely before crumbling cupcakes into a large bowl.
Make frosting: Make cream cheese frosting by beating butter and cream cheese together until fluffy. Add sugar and vanilla and beat until smooth.
Make cake balls: Mix about 3/4 cup of frosting into your crumbled cake, adding more frosting if the mixture is still too crumbly. You want it to reach a sort of stiff play-dough texture so you can shape it into balls. Prepare a sheet pan with a sheet of wax paper on it. Shape your banana mixture into balls and line them on the wax paper. Chill these in the refrigerator overnight. I don’t freeze mine like some sites suggest, because I find chilling them in the fridge instead reduces cracking after I dip them.
Mount and dip cake balls: After cake balls have chilled overnight, melt your candy melts or chocolate bark according to the package directions. I keep my bowl of candy melts situated in a bigger bowl of hot water to keep them warm and fluid, but be careful no water gets into the melts! To mount each cake ball, take a pretzel stick and dip the end in candy melts. Gently but firmly push the end of the pretzel stick into the cake ball. Put these back on their silicone mat or wax paper to chill. Repeat until all cake balls are mounted and chill for about 30 minutes.
After chilling, you’re ready to dip! Dip each cake ball into the candy melts, using a spoon to help coat them. After dipping, hold your cake ball over the bowl and gently bounce to drain the excess off. Turn the pop as you drain. When well-drained, sprinkle some sprinkles on top and gently place the pop in a foam block to continue drying. I placed mine in the fridge to reduce drying time. Once they’re dry, you’re ready to eat them! These keep great in an airtight container in the fridge.
Never made cake pops before? I made this video tutorial to show you some techniques involved.
All Cupcake Week Recipes:
Day One: Chocolate Pistachio Cream Cupcakes
Day Two: Banana Split Cupcakes and Cake Pops
Day Three: Creamsicle Cupcakes
Day Four: Strawberry & Cream Cupcakes and Cake Pops
Day Five: Apple Cinnamon Cream Cupcakes
If you liked this post, please:
–Subscribe to Willow Bird Baking
–Follow Willow Bird Baking on Twitter
–Follow Willow Bird Baking on Facebook
–Give this post a thumbs up on StumbleUpon
![]() Other ways to share this post with friends!
Other ways to share this post with friends!
Maggie @ A Bitchin' Kitchen
August 2, 2011 at 2:49 pm (15 years ago)Teaching kids to bake sounds like so much fun! I measure my flour the old-fashioned home ec taught way – spoon it into the cup and level off! If I had a reliable kitchen scale I’d probably weigh flour, but mine is terrible.
These cupcakes look delish!
Julie @ Willow Bird Baking
August 2, 2011 at 5:49 pm (15 years ago)Thanks Maggie! I’ve never tried the spoon method — too impatient — but I know folks who swear by it 🙂
a snowsprite
August 2, 2011 at 3:03 pm (15 years ago)Mmmmmmm I love cakeballs! I have a friend who is vegan and we’ve made cakeballs often. They are super yummy! but super messy too. I’m not sure we have perfected the shaping part yet, but it’s still way fun.
Also, we tend not to freeze the uncoated cakeballs overnight, but just for an hour or so and it works well. =D Also Also? I loooooooovvvvvve bananas!
Julie @ Willow Bird Baking
August 2, 2011 at 5:50 pm (15 years ago)Thanks! I love cake pops so much — they always come out so cute (well, the ones that work). I actually never freeze mine, because I find that they crack when I do, but just chill them in the fridge overnight. I know some folks who always freeze, though, so it must work for them!
I actually hate bananas themselves, but LOVE them in baked goods. Weird, huh?
Brooke (Baking with Basil)
August 2, 2011 at 3:10 pm (15 years ago)Cupcake Week! How fun!! The Banana Split cupcakes sound good…but I’m still thinking about the chocolate pistachio ones from yesterday. Can’t wait to see what the rest of the week brings.
I use the same “Ina” method as you to measure my flour. Everytime I get out my table knife to get an even top, it takes me back to home ec class. Loved that class. 🙂
Julie @ Willow Bird Baking
August 2, 2011 at 5:51 pm (15 years ago)Thanks, Brooke! I know — I remember Home Ec with fondness. I think we only made one or two recipes, but they were fun 🙂
Lauren at Keep It Sweet
August 2, 2011 at 3:26 pm (15 years ago)Such cute photos, and so fun! Both of those recipes sound delicious.
Julie @ Willow Bird Baking
August 2, 2011 at 5:51 pm (15 years ago)Thanks, Lauren!
Kaitlin
August 2, 2011 at 3:28 pm (15 years ago)You are so adorable. I love that you did this for them!
Also, I love the comment about stabbing the neighbor for stealing the vanilla 😉
Thanks for the tip about the quick mousse!
Julie @ Willow Bird Baking
August 2, 2011 at 5:55 pm (15 years ago)Thanks, Kaitlin! The girls were totally sweet, but they COULD be a wee bit territorial sometimes . . . haha.
Joanne
August 2, 2011 at 8:34 pm (15 years ago)I’m a die-hard scale user but I also find that that makes less of a mess in my kitchen, which is always a good thing. Love the fluff and scoop method though! super cute.
And these cupcakes! glorious.
Julie @ Willow Bird Baking
August 2, 2011 at 8:40 pm (15 years ago)I think if I had a nice scale that didn’t take up much counter space AND I actually let myself get in the habit of using it consistently, I might end up liking it better, too. I do hate all the dirty measuring cups lying around. I usually keep them situated on a paper towel to minimize the mess.
Maybe someday I’ll come into a kitchen scale and see if I can get into it 🙂
Fran@fransfavs.com
August 2, 2011 at 11:18 pm (15 years ago)Julie, I do the same thing–fluff, scoop, and level but with one addition to this procedure. I don’t remember how this started; but, once I have leveled off the measuring cup with a knife, I use the knife to tap on the side of the cup. If the flour has been properly fluffed, it will sink down in the cup just a hair but quite visibly on one side of the cup. If the flour doesn’t sink down, it means it’s too packed and you need to remeasure. Sometimes the tapping will reveal an air pocket, so time to remeasure once again! I actually have photos of before and after the measuring/tapping to post on one of my dessert recipes but just haven’t gotten around to it yet.
Julie @ Willow Bird Baking
August 3, 2011 at 1:48 pm (15 years ago)Smart idea! Will have to give it a try next time! Thanks, Fran!
Fran@fransfavs.com
August 2, 2011 at 11:22 pm (15 years ago)p.s. I, too, am a die-hard kitchen scale user (love my Oxo!!), but I’ve been using the fluff, scoop, level, tap thing forever, so I don’t bother weighing flour. My scale is small and flat; and, since I use it several times a day, I just keep it on the counter.
Julie @ Willow Bird Baking
August 3, 2011 at 1:48 pm (15 years ago)I need to invest in one, I think, and see how I feel after using it awhile.
Jules
August 3, 2011 at 7:29 am (15 years ago)Flour has the tendency to come in annoyingly small packages where I live, so I’ve turned into a “fluff-and-pour” measurer. I suppose as long as you’re consistent, it doesn’t really matter.
Julie @ Willow Bird Baking
August 3, 2011 at 1:50 pm (15 years ago)Aw, the fluff-and-pour! That can get messy for me — I’m sorry for the small packaging!
sandra
August 3, 2011 at 9:13 am (15 years ago)Glad to hear that someone else cheats on the measuring also. The cupcakes look delicious and it looks like the girls had a blast!
Julie @ Willow Bird Baking
August 3, 2011 at 1:50 pm (15 years ago)Thanks, Sandra!
Jennifer
August 3, 2011 at 10:00 am (15 years ago)Delish!
Julie @ Willow Bird Baking
August 3, 2011 at 1:47 pm (15 years ago)Thanks, Jennifer!
A_Boleyn
August 3, 2011 at 1:42 pm (15 years ago)Kudos to you for giving these girls a positive experience of cooking/baking which will hopefully serve them well in the future. I just wish there were some boys in the mix cause they need to know how to cook too and should learn that cooking is fun as well as tasty. 🙂
I buy my flour in 20 kg (44 lb) bags and fill my kitchen flour canister from that. That said, I’m from the fluff, spoon and level school of measuring. I use my kitchen scales to weigh pasta cause I can never estimate how much to cook … 200 gms is usually good for 4-5 servings at my house depending on the sauce.
Julie @ Willow Bird Baking
August 3, 2011 at 1:47 pm (15 years ago)The workshop was open to both genders, but only girls signed up. Thankfully, boys are equally as interested in the cooking classes offered during the year and usually do a fantastic job! I agree that they’re an asset in the kitchen!
A_Boleyn
August 3, 2011 at 5:41 pm (15 years ago)I thought it was probably something like that. In high school, the boys often bring in the results of their female friends’ baking from class and I encourage them to take the class themselves and learn to bake all those goodies. Cause that’s what a teacher does! 🙂
Imee
August 4, 2011 at 2:29 am (15 years ago)I’m still pretty new to baking, but I’ve been doing the ‘fluff and scoop’ method all the time! I think during my first foray into bakingdom, I came across a comment or a blog post somewhere and this was a tip that they gave, and I’ve been doing it ever since. 🙂
(I adore the girls’ aprons in the pictures!)
E
August 4, 2011 at 9:11 pm (15 years ago)I weigh ingredients because it’s culturally the norm here. Measuring by volume is pretty unheard of, although it’s increasingly easy to buy cup measures – I suppose because we more and more often see American recipes? (Although I do love it when you use a site like Allrecipes which very helpfully converts into metric/weight… including translating a teaspoon of herbs to 0.8 grams!) I’m a die-hard mechanical scales user, though I did ought to invest in some electronic ones for greater precision. It was fine back when recipes were in imperial, but now it’s so common to have metric only and thus you end up with less easy quantities. But I get so frustrated when I use electronic ones compared to nice, reliable mechanical.
I do have a lovely set of cup measures, but I use them primarily as prep bowls. It’s only occasionally that they’ll be used to actually measure things. I find measuring by volume to be imprecise, messy and extremely tedious. I usually end up converting the recipe, or just finding another one entirely. Especially if flour is involved. (I do have some nice scoop style measuring cups which I got for Christmas, but I never remember to use them. Besides, I buy my flour in 500g (17.6oz) bags so it’s a bit challenging to scoop anything bigger than a tablespoon.)
Susan
August 8, 2011 at 2:50 pm (15 years ago)Have you tried to freeze cake balls? I have a party on Saturday but my only day off is Tuesday. I run into this problem often actually! I wonder if this is something I can make ahead of time and freeze until the morning of the event. BTW I’m loving cupcake week! You have some great ideas.
Julie @ Willow Bird Baking
August 8, 2011 at 8:27 pm (15 years ago)Hi Susan! No need to freeze them — they’ll keep GREAT in an airtight container from Tuesday to Saturday. I keep mine in the fridge. Set them out a couple of hours in advance in case the change in temp causes some condensation on the outside. Hope you love ’em!
Susan
August 8, 2011 at 11:24 pm (15 years ago)Great, thanks for the tips!
Maranda
August 16, 2011 at 12:41 pm (15 years ago)Awesome flavor combo! I have a big scoop in my bin of flour so I fluff with the scoop, scoop the flour into my measuring cup and level with the flat side of the scoop. Easy peasy. 😉
Lola
March 4, 2012 at 7:35 pm (14 years ago)Love your site and your recipes, Julie! Question about your mousse recipe… Would it be “safe” to use your mousse as a cake or cupcake filling that I’m not planning to refrigerate? In other words, can I fill, frost and decorate my cake on say a Friday for a Saturday party and not refrigerate it?
Julie @ Willow Bird Baking
March 4, 2012 at 7:47 pm (14 years ago)Hi Lola! I don’t think I would due to the cream component. I’m pretty sure it’ll need to be refrigerated.
Thanks!