
You may have realized by now that I’m prone to bouts of exuberance over kitchen achievements. There’s something about tackling a recipe you’re inexperienced with, doing some kitchen acrobatics, and actually succeeding that just brightens the whole week. After crossing puff pastry off my to-bake list, my next goal was a tart. Ohhhh, tarts. They’re so gorgeous — those lovely scalloped edges; dense, golden brown shells; and artfully arranged fillings. I’d never tasted a homemade tart before, so I didn’t even realize that in addition to being beautiful, they’re also heavenly and scrumptious. I definitely found a new favorite dessert, and around this apartment, that’s saying a lot!

I decided on a Chocolate Tart and a Raspberry Cream Cheese Tart for my adventure. Both tarts use the same tart dough, a version of pâte sucrée from Tyler Florence. Pâte sucrée, also called “sweet dough,” is popular for dessert tarts, whereas it’s sibling, pâte brisée (“short dough”) is widely used for both dessert and savory tarts.
Pâte sucrée is apparently notoriously difficult to roll, and after trying once, I decided not to bother. Martha Stewart recommends (and she makes it looks very easy, of course) grating the chilled dough into your tart pan and gently pressing it into place. I found my dough too soft for this (even after freezing). In fact, when I pressed the dough against the grater, it gave way and I sliced my pinky on my tart pan — they’re not kidding when they say those edges are sharp! It’ll come as no surprise that after almost slicing off a finger, I only grated some of my dough. I tore the rest of it into smaller pieces and pressed them into the pan. After this struggle, I found the perfect technique: simply don’t let the dough come together in a ball in the food processor, but stop processing while it’s still in large crumbly pieces. Then pour these pieces into your tart pan and press them out. Perfect, easy, safe. Watch your fingers!
Once in the pan, the tart dough is chilled and blind-baked into a delicious, buttery crust. You end up with a dense but flaky, beautiful edge surrounding whatever sumptuous filling you choose. Want to know which of these two tarts I think you should make? Follow me on a little tangent . . .
I’m addicted to rating things. I’m always creating arbitrary rating scales in my head for movies, outfits, books, restaurants, nail polish colors . . . the list goes on! After eating a meal, I can instantly rank every component on the plate from favorite to least favorite, and am appalled when Mike can’t do the same (this often results in a conversation about my brain being weird).
In fact, you know the little clicky stars for rating things on Goodreads and Netflix? I love those! I wish there were little rating stars floating around in real life; imagine the rating convenience! You could walk around and poke at the stars next to stores, food, people . . . okay, maybe rating people isn’t the best idea. Yikes! At any rate (ha ha), despite the fact that Mike thinks it’s weird, I love to rate. But why am I telling you all this? Here’s why: I want you to know how impressive it is that I cannot decide which one of these amazing tarts I like the best. They’re very different flavors, and both so indulgent and delicious — I just can’t choose! Hopefully this is all the persuading you need to make both of them. You know you want to!
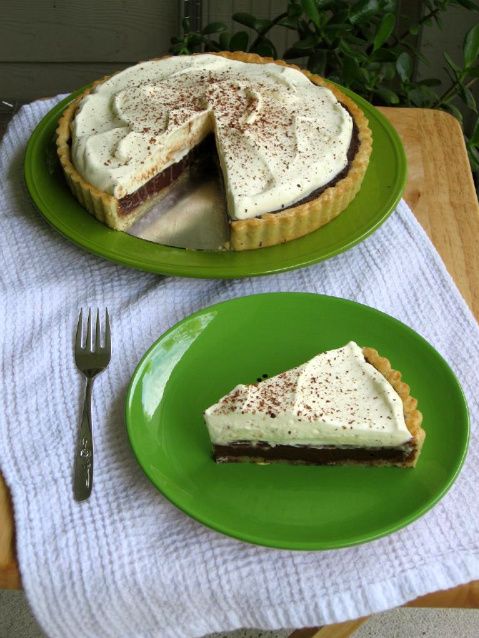
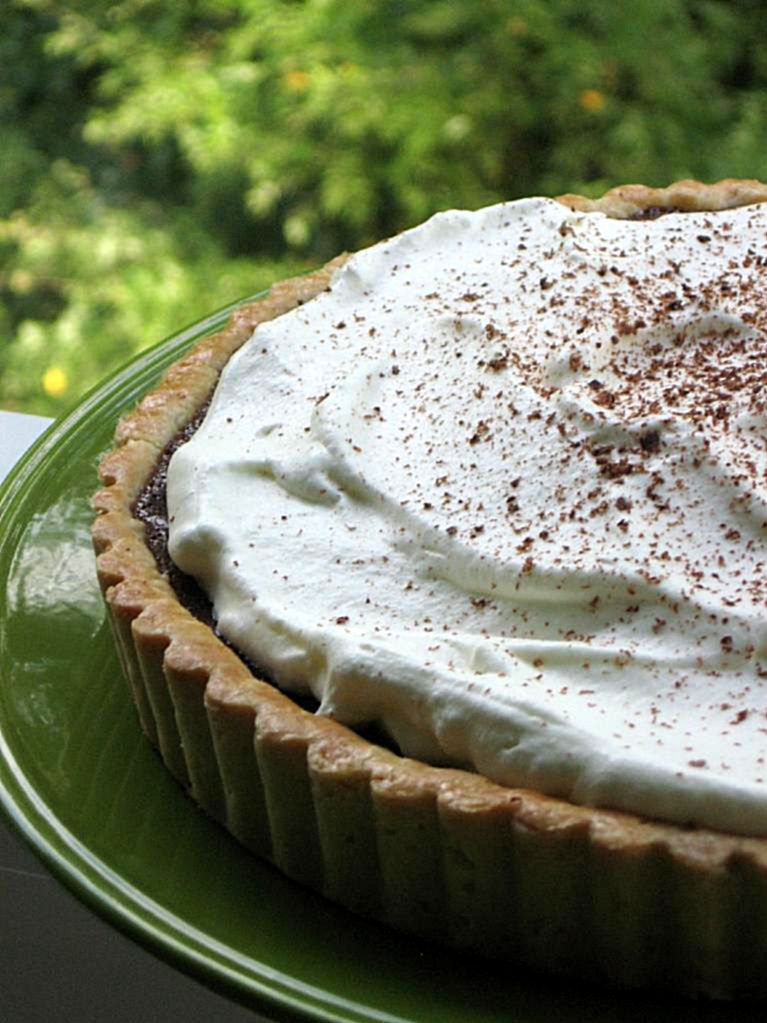
The Chocolate Tart is rich, decadent, and fudgy. The original recipe actually doesn’t include the mounds of fluffy whipped cream, but I knew we’d need more than just the crust to cut the richness of the filling. I have trouble believing even the biggest chocoholic could eat a piece of this tart without a pile of whipped cream or a scoop of vanilla ice cream. Then again, maybe other folks don’t eat a gigantic slab o’ tart like I do (I don’t have the restraint to do slivers, y’all). Regardless, the balance here of the chocolate with the whipped cream topping was perfect — and beautiful.
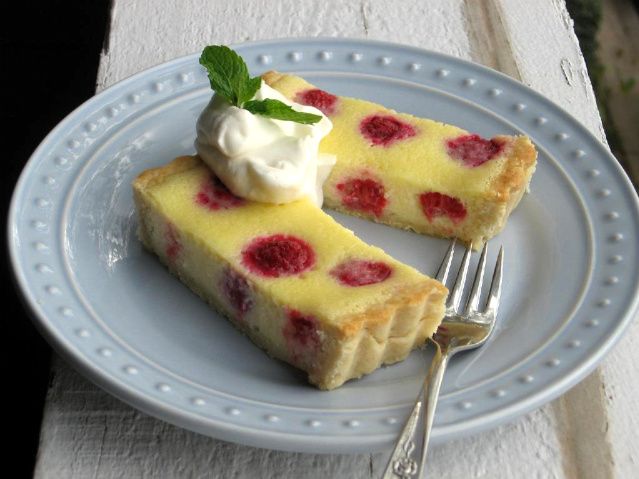
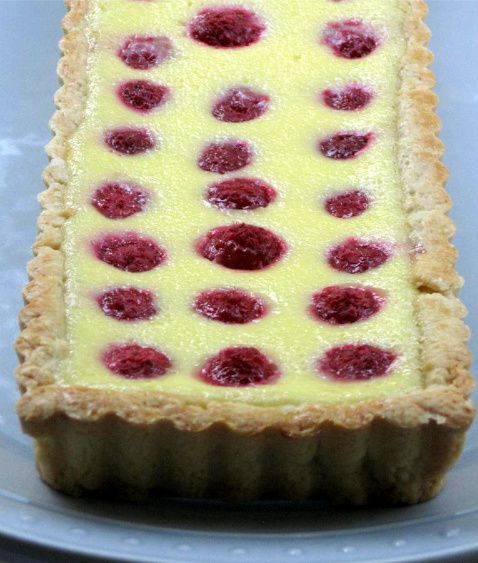
I picked the raspberry tart because I love combining raspberries with mellow cheeses: brie, ricotta, and (obviously) cream cheese. The tart berries in the luxurious, sweet cream cheese were the perfect flavors to pile into my fancy rectangular (!) tart crust once it was cooled from the oven. (Can you tell I’m excited about this tart being a gigantic rectangle? Oh, how I love Williams-Sonoma! I should’ve taken a fan-girl picture with the sales associate that recommended the rectangular pan. Do you think that would’ve seemed creepy? Nah, I’m sure she gets it all the time.) Anyway, once baked, each little raspberry peeks up from its creamy bed just begging to be slathered with whipped cream and devoured. Of course, Mike and I were willing to oblige.
Both of these tarts were so fantastic that I know you’re going to love them. If you don’t own a tart pan, pick one up — mine was only $9 even at fancy Williams-Sonoma, a price well worth the beauty and enjoyment a tart brings. Then roll up your sleeves and create a beautiful dessert.
Chocolate Whipped Cream Tart
Recipe by: Tyler Florence (adapted by me)
Yields: one standard tart, serves about 10
Tart Shell Ingredients:
2 cups all-purpose flour, plus more for dusting
3 tablespoons sugar
1/4 teaspoon salt
3/4 cup (1 1/2 sticks) unsalted butter, cold and chopped
1 large egg, separated
2 tablespoons ice water, plus more if needed
Filling Ingredients:
1 cup heavy cream
1/2 cup milk
10 ounces semisweet chocolate, chopped
2 tablespoons sugar
1/4 teaspoon salt
2 large eggs, at room temperature
Whipped Cream Topping Ingredients:
2 cups heavy cream
5 tablespoons granulated sugar
1/2 teaspoon vanilla extract
Directions:
To make the pastry: combine the flour, sugar, and salt in a large mixing bowl (or food processor). Add the butter and mix with a processor or hands until the mixture resembles coarse crumbs. Make a well in the middle of the pastry. Combine the egg yolk with the ice water in a small bowl, whisking to blend; pour it into the well and work it in to bind the dough until it holds together without being too wet or sticky. Squeeze a small amount together, if it is crumbly, add more ice water, 1 tablespoon at a time. When the dough is coming together but still in crumbs, pour the crumbs into your tart pan and press them out to fill the pan. Press them up the sides evenly and trim off any excess. Dock the dough (prick it slightly) with a fork all over. Put the tart shell in the refrigerator for at least 15 minutes to relax.Preheat the oven to 350 degrees F. Place the tart pan on a sturdy cookie sheet so it will be easy to move in and out of the oven. Line the tart with aluminum foil and add pie weights or dried beans to keep the sides of the tart from buckling. Bake for 30 minutes, then remove the foil and weights. Using a pastry brush, lightly coat the crust with a beaten egg white. Return to the oven and continue to bake for another 8 minutes until the tart is golden in color, but not brown. Remember the tart will be cooked again with the filling. It should be cooked but light in color so that it will not burn on the second bake. Set aside to cool and lower the oven temperature to 325 degrees F.
To make the filling: Heat the heavy cream and milk in a pot over medium-low flame, until it simmers slightly around the edges. Remove from the heat; add the chopped chocolate and stir until melted and smoothed out. Add the sugar and salt and whisk until well incorporated. Beat the eggs in a small bowl until blended and add them to the chocolate mixture, stir until completely blended. Pour the filling into the cooled tart shell and bake at 325 degrees F for 15 to 20 minutes until the filling is set (wiggle the pan to test) and the surface is glossy. If you see any bubbles or cracks forming on the surface, take the tart out right away – that means it is beginning to become over baked. Cool completely before topping with whipped cream.
To make the whipped cream, beat all ingredients together until cream thickens to correct consistency. Pile the mound of whipped cream onto your cooled tart and use a spatula to spread it (messy = more rustic). Shave some leftover chocolate over the cream for decoration.
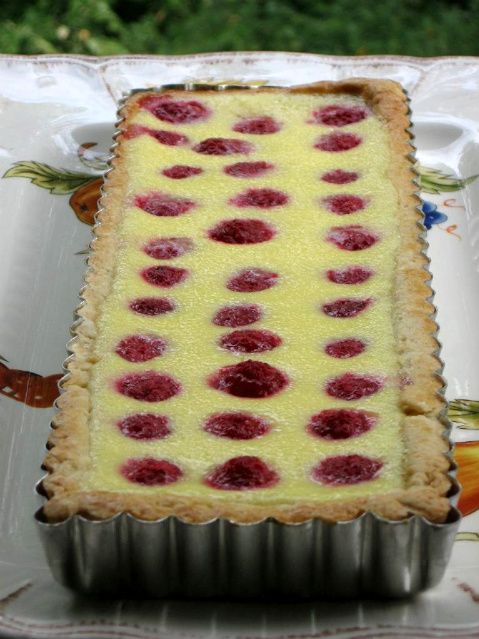
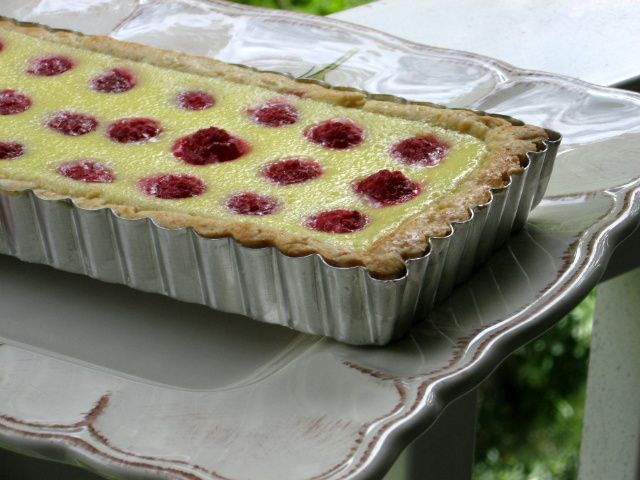
Raspberry Cream Cheese Tart still cooling in its pan.
Raspberry Cream Cheese Tart
Recipe by: Joy of Baking (with crust by Tyler Florence)
Yields: one standard tart, serves about 10
Tart Shell Ingredients:
2 cups all-purpose flour, plus more for dusting
3 tablespoons sugar
1/4 teaspoon salt
3/4 cup (1 1/2 sticks) unsalted butter, cold and chopped
1 large egg, separated
2 tablespoons ice water, plus more if needed
Filling Ingredients:
4 ounces (125 grams) cream cheese, room temperature
1/2 cup (100 grams) granulated white sugar
2 large eggs
3/4 cup (180 ml) light cream or half-and-half (coffee cream)
1/2 teaspoon pure vanilla extract
zest of 1 medium lemon or lime (I used just a spritz of lemon juice)
1 – 1 1/2 cups (110 – 165 grams) fresh raspberries
Whipped Cream Ingredients:
1 cup heavy cream
3 tablespoons granulated sugar
1/4 teaspoon vanilla extract
Directions:
To make the pastry: combine the flour, sugar, and salt in a large mixing bowl (or food processor). Add the butter and mix with a processor or hands until the mixture resembles coarse crumbs. Make a well in the middle of the pastry. Combine the egg yolk with the ice water in a small bowl, whisking to blend; pour it into the well and work it in to bind the dough until it holds together without being too wet or sticky. Squeeze a small amount together, if it is crumbly, add more ice water, 1 tablespoon at a time. Form the dough into a disk and wrap in plastic; refrigerate for at least 30 minutes.Roll out the pastry* on a lightly floured surface into a 12-inch circle, about 1/4-inch thick. Carefully roll the dough up onto the pin (this may take a little practice) and lay it inside a 9-inch tart pan with a removable bottom. Press the dough into the pan so it fits tightly; press the edges into the sides of the pan. It is important to press the dough evenly into every nook and corner of the ring, especially the scalloped edges. Shave off the excess hanging dough with a knife. Dock the dough (prick it slightly) with a fork all over. Put the tart in the refrigerator for 15 minutes to relax.
*Note: As mentioned above, I found it very difficult to roll the dough, and instead carefully grated as much chilled dough as possible into the pan, tearing the rest. I then pressed it into all areas of the pan, being absolutely sure it covered every surface.
Preheat the oven to 350 degrees F. Place the tart pan on a sturdy cookie sheet so it will be easy to move in and out of the oven. Line the tart with aluminum foil and add pie weights or dried beans to keep the sides of the tart from buckling. Bake for 30 minutes, then remove the foil and weights. Using a pastry brush, lightly coat the crust with a beaten egg white. Return to the oven and continue to bake for another 8 minutes until the tart is golden in color, but not brown. Remember the tart will be cooked again with the filling. It should be cooked but light in color so that it will not burn on the second bake. Set aside to cool.
To make the filling: In a food processor or electric mixer place the cream cheese and process until smooth. Add sugar and beat until incorporated. Add eggs, one at a time, and process until thoroughly combined. Add remaining ingredients and beat until well blended and smooth.
Place the tart pan on a larger baking pan. Carefully pour the filling into the pre-baked tart shell. Arrange the raspberries evenly around the tart shell and then bake the tart for about 30 – 35 minutes or until the filling is set (test by gently shaking the pan). Transfer tart to wire rack to cool. Serve warm or cold accompanied by softly whipped cream and fresh raspberries. Refrigerate leftovers.

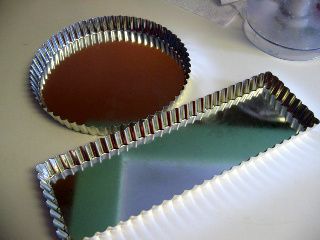
Off to Williams-Sonoma for some tart pan shopping!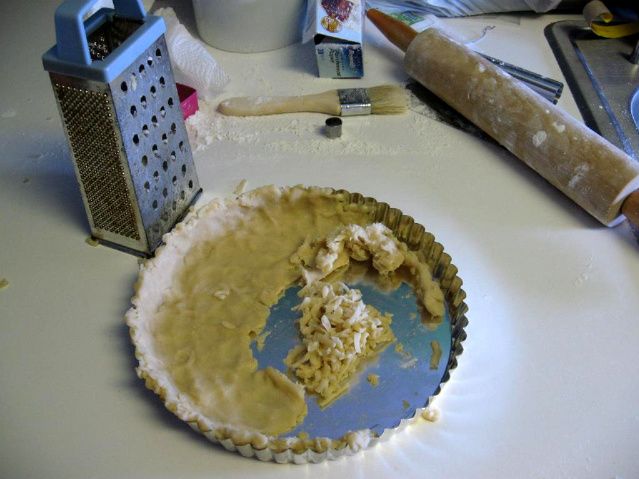
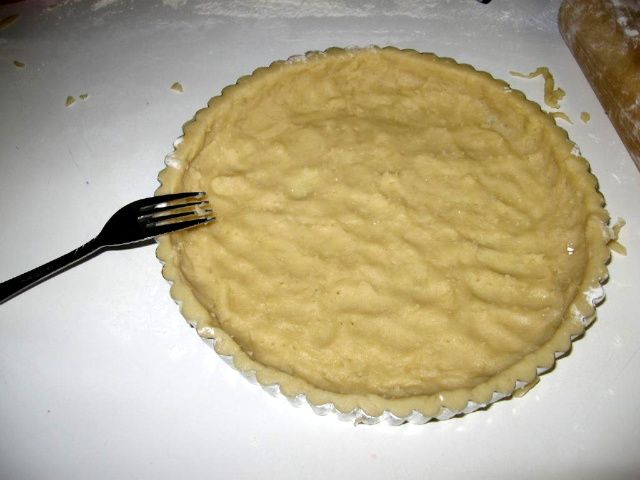
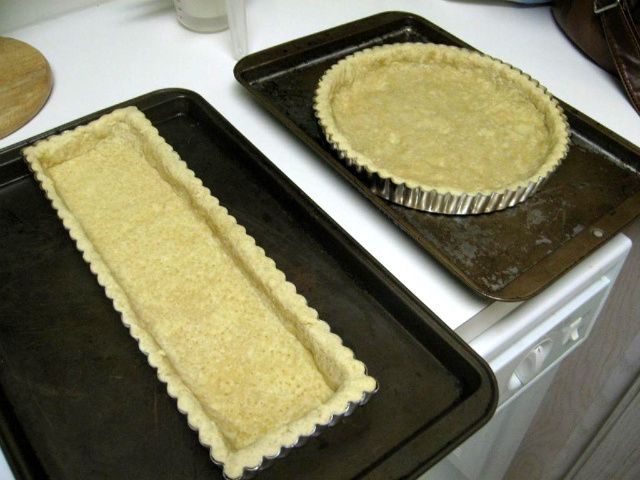
Grating and docking the tart dough (and trying not to lose any digits).
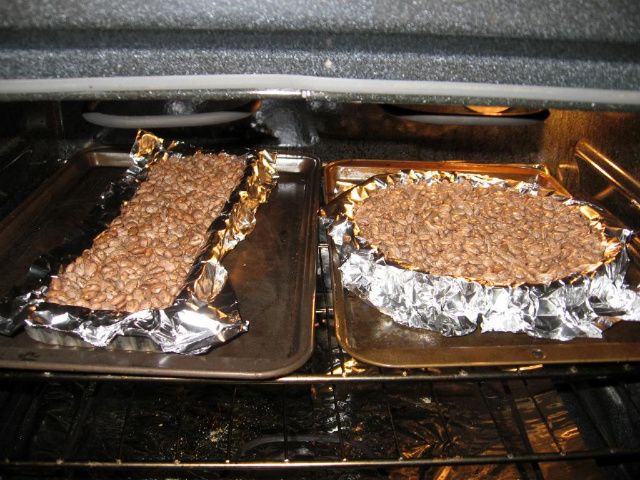
Blind baking the crust with beans as weights.
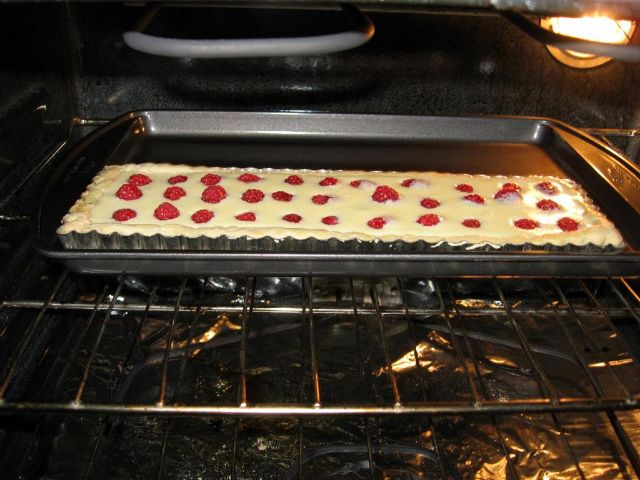
Raspberry Cream Cheese Tart baking and fresh from the oven.
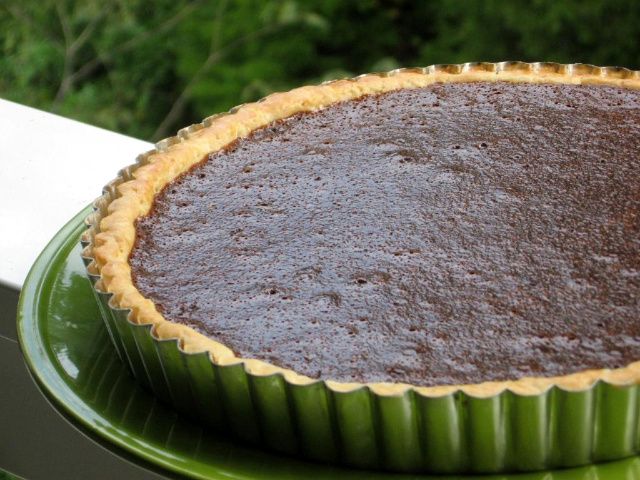
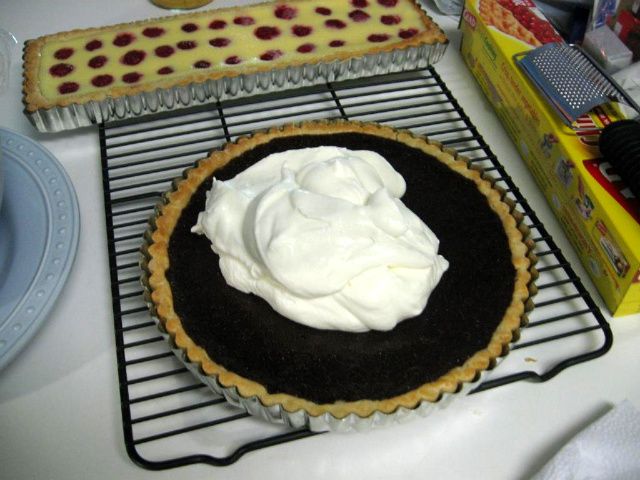
Chocolate Tart cooling, and then getting the whipped cream treatment.
Want to read more about crusts? My article, “Journey Towards a Perfect Crust,” chronicles my quest for buttery, flaky pies and tarts. Read it at The Daring Kitchen.
31 Comments on Two Terrific Tarts: Chocolate and Raspberry Cream Cheese
3Pingbacks & Trackbacks on Two Terrific Tarts: Chocolate and Raspberry Cream Cheese
-
[…] Posts Ice Cream CupcakesTwo Terrific Tarts: Chocolate and Raspberry Cream CheesePaula Deen's Red Velvet Cupcakes with Cream Cheese […]
-
[…] Tart with Pretzels Jump to Comments Funny story: I decided to take a well-loved recipe for a chocolate tart and update it for Mike’s birthday by filling the shell with pretzels before pouring the […]
-
[…] recipes are from these websites: Chocolate Tart Filling by Willow Bird Baking Cream Cheese Frosting by Food […]
Kat
October 17, 2009 at 6:57 pm (15 years ago)I’ve never given rectangular tart pans a second glance, but now they’re getting a third, fourth, and even a fifth!
And how incredible do those tarts look??! I’m doing that chocolate tart tonight! I’ll let you know how it goes…
Julie
October 17, 2009 at 7:45 pm (15 years ago)Oh please do! Can’t wait to hear!! Enjoy it.
Megan
October 17, 2009 at 11:02 pm (15 years ago)Both of those tarts look amazing. Based on my mood right now though, I’d go for a huge piece of the chocolate one! I have a large round tart pan and mini tart pans, but I would love to get a rectangular one too. So sorry to hear about your kitchen injury – I’m always doing things like that!
Julie
October 19, 2009 at 11:05 am (15 years ago)I was much more dramatic about it than it required 😀 Ha!
Thanks, Megan!
Jenni
October 18, 2009 at 12:21 am (15 years ago)Hey, a few weeks ago I saw a widget you can add to your blog that allows you to give ratings to your recipes – just like on Netflix! I think it is called GD Star Rating plugin.
And your tarts look great – I have been eyeing a rectangle tart pan for ages! 🙂
Julie
October 19, 2009 at 11:06 am (15 years ago)Eeee a recipe rating widget!! Sounds so fun!
Thanks, Jenni! I love my rectangular pan (obviously) — you should grab one!
RubberNinja
October 18, 2009 at 12:35 am (15 years ago)Wow. That Chocolate Tart is now on my to-bake list! Looks delicious!
Julie
October 19, 2009 at 11:15 am (15 years ago)Thanks, RubberNinja! It was heavenly!
Ms Alex
October 18, 2009 at 6:27 am (15 years ago)Those raspberries look so good in that presentation, definite wow factor. 🙂
Julie
October 19, 2009 at 11:15 am (15 years ago)Thanks, Ms Alex! Don’t they look like polka dots?
Kathy Howe
October 18, 2009 at 12:29 pm (15 years ago)Both recipes look wonderful, but I will be trying the chocolate tart today. Thank you for sharing the recipe with us.
Julie
October 19, 2009 at 11:16 am (15 years ago)Hope you love it, Kathy! Thanks!
Rose
October 21, 2009 at 6:12 pm (15 years ago)Beautiful blog you have here! WOW! These tarts look fantastic. 🙂
Julie
October 21, 2009 at 6:25 pm (15 years ago)Thank you, Rose!!
Rachel
October 21, 2009 at 9:39 pm (15 years ago)Yumm! The rectangular tart pan is a beauty! I’m so hungry!! 😉
Vera
October 22, 2009 at 1:56 pm (15 years ago)They both look and sound fantastic! I’m not surprised it was difficult to choose a favorite between these two.
Jill
October 23, 2009 at 7:06 pm (15 years ago)Loved your idea about having little star rate everything around us–that would be so handy! I’m with you, I can’t decide which tart I would want to taste–I’ll take both, please! 🙂
P.S. Your Pumpkin Whoopie Pie post totally inspired me to make those & then I had to post about them too–I hope it’s ok that I linked your post in my write-up. 🙂
Lauren
October 23, 2009 at 7:10 pm (15 years ago)So cute & delicious =D. Everything looks wonderful!
Angelia McGowan
October 24, 2009 at 3:25 pm (15 years ago)I’ll have a piece of the chocolate tart, with a side of raspberry, YUM!
nutmegnanny
October 26, 2009 at 4:23 pm (15 years ago)Oh wow these tarts look amazing! There is something about that chocolate tart that is making my stomach go nuts….now I need some chocolate 🙂
billy@ATFT
October 28, 2009 at 3:07 am (15 years ago)using beans to weigh it down is a good idea! But wouldnt the beans cooked? can u still use them?
Julie
October 28, 2009 at 7:17 am (15 years ago)They do become inedible after using them this way, Billy. The good thing is that you CAN reuse them as pie weights. I just poured all of these beans into a ziplock labeled “pie beans” (after they had cooled!) for using next time. Very inexpensive as far as pie weights go 🙂
Foodlover
October 29, 2009 at 11:03 pm (15 years ago)the raspberry tart just looks so beautiful – it’s almost to pretty to eat (almost)…
Julie
October 30, 2009 at 7:09 am (15 years ago)Almost!! 😀 Thank you, Foodlover!
Lorraine @ Not Quite Nigella
October 31, 2009 at 9:21 am (14 years ago)I absolutely love the sound the sound of these tarts. I’m convinced you are the pie and tart queen! 😀
Julie
October 31, 2009 at 10:07 am (14 years ago)Thank you, Lorraine! Injury notwithstanding?? 😀
mara
November 6, 2009 at 12:36 am (14 years ago)oh, these look really tasty. I really need to pick up one of those rectangular tart pans. And, I love rating the netflix as well.
Julie
November 6, 2009 at 12:43 am (14 years ago)Thanks, Mara! I’m lovin’ the rectangle 🙂