
There’s been a joyous new addition to my family! She doesn’t even have a name yet, but she’s already brought so much love and happiness into our lives. And quesadillas. She’s brought a lot of those, too.

Meet my new baby!
That’s right! I have a precious new Cuisinart panini press! And I got her for free! Well, sort of. My local grocery store has been running a promotion where you get a point for every $10 you spend on groceries. You can then use points to “purchase” an array of Cuisinart appliances. My little panini press here cost 100 points, or (wince!) $1,000 worth of groceries. Okay, okay, so obtaining her was a bittersweet accomplishment. Nevertheless, I was as excited as a bunny eatin’ a banana! The cashier politely listened to me ramble about all the panini I planned to make as I scooped my new appliance up to bring her home. Since then, there’s been a whole lotta pressin’ going on!
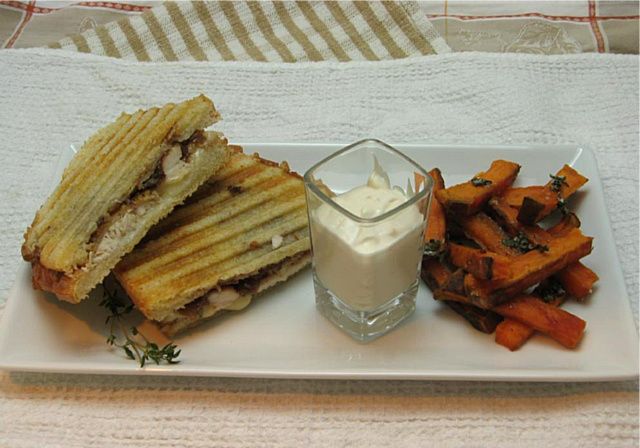
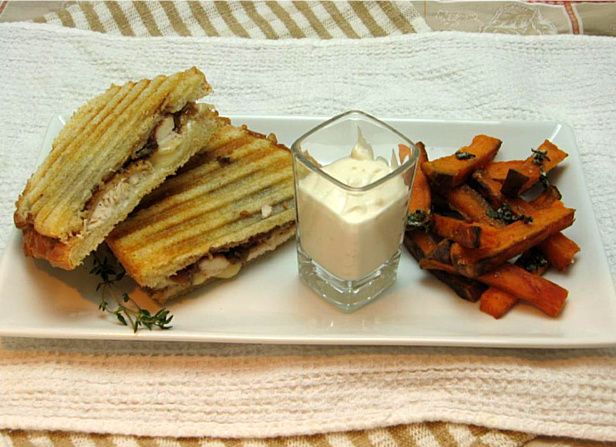
While searching around enthusiastically for panini recipes, I came upon a lovely blog: Panini Happy. A whole blog entirely devoted to using my new favorite kitchen gadget! I got so excited paging through the blog that I planned a whole dinner around panini! On the menu was a succulent Roast Chicken and Onion Jam Panini, a side of Sweet Potato Fries with Basil Salt and Garlic Mayonnaise, and a comforting side of Oven-Baked Macaroni and Cheese.
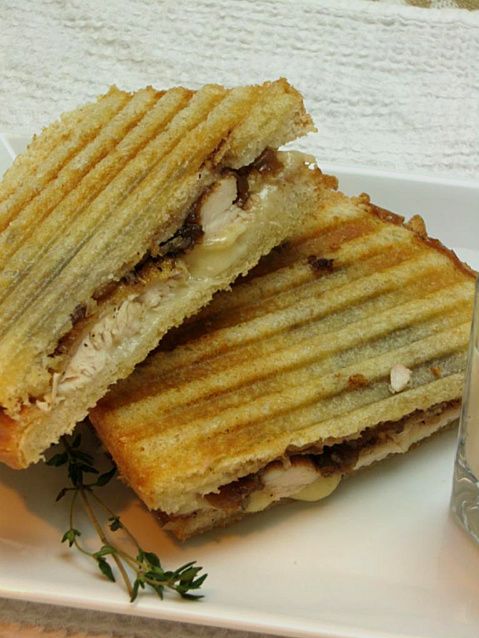
The panini was a synergy of gorgeous materials: sourdough bread, freshly roasted chicken, Gruyère, fresh thyme, garlic mayonnaise, and (drum roll please) ONION JAM. Panini Happy is where I met this Condiment of Condiments. Oh man, y’all, this stuff is good. Sweet caramelized onion, roasted garlic, reduced balsamic vinegar . . . it’s the perfect, hearty, luscious spread to drench your panini in. And drench we did!
Onion Jam
Recipe by: Panini Happy
Yields: ~3/4 cup of onion jam
Ingredients:
3 large sweet onions
2 heads garlic, roasted*
2 tablespoons sugar
2 tablespoons brown sugar
4 tablespoons balsamic vinegar
Directions:
Squeeze roasted garlic cloves unto a small plate. Set aside. Cut onions in half lengthwise; peel. Cut off ends; cut lengthwise into 1/4-inch thick pieces.Coat a 13″ skillet with cooking spray, and set over medium heat. Add onions, and cover. Cook, stirring occasionally, until softened and translucent, about 15 minutes.
Add sugars; re-cover. Cook, stirring occasionally, until onions are golden, 20 – 30 minutes.
Add 1/4 cup water and stir. Cover and cook until dark brown, 20 -30 minutes.
Add balsamic vinegar, roasted garlic cloves, and another 1/4 cup water. Continue cooking until liquid has been absorbed, about 10 minutes. Transfer to a bowl to cool. Store in an airtight container in the refrigerator for up to 1 week.
*See Elise’s helpful guide to roasting garlic on Simply Recipes
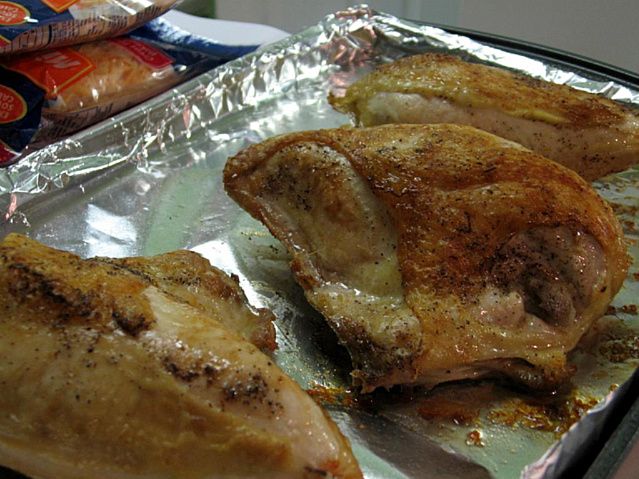
This easy roasted chicken breast was a new recipe for me, which I now adore. It’s simpler than roasting a full bird, but still produces juicy meat with a nice crispy skin. Easy as pie, especially for chicken you’re about to slice up onto a sandwich. Alternatively, you could pick up a rotisserie chicken at the grocer and slice some meat off the already-prepared bird for your panini. But then you don’t get to pull this out of the oven:
All that was left once my onion jam was prepared and my chicken had been roasted was to assemble my panini.
Roast Chicken and Onion Jam Panini
Recipe by: Panini Happy, adapted
Ingredients:
Onion jam (see recipe above)
Roasted chicken (see recipe above), carved
Gruyère cheese, sliced
fresh thyme to taste
garlic mayonnaise (see recipe below, with sweet potato fries)
olive oil
Assembling the Panini:1. Prepare onion jam (can be completed in advance).
2. Prepare roast chicken (can be completed in advance).
3. Preheat closed panini press to medium.
4. Brush one side of a slice of sourdough with olive oil and placed it on a preheated panini press. Assemble materials on top: slather on garlic mayonnaise, layer slices of cheese, slices of roasted chicken, a sprinkle of thyme, and heaping spoonfuls of onion jam. Place second slice of oiled bread on top, oil side up.
5. Using gentle pressure, press sandwich and hold for about 3 minutes, or until bread is toasted with grill marks and ingredients are heated through. Slice in half and enjoy immediately.
Finding the perfect side items to accompany the perfect panini was quite a task. The comforting, creamy side items I’d been craving throughout the cold, rainy weeks of November didn’t seem to “fit” next to my hip panini, but typical light sandwich fare didn’t appeal to me. So I compromised and made both! I baked a pan of my beloved Oven-Baked Macaroni and Cheese, but also crisped up some delicious (and more appropriate) sweet potato fries. Giada DiLaurentis’s sweet potato fries are my favorite; they’re sprinkled with fresh basil and kosher salt, and dipped in a tangy garlic mayonnaise (the same garlic mayonnaise, by the way, that I slathered on my sandwich). I’ve loved these sweet potato fries since I took my very first bite of them months ago. I cut mine thick, but you can slice them thinner for a crispier fry.

Sweet Potato Fries with Basil Salt and Garlic Mayonnaise
Recipe by: Giada DiLaurentis
Yield: 4 to 6 servings
Ingredients:
5 sweet potatoes, cut into about 1 by 5-inch “fries”*
3 tablespoons olive oil
2 tablespoons chopped fresh basil leaves
2 teaspoons kosher salt
1/2 teaspoon freshly ground black pepper
3/4 cup mayonnaise
1 clove garlic, minced
1 tablespoon lemon juice
*Note: I usually make this recipe in batches of 1-2 potatoes at a time, and it’s perfect for 1-2 people. I keep the garlic mayonnaise recipe the same and have extra throughout the week for a sandwich spread.
Directions:
Preheat the oven to 400 degrees F.Place the sweet potato “fries” on a foil-lined baking sheet and toss with the olive oil. Bake until golden, about 45 minutes. Meanwhile combine the basil, salt, and pepper in a small bowl. In another small bowl combine the mayonnaise, garlic, and lemon juice, and stir to combine. When the sweet potato fries come out of the oven, sprinkle with the basil salt. Serve with the garlic mayonnaise alongside for dipping.
Even if you don’t have your own panini press, I hope you’ll get out a regular ol’ skillet and grill up some cheesy, onion jammy sandwiches — and don’t forget the delicious sides! Oh, and one last thing . . . what do you think I should name my new gadget?
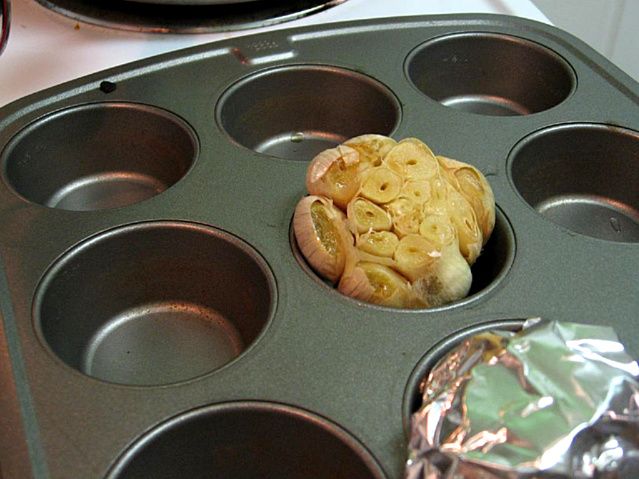
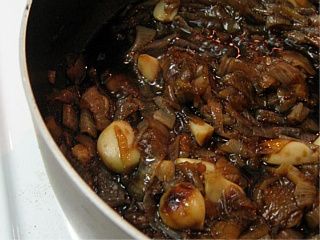
Roasted garlic and delicious finished onion jam.


Sweet potato fries cooking and panini grilling!
Enjoy!