cookies

One-Skillet Gooey Pumpkin Cookie Cake

Pale strands of my hair tangled into the mess of dusky flowers in my lap. Mike’s car sliced quietly through the lukewarm air of the countryside until a gravel drive slid into view. We turned into it with a crunch, parked, and began the arduous process of shuttling picnic supplies down a rocky path.

Some time later we sat alone by a still pond, the flowers now perched on a stack of books beside us. We’d just finished eating an elaborate lunch on my childhood patchwork quilt. The ground was hard and uneven — it always seemed so soft in movies — but at one point I lay down, the silk of my slip dress cool in the autumn breeze, and watched the highest leaves fluttering against the sky. Then I looked back to Mike’s ruddy, bespectacled face and smiled.

Sometimes you only realize how special a moment is once it’s passed, but every now and then, you get the gift of realizing in the moment itself. This was one of those times.

I’d never been on a legitimate blanket-on-the-ground picnic before, and living in different cities, Mike and I rarely got to just sit and enjoy each other’s company. Now here we were, grinning at each other, stuffed like turkeys in the middle of the woods and post-lunch euphoria. The streamer of hearts I’d hung from the trees around us whispered in the wind. The whole afternoon spread out before us.

That was last fall. In the dark days that followed, I remembered that picnic as a bright bit of joy to hold onto.

I love those unexpected moments that settle into your heart as significant — the ones that nestle like bookmarks into the very best folds of time. I remember so many of them:

Sitting by a fire in Gatlinburg with Mike, drinking hot chocolate in mugs we’d just bought from a Walgreens around the corner.

Dancing with a stranger on the sidewalk one night in San Francisco.

Pausing with Mike on the stairwell of my apartment building to watch the sunset.

Looking down at the fluffy mop in my lap while driving home from Carolina Poodle Rescue and realizing that Byrd was truly mine.

Embracing my new friend, 7-year-old Zoe, when she ran up to hug me after we’d been baptized together one Sunday morning.

Walking alone across the Georgia Tech campus one summer night in the middle of my teacher training, the golden skyline glowing above me.

Getting the phone call where my dad revealed that after years of dangerous treatments, he was cancer-free.

Running barefoot through the grass in La Jolla one warm night with my sister, Sarah, for no reason at all.

Sitting in traffic on i-85 to Raleigh with the sun illuminating the gorgeous fall leaves and little Byrd poking her nose out the open window.

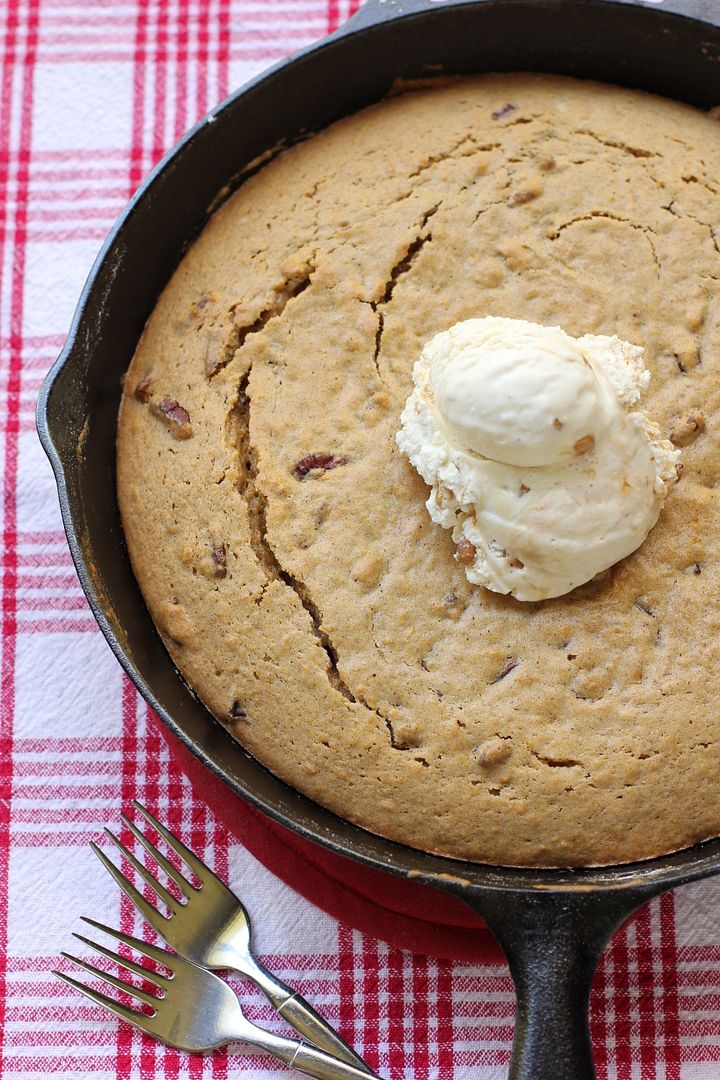
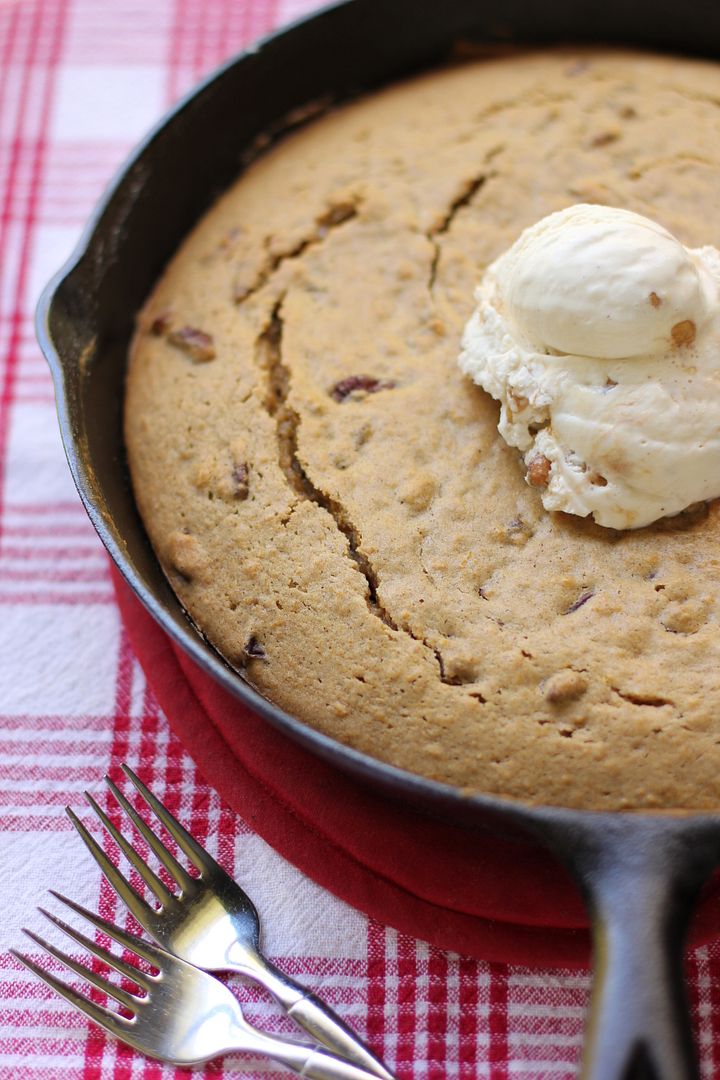
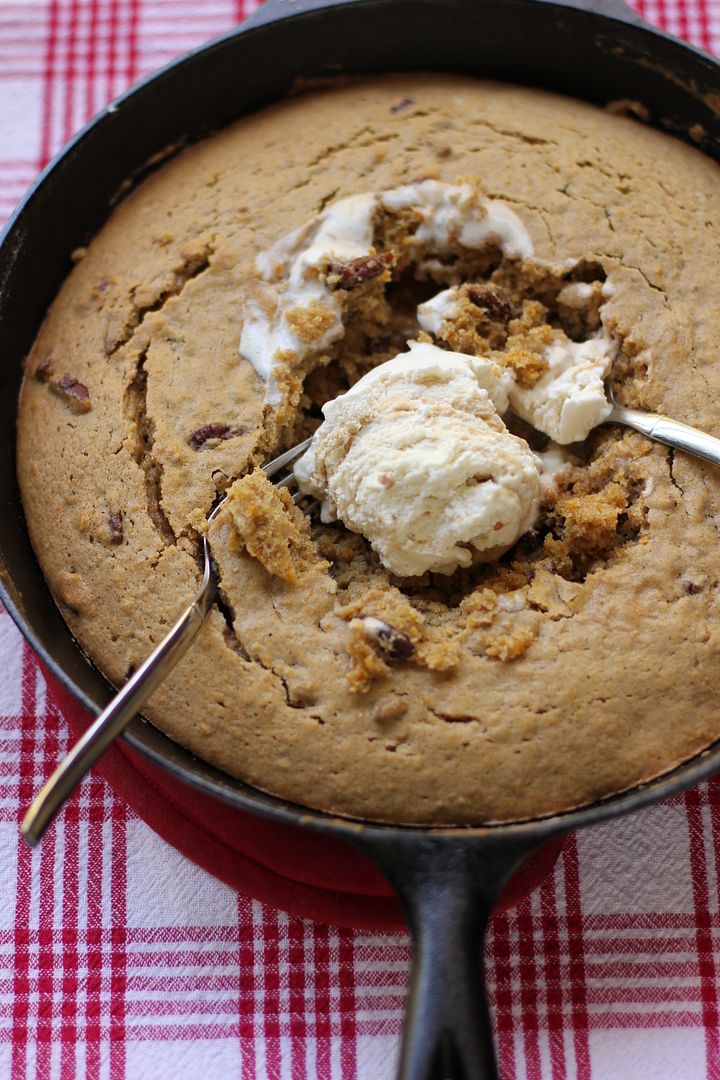
And, most recently, sitting with Mike and eating gooey pumpkin cookie cake straight out of my cast iron skillet. I’d just pulled the cake from the oven and taken dozens of photos, and with my camera still propped up beside me, we dug in. No plates needed — just forks and some ice cream. There’s just nothing like the casual, sweet act of devouring forkfuls of a shared dessert without even an ounce of fuss.

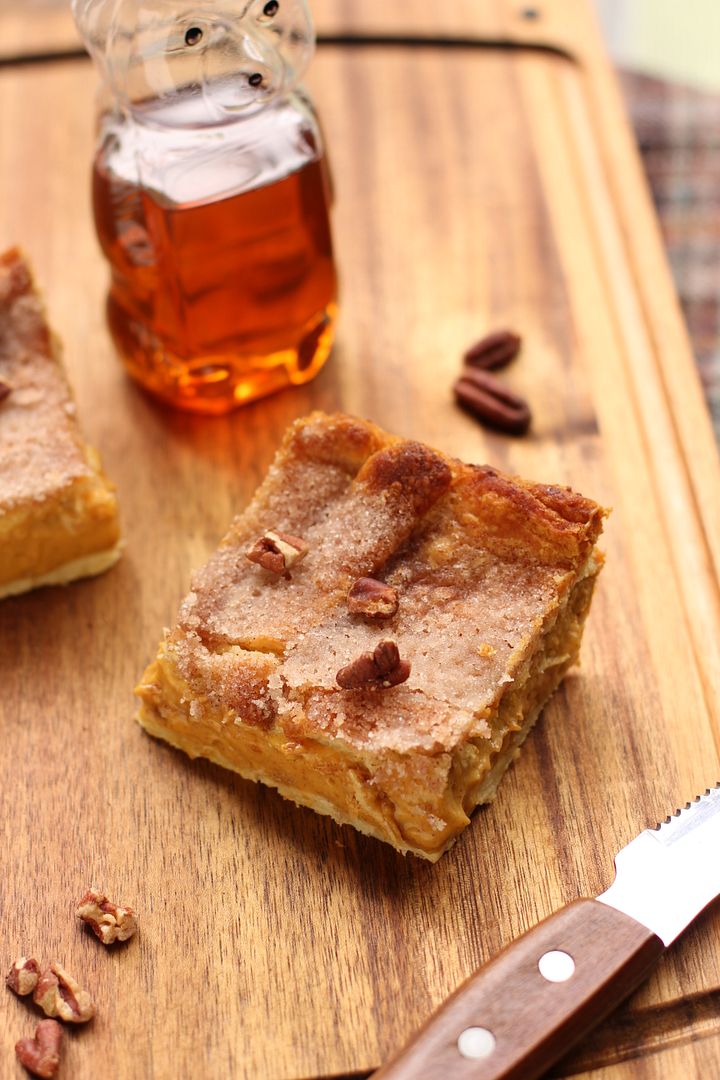
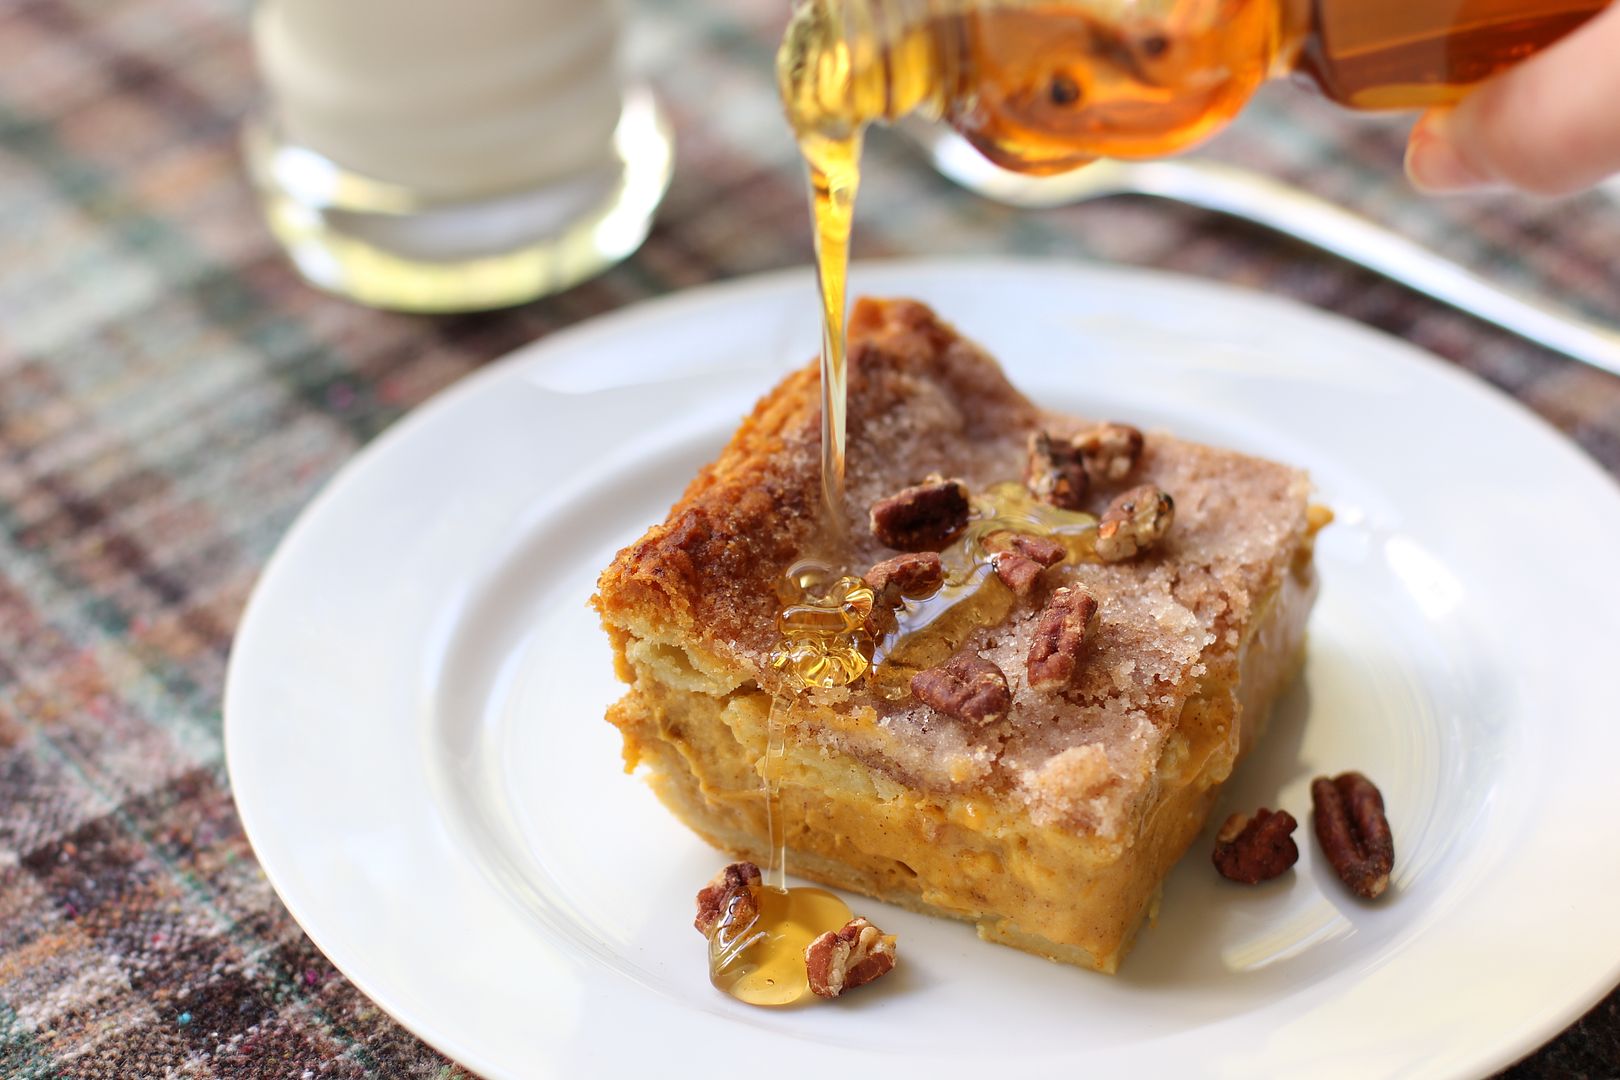
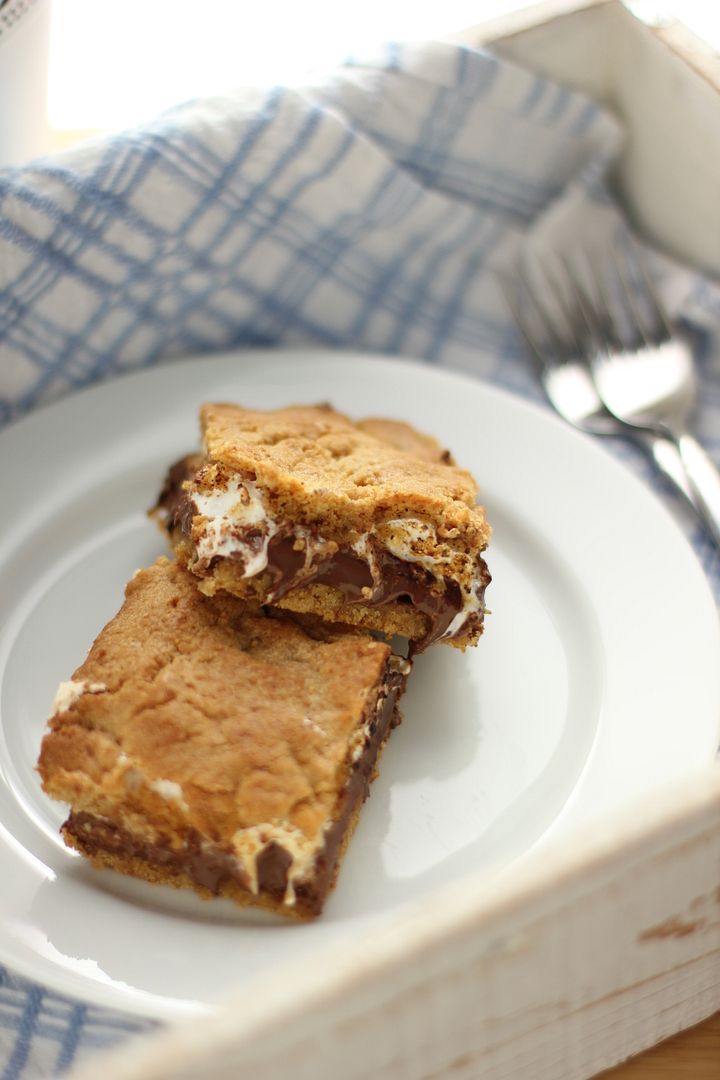
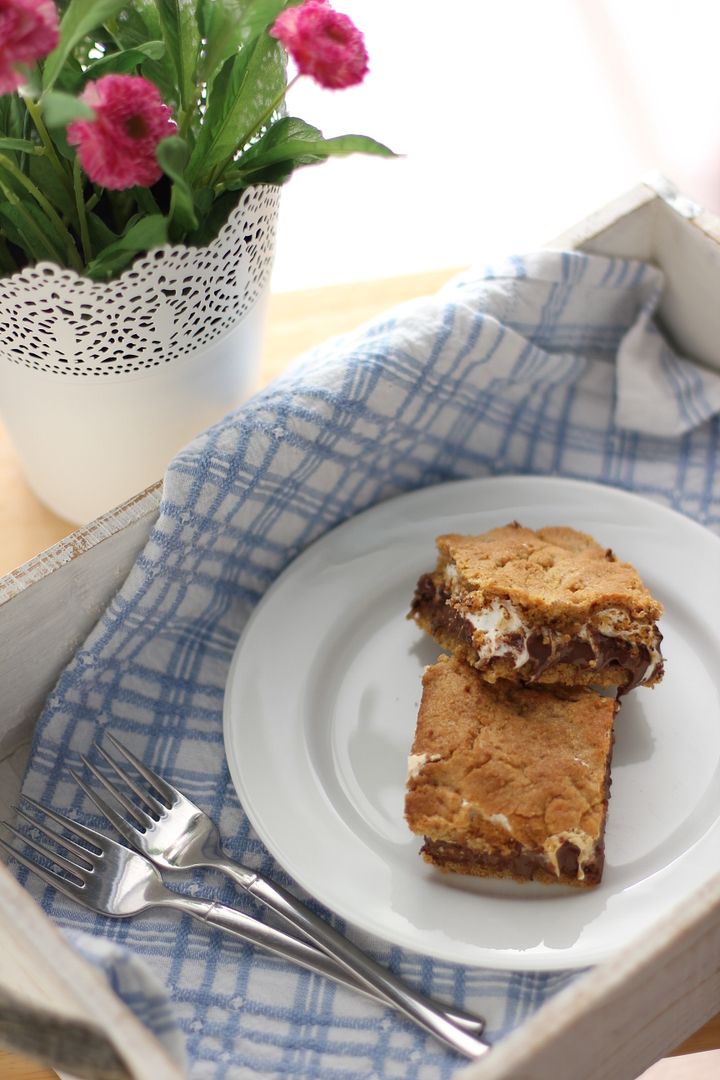
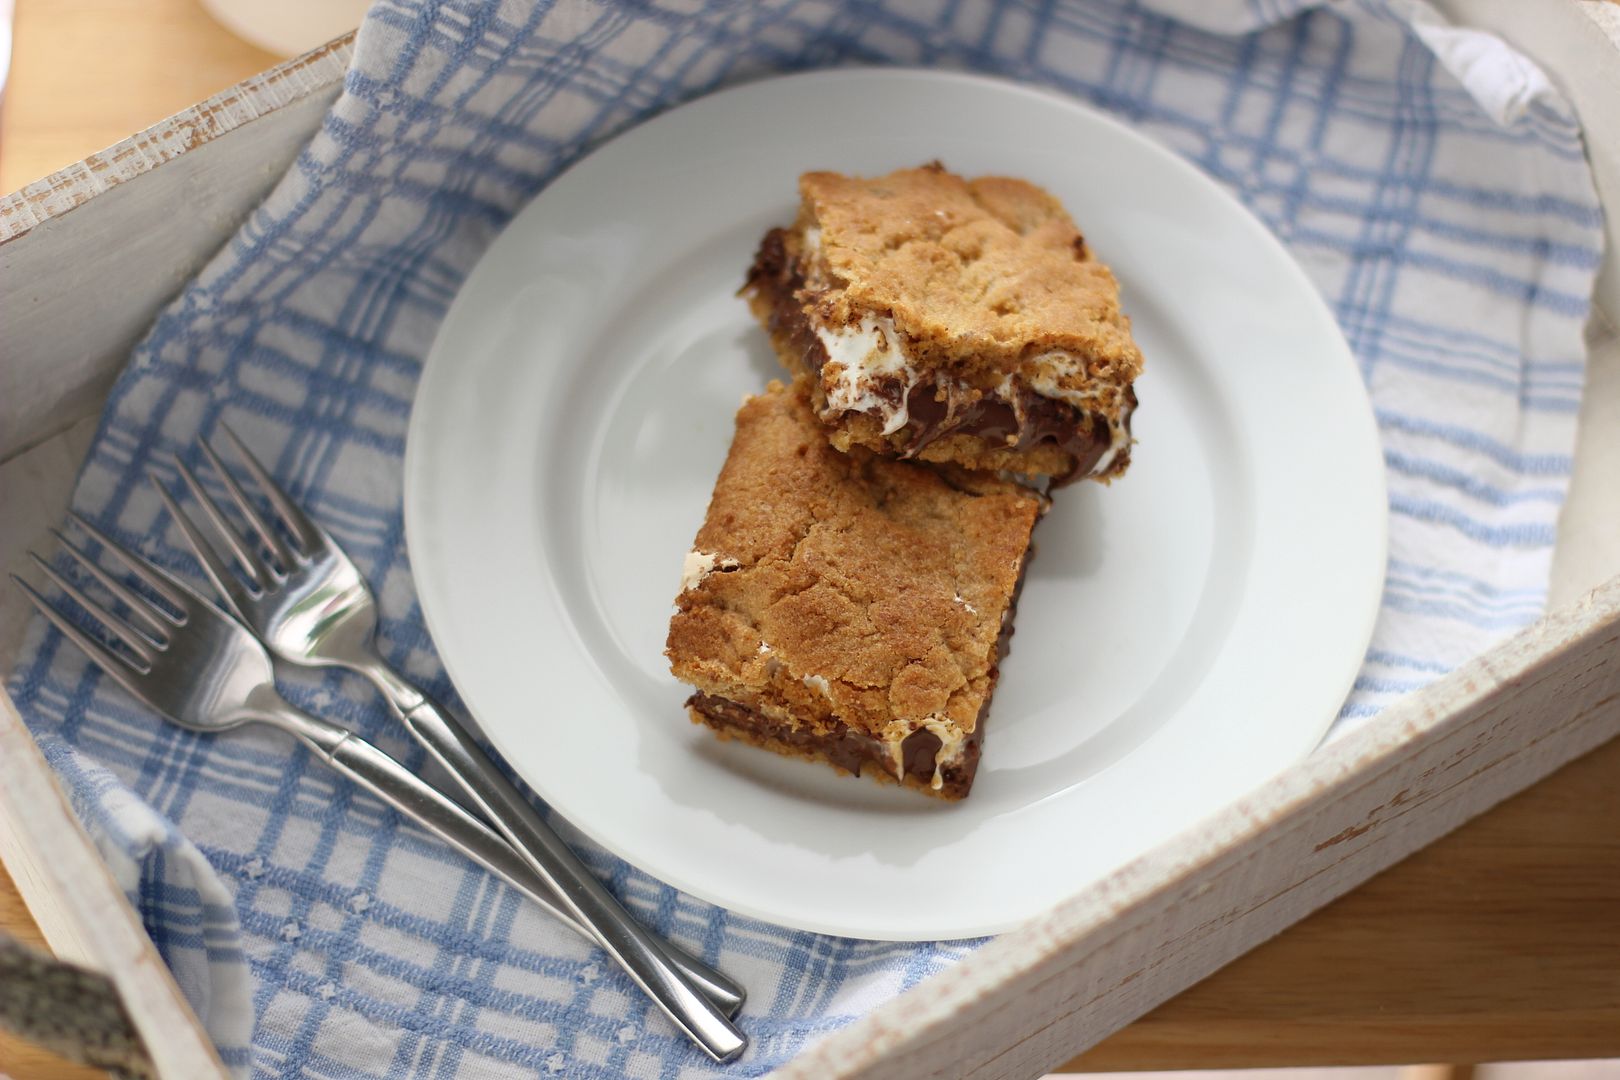
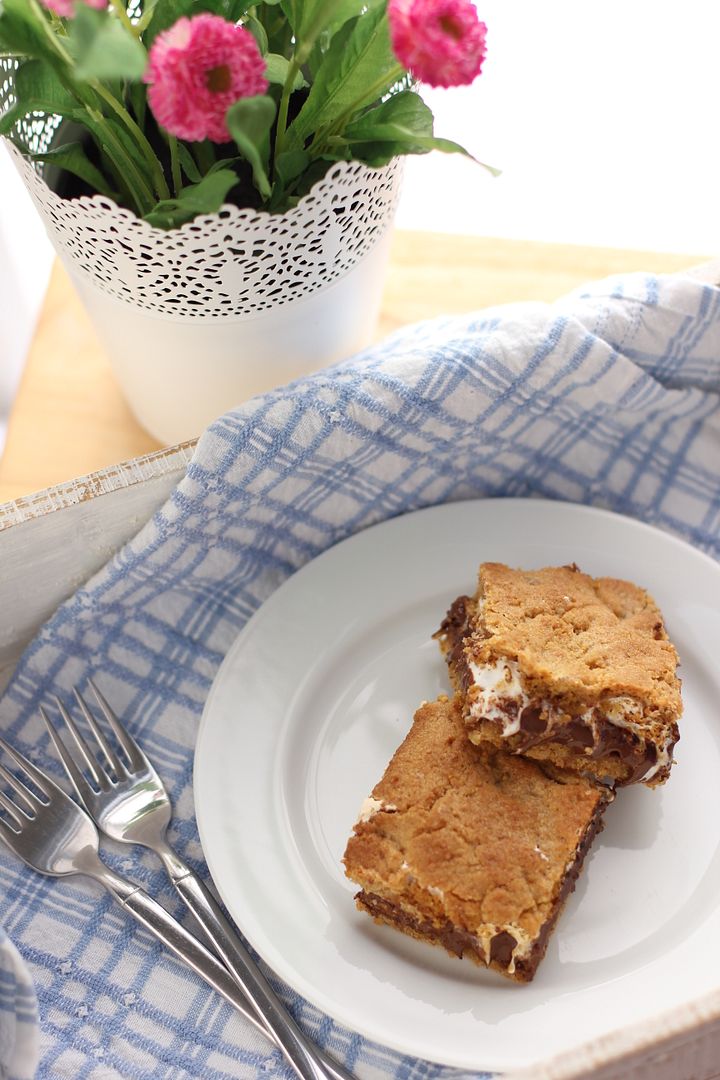
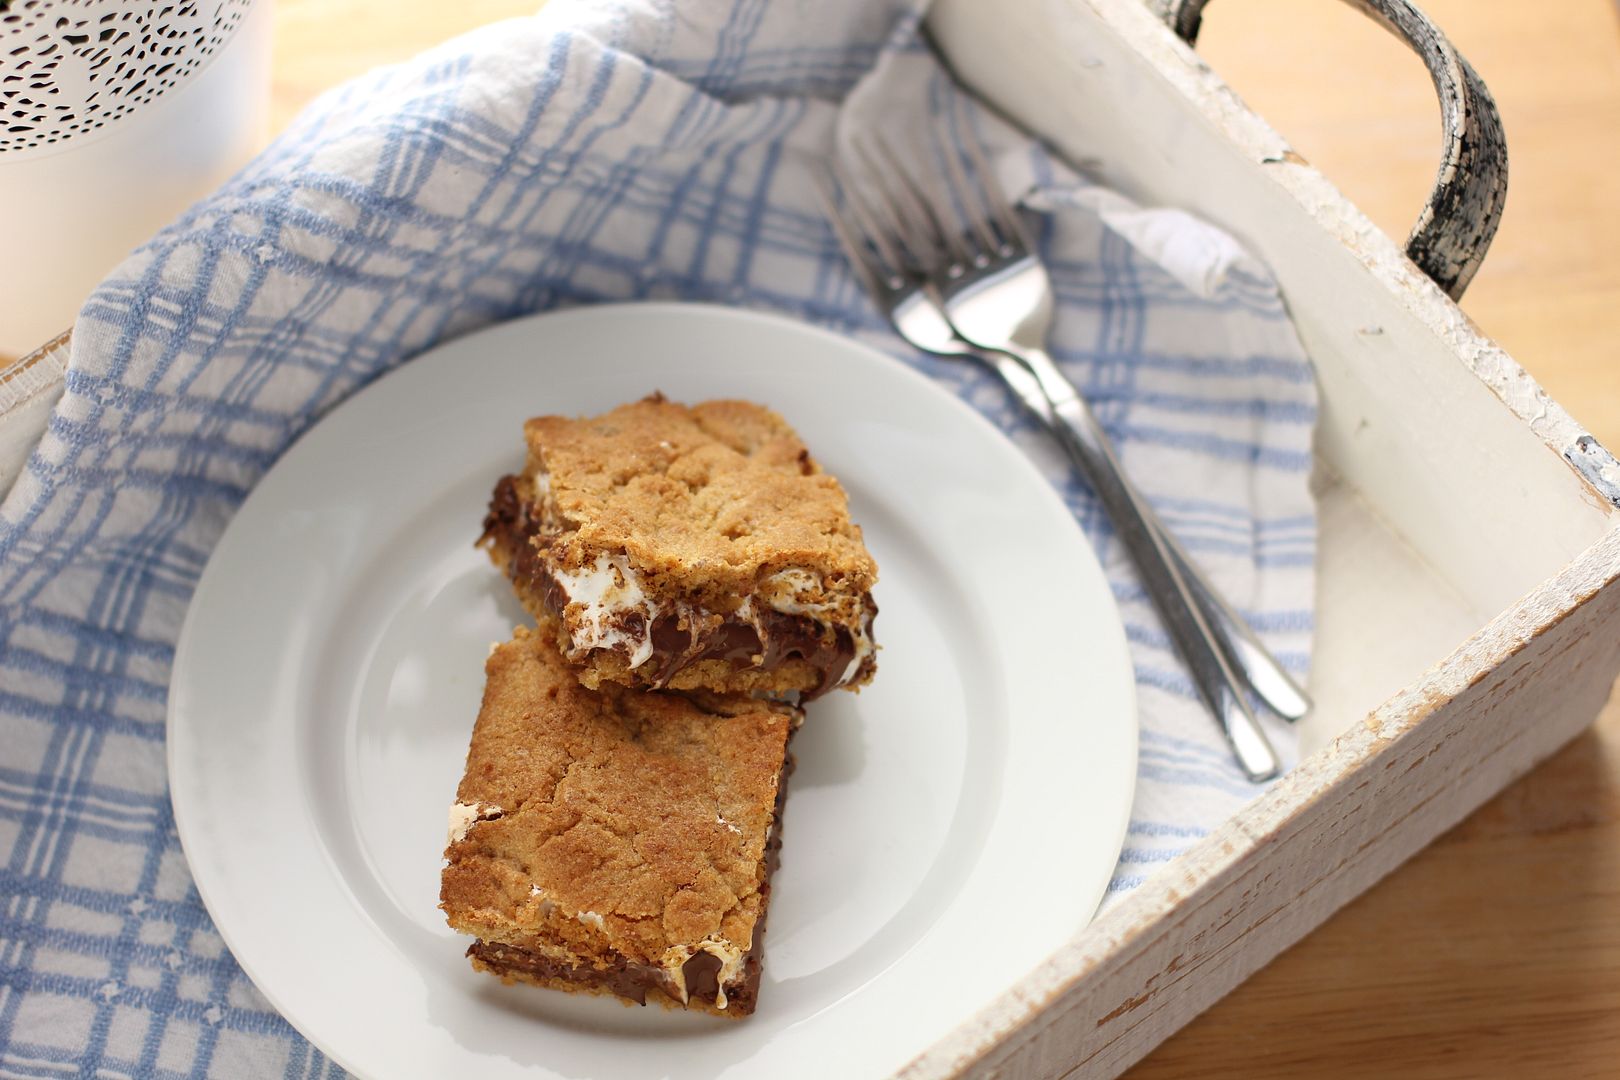
And this cake! I made it twice to fiddle with proportions a bit. The first version (pictured throughout this post) was great, but the second version (see pictures below) was insane: a moist, gooey, comforting cake boasting surprise bites of caramel and toasted pecans.

Not only that, but you can make this cake in about half an hour with one skillet! Even if you choose to toast up some pecans and make some streusel to go with it (which I recommend!), you’ll have minimal dishes to wash. Especially if you skip the plates.


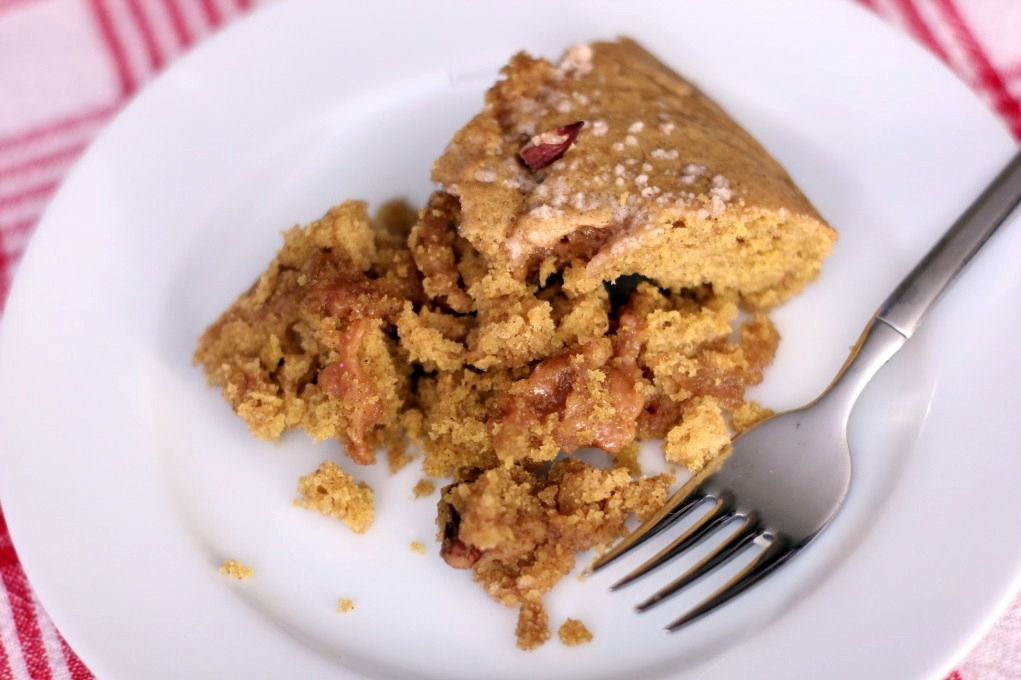
A slice of the final cake.

You have to make this thing as soon as possible. Make it tonight! Throw it together and eat it on the couch with someone sweet. Or take it to your Halloween parties. Or eat the entire thing alone while watching old episodes of Hoarders. No judgments. It’ll be amazing no matter what.

And in the meantime, share a beautiful moment that stands out in your memory.

One-Skillet Gooey Pumpkin Cookie Cake


Recipe by: Willow Bird Baking, inspired by Sophistimom and Food Network
Yield: about 8 servings

This melt-in-your-mouth pumpkin spice cake is warm, moist, and delicious. Gooey caramel and toasted pecans amp up the “mmm” factor. And to say it’s easy is an understatement — you can make it in one skillet in about 35 minutes! This is the perfect recipe to whip up on a whim and eat in your PJs on the couch. Devour it straight from the skillet with a pile of ice cream. (P.S. If you don’t care about the number of pots and pans and want to go a little crazy, cut down the sugar a little and try the cake with this amazing caramel sauce.)

Ingredients:
3/4 cup (1 1/2 sticks) unsalted butter
1/4 cup vegetable oil
3/4 cup granulated sugar
1/4 cup firmly packed light brown sugar
1 cup pureed pumpkin
1 teaspoon vanilla extract
2 eggs
2 1/8 cups all-purpose flour
1 teaspoon baking powder
1/2 teaspoon baking soda
1/2 teaspoon salt
2 teaspoons cinnamon
1/2 teaspoon nutmeg
1/2 teaspoon ginger
1/4 teaspoon allspice
some dulce de leche or 10-15 caramels
1/2 cup toasted pecans (optional, see note in directions)

Directions:
Note: The first time I made this cookie cake, I mixed in 1/2 cup of chopped pecans that I’d toasted (on a sheet pan at 350 degrees F for about 6 minutes or until fragrant, stirring a couple of times). The second time I made it, I mixed in this toasted pecan streusel — heavenly! These extra mix-ins will add a bowl and a sheet pan to your prep, but I highly recommend them.

Preheat the oven to 350 degrees F. In a 10- or 12-inch cast iron skillet over medium heat, melt the butter. Stir in the vegetable oil, sugars, and vanilla and remove from heat. Let this mixture cool until the pan is no longer hot (about 5 minutes) so you won’t scramble your eggs.

Add both eggs to the butter mixture, whisking them well to combine. Whisk in the pumpkin. In a separate bowl, whisk together the flour, salt, baking soda, baking powder, cinnamon, nutmeg, ginger, allspice (Note: it’s kind of lame to use another bowl for this, and according to Sophistimom, you should be able to just dump all your dry ingredients on top and whisk them in well, but I was too chicken to try. So I guess this is technically “One-Skillet, One-Bowl” cake if you do it my way. If you just dump them in, please let me know how it goes!) Whisk the dry ingredients into the wet and pour the batter into your skillet.

Stir in the toasted pecans or streusel if you’re using them. Place dollops of dulce de leche or caramel candies around the surface of the batter. Bake your skillet cookie for 15-25* minutes, or until the edges are getting golden and the center is still soft (a toothpick inserted into the center should come out with some moist crumbs, but no liquid batter). Eat immediately (preferably straight out of the skillet!) with heaps of vanilla ice cream (or a fun caramel flavor).

*Depending on your skillet, this cooking time can really vary. I’d start checking at 15 minutes and then check every couple of minutes after that with toothpicks. Make sure to look for moist crumbs, not a clean toothpick. If you overbake, it might be dry!


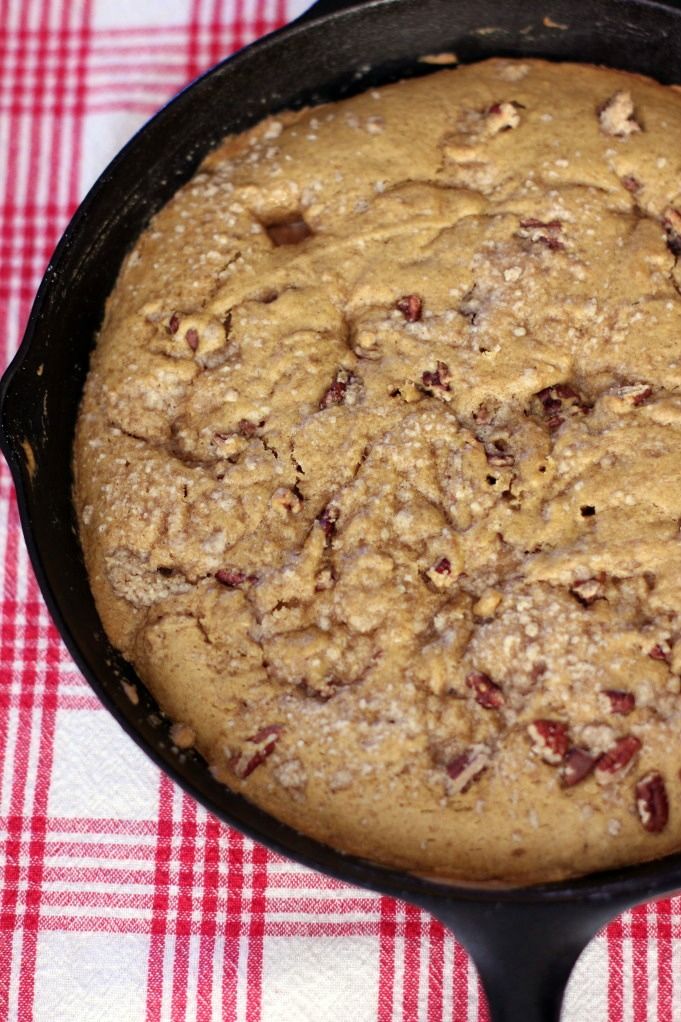
Recipe before and after tweaking to warm, gooey perfection.

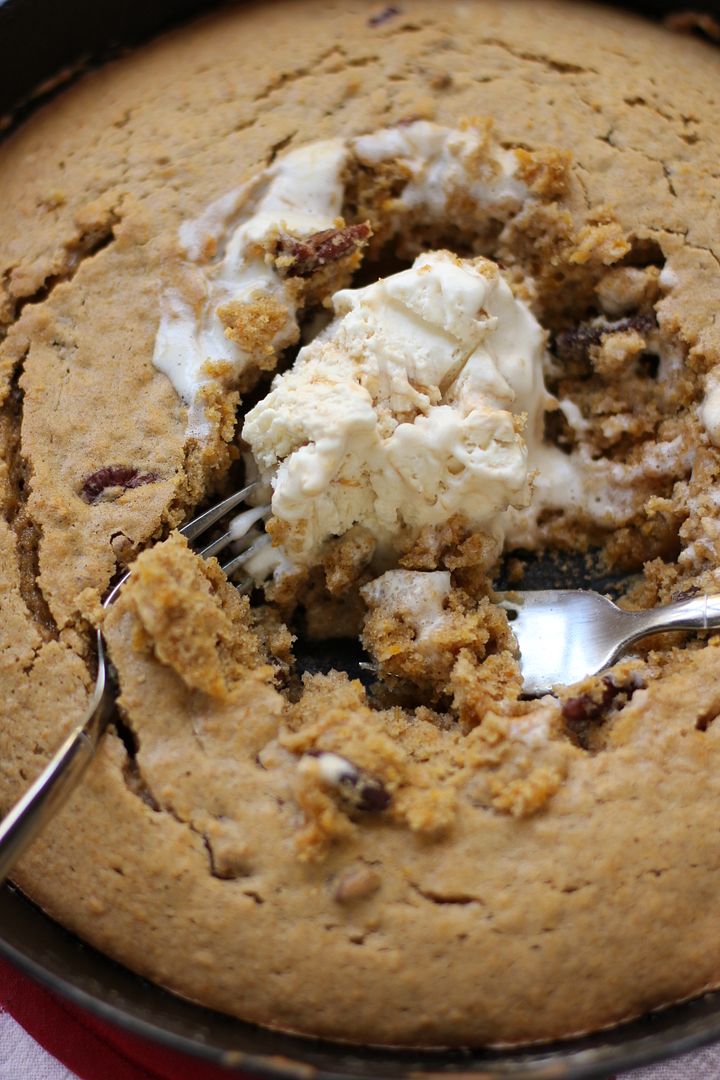
Need a closer look at the final product?


Gooey, caramelly, streuselly, pumpkiny, amazing.

If you liked this post, please:
Subscribe to Willow Bird Baking
Follow Willow Bird Baking on Twitter
Follow Willow Bird Baking on Facebook
Give this post a thumbs up on StumbleUpon
Pin It


ShareOther ways to share this post with friends!

Pumpkin Cheesecake Stuffed Snickerdoodles

A few evenings ago I was driving home on Harris Boulevard straight into the hot-gold sunset. The windows were rolled down — enough so that the tepid autumn air rushed into the car across my forehead, but not enough to assault me with a face full of blonde tangles. My favorite 80s song tumbled out of the speakers and vibrated the swirling air around me.

I acquiesced: okay, fall.

I’m a summer girl. Cold air feels like a heavy restraint: every trip outside with Byrd involves shrugging on two coats, two pairs of pajama pants, a scarf, and some mittens. I have to wrangle her into her snuggie (what? don’t act like you don’t own a dog snuggie) and wrap her in my scarf. It feels like I’ve doubled in weight as I lumber down the stairs like an abominable snowperson (with an abominable — but adorable — little snowdog in my arms).

It’s harder to move. The ice-edged air is harder to breathe. It takes longer to get up the gumption to do something as simple as take a walk.

Besides the discomfort, there’s that slate winter sky. Every day is a sloshy gray, and the sky seems lower somehow. Some summer days breeze in with mountainous clouds; their enormity makes the ocean of blue sky seem endless. In winter, though, the clouds form a heavy wool blanket that seems to sit just overhead. All summer we drift about in miles of free space; all winter we’re squashed like heavily-clothed little bugs.

I dislike winter so strongly that even on the most oppressively hot days this summer, I refused to complain. Sweat? Okay. Sunburn? No problem. Heat stroke? I’ll deal. Because the alternative is disgusting, wet, despicable, muddy, gray, depressing winter.

Facebook friends pined all summer for cooler weather and it was all I could do to avoid responding, “If you wish away my summer, I will find a way to haunt you all. winter. long.”

I dislike winter so strongly that every year, I initially dislike fall. Fall is a premonition of winter’s evil, marching stolidly across the globe toward us, indifferent to our terrified screams–

Okay, well that’s a little much. But fall means winter’s coming, and that makes me sad. Instead of accepting the advent of cooler air, I hang on to summer as long as possibly.

Others get out their boots while I stubbornly continue wearing my bohemian beach flip flops. I wear tiny sundresses, budging in my resolve only to slip on a sweater with a scowl when the temperature drops to 40 degrees each evening. I heat my house like the tropics and continue wearing my beloved nightgowns. I eat ice cream sundaes.

But every year, things start to happen that weaken my resolve. I’ll realize that I can light my fir tree and cinnamon spice candles at the same time and make my apartment smell like Christmas. I’ll see that the Southern Christmas Show (only my favorite event of the year!) is coming to town. I’ll remember the awesome sweater I was sad to put away last spring.

And finally, most importantly of all, I’ll realize there’s a whole new season of recipes to be created. Y’all know I bake anything and everything with pumpkin as soon as the first can hits the shelf. I love apples and nuts and cranberries, but there is no ingredient that winterizes the summery cockles of my heart (wait, that doesn’t sound like a good thing?) as much as that gourd.

Eventually there comes a moment when I accept the inevitable. Jamming out in my car a few evenings ago, I finally welcomed fall. And you know, I might have even been a little joyful to do so.

Whether you’re still having trouble accepting the change of seasons or not, these cookies will make you joyful. I don’t say this often because it totally ruins your street cred if you just throw it out there about every recipe you create, but these cookies are one of the best things I’ve ever made. Warm snickerdoodles are already the cinnamony, sugary bees’ knees, but when you stuff them plumb full of an autumn-spiced pumpkin cheesecake mixture, they become otherwordly. Who needs summer?

What’s your favorite season?

Pumpkin Cheesecake Stuffed Snickerdoodles


Recipe by: Willow Bird Baking, cobbled together from Whole Foods (filling) and Sunset, 1998 (via Bakergirl) (cookies)
Yield: about 30-35 large cookies

Make these cookies as soon as you can — they are incredible! Warm, cinnamon-sugar snickerdoodles surround a creamy ball of pumpkin cheesecake spiced with graham cracker and gingersnap crumbs. These cookies are crumbly, buttery, melt-in-your-mouth nuggets of autumn love. Sure, they have a lot of fat and a lot of sugar — so reserve them for a special occasion. But don’t skimp! They’re worth it. Also, while the cookies look fancy, they’re quite simple to make. Store leftovers in an airtight container in the fridge and heat them for 20-30 seconds or so before serving them with a tall glass of milk.

Snickerdoodle Ingredients:
1 cup butter, softened
1 cup vegetable oil
3/4 cup granulated sugar
1 cup powdered sugar
2 large eggs
4 1/4 cups all-purpose flour
1 teaspoon baking soda
1 teaspoon cream of tartar
1/2 teaspoon salt
1/2 cup granulated sugar + 1 tablespoon cinnamon for rolling cookies

Filling Ingredients:
2 cups white chocolate chips (about 10 ounces)
1 cup pumpkin puree
1 1/2 cups finely ground gingersnaps
1 1/2 cups graham cracker crumbs
4 tablespoons powdered sugar
1/2 teaspoon ground cinnamon
Pinch of orange zest (I used a dash of orange extract)
1 (8-ounce) package cream cheese, softened

Directions:
First, make the pumpkin spice truffle filling. Melt the white chocolate chips in the microwave on half power. Start with 1 minute and stir. Continue to heat the chocolate in 15 second intervals, stirring well after each to aid the melting, until it is smooth (be careful not to overheat). Set this aside to cool slightly. In the meantime, mix the pumpkin, gingersnap and graham cracker crumbs, confectioners’ sugar, cinnamon, orange zest or extract, and cream cheese together. Add the white chocolate and mix well until thoroughly combined. Transfer the mixture to the refrigerator to chill and firm up. In the meantime, make the snickerdoodle dough.

Mix together the butter, vegetable oil, granulated sugar, powdered sugar, and eggs in a large bowl. In a separate large bowl, whisk together the flour, baking soda, cream of tartar, and salt. Add the flour mixture into the butter mixture in 3-4 additions, mixing until just combined between each. Place the finished dough in the refrigerator to chill. While the cookie dough chills, roll pumpkin mixture into balls and place the balls on a wax paper lined baking sheet. Cover, and freeze until firm (about 1 hour).

In a small bowl, whisk together 1/2 cup granulated sugar and cinnamon. Preheat oven to 375 degrees F. Take a few pumpkin balls out of the freezer at a time to work in small batches (so they stay firm). Scoop out about a tablespoon of chilled cookie dough. Press a frozen pumpkin cheesecake ball into the center, then cover with another bit of dough, working the dough around the whole ball. Roll in cinnamon-sugar and place on a greased baking sheet. Repeat the process, placing cookies 3-4 inches apart. If cookie dough gets too soft, re-chill it for a bit and continue working. I made sure to stick it back in the fridge during any downtime (like when the cookies were in the oven).

Bake for 12-15 minutes, or until edges are slightly browned. Let the cookies cool on the pan for a few minutes before removing them to a cooling rack to cool completely.

If you liked this post, please:
Subscribe to Willow Bird Baking
Follow Willow Bird Baking on Twitter
Follow Willow Bird Baking on Facebook
Give this post a thumbs up on StumbleUpon


ShareOther ways to share this post with friends!

Easy Sopapilla Pumpkin Cheesecake Bars

There’s a banner that hangs above the whiteboard at the front of my classroom. It’s about six feet long and so high that you can see it from anywhere in the room — unless you’re hiding under my desk, I guess, but why would you be doing that? You’re just asking for a behavior tally.

I made the banner by hand, writing its message (which comes from a book I read before I started teaching) in huge blue block letters: THERE ARE NO SHORTCUTS.

For most of my students, middle school is just the right time to be confronted with this reality. New 6th graders walk into my classroom fresh from the cottony, comforting cocoon of elementary school. Their elementary school teachers did a little more hand-holding, offered a little more amnesty. It’s not because they were softies; rather, it’s because students aren’t typically ready to be independent learners at that point in their development. Some of my 6th graders aren’t ready when they first meet me, either — but it’s my job over the course of two years to get them there.

Sometimes it happens the hard way. I can see the surprise in their eyes when I give them their first zero on a homework assignment. They stammer, “But my printer was broken! I couldn’t print it!” I ask if they followed the advice given at the beginning of the year to find a “printer buddy,” a classmate willing to print for them in case of technical difficulties. The blank stare I get in response speaks volumes. I pencil in the zero, and as I move along briskly to the next student, there’s a heavy lesson being learned in my wake.

They don’t quite know what hit them, but if they asked, I could tell them: it’s responsibility. The whole weight of it just fell on their little shoulders! It feels like a heavy load, but actually, they can manage that zero. In doing so, in fact, they get used to managing (and working to prevent) discomfort, disappointment, and failure. They get used to making their own choices and experiencing the results. They become independent learners.


This was supposed to be a drizzle, but I got carried away.

Teaching them that there are no shortcuts (you just have to buckle down and complete the work, study for the tests, take ownership of your learning experience) is invaluable, but I also work with some kids who need a different message.

There are a few kids every year who come in with everything color coded. Their handwriting is perfect. They create mile-high stacks of flashcards before every quiz. It’s a teacher’s dream — until you notice the tiny cracks in their morale that are widening under pressure. You hear that they’re agonizing over their homework for hours to make it perfect, or you see them tearing up over a few missed points on a quiz. You feel their tension when you confer with them about their essay. These kids are the perfectionists. I empathize with them because I’m a perfectionist, too. I know what a heavy load it is to bear.


Drenched. This is too much honey, but it looks nice.

Perhaps this sounds hypocritical considering the first half of this post, but for the perfectionists, my message is often: THERE ARE SHORTCUTS. While it’s not a message I’d want to post on the wall of my classroom (the perfectionists are a small minority, after all), it’s a crucial one to convey.

These are children who need to be given permission to give 80% rather than trying their “best,” which is often overkill. They need help scaling their efforts down for smaller assignments with lower point values, and saving their ardor for important endeavors. They sometimes need advice, believe it or not, on how to relax.

One of my college English professors said it best — and I repeat this to my students every year — when he said something to the effect of, “Your cat will still love you if you don’t make an A.” The perfectionists need to know that there’s life beyond working hard for the sake of working hard. This literally didn’t sink in for me until after college, when I tried my hardest at something and for the first time, failed miserably — but that’s a story for another day. For now, I just want to tell you: THERE ARE SHORTCUTS.


I ate this.

Last winter I bought some pumpkins to chop in half, seed, roast, and strip for pumpkin puree. It was lovely to work with the pumpkins, but I did it mostly for the sake of having made the dish completely from scratch. I was in the middle of Project Food Blog and certainly didn’t want to take any unnecessary shortcuts. There’s nothing wrong with that — except that it was another hour in the kitchen, another mess to clean up. Did I really have to do all of that just to be “perfect”? Probably not: America’s Test Kitchen determined with taste tests that people can’t really differentiate between canned and fresh pumpkin in a recipe.

It’s not that there’s no point in ever making things from scratch. Apart from being able to fully control how you nourish your body, you gain confidence by making something beautiful from a collection of raw ingredients. Every now and then, though, when a simple and satisfying dessert is your primary goal, there are shortcuts. In this recipe, for instance, two cans of premade crescent roll dough and some canned pumpkin make a gorgeous autumn treat in 40 minutes flat. Enjoy a restful recipe now and then.

Where do you take shortcuts?

Easy Sopapilla Pumpkin Cheesecake Bars


Recipe by: Willow Bird Baking, using adapted versions of Pillsbury’s Sopapilla Cheesecake Bars and Philadelphia’s No-Bake Pumpkin Cheesecake
Yield: about 15-20 bars

I first saw the recipe for Sopapilla Cheesecake Bars on Cookies and Cups and decided to give them some pumpkin love. In these bars, two layers of premade crescent roll dough sandwich a thick layer of simple pumpkin cheesecake — it couldn’t get easier and quicker! The top bakes into a crisp, buttery cinnamon-sugar “sopapilla.” I served the bars heated up a few seconds (just to remove the chill), sprinkled with toasted pecans, and drizzled with a little honey.

Bar Ingredients:
2 cans crescent rolls
2 (8-ounce) package cream cheese, softened
2 cup canned pumpkin
5/8 cup sugar
2 teaspoon vanilla extract
2 teaspoons ground cinnamon*
1/4 teaspoon ground allspice*
1/2 teaspoon nutmeg*
1/2 teaspoon ginger*
*or substitute 2 teaspoons of pumpkin pie spice for these spices.

Topping Ingredients:
6 tablespoons butter, melted (for topping)
1/2 cup sugar (for topping)
1 teaspoon cinnamon (for topping)

Optional Extras:
honey
toasted pecans (see directions below)

Directions:
Preheat oven to 350 degrees F. Grease a glass 9×13 inch baking dish. Unroll one can of crescent roll dough (all in one piece) and lay it in the dish, pressing it out to cover the bottom and pinching any seams together.

In a large mixing bowl, beat together the cream cheese and sugar until light and fluffy. Add pumpkin, vanilla, cinnamon, ginger, nutmeg, and allspice, and beat to combine. Spread this mixture over the crescent roll dough in your pan. Unroll the other can of crescent roll dough and lay it over top of the pumpkin cheesecake mixture (I actually found it easier to lay it on some plastic wrap secured over a cutting board — this gave me a surface on which to pinch the seams closed and make it into one big rectangular sheet. I then used the plastic wrap to “flip” it carefully over onto the cheesecake mixture).

In a small bowl, whisk together 1/2 cup sugar with 1 teaspoon cinnamon. Pour melted butter over top of crescent roll dough and sprinkle cinnamon and sugar mixture evenly across the surface. Bake for 30 minutes or until golden brown. While the bars bake, you can also toast the pecans on another rack — just spread them out in a single layer on a baking sheet and toast for about 6 minutes or until fragrant, stirring about halfway through the cook time. Transfer nuts to a plate to cool.

Let bars cool completely before covering them and placing them in the refrigerator to chill for at least a couple of hours (I left mine overnight). Cut into squares, heat for just about 20 seconds to take off the chill, and serve with a drizzle of honey and a sprinkle of toasted pecans.

If you liked this post, please:
Subscribe to Willow Bird Baking
Follow Willow Bird Baking on Twitter
Follow Willow Bird Baking on Facebook
Give this post a thumbs up on StumbleUpon


ShareOther ways to share this post with friends!

Gooey Cookies & Cream Bars

On top of a sheet of felt-and-glitter tabletop snow, wooden blades were spinning, propelled by steam from tiny candles. Below the windmill but carved from the same light wood, tiny German townspeople busied themselves preparing for a wooden winter. I stood there for a few minutes, watching the delicate dance of the Christmas Pyramid: wood and fire, fuel and hunger.

It was my first visit to Mike’s great-aunts’ house, and thankfully, I was just in time to see their earnest and intricate Christmas display. Rose and Martha had been adding to their holiday collection over the course of many years and many travels, and their home now good-naturedly bore its heavy load of cheer.

Along with the Christmas Pyramid, a yuletide scene adorned every available surface in the house. The sturdy 1950s countertop in the kitchen boasted a full Christmas village. Warm orange lights glowed from miniature, snowy-silled windows. Plastic children, round with winter wool and red-nosed beneath fur caps, constructed snowmen in the yard. Figurines of all shapes and sizes skated on a mirrored glass pond thanks to tiny unseen magnets. And, in my favorite tableau, kids posed with St. Nick before a toy camera that gave a CLICK-FLASH! every few seconds as if snapping their photo.

The entire house was busy with whirring, chirruping, chiming, ringing. Understated carols rung out at regular intervals from mysterious origins. I would turn my head to find the source only to see a Christmas train, a Christmas snowman, a Christmas door hanging, a pudgy Christmas Santa statue, lights, bells, snow — Christmas chaos!

Imagine yourself as a child. Imagine that one day you really did get to step through your mirror, like you’d always dreamed might be possible. All it took was a little shimmy, a heel click or two, maybe a wink, and you were finally allowed to flow right through the glass. Imagine that when you stepped in, you stepped straight into a world of candy and jolly Santas and benevolent holiday rabbits and secret gardens and fairies and talking animals.

The joy of this house was that same joy. Walking into the door of this house was like walking into a fantastic place you knew existed somewhere, but could never seem to find as a child.

If the house was a Christmas fairyland, Rose and Martha were the magnificent queens of the domain. Martha was lovely, humble, and meticulous, welcoming and distributing presents. And Rose was mischievous, adventurous, and excited, whispering sly comments and shaking gifts. Together, what a pair.

They weren’t just wonderful on Christmas, either, and not just the first time I met them. We would celebrate their birthdays together at a boisterous gathering at Trio, one of their favorite restaurants. Folks from far and wide would turn up and share stories of the things they’d accomplished.

Both were teachers that poured out their time and energy for their students. Rose spent 11 years in night school to earn her degree in History. She then spent several more years learning about computers as she taught, creating a computer lab for her elementary school students. Rose and Martha traveled around the world together, sometimes preferring a foreign country, and sometimes heading to Chetola, a beloved spot in the North Carolina mountains, instead.

It was hard to believe things could ever be difficult for Rose. It seemed impossible that her pure fire-engine gumption couldn’t propel her through just about anything, including health problems and age and, good grief, probably a wall of fire and a mountain of steel at that.

She did slow down, though. At one point she broke a bone and had to recover in a nursing home, and I remember going to see her and realizing her gumption was willing, but her body demanded rest. When you see a pillar of strength and realize it’s fragile, it shakes you. Your whole frame of reference starts to bend just a bit.

Rose’s bone slowly healed. She went home and continue living her beautiful life. We went to dinner and a basketball game with her and Martha months later — her beloved UNCC 49ers — and though she had grown more frail, we could still see the spark of her heart.

This past Saturday, though, just hours before Mike was planning on visiting her, Rose passed away. The book of Greek myths he planned to take and read to her still sits where I tucked it quietly away once I heard. There’s nothing I can say to fully eulogize this sort of burning life. I wish, instead, you could’ve heard Martha’s strong voice at Rose’s funeral singing Amazing Grace with unexpected verve.

And I hope that Rose feels just now as if she’s stepped, finally, through a looking glass. I hope the real presence of Christ is stronger even than the joy of a billion Christmas wonderlands on a billion countertops. I hope she feels like, finally, she’s home.

Gooey Cookies & Cream Bars


Recipe by: Willow Bird Baking, inspired by S’mores Bars
Yield: About 12 bars

I made these Gooey Cookies & Cream Bars as a treat for Mike, ditching a previous plan involving pumpkin (which he’s not fond of). I’m so glad I did. They’re rich and heavenly, crunchy and gooey, and altogether full of warm niceness for a cool autumn day. Apart from tasting amazing, they’re super quick and simple — something I value more and more lately. Heat up one or two of these and enjoy them with some cold milk.

Ingredients:
1/2 cup butter, room temperature
1/2 cup plus 2 tablespoons sugar
1 large egg
1 teaspoon vanilla extract
1 1/3 cups all-purpose flour
3/4 cup chocolate sandwich cookie crumbs (i.e. crumbs of about 10 Oreos)
1 teaspoon baking powder
1/4 teaspoon salt
2 king-sized Cookies ‘n Cream candy bars (e.g. Hershey’s)*
1 1/2 cups marshmallow creme
*can substitute a regular white chocolate bar if these are unavailable where you live!

Directions:
Preheat the oven to 350°F. Grease an 8-inch square baking pan and create a foil sling: tear off 4, 16-inch long pieces of aluminum foil and fold them in half. Situate two side-by-side in the pan, covering the bottom of the pan to the edge (they will overlap). Situate the other two strips in the same manner, but perpendicular to the first. The overhanging foil of the sling will make it easy to remove the bars from the pan after baking and cooling. Grease the foil as well.

Cream the butter and sugar together in a large bowl until fluffy and pale yellow (2-3 minutes). Beat in the egg and vanilla. In a small, separate bowl, whisk together the flour, cookie crumbs, baking powder and salt. Add the dry ingredients to the butter mixture and mix until just combined. Divide the dough roughly in half, placing half the dough in your prepared pan and the other half in the fridge to chill until you’re ready for it.

Use the back of a spoon sprayed with cooking spray and to press and spread the dough in the pan until it covers the bottom of the pan in an even layer. Place the Cookies ‘n Cream bars side by side over the dough (if they fit; if not, break them and arrange) such that you have a full single layer of chocolate (about 1/4 inch thick). Glop on marshmallow creme and use a greased offset spatula to spread it evenly across the candy bars. Take the remaining dough out of the fridge and place it on top of the marshmallow layer (to do so, take a small handful at a time and flatten it into a “shingle” in greased fingertips. Lay these side by side over the top. They’re a little sticky so it takes some fiddling, but just clean your fingers off if the dough starts sticking to them too much and continue).

Bake for 25 to 30 minutes or until lightly browned. Let cool completely in pan before gently using the overhang of the foil sling to lift the bars out of the pan and place them on a cutting board to slice. When ready to serve, heat each bar in the microwave for about 25-30 seconds. Store extras in an airtight container. Enjoy!

If you liked this post, please:
Subscribe to Willow Bird Baking
Follow Willow Bird Baking on Twitter
Follow Willow Bird Baking on Facebook
Give this post a thumbs up on StumbleUpon


ShareOther ways to share this post with friends!

Gooey S’mores Bars

GUESS WHAT I JUST BOUGHT. Can you guess?! First, let me tell you a story. Maybe I’ll drop some hints here and there . . .

I got my first camera in high school. It was a Polaroid I-Zone, and I had no idea how cool it was. It took grainy, gorgeous photos full of unintentional auras and printed them instantly on adhesive-backed paper. You’ll have to forgive my poetic heart for the example below — a triptych (am I allowed to call it that?) of a goose that had been hit by a car. The middle frame is my hand full of its oversaturated feathers. Morbid, I know, but isn’t it pretty?

My next camera was a little Kodak film camera. I carried it everywhere with me, hoping to capture some gritty reality. I took photos of the outcast crowd at my high school (I wasn’t cool enough to fit in, even with them), of my feet, of neon lights. I filled rolls of film and convinced my parents to get them developed only to find, again and again, that my photos weren’t this or this or this. They were flat snapshots.

I gave up.

Fast forward to food blogging. I’m a baker and I’m a writer, so food blogging suits me nicely. But, I told everyone who asked, I am not a photographer.

Photography was the red-headed stepchild (what’s so bad about one of those, anyway?) of Willow Bird Baking. It was an ill-behaved upstart of a stepchild at that — one that I often had to drag along behind me as it kicked its tiny mismatched-stocking feet.

Since WBB’s inception in June 2009, I’ve used a Canon PowerShot A540 to shoot all of my photos. That faithful little point-and-shoot was powerful, don’t get me wrong, but the fiddling that went in to my hours-long photo shoots was extremely stressful. I shot in manual mode and it went something like this:

Make food for hours. Style food. Wait until the perfect time of day. Go out onto the balcony to freeze and/or sweat. Set up my camera on its tripod. Set all camera settings: manual mode, white balance, macro mode, exposure time, self-timer. Hold up white boards to bounce light in crazy directions. Change all settings repeatedly, taking photos with varying exposures, camera angles, and lighting setups. Run into the apartment to upload the photos every 50 or so snaps to see if I’m on the right track, usually to find that ALL of the photos were out of focus. Hours and hundreds of photos later, drag myself inside and clean up. Go through the hundreds of photos looking for the 6 or 7 acceptable ones. Edit them. Write my post.

Even while I loved my camera (so much so that I decided I’d stick with Canon whenever I upgraded), it’s not hard to see why photography stressed me out. There was a teensy (and sometimes nonexistent) yield for all the sweat I put into it.

When Willow Bird Baking was featured recently in the Davidson Journal, Meg Kimmel was kind enough to mention my “burgeoning skills as a food photographer.” They even printed my photo of my Coffee Cookie Dough Fudge Cheesecake for good measure. But oh, did I have a love-hate relationship with photography.

That is, until now.

Have you guessed yet? I think I set you up pretty well, and hopefully the photos were helpful hints. I bought a new camera!

A Canon Rebel T2i with a 50mm f/1.4 lens, to be exact. By no means did the camera make me an instant photographer extraordinaire, but when I styled and photographed these Gooey S’mores Bars (inside! with air conditioning!), I marveled at how fun and exciting and creative it felt!

I wasn’t doing acrobatics to get an acceptable shot in 100 degree heat — the camera was doing more than its fair share of work! I wasn’t forcing the photos — I was making artistic decisions! I wasn’t fretting and uploading a dozen times to check my shots — I was contentedly fiddling with various camera settings and enjoying the results! For the first time in years, I think I’ve almost recaptured the joy of snapping a photo with that old Polaroid I-Zone and sticking it in my poetry notebook surrounded by walls of messy handwriting.

. . . Almost.

P.S. Will you look at the number of exclamation points in that last paragraph? I must be in love.

P.S. 2 There’s just over a week left in the Willow Bird Baking Cupcake Challenge! Bake your creation and email photos to juruble ‘at’ gmail.com by Wednesday, September 7, 2011. I’ll feature your cupcake on WBB! Find more details and some cupcake inspiration here.

Gooey S’mores Bars


Recipe by: Adapted from Lovin’ From the Oven
Yield: 9-12 bars depending on your appetite

These Gooey S’mores Bars were more than worthy of being the first dish snapped by my new camera. They combine a chewy, graham cracker-flavored base with melty marshmallow creme and a hearty dose of chocolate. I heated each bar in the microwave for 25 seconds and then used a kitchen torch to toast the sides before serving, resulting in the perfect s’more flavor. Don’t worry if you don’t have the torch, though — they’d be delicious without.

Ingredients:
1/2 cup butter, room temperature
1/4 cup brown sugar
1/2 cup sugar
1 large egg
1 teaspoon vanilla extract
1 1/3 cups all-purpose flour
3/4 cup graham cracker crumbs
1 teaspoon baking powder
1/4 teaspoon salt
2 king-sized milk chocolate bars (e.g. Hershey’s)
1 1/2 cups marshmallow creme/fluff

Directions:
Preheat the oven to 350°F. Grease an 8-inch square baking pan and create a foil sling: tear off 4, 16-inch long pieces of aluminum foil and fold them in half. Situate two side-by-side in the pan, covering the bottom of the pan to the edge (they will overlap). Situate the other two strips in the same manner, but perpendicular to the first. The overhanging foil of the sling will make it easy to remove the bars from the pan after baking and cooling. Grease the foil as well.

Cream the butter and sugar together in a large bowl until fluffy and pale yellow. Beat in the egg and vanilla. In a small, separate bowl, whisk together the flour, graham cracker crumbs, baking powder and salt. Add the dry ingredients to the butter mixture and mix until just combined. Divide the dough roughly in half.

Press half of the dough (using clean fingers is easiest) into the pan. Place the chocolate bars side by side (if they fit; if not, break them and arrange) over the dough such that you have a full single layer of chocolate (about 1/4 inch thick). Glop on marshmallow creme and use a greased offset spatula to spread it evenly across the chocolate. Place the remaining dough on top (to do so, take a small handful at a time and flatten it into a “shingle,” laying these side by side over the top). Bake for 25 to 30 minutes or until lightly browned. Let cool completely in pan before gently using the overhang of the foil sling to lift the bars out of the pan and place them on a cutting board to slice.

When ready to serve, heat each bar in the microwave for about 25-30 seconds and use a kitchen torch to lightly “toast” the exposed marshmallow (optional). Enjoy!

If you liked this post, please:
Subscribe to Willow Bird Baking
Follow Willow Bird Baking on Twitter
Follow Willow Bird Baking on Facebook
Give this post a thumbs up on StumbleUpon


ShareOther ways to share this post with friends!

1 5 6 7 8 9 10