cream cheese

Blueberry Cream Cheese Almond Braid

So much dust. Shuffling papers, flying markers, scuffling footsteps. The crush of boxes being broken down, the shrill hum of students’ voices. As chairs were stacked and debris was cleared, the classroom started to look foreign. There was an alien quality to the space (cleanness, maybe? emptiness?) that made us all feel like we didn’t quite belong there anymore.

And we didn’t, really. It was the last, abbreviated week of school. The kids had one foot out the door, and the other was probably kicking someone under the table.

The teachers out there will give me an amen when I say that during those last few days, you fight a losing battle for your students’ attention. My middle schoolers and I work until the last minute — reflecting on how their writing has grown over the course of the year, finishing up our last novel — but there’s always a current of near-hysteria that runs through the classroom at the end of the year. I start to feel like I’m trying to hold back a tidal wave with a beach towel. At any given moment, they’re about to lose their little minds entirely and start surfing on the tables.

When I realize we’ve reached this point, the turning of the tide of sanity, I start pining for summer myself. Up until then, everything is a flurry of urgent business: grading projects, writing emails, blogging, creating curriculum. There’s barely a second to let the idea of vacation sink in. But finally, staring into a dozen sets of half-crazed student eyeballs, I see the bright summer sunshine at the end of the tunnel.

This year, I had the presence of mind to make a summer to-do list. It includes all of the mundane tasks I neglected while being a teacher 24/7 during the school year: clean under the bed, clean out the closet, reorganize the bookshelf. It contains resolutions reminiscent of New Year’s: join the Y, start exercising regularly, figure out summer meal plan. It contains techy bloggy things: move to self-hosting, spruce up Willow Bird Baking.

But something’s missing.

Know how I know? I recently re-read my Raspberry Almond Braid post from over a year ago as I was preparing to create this Blueberry Cream Cheese Almond Braid.

When I wrote that post of yesteryear, I was on spring break and gushy about how much I loved the freedom. I listed 20 things I was enjoying, including things like running through the grass, playing fetch with Byrd, and reading. Oh, yeah. Things that are totally absent from what I’ve come to realize is my summer chore list.

Don’t worry, I’m going to fix it.

In fact, it’s only been summer vacation for one day now, but I’ve already read a book: the first of the Hunger Games series my students have been recommending to me. I’ve already done a mini craft project (a card for a friend that turned out wonky but hopefully lovable). I’ve already baked something. I’ve already taken a nap. So far, so good!

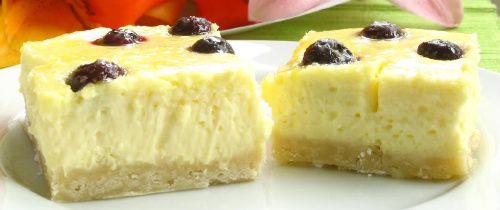
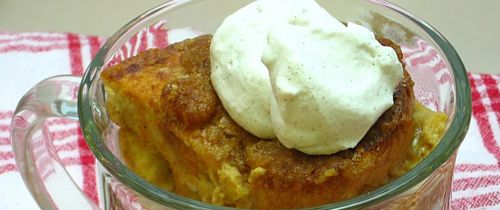
Apart from helping me realize the error of my summer ways, this Blueberry Cream Cheese Almond Braid was also the perfect restful recipe: though the process is as simple as can be, the result looks and tastes phenomenal. The flaky, tender almond pastry surrounds a cream cheese filling in addition to the blueberry preserves, making this one of my new favorite things to eat. It’ll definitely get a heart on the WBB Recipe Index.

You have to make it as soon as you can — and then hopefully you can find the time for a summer nap in a lawn chair somewhere.

What are your family’s summertime plans?

Blueberry Cream Cheese Almond Braid


Recipe by: Adapted from Luna Cafe
Yields: 10-12 1-in. slivers of braid, or about 4 servings

Dough and Filling Ingredients:
2 cups all-purpose flour, sifted
1 teaspoon baking powder
1/2 teaspoon salt
1/2 cup unsalted butter
3 ounces best quality cream cheese
1/2 cup milk, minus 1/2 teaspoon
1/2 teaspoon almond extract
1/2 cup blueberry preserves (or your favorite preserves)

Cream Cheese Filling Ingredients:
8 ounces (227 grams) cream cheese, room temperature
1/4 cup granulated white sugar
1 large egg
1/2 teaspoon pure vanilla extract

Icing Ingrdients:
1/2 cup powdered sugar
1 tablespoon milk
1/8 teaspoon vanilla
1/8 teaspoon almond extract
2 tablespoons toasted sliced almonds (optional)

Directions:
NOTE: To prepare this braid in advance, complete all steps and assemble the braid but do not bake. Cover the braid on its parchment lined baking sheet with plastic wrap and refrigerate overnight. Set out in the morning as you preheat the oven and then bake as usual.

Make the cream cheese filling. In your electric mixer, or with a hand mixer, beat the 8 ounces of room temperature cream cheese until smooth. Add the sugar, egg, and vanilla extract and beat until creamy and smooth. Set aside while you make your braid.

Preheat oven to 425 degrees F. In the bowl of a food processor, mix the flour, baking powder, and salt. Add the cream cheese and butter into the flour mixture and pulse to cut the fat into the flour (about 6 pulses). Add the milk and almond extract and blend into a loose dough.

Turn the dough onto a floured surface and knead VERY LIGHTLY for 4-5 strokes. (NOTE: This is the step at which you can ruin the braid. If you overwork the dough, the pastry will be tough. Just gather the dough together and don’t worry about making it smooth. It will still look a little rough. That’s perfect.)

Between two sheets of waxed paper, roll the dough to an 8- by 12-inch rectangle. Turn dough out onto a lightly greased baking sheet and remove the waxed paper. Measure and mark the dough lengthwise into thirds. Spread preserves down the middle third of the dough and spread a thick line of the cream cheese mixture on either side of the preserves (still remaining in the middle third of the dough — try to keep your filling about ½ inch from the mark on both sides.)

Make 2¾-inch slight diagonal cuts at 1-inch intervals on each the long sides (see photos below). Do not cut into the center jam-filled area. Fold strips, first one from one side and then one from the other side in a rotating fashion, over the filling. It will now resemble a braid. Bake in a 425° oven for 12-15 minutes, until the dough is cooked through and the top is lightly browned.

In a small glass measuring cup with a pouring spout, combine the sugar, milk, vanilla, and almond extract. Drizzle over the top of the braid. If desired, sprinkle on the toasted sliced almonds while the icing is still wet. Serve warm.

If you liked this post, please:
Subscribe to Willow Bird Baking
Follow Willow Bird Baking on Twitter
Follow Willow Bird Baking on Facebook
Give this post a thumbs up on StumbleUpon


ShareOther ways to share this post with friends!

Strawberry Cheesecake Stuffed Amaretto Cake Pops (on Pretzel Sticks!)

Dear Rebecca Black,

For the record, I think you’re adorable and I want you to be in my 7th grade class. We talked about you a little bit when we were all having fun fun fun fun with your song, and about how mean some folks on the interwebz can be.

My students realized that you were their age (just 13!), and we all felt like if it’d been one of them taking the brunt of jokes and criticism, we’d be sad. So we want you to know that we’re sorry about the meanies, and we hope you’re enjoying all the good-spirited parodies of your song as much as we are.

Oh, but my 7th grade students told me about the “censored” parody of your song — don’t enjoy that one. Don’t even watch it. Cover your ears, young lady! I’ll redirect you to the Sunday school parody instead.

Anyway, your song has brightened up lots of my weekends! Sometimes I blast it at the beginning of class on Fridays and it never fails to produce smiles. And yeah, we break it down — everyone needs a 5 minute dance party now and then.

And you know what? I get it, girl. You so excited about Friday that you’re dropping verbs and everything else, and I want you to know that I understand.

In fact, I’m a little obsessed with your song right now. It just describes so perfectly how I feel about so many things. I’m going out to eat? I-I-I so excited! It’s only 4 weeks until summer vacation? I-I-I so excited! I’m making flippin’ Strawberry Cheesecake Stuffed Amaretto Cake Pops on flippin’ pretzel sticks?! I SO EXCITED!

These cake pops started as a bright spark of inspiration from CakeSpy: pops on a pretzel stick! Using an edible, salty vehicle for a sweet treat struck me as absolutely bee’s-knees brilliant. I had to try it immediately.

Then there was this other idea I’d been toying with, too: mixing up no-bake cheesecake filling, freezing it into little pearls, and hiding the pearls in the center of each cake ball. A cheesecake-stuffed cake ball on a pretzel stick? It couldn’t get any better — unless you used an amaretto-spiked version of the best pound cake in the world for your cake!

This cake pop endeavor turned out so easy and so fantastic. I made a video tutorial (located at the bottom of this post) so that you can follow along with the steps as you make them; it’ll show you how to pipe your cheesecake centers, form the cake balls around them, insert the pretzel sticks, and dip and decorate the pops.

But the cake pop tutorial isn’t the only video I made.

What can I say, Rebecca? These cake pops just made me wanna sing! So here’s my tone-deaf tribute to plucky middle schoolers, cake pops, and YOU. Thanks for the fun!

P.S. I have a newfound respect for you after trying to sing this song a billion times and realizing I was basically the worst singer on the planet.

Strawberry Cheesecake Stuffed Amaretto Cake Pops (on Pretzel Sticks!)


Recipe by: Willow Bird Baking
Yields: about 40 cake pops
Print this Recipe

Cream Cheese Pound Cake Ingredients:
3/4 cups butter, softened
4 ounces cream cheese, softened
1.5 cups sugar
3 large eggs
3/4 tsp vanilla
1/4 cup amaretto
1.5 cups flour
pinch salt

Strawberry “Cheesecake” Ingredients:
1 8-oz. package cream cheese, softened
2 tablespoons sugar
1/2 cup diced strawberries

Cream Cheese Frosting Ingredients:
4 oz. cream cheese, softened
1/4 cup (1/2 stick) of butter, softened
1/4 teaspoon vanilla extract
1 cup confectioners’ sugar, sifted

Other Ingredients:
2 pounds candy melts (I chose light pink)
about 40 pretzel sticks (I used Snyder’s because they were longer and sturdier than others)
white chocolate or candy melts for drizzling

Directions:
*NOTE: See the cake pop video tutorial below to see many of these steps being completed!

Make the pound cake: Preheat oven to 300 degrees F. Butter and flour a loaf pan. Beat butter and cream cheese at medium speed of an electric mixer 2 minutes or until creamy. Gradually add sugar and beat 5-7 minutes until light and fluffy. Add eggs, one at a time and beat only until yellow disappears. Stir in vanilla and amaretto.

Combine flour and salt and add to creamed mixture beating on low speed of electric mixture just until blended after each addition. Fill a 2-cup ovenproof dish with water and place in oven with cake (keeps it moist!). Bake at 300 degrees for about 1 hour and 20 minutes, or until a knife inserted into the middle comes out clean (check in several areas of the cake to be sure it’s completely done). You may need to cover cake with foil the last 20-30 minutes of baking if it looks like it’s getting too brown on top. Let cool on wire rack for 10 minutes then remove from the pan by inverting it into a bowl. Once cool enough to handle, crumble the cake in the bowl, removing any hard outer crust portions. Let cool completely.

Make the strawberry cheesecake middles: While the cake is baking, mix all the cheesecake ingredients together well. Fill a gallon sized plastic zip bag with the mixture and cut off the corner (big enough so that the diced strawberries won’t get stuck). Pipe the cheesecake mixture into small swirls on a silicone mat or wax paper (see video tutorial below to see this step). Freeze these until firm.

Make frosting: Mix all frosting ingredients together on medium-high speed until combined. When cake is cooled and crumbled, mix frosting into it until you reach a dough-like consistency. I used most of my frosting but not quite all of it.

Make cake balls: Once your cake mixture is ready and your cheesecake middles are frozen firm, you’re ready to assemble your cake balls! Take a frozen cheesecake middle and pack some cake around it. Roll it into a ball and place it on a silicone mat or wax paper. Continue until all cake balls are rolled. Chill these in the refrigerator overnight. I don’t freeze mine like some sites suggest, because I find chilling them in the fridge instead reduces cracking after I dip them.

Mount and dip cake balls: After cake balls have chilled overnight, melt your candy melts according to the package directions. I keep my bowl of candy melts situated in a bigger bowl of hot water to keep them warm and fluid, but be careful no water gets into the melts! To mount each cake ball, take a pretzel stick and dip the end in candy melts. Gently but firmly push the end of the pretzel stick into the cake ball. Put these back on their silicone mat or wax paper to chill. Repeat until all cake balls are mounted and chill for about 30 minutes.

After chilling, you’re ready to dip! Dip each cake ball into the candy melts, using a spoon to help coat them. After dipping, hold your cake ball over the bowl and gently bounce to drain the excess off. Turn the pop as you drain. When well-drained, gently place the pop in a foam block to continue drying. I placed mine in the fridge to reduce drying time.

Decorate dried pops: Once your pops are dry, melt some white chocolate according to package directions. Let it cool slightly before spooning it into a small plastic zip bag with the tiniest bit of the corner cut off. With the pops standing in their foam block, quickly and confidently pipe a zigzag design over each one. Let these dry. Serve immediately or store in an airtight container in the refrigerator.

VARIATIONS:
-You can leave the cheesecake middles out of this recipe and roll the cake into a solid ball if you want traditional cake pops.
-You can use any flavor of cake (or even a cake mix) for your cake, but this one is absolutely the best I’ve ever had!
-You can leave the strawberries out of your no-bake cheesecake mixture or even add in other berries, chocolate, etc., to produce different flavors of cheesecake in the center.
-You can use lollipop sticks instead of pretzel sticks, or leave the sticks out altogether and make regular cake balls instead of cake pops.
-You can decorate with sprinkles instead of zigzags.

And just for my lovely Willow Bird Bakers, here’s a tutorial for how to make cheesecake stuffed cake pops. This video would also be useful for making regular cake pops. WBB is all about inspiring kitchen confidence in home cooks by encouraging them to tackle challenges — so if you’ve never made cake pops before, this is your double-triple-dog dare! Get in the kitchen and try it out! Don’t forget to snap some photos of your finished product for us to see!

If you liked this post, please:
Subscribe to Willow Bird Baking
Follow Willow Bird Baking on Twitter
Follow Willow Bird Baking on Facebook
Give this post a thumbs up on StumbleUpon


ShareOther ways to share this post with friends!

Rich Ice Cream and Coffee Cheesecake

I don’t love coffee. If I wanted something scalding, bitter, and hard to swallow, I’d google the Carolina Panthers’ season record. Ha ha.

Yeah, that’s one of those jokes that’s kind of more sad than funny. Oh well.

My mother (yes, of cross stitching birthday party fame) used to feel certain that I would acquire an affinity for coffee as I got older. Periodically she would test this hypothesis, urging me to take a sip from her cup or buying me something frothy and caramely at Starbucks, only to find that things weren’t unfolding as she anticipated.

What can I say? Coffee is gross.

I could load it up with sugar and cream (and donuts — can you do that?) and probably choke it down, but if I’m going to ingest that many calories, I’d rather just have some dessert.

Paradoxically, despite my antipathy towards coffee in its beverage form, I’ve always loved coffee-flavored confections. Coffee ice cream was my absolute favorite treat as a little girl, for instance. Coffee also plays an Oscar-worthy supporting role in Coffee Cookie Dough Fudge Cheesecake, one of my current faves. I adore the coffee-brownie combination in my Ice Cream Cupcakes. You get the idea.

And besides all those things, I’m in love with this cheesecake. IN LOVE. Like, buy it a ring, get down on one knee, drag it to the altar kind of love. It might be one of the best cheesecakes I’ve ever made. Basically: swoon.

For one thing, it has the perfect ratio of rich coffee cheesecake to cold ice cream (oh, and did I mention the layer of fudgy ganache in there as well?). For another thing, the ice cream flavor I chose rocked the Casbah.

I considered coffee or chocolate ice cream, but decided that might be too rich. I also knew I wanted brownie chunks. Ben & Jerry’s makes a Cheesecake Brownie ice cream that fit the bill (how perfect is that, seriously?)

Apart from inspiring a matrimonial sort of adoration in me, this cheesecake is one of the easiest I’ve ever put together. It’s as simple as baking and cooling your cheesecake, softening up your favorite ice cream, and spreading it on top. Freeze the whole thing until it’s firm, cut it with a hot knife, and then call up the preacher. That’s about how it goes.

What ice cream flavor would you like to spread all over your coffee cheesecake?

Rich Ice Cream and Coffee Cheesecake


Recipe by: Willow Bird Baking
Yields: 15 servings

Crust Ingredients:
37 chocolate sandwich cookies, finely processed into crumbs
6 tablespoons unsalted butter, melted and cooled
Small pinch of salt

Ganache Ingredients:
3/4 cups heavy cream
10 oz. bittersweet or semisweet chocolate, finely chopped (I combined both)

Filling Ingredients:
3 (8 oz.) packages cream cheese, at room temperature
1 cup sugar
1½ tablespoons all-purpose flour
1 tablespoons instant coffee granules
2 teaspoons vanilla extract
1½ teaspoons mild-flavored (light) molasses
3 large eggs

Topping:
Ice cream of your choice (I used Ben & Jerry’s Cheesecake Brownie ice cream)
dark chocolate candies of your choice for decorating (I used Ferrero Rondnoir)

Directions:
To make the crust, butter a 9-inch springform pan. Combine the chocolate cookie crumbs, melted butter and salt in a small bowl. Toss with a fork to moisten all of the crumbs. Press into a thin layer covering the bottom and sides of the springform pan (at least 3 inches up the sides). I did this using a smooth glass to press crumbs into place.

Bring the cream to a simmer in a medium saucepan. Place the chocolate in a medium bowl. Once the cream reaches a simmer, pour the cream over the chocolate and let stand 1-2 minutes. Whisk in small circles until a smooth ganache has formed. Pour 1.5-2 cups of the ganache over the bottom of the crust (if you have leftover, save it for eating or decorating with later). Freeze until the ganache layer is firm, about 30 minutes.

Preheat the oven to 350˚ F and position a rack in the middle of the oven. In the bowl of an electric mixer fitted with the paddle attachment, beat the cream cheese and sugar on medium-high speed until well blended. Beat in the flour. In a small bowl, combine the coffee granules, vanilla and molasses, stirring until the coffee dissolves. Add to the cream cheese mixture and beat until well incorporated, scraping down the sides of the bowl as needed. Beat in the eggs one at a time, scraping down the bowl between each addition.

Pour the filling over the cold ganache in the crust. Enclose the bottom of the springform pan in tightly wrapped foil and place it in a baking dish. Fill the baking dish with hot water about halfway up the cheesecake pan, careful not to let the moisture touch the cheesecake. Bake until the top is lightly browned, puffed and cracked at the edges, and the center moves only very slightly when the pan is lightly shaken, about 1 hour. Transfer to a wire cooling rack. Let cool at room temperature for at least 30 minutes. Transfer to the refrigerator and let cool at least 3 hours, until completely chilled and set.

Soften ice cream of your choice (I used Ben & Jerry’s Cheesecake Brownie ice cream) for 10-15 minutes or until soft enough to spread. Scoop out a few big scoops onto the top of your cheesecake and spread with an offset spatula or the back of a spoon. Add more ice cream until it’s flush with the top of your crust. Freeze cake until solid (overnight is best). Decorate with dark chocolate candies of your choice (I used Ferrero Rondnoir). Slice with a knife held under hot water to serve. Keep in freezer when not serving — it melts quickly.

If you liked this post, please:
Subscribe to Willow Bird Baking
Follow Willow Bird Baking on Twitter
Follow Willow Bird Baking on Facebook
Give this post a thumbs up on StumbleUpon


ShareOther ways to share this post with friends!

Birthday Cake Cheesecake

At 26-going-on-27, I’ve grown to love birthdays that feel like deep crow-footed, cheek-hurting smiles, that sound like clanging dishes and brassy laughter.

On birthdays, I need my family. We need a table to sit around to hold our leaning elbows. We need food, we need each other, but that’s all.

For children, though, birthdays have to involve some sort of event. Kids want to scarf down plasticky pizza, be mildly terrorized by an oversized animatronic mouse playing a banjo, and wallow in a germy ball pit. Or they want to light tiki torches, drink pineapple punch, and marco polo around a swimming pool until their fingers are wrinkly.

When I was little, my mom convinced me that I wanted to throw a cross-stitching birthday party.

Naturally, the most direct avenue to popularity among your elementary school friends is to invite them to something called a “party” and proceed to introduce them to the pastime of 70-year-old ladies everywhere.

When my birthday rolled around, my unsuspecting friends gathered around the coffee table and listened intently to the plan. Our goal was to pick a pattern and each cross-stitch a bookmark before cake and gifts. We dutifully chose the our favorite design, fussed with threading our needles, and got to work.

Well, turns out cross-stitching requires quite a bit of time. And, like, patience and stuff. Things that are in short supply for kids at birthday parties.

My friends faded fast. Soon we were stuffing our faces with cake, our half-finished bookmarks languishing in the needle-and-thread strewn living room.

Oh well. As long as there’s cake, right?

In that spirit, boy do I have a cake for you. This particular cake is an explosion of birthdayness. A “Funfetti” cheesecake on a vanilla wafer crust is topped with a layer of Funfetti cake, a layer of cake batter cookie dough, chocolate sauce, whipped cream, and a cherry. Every layer contributes a little bit of birthday joy. The final product is scrumptious and outrageously festive.

I have more ridiculous birthday stories from when I was a child, because apparently it was impossible for me to have a normal, uneventful birthday party. But I’ll spread the love and save those for later. In the meantime, have some cake.

Describe one of your favorite (or least favorite) childhood birthday memories.

Birthday Cake Cheesecake


Recipe by: Willow Bird Baking, with chocolate sauce adapted from Bakers Royale
Yield: 24 mini cheesecakes or 1 full-sized cheesecake

Crust Ingredients:
45 vanilla wafers, finely processed into crumbs
5 tablespoons unsalted butter, melted and cooled
Small pinch of salt

Cheesecake Ingredients:
2 (8 oz.) packages cream cheese, at room temperature
2/3 cup sugar
1 tablespoons all-purpose flour
1 tablespoon cake mix
1 1/2 teaspoons vanilla extract
2 large eggs
1 tablespoon sprinkles
1 Funfetti cake mix (or homemade yellow cake with sprinkles mixed in), prepared and baked in thin layers
melted chocolate (for topping)
whipped cream (for topping)
maraschino cherries (for topping)

Cake Batter Cookie Dough Ingredients:
1 1/2 cups all-purpose flour
2/3 cup yellow cake mix
1/4 teaspoon salt
1/2 cup unsalted butter, room temperature
1/2 cup granulated white sugar
1 teaspoon pure vanilla extract
2 tablespoons sprinkles
4-8 tablespoons water

Chocolate Pouring Sauce:
2/3 cups dark chocolate
2 tablespoons heavy cream
4 tablespoons powdered sugar, sifted
4-5 tablespoons water, warm

Directions:
Note on Scheduling: This is a great recipe to make over the course of a few days. You can make the Funfetti cake one day and freeze it, make the cookie dough disc another day and freeze it, make the cheesecake one day and refrigerate it, and then make your chocolate pouring sauce and assemble on the day you’ll serve the dessert.

Prepare your Funfetti cake: Mix and bake in 9-inch round cake pans according to box instructions and set aside to cool. Make one of these a pretty thin layer of cake — this will be the one you use on your cheesecake (be careful; a thinner layer will bake for less time). The other layer is extra; I tore mine up and froze it for future cake balls. After cooling, freeze your cake layer — it’s easier to work with when frozen.

Prepare your cheesecake: To make the cheesecake crust, preheat the oven to 350 degrees F. Butter two mini or one full-sized cheesecake pan. Combine the cookie crumbs, melted butter and salt in a small bowl. Toss with a fork to moisten all of the crumbs. Press into a thin layer covering the bottom of your cheesecake pan(s).

In the bowl of an electric mixer fitted with the paddle attachment, beat the cream cheese and sugar on medium-high speed until well blended. Beat in the flour and cake mix. Add in the vanilla and beat until well incorporated, scraping down the sides of the bowl as needed. Beat in the eggs one at a time, scraping down the bowl between each addition. Pour the filling into your cheesecake pan(s), leaving room for a cake and cookie dough layer on top of your cheesecake.

Bake until the top is lightly browned, puffed and cracked at the edges, and the center moves only very slightly when the pan is lightly shaken (about 40 minutes for a full-sized cheesecake or 12-15 minutes for mini cheesecakes). Transfer to a wire cooling rack. Cool at room temperature for at least 30 minutes. Transfer to the refrigerator and let cool at least 1 hour, until completely chilled and set.

Make the cookie dough: In a medium bowl, cream together butter and sugar for 2-3 minutes until light, fluffy, and pale yellow. Mix in salt, flour, cake mix, sprinkles, and vanilla. Add water one tablespoon at a time, mixing after each, until you reach cookie dough consistency. If making a full-sized cheesecake, line a 9-inch cake pan with plastic wrap and spread cookie dough in a disc in the pan. Freeze it until firm, about 15 minutes. If making mini cheesecakes, just chill the cookie dough until you’re ready to assemble your cakes.

Make the chocolate pouring sauce: Heat chocolate and cream together in a bowl set over simmering water. Let them sit for a few minutes before whisking them together to combine. Whisk in powdered sugar and then add 1 tablespoon of water at a time, mixing after each until you reach pouring consistency. Set the sauce aside and let it cool to warm.

Assemble the cheesecakes: If you’re making mini cheesecakes, use a round cookie cutter or a serrated knife to cut circles of Funfetti cake to fit on each mini cheesecake. Spread a little chocolate sauce on the top of each mini cheesecake before placing a cake round on each and gently pressing them down snugly. If you’re making a full-sized cheesecake, spread chocolate sauce over your cheesecake and just place full frozen cake layer on top and gently press down.

If making mini cheesecakes, spread cookie dough into the top of each well with the back of a spoon. If making a full-sized cheesecake, spread another thin layer of chocolate sauce on top of the cake layer to act as glue, and then take your frozen cookie dough disc and place it on top. Chill cheesecake(s) for about 30 minutes before gently unmolding them. Drizzle with melted chocolate and top with a dollop of whipped cream, sprinkles, and a maraschino cherry.

If you liked this post, please:
Subscribe to Willow Bird Baking
Follow Willow Bird Baking on Twitter
Follow Willow Bird Baking on Facebook
Give this post a thumbs up on StumbleUpon


ShareOther ways to share this post with friends!

Celebrating Cheesecake — and a challenge for you!

Taylor from Taylor Takes a Taste tweeted me yesterday with a very, very important message: Today is National Cheesecake Day! Well, okay, it’s actually National White Chocolate Cheesecake Day, but I’ve never made a white chocolate cheesecake, so just ignore that part. I’ll add it to my to-do list.

In order to celebrate, I thought I’d compile Willow Bird Baking’s many cheesecake recipes and issue a challenge for you!

My goal is to inspire kitchen confidence in home cooks by encouraging them to tackle fun, challenging new recipes. So I’m challenging you this month! Here’s what you do:

Choose one of the cheesecake recipes below that feels like a challenge to you and make it for friends, family, or coworkers.

– Take a photo and email it to me at juruble ‘at’ gmail ‘dot’ com with a few comments about how it went and a link to your blog (if you have one — if you don’t, that’s okay too!).

– Do this before April 5, 2011. In exactly a month, I’ll post all of your cheesecake masterpieces here on Willow Bird Baking!

– You can also grab the badge at the bottom of this post if you’d like to let your readers know that you’re participating in the Cheesecake Challenge, but it’s optional.

If you’d like to participate, leave me a comment below and let me know! If you’ve already made one of the recipes below, that counts too! Just send me a photo!

Willow Bird Baking’s Cheesecake Recipes:

1. Coffee Cookie Dough Fudge Cheesecake


2. Red Velvet Cheesecake


3. Caramel Fudge Brownie Cheesecake


4. Chocolate Peanut Butter Bliss Cheesecake


5. Blueberry Lemon Cheesecake Cupcakes


6. Chocolate Cheesecake-Stuffed Cupcakes with Ganache


7. Lemon Blueberry Cheesecake Squares with Shortbread Crust


8. Marbled Chocolate Cheesecake Brownies


9. Pumpkin Cheesecake Bread Pudding

And don’t forget to watch my (slightly embarrassing) cheesecake tutorial for great cheesecake pointers!

Finally, here’s the Cheesecake Challenge badge if you want to grab it:

If you liked this post, please:
Subscribe to Willow Bird Baking
Follow Willow Bird Baking on Twitter
Follow Willow Bird Baking on Facebook
Give this post a thumbs up on StumbleUpon


ShareOther ways to share this post with friends!

1 11 12 13 14 15 20