Month: July 2012

Elvis Presley Bars (Peanut Butter Banana Bacon Bars – with a vegetarian variation!)

When I posted the invitation on my Facebook wall, I was pretty sure no one was going to respond (except to heckle me.) Imagine my surprise when a couple of my friends — one from Sunday school and one from high school — responded that they’d come. That meant it was really happening.

When Saturday evening came, I drove across town, listening to the radio to distract myself from what I was about to do. It was only when I stepped out of my car and surveyed the busy roller skating rink in front of me that visions of ambulances flashed through my head. Was I really about to go roller skating for the first time in 20 years?

My doubts resurfaced a few moments later when I carefully stood up in my skates for the first time. I thought that the four-wheeled skates would provide more, uh, balance than that. They didn’t come with, like, knee pads or anything? Maybe some bubble wrap?

I looked at my friends and attempted a confident smile. It must’ve been about as wobbly as I was, though, because they both looked worried. To lighten the mood, I mentioned that I was actually considering trying to join the roller derby someday. They laughed a little too much at that. Hm. Bad sign.

Nevertheless, we made slow, shaky progress over to the opening in the rink — which, I noted bitterly, only had a wall around about a quarter of it. At this point I was pretty certain the night was going to end in one or more broken limbs. My left arm ached as if to remind me the Roller Skating Incident in third grade, which left me with a sling for a few months and residual pain well into my adulthood. I stepped gingerly onto the slick floor and pushed clear of the doorway, wondering what I’d gotten myself into.

Turns out my friend Meredith is a total roller skating rockstar. My friend Steven was slower but still relatively surefooted. Next to them, I felt like a roller skating walrus with a coordination problem. They were ruthlessly encouraging, though, assuring me I was doing well despite my tendency to flail-and-scream every 30 seconds or so.

I did huff and puff. And I did hug the wall more than my friends. And I did take several breaks. And my quads did start burning because I’m in roughly the same physical shape as an old lady with a video gaming addiction.

But I want you to know that I did not fall even once! I want you to know that I upgraded to fancy inline skates! I want you to know that Meredith assured me (sincerely!) that I was doing tons better by the end of the night! And most importantly, I want you to know that the only thing louder than the rockin’ roller rink soundtrack and the gaggles of middle school girls was the sound of our laughter — because we had so much fun.

Roller skating was a blast from the past. Meredith, Steven, and I have already decided to make a monthly date out of it. Who knows, maybe after a few months practice, the roller derby will recruit me. No? Okay, maybe not.

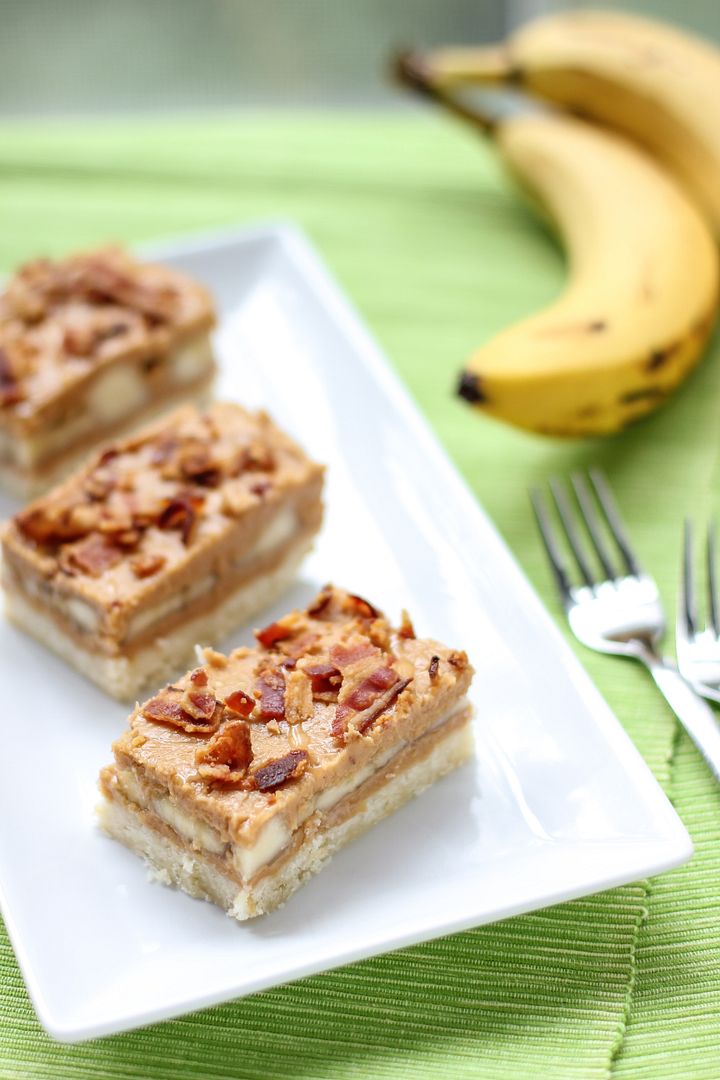
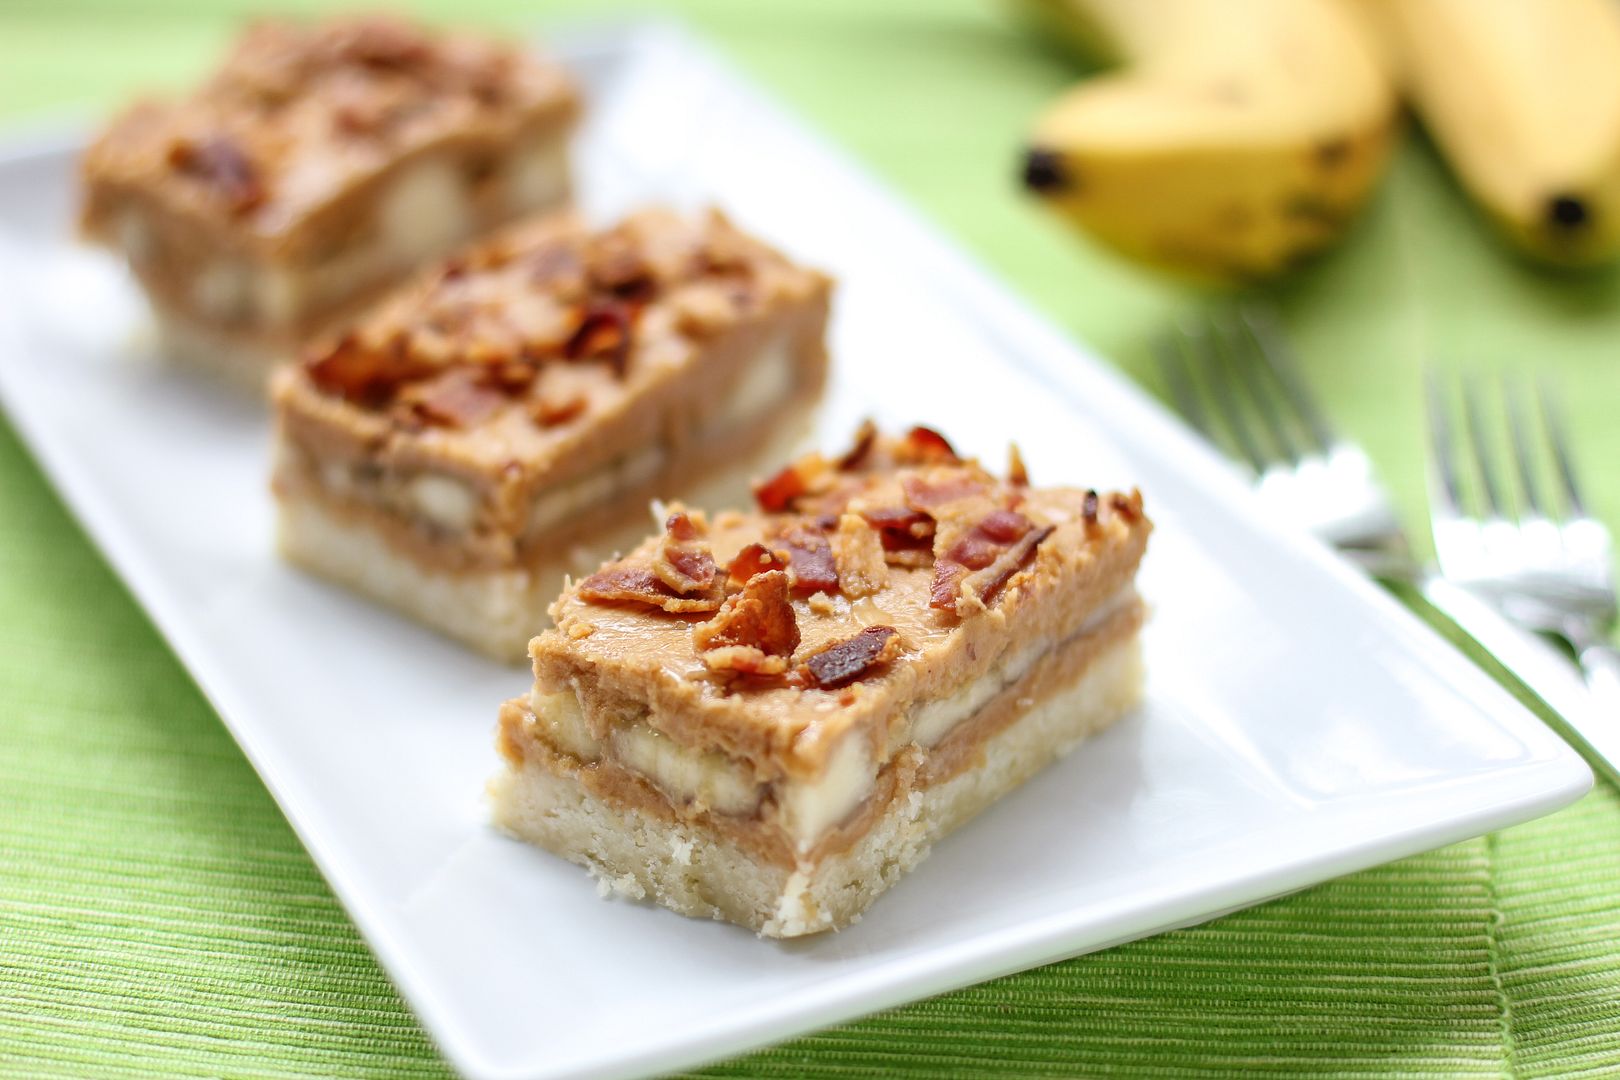
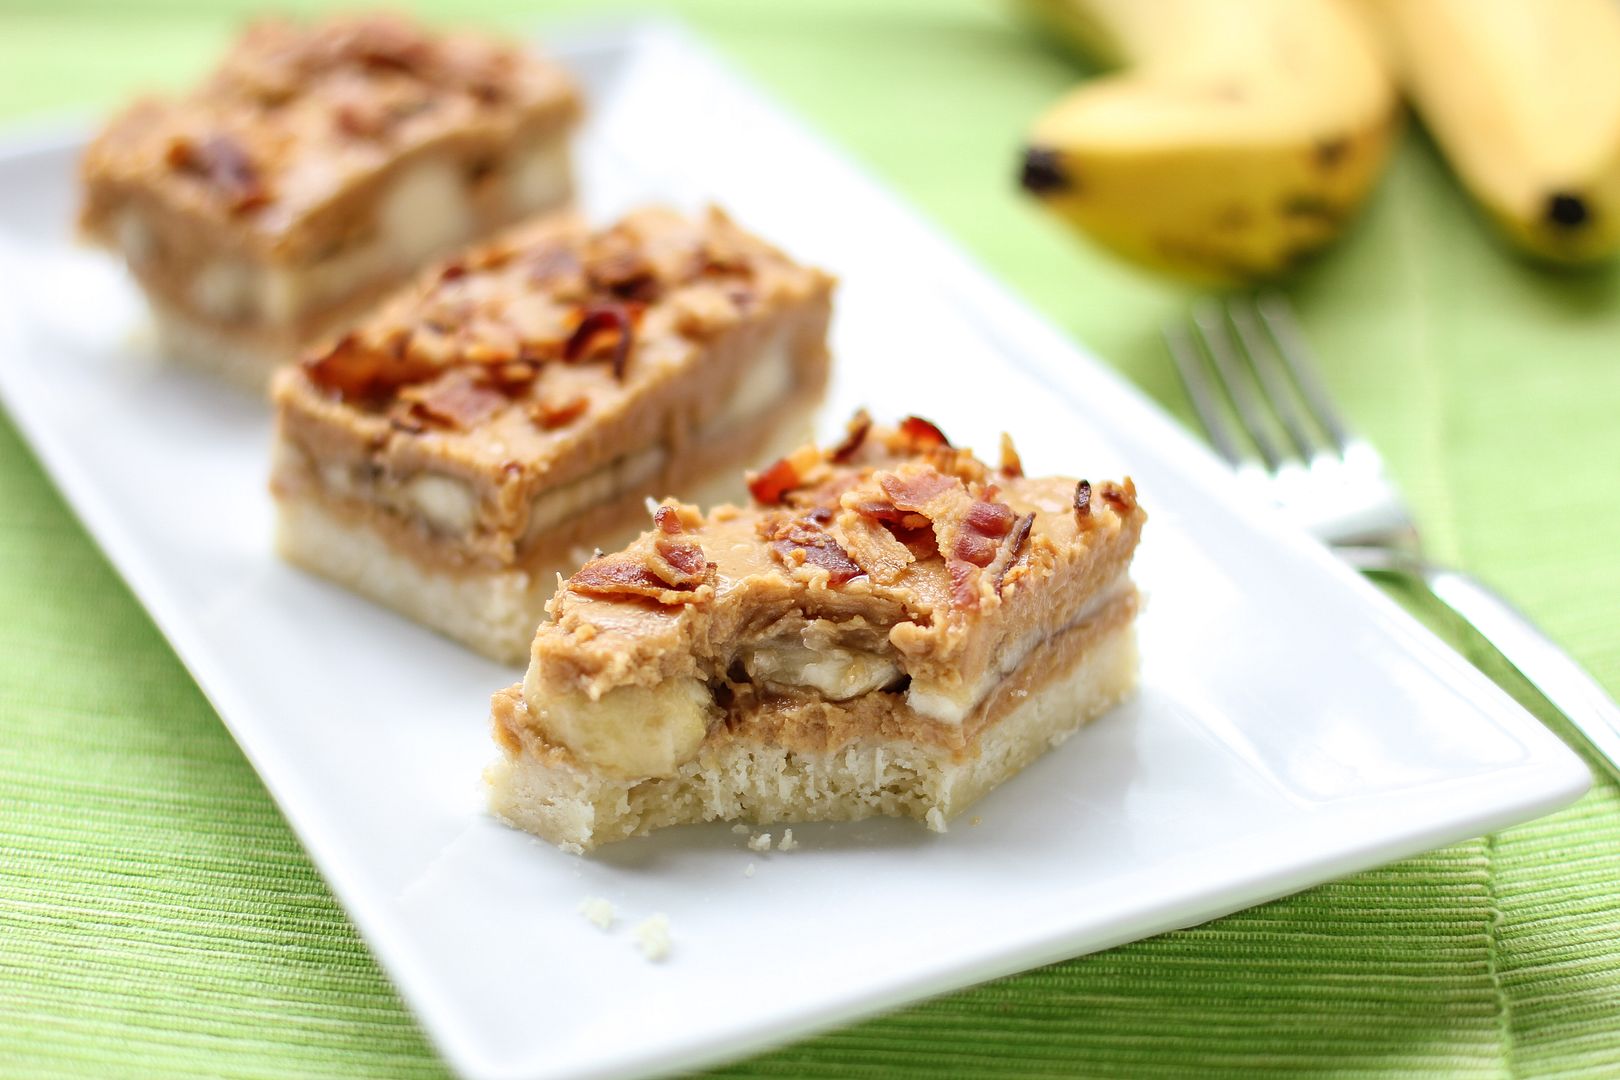
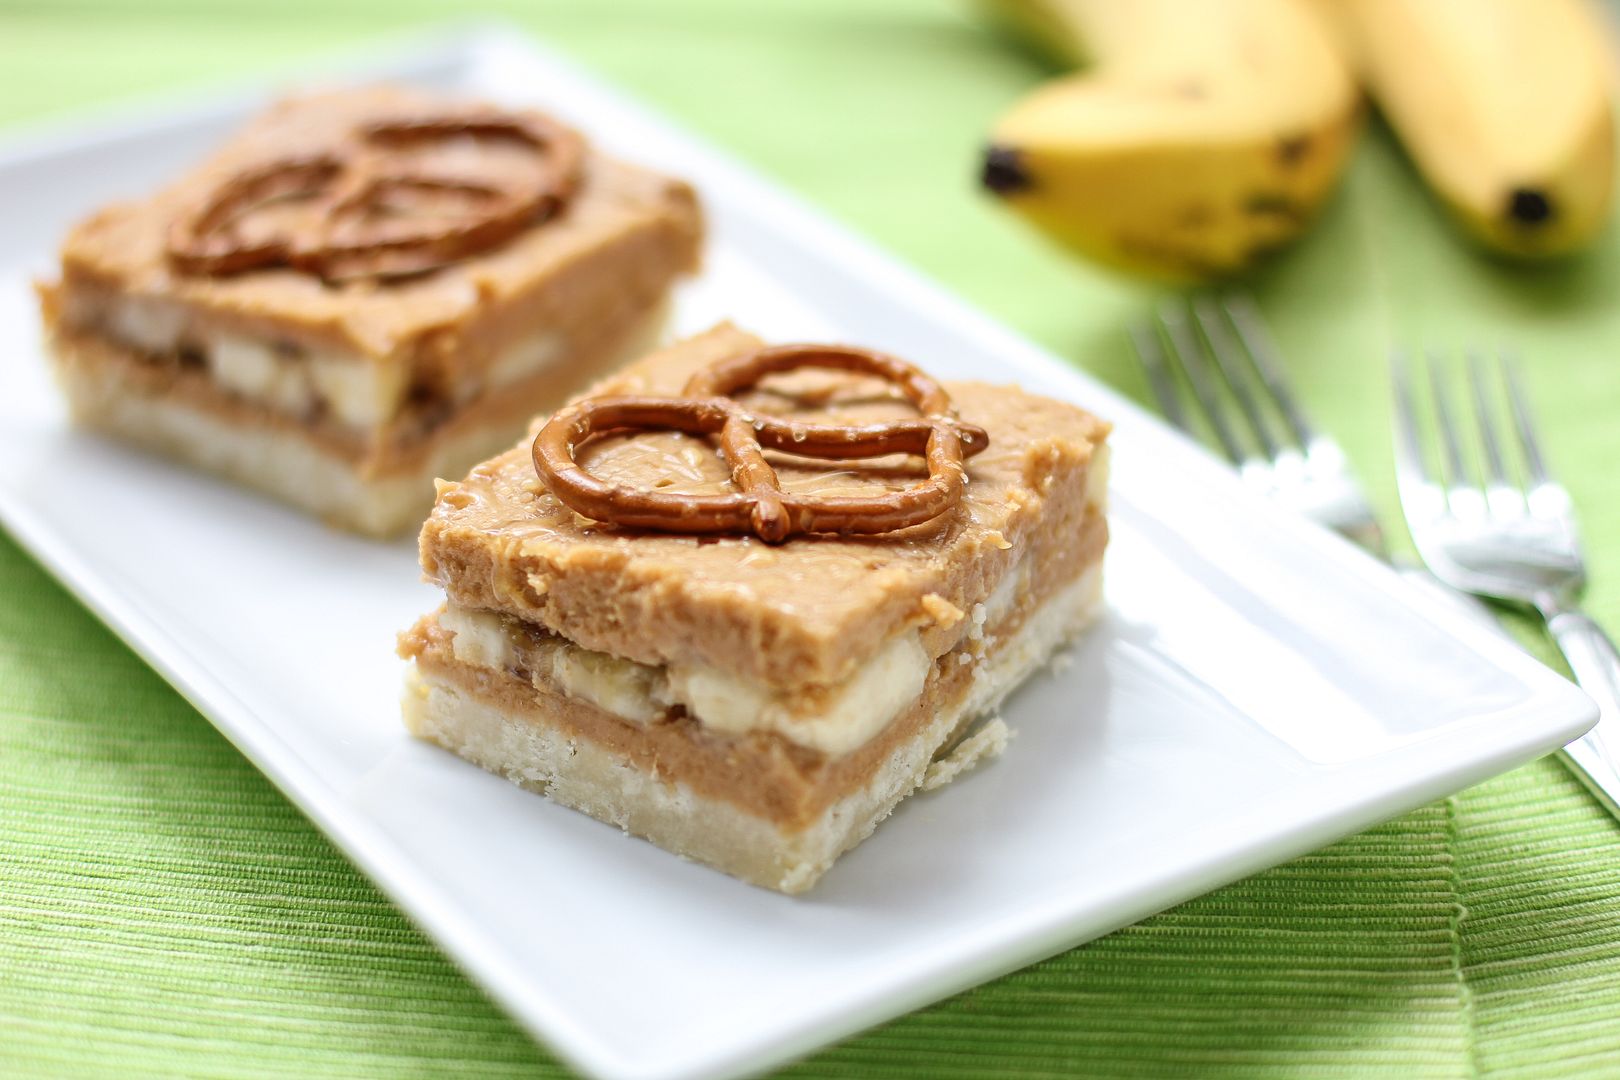
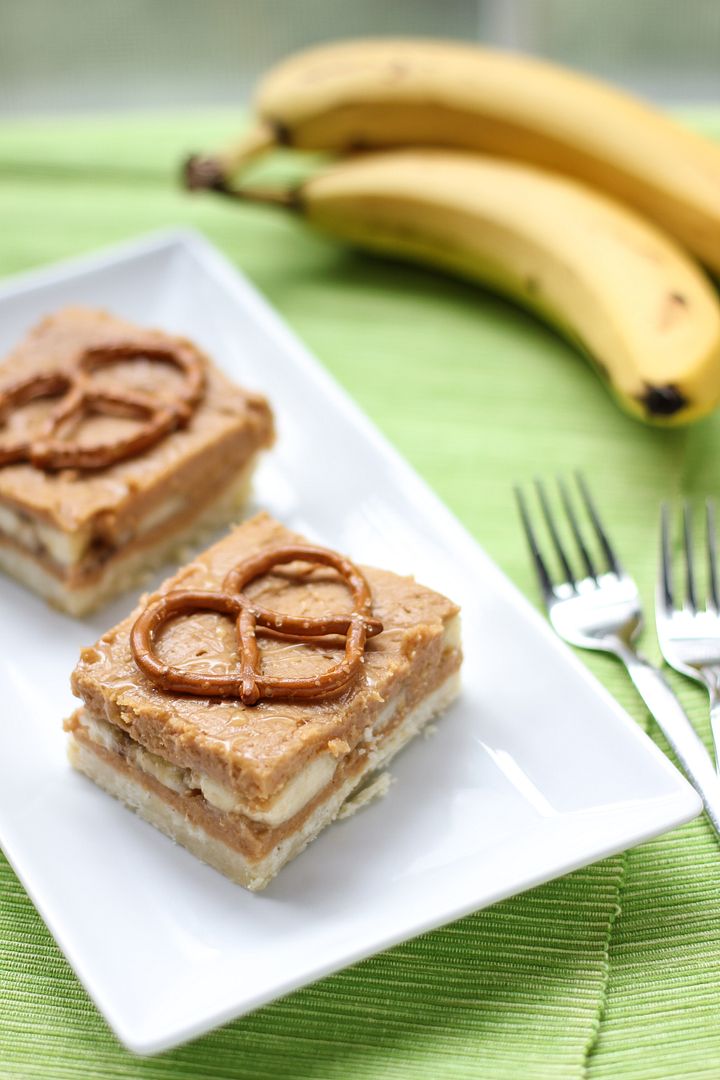
Another blast from the past that I enjoyed recently (one that you might actually want to join me for!) are these Elvis Presley Bars. They’re based on Elvis’s favorite sandwich: Peanut Butter, Banana, and Bacon. Anything with bananas and peanut butter has that elementary-school-lunch nostalgia that I love, but adding bacon for a salty twist makes these bars extra delicious. Don’t worry if you’re a vegetarian; big crunchy pretzels can be used as your salty component. Either way, I think Mr. Presley would be proud.

One year ago: Fig, Prosciutto, and Arugula Pizza
Two years ago: Chocolate Mousse Pie
Three years ago: Mallow Cookies

Elvis Presley Bars (Peanut Butter Banana Bacon Bars)


Recipe by: Willow Bird Baking, with peanut butter filling adapted from Fine Cooking
Yield: about 15 bars

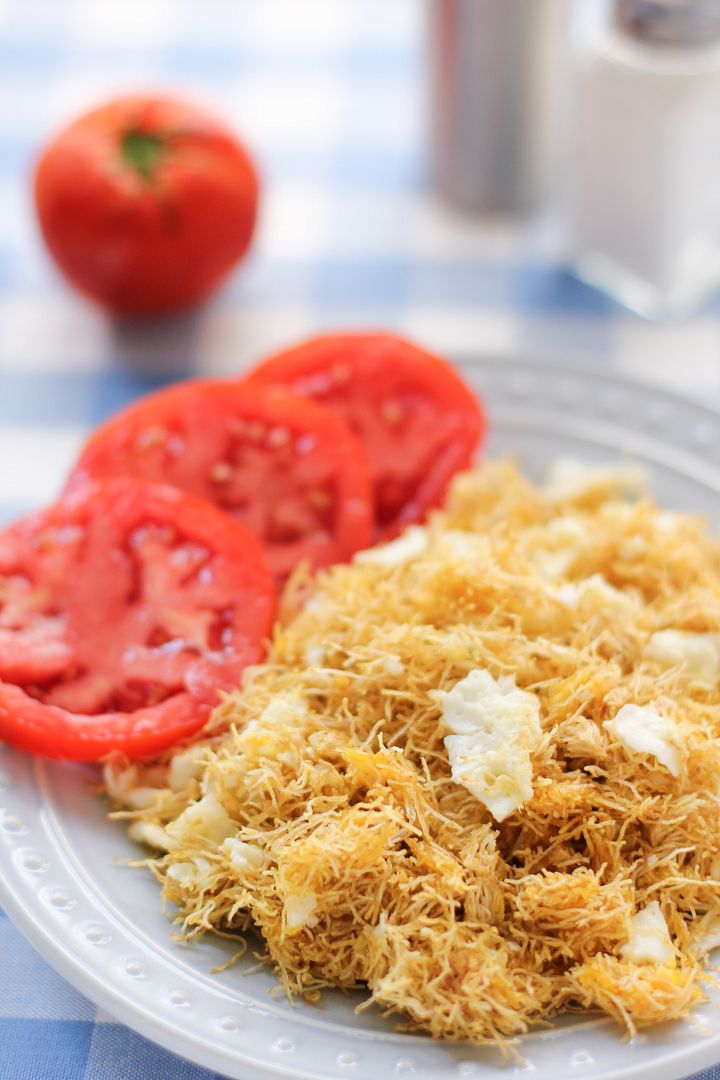
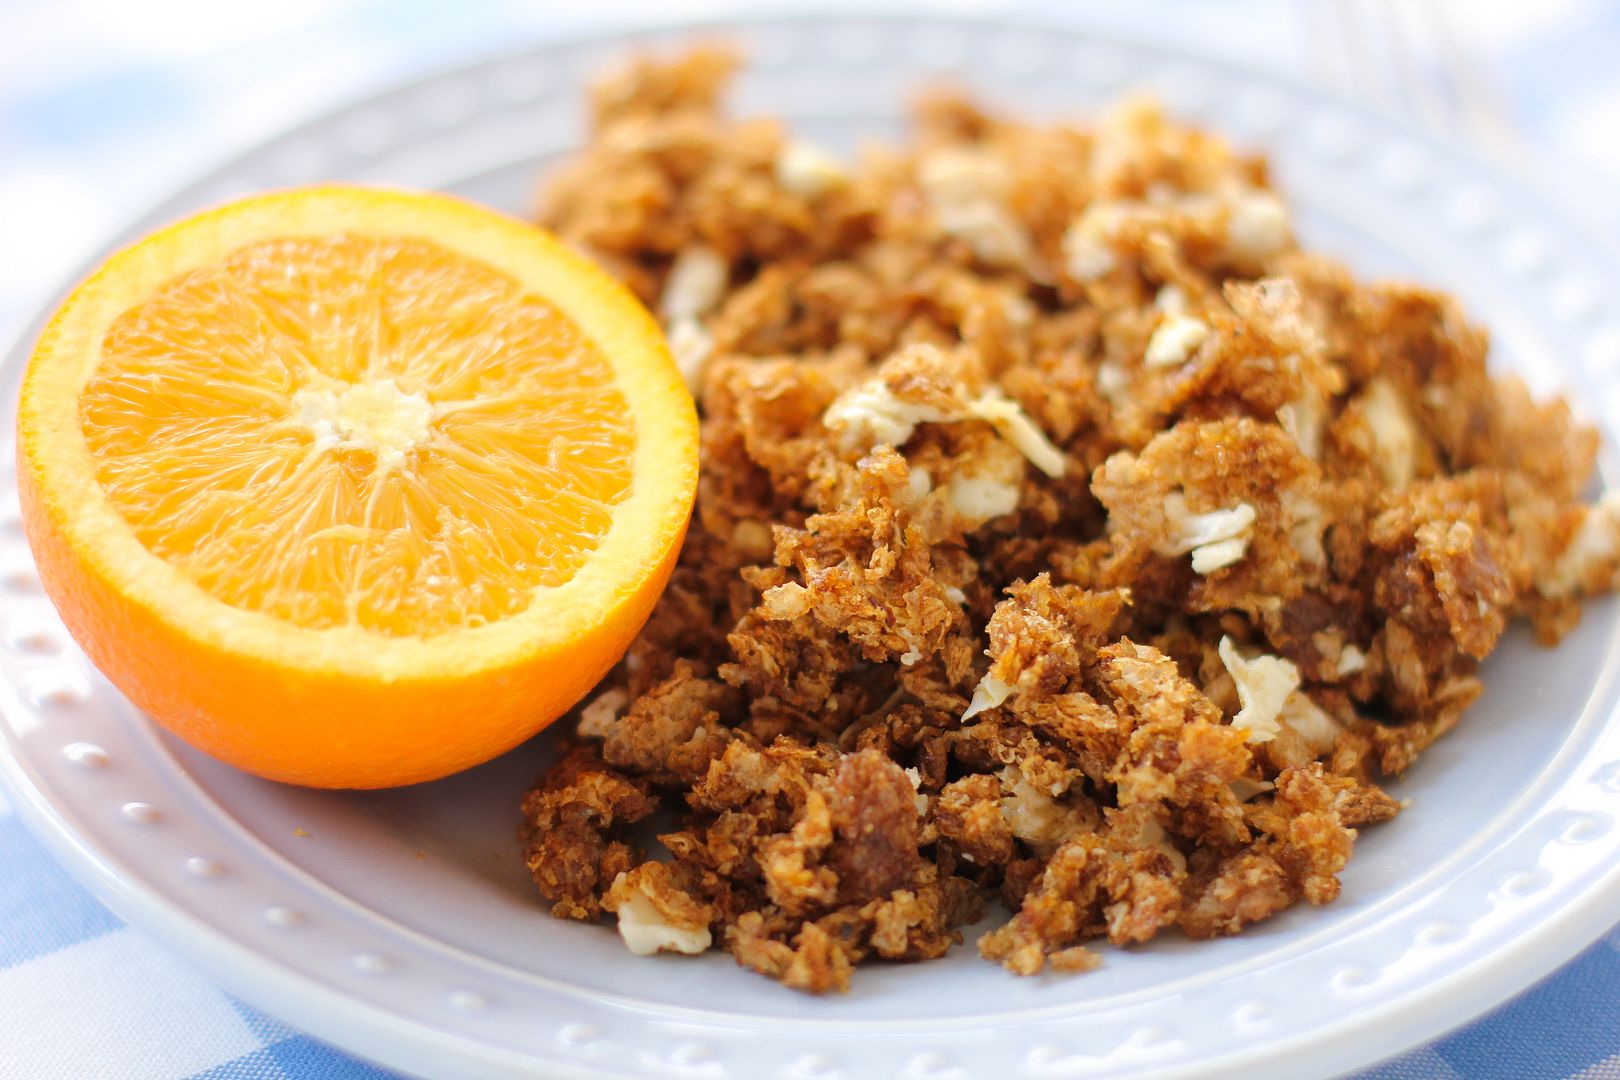
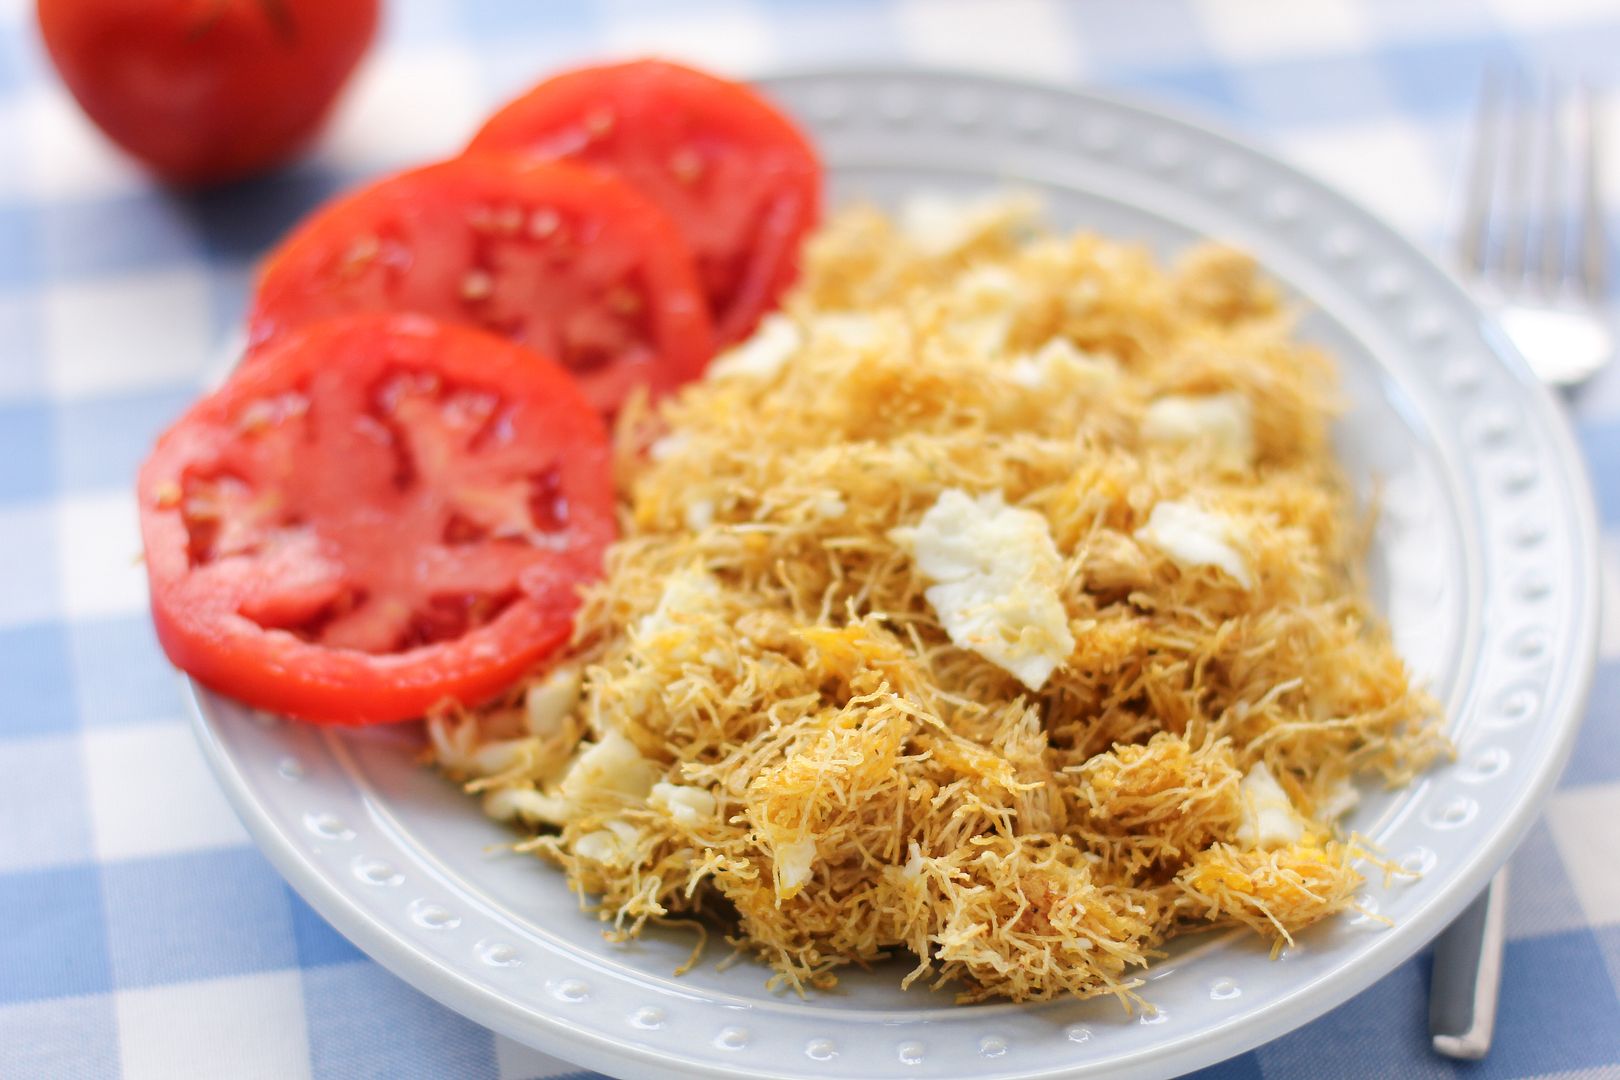
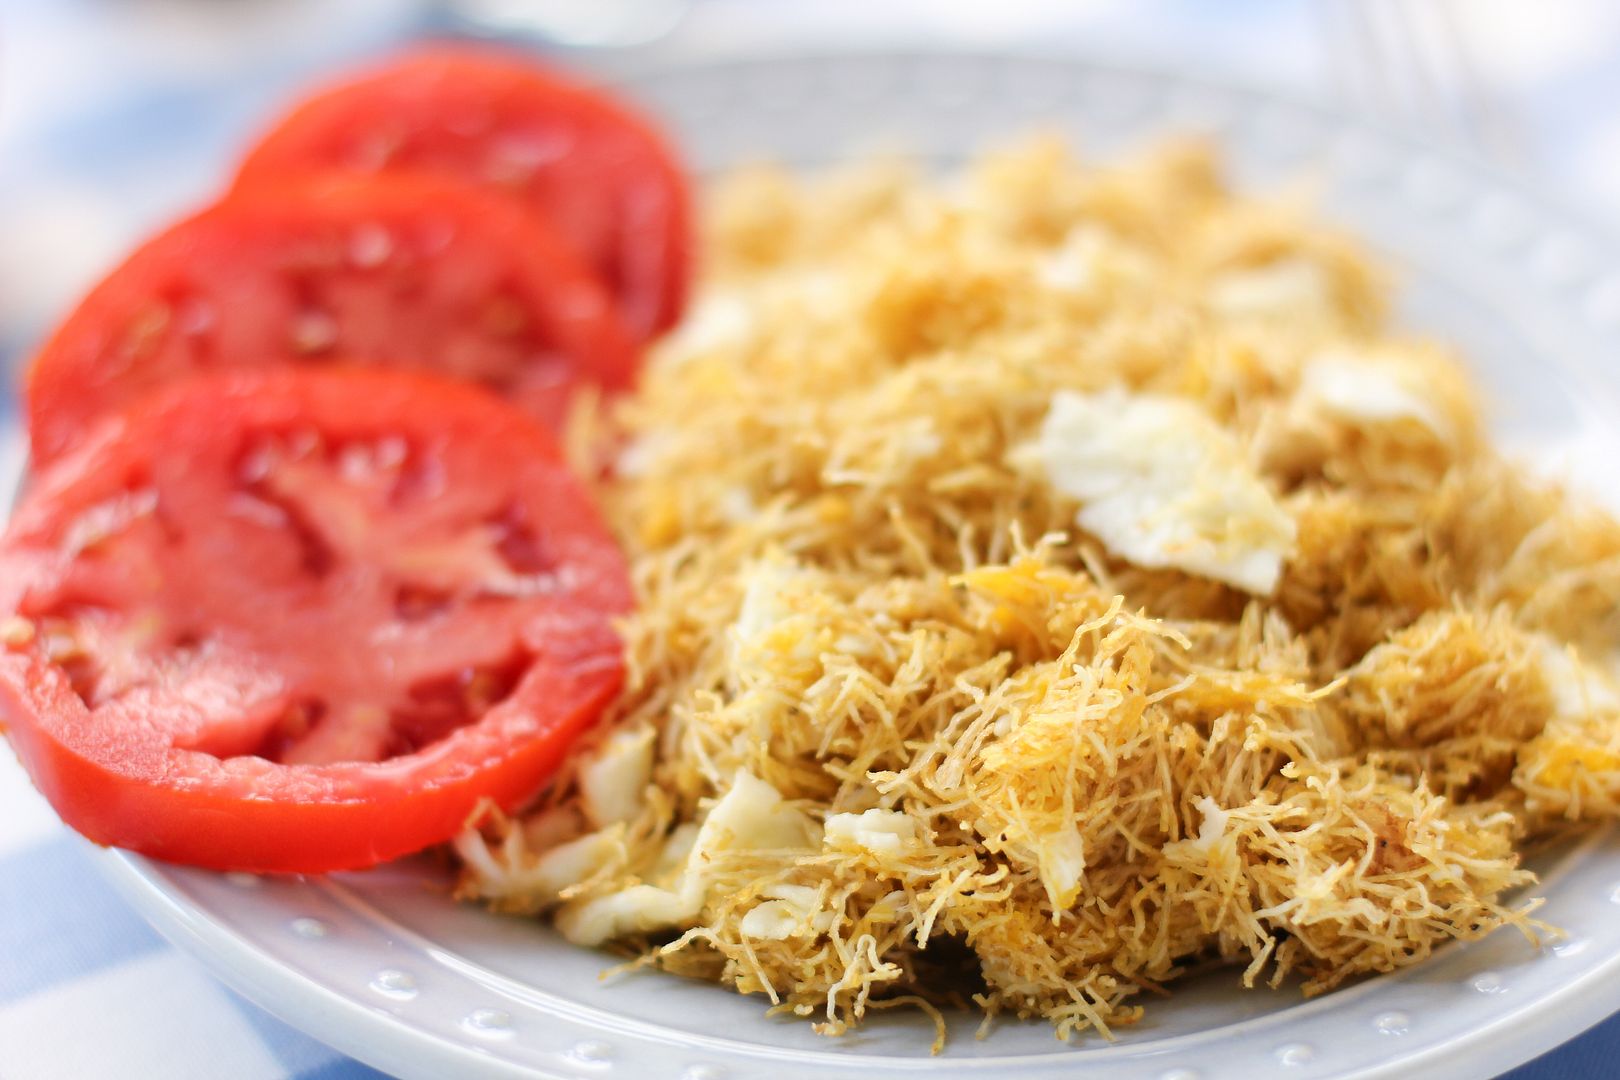
These Peanut Butter, Banana, and Bacon Bars are a delicious combination of salty and sweet. Pretzels can be used to replace the bacon for a vegetarian substitute. Since the recipe makes a big pan of bars, they’re perfect for taking to a potluck or for pleasing a crowd.

Shortbread Crust Ingredients:
2 cups all-purpose flour
1/2 cup powdered sugar
1 cup cold butter, cut into small pieces
1/2 teaspoon salt

Peanut Butter Filling Ingredients:
2 cups creamy peanut butter (use an emulsified kind like JIF, not natural peanut butter)
12 tablespoons unsalted butter, at room temperature
2 1/2 cups powdered sugar
2 teaspoons pure vanilla extract
4 tablespoons hot water
3-4 bananas
honey for drizzling
5-6 strips bacon OR large pretzels for topping

Directions:
Preheat the oven to 350 degrees F and line a 9 x 13-inch baking dish with a foil sling with the ends overhanging the pan to facilitate the removal of the bars later on.

Pulse the flour, powdered sugar, and salt together in a food processor to combine. Add the cold butter chunks and pulse about 10-12 times until you have the texture of coarse sand (you can also use a pastry cutter or two knives to accomplish this if you don’t have a food processor). Pour this mixture into the prepared dish and use a spatula or the bottom of a glass to press it down into an even layer. Bake it for about 15 minutes or until it’s lightly browned. Let it cool completely.

In a medium bowl or in the bowl of a stand mixer, beat together the peanut butter and butter until smooth and fluffy, about 1 minute. Add the vanilla extract, 2 tablespoons of hot water, and half the powdered sugar to the mixture and beat until combined and fluffy. Add the rest of the powdered sugar and another 2 tablespoons of hot water. Once combined, beat for an extra minute until the mixture is smooth and thick like frosting.

Use a spoon to glob half the peanut butter mixture onto the cooled shortbread crust, and then use an offset spatula to gently spread it into a roughly even layer (don’t worry if it’s not perfect.) Lay banana slices across the entire surface. Glob the rest of the peanut butter mixture all across the top. Again, use your offset spatula to gently spread the peanut butter mixture over all the banana slices (you want the banana slices to be covered because bananas oxidize and turn brownish, so the bars are prettier if you can’t see them. It’s hard to get them all covered, but just be patient and keep working the peanut butter around, cleaning off your spatula now and then.) Chill the bars for at least 3 hours.

While the bars are chilling, preheat the to 400 degrees F and cover a baking sheet with aluminum foil. Lay out the strips of bacon on the baking sheet and bake for 17-20 minutes or until crisp. Let bacon drain and completely cool on a paper towel covered plate.

When the bars are chilled, lightly drizzle the surface with honey (they’re already very sweet, so don’t be heavy-handed), and crumble bacon pieces over the surface (or top with pretzels as desired). Gently use the sling to pull the bars out and cut them on a cutting board. Serve them within a day or two (before the bananas get too brown), storing them in an airtight container in the fridge if needed.

If you liked this post, please:
Subscribe to Willow Bird Baking
Follow Willow Bird Baking on Twitter
Follow Willow Bird Baking on Facebook

Shredded Wheat (or Weetabix) Breakfast Scramble


Shredded Wheat Breakfast Scramble

The only time I’ve lived away from my hometown was during my sophomore year in college when I moved to Beaufort, a small town on the coast of North Carolina. I lived there for a few months before traveling for a month down the Eastern seaboard to study marine zoogeography. That semester changed my life, and I’ve continued to process the memories over the years. Periodically I’ll share stories here on Willow Bird Baking from that time.

I pulled onto the Davidson campus in my gray Nissan Altima and pulled up to the curb. Kim, who’d been waiting, shoved her duffle bag into my trunk and dropped into the passenger seat next to me. We took a moment to introduce ourselves; we’d seen each other around campus, but hadn’t officially met. Now we were both about to embark on a semester in Beaufort studying invertebrates. We had arranged via email to drive to the coast together.


Weetabix Breakfast Scramble

I was a little worried about interacting with a stranger for 6 hours straight, but getting to know Kim was hilarious and fun. I put on a CD and we talked about school, the guy she kinda liked, why we were going to Beaufort.

About halfway through the trip, though, I voiced my frustration with other drivers. If you’ve ever ridden in my car, you know that this is not wholly unusual, but this time was a little different.

I started in: “Why do people feel the need to ride my bumper? Just look at how close this guy behind me is! It’s so rude! I’m driving at a reasonable speed!”

Kim laughed and did something no one had ever done before: she argued with my road rage. “Julie, he’s totally trying to pass you. He just wants you to get over.”

Huh.

My first impulse was to argue. “Well, I’m going over the speed limit! Why does he even need to pass?” Ultimately, though, I realized she was right. It seemed so obvious now that she had mentioned it, but I’d honestly never realized that I was blocking the passing lane. I flicked on my turn signal (because I always use my turn signal, and you better too! Unless you’re an ice road trucker) and moved over to the right. The offending car sped past.

“Hm,” I said sheepishly, “I guess that is what he wanted.” Kim laughed, because of course that’s what he wanted.

Since that day, I’ve been much more lane-conscious. I’ll drive in the rightmost lane that suits my speed, passing on the left as appropriate. I always let faster cars pass on the left.

Unfortunately, I’ve also been the recipient of some sweet poetic justice. On many occasions, I’ve been the car stuck behind someone blocking the passing lane! Every time I start to think evil thoughts towards the driver, though, I have to remind myself that however unlikely it may seem, they may not realize I want to pass. After all, I was in their shoes once and had no idea.

Sometimes I wonder how many other everyday truths I’m blind to. When are more Kims going to pop up in my life and gently make me aware of something I was missing? I like to think I’m ready to accept those new revelations as seamlessly as I managed that quick lane shift. Realistically, though, I know there’ll be bumps in the road.

Another simple idea I was introduced to recently was this quick breakfast scramble. My friend Serene of The Mom Food Project mentioned it in my breakfast thread on Willow Bird Baking’s Facebook page (Are you already following it? We have a lot of fun over there. Maybe too much.)

When she first mentioned it, I was a little skeptical, but I’m not one to shy away from trying anything once. I went out and bought original Shredded Wheat (not the spoon size) and some Weetabix biscuits for a variation. Sure enough, the recipe was quick and easy, and produced a rich, delicious breakfast. I loved serving it with a fresh sliced tomato from Mike’s grandaddy’s garden. What a great new idea this turned out to be!

What’s something you only just recently realized or learned about?

One year ago: Pretty Italian Pressed Sandwiches
Two years ago: Buttermilk Cranberry Scones
Three years ago: Lemon Burst Fairycakes

Shredded Wheat Breakfast Scramble


Recipe by: Slightly adapted from The Mom Food Project
Yield: 1 serving

If you’re like me, you’ve never heard of this breakfast before and it seems weird. I get it. But give it a try. The richness of the gooey yolks and butter coat the cereal and make a lovely, hearty, filling meal. Using the Weetabix biscuits in the place of Shredded Wheat gives a nuttier flavor. I loved them both, so it’s hard to say which you’ll like better. Try them both, or try with whichever you have on hand. Serve this lovely breakfast with some fresh sliced tomatoes, lightly salted, or an orange.

Ingredients:
2 bricks original Shredded Wheat (or 3 Weetabix biscuits)
2 eggs
4 teaspoons butter
salt and pepper to taste

Directions:
Shred the Shredded Wheat or Weetabix biscuits into a bowl. Place 2 teaspoons of butter on top of it.

In a skillet over medium-high heat, melt the remaining 2 teaspoons of butter. Crack two eggs into the skillet and fry them to over-easy (so the yolk will still be runny, but the white is cooked through.) Place cooked eggs over top of the butter and cereal in the bowl. Using two forks, mash the eggs, butter, and cereal all together until well combined. Salt and pepper to taste.

If you liked this post, please:
Subscribe to Willow Bird Baking
Follow Willow Bird Baking on Twitter
Follow Willow Bird Baking on Facebook

Lemon Raspberry Squares

I know I said that sometimes you need to settle in and let the hard times wash over you like waves. And that’s true. You need to do this the most when you’ve been running like a hamster in a wheel, trying by virtue of your own power to get somewhere.

Other times, though — those times when you’re exhausted and overwrought — it’s okay to build a boat.

Not a canoe. I’m talkin’ a big, sturdy boat. And it’s okay to get in that boat and put on some headphones. And a blindfold. It’s okay to sing at the top of your lungs, to willfully drown out the sight, sound, and persistent pressure of the waves until you forget they exist altogether. We both know that someday you have to get out and face the ocean. But it doesn’t have to be today.

I recently asked you on Facebook to help me build a boat and distract myself from the waves. We shared funny stories on a hard day, and oh dear, you are a witty bunch! I thought I’d share my own funny story in more detail here, in case you need a distraction today. I present to you The Tale of The Wayward Underwear.

(Did I just lose my sponsors? Oh well. Anyway…)

Back in college, I had a sweet apartment above my professor’s garage (hi, Dr. Peroni). It didn’t have a full kitchen, but I hadn’t really started baking yet anyway. I made chili in my electric skillet, hot dogs in my microwave, and that was all I needed. That and The Fresh Prince of Bel-Air on television. And my blue couch from Goodwill, which had no back legs and thus reclined. Awesome.

The washer and dryer downstairs was icing on the cake. I did laundry about once a week, but was usually too busy to bother putting the clean clothes away. Instead, I grabbed things straight from the dryer and threw them on before class.

One day I was late to my American Lit class and I did just that. I absentmindedly tugged on a pair of jeans and a t-shirt before hopping on my bike and pedaling furiously to my class. I made it in time, slid into my seat, and adroitly navigated the discussion of a text I hadn’t actually had time to read (ah, college). Everything seemed fine . . . until I began the ride back to my apartment.

About halfway there, I noticed something lying in the middle of the sidewalk. As I approached the object, it started to look familiar. Too familiar. Unacceptably familiar. I stopped a few feet away and stared at it, aghast.

There, lying in the middle of the sidewalk of one of the busiest streets in Davidson, was a pair of my underwear.


I know it’s traumatic. Just try to think of lemon raspberry squares.

My brain could not process the visual information it was receiving. Instead, it was cycling through myriad half-formed thoughts: Wha–? How in the world–?

I finally pieced together that my underwear must have been clinging to my jeans when I grabbed them out of the dryer. The fact that they fell off in the middle of the sidewalk was bad enough, but it was nothing compared to the realization that they might not have fallen off — that I might’ve worn them straight into class!

Just to make sure you have a clear picture in your brain, these were not my nice, normal underwear. They were my cute underwear, with little purple trim all over them. And they were lying about 100 feet from a college campus. This situation had no doubt been conjuring up images of drunken debauchery in passersby’s minds for the past hour while I’d sat in class, blissfully unaware.

And if there’s anything I was not, it was drunken, debauched, or scandalous in any way. I was as straight-laced as a new sneaker.

Standing there, staring at this pair of underwear on the sidewalk for way too long to seem inconspicuous, I tried to get a handle on my racing thoughts. However improbable, the idea that someone could link this undergarment to me and misunderstand how it arrived on the sidewalk made me flush with embarrassment.

Also, what was I supposed to do about this situation? I began to debate: could I possibly pick them up? They were some of my favorite underwear, after all. But if anyone saw me picking up a pair of underwear off the flippin’ street and taking them home, what would they think? Could I possibly leave them there? And let more people see them? And who would eventually have to pick them up?! I almost died.

After several minutes of standing with my mouth agape, I finally got myself together and rode home — without my wayward underwear. They were gone the next day and I don’t ever, ever want to know where they went or how they got there.

If you’re in need of even more fun after that humiliating tale, don’t worry. I have another distraction for you: Lemon Raspberry Squares. Think of your typical gorgeous, sweet-tart lemon squares on a buttery shortbread crust. Now mentally slather a layer of raspberry jam right down the middle. Now eat about 50 of them.

See? All better.

What’s your favorite way to get your mind off of troubles?

One year ago: Soft Sugar Cookies
Two years ago: Secret Garden Craft: Simple Luncheon Napkins

Lemon Raspberry Squares


Recipe by: Slightly adapted from Heather Christo Cooks
Yield: 12-15 bars

This is a dessert for folks who have a sweet-tooth! They’re sweet, buttery, tart, and downright delicious. They taste like sunshine.

Ingredients:
2 cups all-purpose flour
1 cup powdered sugar
1 cup cold butter, cut into small pieces
1/2 teaspoon salt
4 eggs
2 cups white sugar
1/3 cup flour
1/2 cup fresh lemon juice
raspberry jam (I think I used about a cup — just eyeball enough for a thin layer), room temperature

Directions:
Note: You want your jam at room temperature here because in regular lemon squares, the lemon mixture is poured onto a hot crust. If you pour it onto cold jam instead, it takes longer for the middle to cook (don’t ask me how I know this.) I think having the jam at room temperature will help the whole dish cook more evenly.

Preheat the oven to 350 degrees F and spray a 9 x 13-inch baking dish with cooking spray. You could also place parchment paper in the dish to form a sling if you’d rather — this will make the bars easier to remove.

Pulse the flour, powdered sugar, and salt together in a food processor to combine. Add the cold butter chunks and pulse about 10-12 times until you have the texture of coarse sand (you can also use a pastry cutter or two knives to accomplish this if you don’t have a food processor). Pour this mixture into the prepared dish and use a spatula or the bottom of a glass to press it down into an even layer. Bake it for about 15 minutes or until it’s lightly browned.

While it’s baking, stick a spoon in your jam so it’s ready to spread on quickly. In a medium bowl, whisk the eggs until fluffy before adding sugar while whisking constantly (if you stop whisking here, the sugar will “cook” the eggs, and you don’t want that!) Once the sugar and eggs are combined, add in the flour and the lemon juice, continuing to whisk. Spread the jam in a thin layer over the entire hot crust. Then pour the lemon mixture over the jam.

Stick the entire dish back into the oven and bake 15-25 minutes (this is such a wide range because the temperature of my jam might’ve made my baking time longer — it took my bars around 25 minutes to get pretty set.) Start checking at 15 minutes by giving the pan a little jiggle. The lemon mixture should be about set (slight jiggle only) and a light golden brown. If it starts to get too dark before it’s set, cover the pan with foil as it finishes baking.

When the bars are done, remove the dish to a cooling rack to cool completely before cutting (if you don’t cool them completely, I’m betting they’ll be runny, so be patient!) Use a sharp knife to cut the bars and serve them. You can sprinkle powdered sugar from a sifter over the top for decoration, but the bars are very sweet already, so go easy!

If you liked this post, please:
Subscribe to Willow Bird Baking
Follow Willow Bird Baking on Twitter
Follow Willow Bird Baking on Facebook

Thyme Orange Cranberry Shortbread Cookies

“But I also wondered if he wasn’t right, that we were designed to live through something rather than to attain something, and the thing we were meant to live through was designed to change us.”
A Million Miles in a Thousand Years, Donald Miller

I don’t know about you, but I generally feel like I’m right about things. I don’t mean that I’m always right, and I’m not a know-it-all; I’ve just spent a lot of time forming my beliefs and I’m a thoughtful person, so I usually don’t feel like my worldview is too far off base.

I think most people probably feel this way. There aren’t very many of us, I’ll wager, who walk through life feeling totally insecure in our ideas and worldview. We believe what we believe for reasons — sometimes good reasons, sometimes misguided ones — and we walk through life feeling pretty certain. Open to change, we hope, and open to learning, but pretty settled.

Every now and then, though, you hit a wall that sends your worldview reeling. Firm ideas you had about your life’s purpose, how to weather different circumstances, and how the world works suddenly seem a lot more fluid. In my own life, I feel like I’ve recently run into the Great Wall of China, not to be melodramatic or anything, and I’m scrambling to find confirmation or revision of my worldview. I won’t bore you with the gory details, but I’d like to share some of my revelations with you over the coming weeks.

The first one is that life is not about checking off boxes. Donald Miller, a writer who had to “edit” his life into a screenplay and discusses the process in his book, A Million Miles in a Thousand Years, realized that inasmuch as life is a story, there are certain elements that are necessary to make it a meaningful one. One of those elements is character transformation.

We sometimes imagine that attaining our goals in life is what makes us successful: finding a husband, having kids, finding a house, finding a job. Have you ever wondered why we never seem to arrive? If we never seem to be finished with achieving, maybe it’s because the achievement itself isn’t the goal, but how we change during the pursuit.

Everyone always says, “the journey is the destination,” but then when we’re faced with health crises, relationship problems, job frustrations, and uncertainty about our future, that ideology falters. We want solutions. We want to be on the other side. It’s hard to rest in the storm, knowing God is using every strong wind and bolt of lightning to transform us in the exact way we need to be transformed. That idea can even evoke hostility in people in the midst of their greatest trials — the idea that God would, even while holding us and loving us in the ultimate sacrificial way, allow us to endure seemingly insurmountable trials is difficult to swallow.

Moreso even than others, I can have trouble resting in a trial. I don’t fault God for letting me go through the hard times, but I do inadvertently try to make myself my own savior, scrambling to fix it fix it fix it! My anxiety gets the better of me, and I flail through all different “solutions,” some of which do more harm than good. Lately I’ve been practicing, instead, letting the trouble wash through me like waves. Maybe they’re strong waves, and maybe they’ll move me. Maybe they’ll even knock me off my feet for a bit. But ultimately they’ll flow past and disappear against the shore.

If you’re in the middle of a trial, practice thinking of each new difficulty like a wave and let it come. Then let it go. And in the meantime, maybe make some cookies. Cookies never hurt.

One year ago: Straw-Raspberry Basil Fruit Leather
Two years ago: Homemade Buttery Croissants and Pains-au-Chocolats

Thyme Orange Cranberry Shortbread Cookies


Recipe by: Willow Bird Baking
Yield: two logs of about 15 cookies each

These are some amazing cookies. Buttery, delicate shortbread is already delicious, but the addition of orange zest, cranberries, and thyme make these shortbreads particularly special. They’re not too sweet, but a drizzle of white chocolate sweetens them up. They’d be perfect for tea, snacking, or a dessert. It’s also easy to bake a log of them and keep the second log in the freezer for unexpected company!

Ingredients:
2 cups all-purpose flour
1/4 teaspoon salt
2 1/2 teaspoons crushed dried thyme
3/8 cup powdered sugar
1 cup (2 sticks) butter, at room temperature
1 1/2 tablespoons finely grated orange zest (about the zest from one orange)
1/4 cup freshly squeezed orange juice
1/2 cup dried cranberries, finely chopped
about 1/2 cup white chocolate chips

Directions:
In a large bowl, whisk together the flour, salt, and dried thyme. In a separate large bowl, cream together the butter, orange zest, and powdered sugar 2-3 minutes or until pale, light, and fluffy. Mix in the orange juice. Beat in the flour mixture and then stir in the cranberries by hand to be sure everything is combined.

Use a sheet of wax paper to roll the dough into a 1 1/2-inch wide log (if you’re having trouble, chill the dough for a bit in the fridge before rolling it). Wrap plastic wrap or foil around the logs and freeze them for 20 minutes until firm (you can also double-wrap them and leave them frozen for up to 3 weeks at this point. When you’re ready to bake, just use a serrated knife to cut the cookies and bake as usual. It make take a few minutes longer since they’ll be baking from frozen, but just keep an eye on them.) While they cookies are freezing, preheat the oven to 350 degrees F and place the rack in the center. Prepare a baking sheet with parchment paper or a silicone baking mat.

Use a serrated knife to slice each log into 1/4-inch slices and place these about 1 inch apart on the prepared baking sheet. Bake until golden, about 8-10 minutes, rotating once halfway through baking. Let the cookies cool for a couple of minutes on the pan before transferring them to a cooling rack to cool completely. In the meantime, melt white chocolate according to package instructions (usually half-power, in small increments, stirring often) and spoon it into a plastic zip-top bag with a tiny corner cut off. Set cookies on wax or parchment paper and squeeze the melted chocolate from the zip-top bag over them in a zig zag design. Let them dry. Store them in an airtight container separated by leaves of parchment or wax paper for up to a week.

If you liked this post, please:
Subscribe to Willow Bird Baking
Follow Willow Bird Baking on Twitter
Follow Willow Bird Baking on Facebook