
If there were ever a hard month to work a Daring Bakers challenge into the schedule, November would be it! This past week has been filled to the brim with cooking pies, cakes, enchiladas (no one ever said I was normal). And I was only responsible for a small part of my family’s Thanksgiving meal — I don’t know how folks responsible for the entire dinner manage to get everything finished!
Speaking of Thanksgiving, it was grand — lovely food and a lovely time with family. The yeast rolls, as always, were my favorite part, but the turkey made a fine showing:

The juicy stuffed bird my parents made. That’s my mother’s china in the background, which I promised her I would not sell on eBay after she dies (isn’t this the sort of discussion everyone has over Thanksgiving dinner?)
Back to the Daring Bakers Challenge, though!
The November 2009 Daring Bakers Challenge was chosen and hosted by Lisa Michele of Parsley, Sage, Desserts and Line Drives. She chose the Italian Pastry, Cannolo (Cannoli is plural), using the cookbooks Lidia’s Italian-American Kitchen by Lidia Matticchio Bastianich and The Sopranos Family Cookbook by Allen Rucker; recipes by Michelle Scicolone, as ingredient/direction guides. She added her own modifications/changes, so the recipe is not 100% verbatim from either book.

What’s funny about this challenge is that just a couple of days prior to Lisa’s announcement, I was walking through the grocery store pondering cooking techniques I wanted to try. I settled on deep frying as one thing that still really mystified me. When this challenge was issued, it just confirmed for me what I’ve remarked every month about the Daring Bakers; that is, that the group helps me stretch my skills with each new “daring” recipe.
I enthusiastically shopped around online for some cannoli forms, though other daring bakers got inventive with tinfoil. Look, he even has a little blueprint drawn out! Leave it to an engineer, right? Other than the forms, I was all set: big heavy saucepan, candy/fry thermometer, big round cookie cutter, and bottle after bottle of vegetable oil.
Turns out cannoli are quite simple! After mixing and chilling the dough, I rolled it out (springy, but otherwise nice to work with), cut some circles, and rolled them out until they were extremely thin. While my first shell turned out a little dark (you really have to remove them a touch before you think they’re done), overall, they were a success!

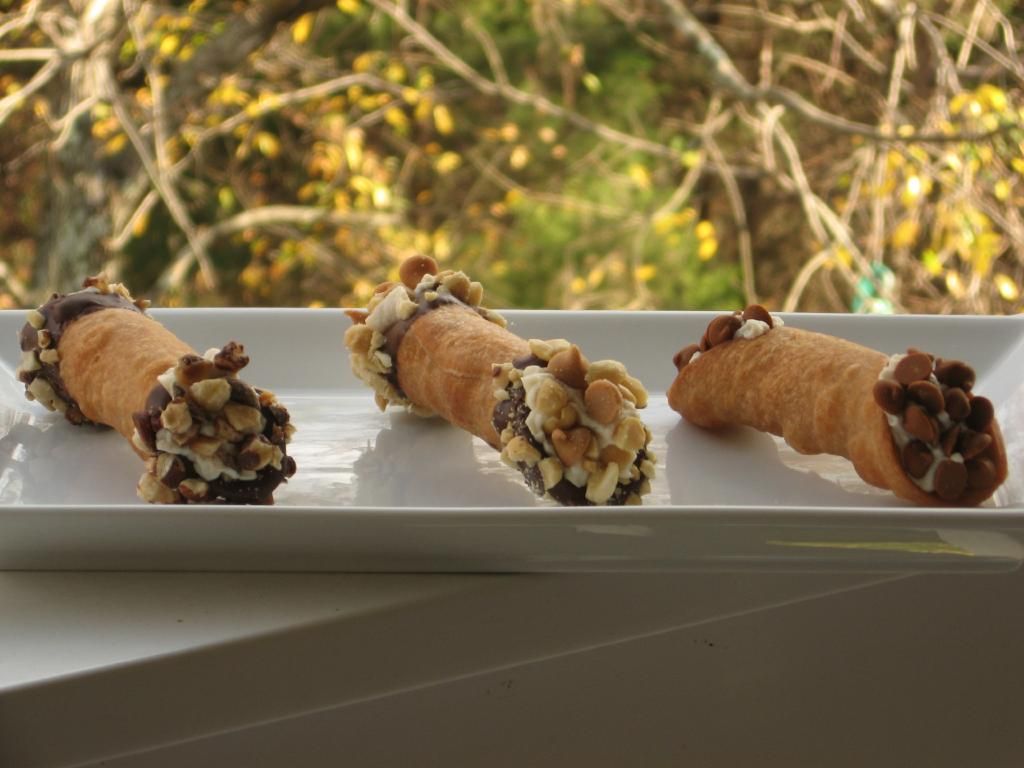
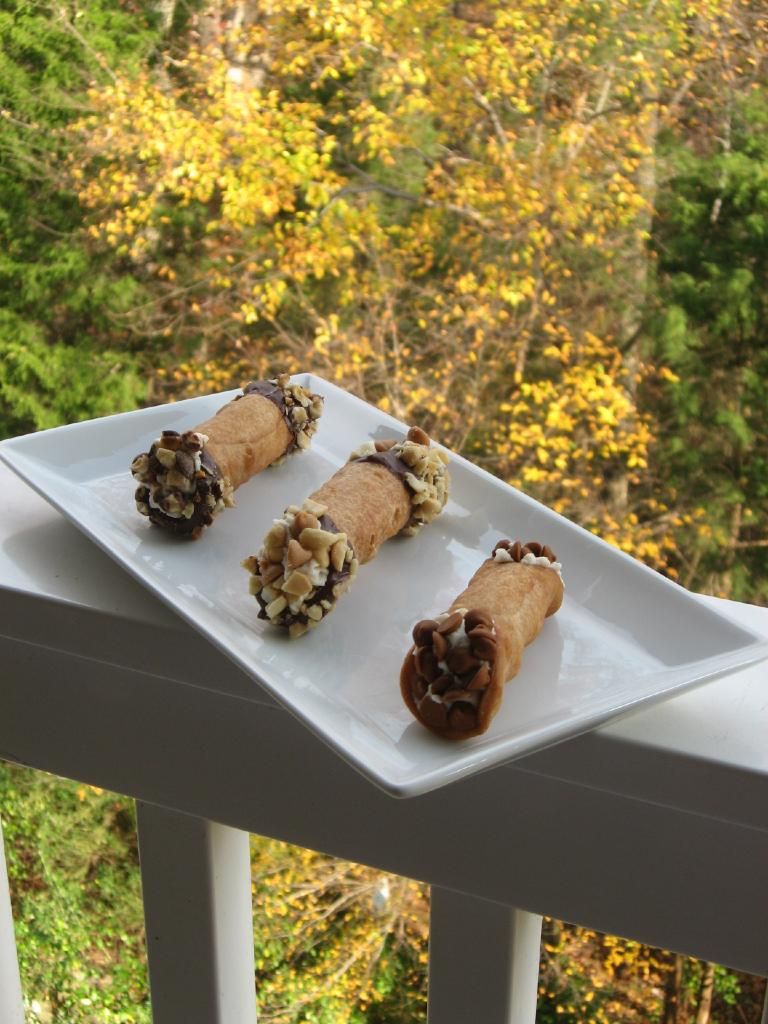
Three topping selections and some chocolate-dipped edges!
I filled my shells three ways. All started with the same traditional sweetened ricotta base, but one group was then covered in chopped hazelnuts and hunks of dark Ghirardelli chocolate. The next batch was covered with chopped peanuts and Reese’s Peanut Butter Chips. Finally, the last group of cannoli were coated with a big handful of Hershey’s Cinnamon Chips. These were my favorite; the cinnamon chips amplified the subtle cinnamon flavor of the shells. No matter which way we ate them, though, they were delectable little three-bite desserts, with the perfect ratio of crunch to cream.

No need to be intimidated by this Daring Bakers Challenge. While it pushed me out of my comfort zone, it was relatively simple and definitely a lot of fun. Thanks to Lisa for a delicious mission!

My favorite topping: cinnamon chips!
Cannoli
Recipe by: adapted from Lidia Matticchio Bastianich, Allen Rucker, Michelle Scicolone
Yields: 22-24 4″ cannoli
Printable version of this recipe
Cannoli Shells Ingredients:
2 cups (250 grams/8.82 ounces) all-purpose flour
2 tablespoons(28 grams/1 ounce) sugar
1 teaspoon (5 grams/0.06 ounces) unsweetened baking cocoa powder
1/2 teaspoon (1.15 grams/0.04 ounces) ground cinnamon
1/2 teaspoon (approx. 3 grams/0.11 ounces) salt
3 tablespoons (42 grams/1.5 ounces) vegetable or olive oil
1 teaspoon (5 grams/0.18 ounces) white wine vinegar
Approximately 1/2 cup (approx. 59 grams/approx. 4 fluid ounces/approx. 125 ml) sweet Marsala or any white or red wine you have on hand (I used Sauvignon Blanc)
1 large egg, separated (you will need the egg white but not the yolk)
Vegetable or any neutral oil for frying – about 2 quarts (8 cups/approx. 2 litres)
1/2 cup (approx. 62 grams/2 ounces) toasted, chopped pistachio nuts, mini chocolate chips/grated chocolate and/or candied or plain zests, fruits etc.. for garnish
Confectioners’ sugar
*Note – If you want a chocolate cannoli dough, substitute a few tablespoons of the flour (about 25%) with a few tablespoons of dark, unsweetened cocoa powder (Dutch process) and a little more wine until you have a workable dough (Thanks to Audax Artifex).
Cannoli Filling Ingredients:
2 lbs (approx. 3.5 cups/approx. 1 kg/32 ounces) ricotta cheese, drained
1 2/3 cups cup (160 grams/6 ounces) confectioner’s sugar, (more or less, depending on how sweet you want it), sifted
1/2 teaspoon (1.15 grams/0.04 ounces) ground cinnamon
1 teaspoon (4 grams/0.15 ounces) pure vanilla extract or the beans from one vanilla bean
3 tablespoons (approx. 28 grams/approx. 1 ounce) finely chopped good quality chocolate of your choice
2 tablespoons (12 grams/0.42 ounces) of finely chopped, candied orange peel, or the grated zest of one small to medium orange
3 tablespoons (23 grams/0.81 ounce) toasted, finely chopped pistachios
*Note – If you want chocolate ricotta filling, add a few tablespoons of dark, unsweetened cocoa powder to the above recipe, and thin it out with a few drops of warm water if too thick to pipe.
DIRECTIONS FOR SHELLS:
1. In the bowl of an electric stand mixer or food processor, combine the flour, sugar, cocoa, cinnamon, and salt. Stir in the oil, vinegar, and enough of the wine to make a soft dough. Turn the dough out onto a lightly floured surface and knead until smooth and well blended, about 2 minutes. Shape the dough into a ball. Cover with plastic wrap and let rest in the fridge from 2 hours to overnight.2. Cut the dough into two pieces. Keep the remaining dough covered while you work. Lightly flour a large cutting or pastry board and roll the dough until super thin, about 1/16 to 1/8” thick (An area of about 13 inches by 18 inches should give you that). Cut out 3 to 5-inch circles (3-inch – small/medium; 4-inch – medium/large; 5-inch;- large. Your choice). Roll the cut out circle into an oval, rolling it larger and thinner if it’s shrunk a little.
3 Oil the outside of the cannoli tubes (You only have to do this once, as the oil from the deep fry will keep them well, uhh, oiled..lol). Roll a dough oval from the long side (If square, position like a diamond, and place tube/form on the corner closest to you, then roll) around each tube/form and dab a little egg white on the dough where the edges overlap. (Avoid getting egg white on the tube, or the pastry will stick to it.) Press well to seal. Set aside to let the egg white seal dry a little.
4. In a deep heavy saucepan, pour enough oil to reach a depth of 3 inches, or if using an electric deep-fryer, follow the manufacturer’s directions. Heat the oil to 375°F (190 °C) on a deep fry thermometer, or until a small piece of the dough or bread cube placed in the oil sizzles and browns in 1 minute. Have ready a tray or sheet pan lined with paper towels or paper bags.
5. Carefully lower a few of the cannoli tubes into the hot oil. Do not crowd the pan. Fry the shells until golden, about 2 minutes, turning them so that they brown evenly.
8. Lift a cannoli tube with a wire skimmer or large slotted spoon, out of the oil. Using tongs, grasp the cannoli tube at one end. Very carefully remove the cannoli tube with the open sides straight up and down so that the oil flows back into the pan. Place the tube on paper towels or bags to drain. Repeat with the remaining tubes. While they are still hot, grasp the tubes with a potholder and pull the cannoli shells off the tubes with a pair of tongs, or with your hand protected by an oven mitt or towel. Let the shells cool completely on the paper towels. Place shells on cooling rack until ready to fill.
9. Repeat making and frying the shells with the remaining dough. If you are reusing the cannoli tubes, let them cool before wrapping them in the dough.
DIRECTIONS FOR FILLING:
1. Line a strainer with cheesecloth. Place the ricotta in the strainer over a bowl, and cover with plastic wrap and a towel. Weight it down with a heavy can, and let the ricotta drain in the refrigerator for several hours to overnight.2. In a bowl with electric mixer, beat ricotta until smooth and creamy. Beat in confectioner’s sugar, cinnamon, vanilla and blend until smooth. Transfer to another bowl and stir in chocolate, zest and nuts. Chill until firm.(The filling can be made up to 24 hours prior to filling the shells. Just cover and keep refrigerated).
ASSEMBLE THE CANNOLI:
1. When ready to serve..fill a pastry bag fitted with a 1/2-inch plain or star tip, or a ziplock bag, with the ricotta cream. If using a ziplock bag, cut about 1/2 inch off one corner. Insert the tip in the cannoli shell and squeeze gently until the shell is half filled. Turn the shell and fill the other side. You can also use a teaspoon to do this, although it’s messier and will take longer.2. Press or dip cannoli in chopped pistachios, grated chocolate/mini chocolate chips, candied fruit or zest into the cream at each end. Dust with confectioner’s sugar and/or drizzles of melted chocolate if desired.
LISA’S TIPS AND NOTES:
– Dough must be stiff and well kneaded
– Rolling the dough to paper thinness, using either a rolling pin or pasta machine, is very important. If the dough is not rolled thin enough, it will not blister, and good cannoli should have a blistered surface.
– Initially, this dough is VERY stubborn, but keep rolling, it eventually gives in. Before cutting the shapes, let the dough rest a bit, covered, as it tends to spring back into a smaller shapes once cut. Then again, you can also roll circles larger after they’re cut, and/or into ovals, which gives you more space for filling.
– Your basic set of round cutters usually doesn’t contain a 5-inch cutter. Try a plastic container top, bowl etc, or just roll each circle to 5 inches. There will always be something in your kitchen that’s round and 5-inches if you want large cannoli.
– Oil should be at least 3 inches deep and hot – 360°F-375°F, or you’ll end up with greasy shells. I prefer 350°F – 360°F because I felt the shells darkened too quickly at 375°F.
– If using the cannoli forms, when you drop the dough on the form into the oil, they tend to sink to the bottom, resulting in one side darkening more. Use a slotted spoon or skimmer to gently lift and roll them while frying.
– DO NOT crowd the pan. Cannoli should be fried 2-4 at a time, depending on the width of your saucepan or deep fryer. Turn them once, and lift them out gently with a slotted spoon/wire skimmer and tongs. Just use a wire strainer or slotted spoon for flat cannoli shapes.
– When the cannoli turns light brown – uniform in color, watch it closely or remove it. If it’s already a deep brown when you remove it, you might end up with a really dark or slightly burnt shell.
– Depending on how much scrap you have left after cutting out all of your cannoli shapes, you can either fry them up and sprinkle with confectioner’s sugar for a crispy treat, or let the scraps rest under plastic wrap and a towel, then re-roll and cut more cannoli shapes.
– Push forms out of cannoli very gently, being careful not to break the shells as they are very delicate. DO NOT let the cannoli cool on the form, or you may never get it off without it breaking. Try to take it off while still hot. Hold it with a cloth in the center, and push the form out with a butter knife or the back of a spoon.
– When adding the confectioner’s sugar to the filling, TASTE. You may like it sweeter than what the recipe calls for, or less sweet, so add in increments.
– Fill cannoli right before serving! If you fill them an hour or so prior, you’ll end up with soggy cannoli shells.
– If you want to prepare the shells ahead of time, store them in an airtight container, then re-crisp in a 350°F (176 °C) oven for a few minutes, before filling.
– Practice makes perfect. My first batch of shells came out less than spectacular, and that’s an understatement. As you go along, you’ll see what will make them more aesthetically pleasing, and adjust accordingly when rolling. My next several batches turned out great. Don’t give up!!


Cutting out cannoli and getting ready to fry.


My first little cannoli! Then all the cannoli ready for dipping and filling.
Don’t forget to check out the Daring Bakers blogroll for other fantastic cannoli!
25 Comments on Cannoli
1Pingbacks & Trackbacks on Cannoli
-
[…] that they are not that hard to make and be sure to check out some other fantastic fried creations formulated by other fabulous daring […]
Megan
November 27, 2009 at 6:45 pm (17 years ago)Your cannoli came out great! (And that is one gorgeous turkey.) I definitely agree with you about taking them out a touch before you think they’re done — they looked so light in the oil and then out on the paper towels, they’d darken right up.
Hazelnuts and chunks of chocolate sound fabulous to me… and I can just imagine how good the ones with cinnamon chips were too.
Wolf
November 27, 2009 at 7:03 pm (17 years ago)Yum, Cinnamon Chips}:P Around here, they only carry them this time of year, so I have to stockpile them. LOL
Mom
November 27, 2009 at 9:20 pm (17 years ago)These were delicious, I hear! (From a LOT of people)! That turkey WAS great this year. It was moist and tender….. a never frozen bird! 🙂
Yes, ALL families DO have this type of discussion over Thanksgiving dinner! lol Your two wicked sisters are plotting to auction those rose dishes off on eBay and it is up to you to stop them!
Laura
November 27, 2009 at 10:15 pm (17 years ago)Your Cannoli look lovely! I like what you said about the DB stretching one’s baking skills. I feel the same way, except I chickened out on frying mine….
Barbara
November 27, 2009 at 10:16 pm (17 years ago)Love the idea of using cinnamon chips! Your cannoli looks perfect! Great job!
Audax Artifex
November 27, 2009 at 11:00 pm (17 years ago)Goregous looking turkey but better looking cannoli and hazelnuts and chunks of chocolate filling sounds so delicious. Bravo bravo and bravo and kudos to you on your fabulous cannoli. Cheers from Audax in Australia.
Lauren
November 28, 2009 at 1:56 am (17 years ago)Wonderful job! I love the dipped edges and everything – it all looks fantastic Julie =D.
John (Eat4Fun)
November 28, 2009 at 1:57 am (17 years ago)A terrific job on your cannoli! Hershey makes cinnamon chips? Never knew that… However, I’m more partial to the pb chips. Wonderful photos and variations too! Also, thanks for the mention on your challenge posting. 🙂
Wic
November 28, 2009 at 3:41 am (17 years ago)your pictures are amazing ( oh boy do I wish we in Germany would have thanksgiving ). the cannoli look delicious, always adore step by step pictures.
Alyson
November 28, 2009 at 12:38 pm (17 years ago)Oh, your Cannoli are so beautiful! I always say I’m going to attempt the Daring Bakers challenge, but then I chicken out ahaha. Yours look delicious!
Lorraine @ Not Quite Nigella
November 28, 2009 at 5:56 pm (17 years ago)Woah! Look at that amazing turkey (and lol at the ebay dinner table discussion) and then I see your fantastic cannoli! Amazing job Julie and Happy Thanksgiving! 😀
Marcellina
November 28, 2009 at 7:10 pm (17 years ago)Great work, Julie, especially since November is such a challenging month for you guys. Wow, what delicious flavoured choc chips you have. I can only get dark, milk or white!! Your cannoli look devine!
lisamichele
November 29, 2009 at 2:51 am (17 years ago)Julie..I’m so happy to see that you had a relatively easy time wit the cannoli, and loved the results! May I say..I loved YOUR results! Your shells are perfect, golden and blistery, and your fillings, especially the peanut butter cup, are mouth watering! Thank you so much for stepping outside your comfort zone to deep fry with me this month!
isa
November 29, 2009 at 9:17 pm (17 years ago)These are perfect – I love cinnamon chips! Your photos are beautiful!
Natalie
November 30, 2009 at 12:37 am (17 years ago)You did a fabulous job on your cannoli! I love your presentation too.
Natalie @ Gluten A Go Go
Jenny Tan
November 30, 2009 at 3:40 am (17 years ago)Mmmm…cinnamon chips?! I haven’t had them before, but they sure sounds delicious! Great cannoli you got, and the turkey too! 🙂
Sue
November 30, 2009 at 11:08 pm (17 years ago)I’d love to bite into one of your cannoli just to hear the CRUNCH! The look fantastic! YUM!
Sue
November 30, 2009 at 11:08 pm (17 years ago)“They” look fantastic:)
shaz
November 30, 2009 at 11:39 pm (17 years ago)Cinnamon chips sound awesome. Great work Julie! (Pssst..don’t tell your mum but I’d happily take the china off your hands on Ebay)
nutmegnanny
December 1, 2009 at 1:29 am (17 years ago)Your cannolis look great I coulnd’t find the time to fit it in but now I’m wishing I had! They just look so awesome…..yum!
Emily
December 1, 2009 at 10:59 pm (17 years ago)Hey Julie!
My family and I have just recently moved back to Charlotte. It’s great to hear about all of your success! Eli is ADORABLE now! Hope to hear from you!
Much love,
Emily Vestal
Julie
December 2, 2009 at 12:08 am (17 years ago)Hi Emily! How I’ve missed your smiling face! It’s so good to hear from you! I’m off to email you right this minute.
Jill
December 2, 2009 at 10:32 pm (17 years ago)Beautiful cannoli!! Also that turkey looks so DELICIOUS!! Happy Belated Thanksgiving! 🙂
ash
December 5, 2009 at 5:44 pm (17 years ago)wow! they turned out so nice!! I’d like two please! hehe