savory

Baking to Freeze: Mexican Lasagna

Mexican Lasagna is the first recipe in my “baking to freeze” series (see the introduction post here, if you missed it!)


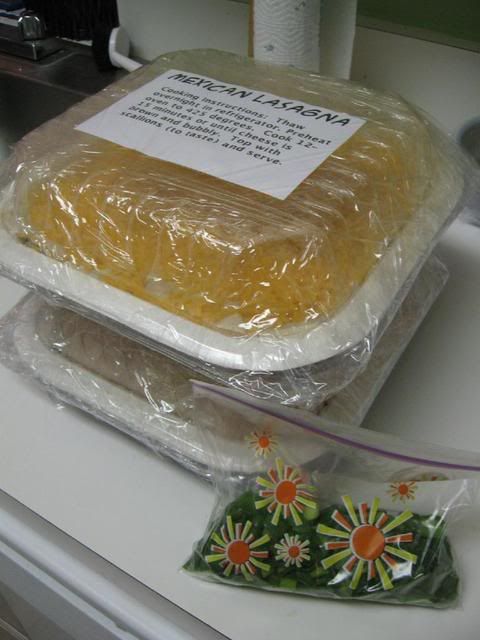
Two dishes of Mexican Lasagna with thawing/baking instructions and green onions on the side

Baking to Freeze Recipe #1: Mexican Lasagna


Recipe by: Adapted from Rachael Ray
Yields: About 6-8 servings

2 pounds ground beef
1 packet taco seasoning, such as McCormick’s
Cheesy Taco Seasoning
1 tablespoon chili powder
1 teaspoon ground cumin
1/2 red onion, chopped
1 15-ounce can black beans, drained
1 14-oz can fire roasted tomatoes
1 cup frozen corn kernels
Salt
8 8-inch flour tortillas
2 1/2 cups shredded cheddar
2 scallions, chopped

Directions:
Preheat the oven to 425 degrees F. Preheat a large skillet over medium high heat. Brown ground beef and drain the fat. Return beef to pan and add taco seasoning (and water, if the seasoning packet calls for such) chili powder, cumin, and red onion. Mix and cook for 2-3 minutes. Add fire roasted tomatoes, black beans, and corn. Heat the mixture through, 2 to 3 minutes, then season with salt to your taste.

Spray a shallow baking dish (disposable oven-proof baking dishes are wonderful for freezing in) with nonstick spray. Cut the tortillas in half or quarters to make them easy to layer with. Build lasagna in layers of meat and beans, then tortillas, then cheese. Repeat: meat, tortilla, cheese again. If freezing, wrap tightly and freeze, keeping bag of scallions and side of salsa in the fridge ready to serve on the side. Lasagna will keep for up to 3 months. If not freezing, simply bake lasagna 12 to 15 minutes until cheese is brown and bubbly. Top with the scallions and serve.

NOTE: if you’re freezing the lasagna but don’t have a disposable baking dish, you can also line a glass baking dish with foil and leave the ends hanging over the dish. Assemble your lasagna in the dish and bake only about 10 minutes. Then, after it’s cooled, you can freeze the casserole, pull it out using the ends of the foil, and store it in a large ziplock bag. When you’re ready to thaw and bake, you can use the original dish.

Thawing Instructions: Thaw overnight in refrigerator. Preheat oven to 425 degrees. Cook 30 minutes or until casserole is heated through and cheese is brown and bubbly. Top with scallions (to taste) and serve.


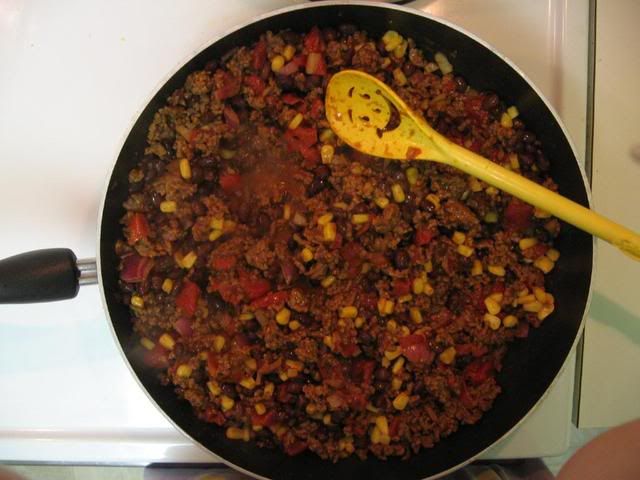
Mexican Lasagna filling: browned ground beef, red onions, taco seasoning, extra chili powder and cumin, corn, black beans, and fire-roasted tomatoes.

Click here to download thawing/baking instruction labels and recipe card to include with this dish.

Preview:

Oven Baked Macaroni and Cheese

After reliving the lovely memories associated with fresh yeast rolls, I want to share another special family recipe with you: Oven Baked Macaroni and Cheese. My love of macaroni and cheese runs deep. After all of the amazing things I’ve eaten, I still feel like I can say it’s my favorite food.

In fact, I can remember many of the macaroni and cheeses I’ve enjoyed throughout the years. Apart from raiding the macaroni on the buffet at Quincy’s, I remember getting double helpings when my family visited K&W, a cafeteria style restaurant. I also fondly remember when I finally endeavored to make the blue box macaroni on my own as a child, and proceeded to eat most of it on my own as well. The delicious soul food macaroni and cheese at Charlotte’s historic restaurant, the Coffee Cup. The gourmet lobster macaroni and cheese at a restaurant in south Charlotte. The decadent, bready macaroni and cheese Mike’s mom makes. Perhaps I should write a poem on the subject: my life in macaroni.

Over the years, one recipe tops the list as my favorite macaroni and cheese. I guess you’d expect it to be a labor intensive recipe with numerous cheeses and a mile-long list of ingredients. But you know what’s funny? Sometimes the simplest things really are the best. This Oven Baked Macaroni and Cheese (with optional sausages) takes all of 5 minutes to throw together, bakes for 45 minutes, and is truly outstanding. I’ve had people ask if I put ricotta in it because it’s so creamy, and I’ve had people request that I bring two pans of it to a party instead of just one. You’re going to love this recipe, just like my family has for years.


Oven Baked Macaroni and Cheese

I often serve this as a main course with the optional breakfast sausages on top. You can serve it with big spinach salads. In one particularly fabulous meal, I just made a big pan of this macaroni and a big pan of homemade yeast rolls and Mike and I loaded up on carbs! It also goes wonderfully as a side dish, of course. Here are my serving suggestions in photograph form (can you tell we eat this a lot?):


One serving suggestion: big spinach salads with Oven Baked Macaroni and Cheese (and some goodies in the background as a teaser — that post is coming soon!)


Another delicious way to eat Oven Baked Macaroni: with a big bowl of yeast rolls!


Last but not least, another carb indulgence: Oven Baked Macaroni and Cheese acting as a side dish to our Taco Stuffed Crescent Rolls (another great and easy recipe I’ll have to post soon!)


Oven Baked Macaroni and Cheese


Recipe By: unknown
Yields: a large casserole dish; serves about 4.

Ingredients:
3 tablespoons butter
2 cups dry macaroni
4 cups milk
1 block sharp cheddar cheese, grated (or about 4 cups)
1 package breakfast sausage links or bulk sausage, cooked (optional)
salt and pepper
a sprinkle of fresh chopped chives (optional)

Directions:

Preheat oven to 400 degrees. Spray large, rectangular pyrex dish with nonstick cooking spray. Put butter into dish and set it in the oven as it preheats. When butter is melted, take the dish out and add macaroni. Stir until macaroni is coated. Add milk, cheese, salt, and pepper. Stir and make sure ingredients are evenly distributed. Bake at 400 for 45 minutes, stirring twice during baking. Place cooked breakfast sausages on top (and sprinkle a little extra cheese if desired) and heat in oven until hot. Sprinkle on fresh chopped chives if desired.


Ready for the oven!


Ready to eat!


As a bonus, will you just LOOK at my adorable cooking buddy’s sleeping position as I type this? I had to capture it with my grainy Photobooth since my camera is nowhere in sight. Isn’t she the cutest?!


Sleepy little Byrd helping Mom post recipes and dreaming of belly rubs!

Overnight Yeast Rolls

When I was little, my family enjoyed packing into the car and driving to Quincy’s Buffet. I don’t even know if Quincy’s exists anymore. Even if it does, it’s probably not the magical wonderland of food my childhood brain made it out to be. At any rate, I so loved making the pilgrimage to it back then. My memories from the all-you-can-eat buffet include ravaging the macaroni and cheese and visiting the soft-serve ice cream dispenser. I’d get a chocolate vanilla swirl cone with lots of random candy, sprinkles, nuts, and goo for good measure. But the most memorable part of Quincy’s — the part we all raved about before and after our visit — were the warm, fluffy yeasts rolls with honey butter smeared all over them.

Those are fond memories, but even Quincy’s yeast rolls were just a pale imitation of the light, soft, and buttery rolls my mother would make from scratch a few times a year. In the middle of the nights following Thanksgiving, I would creep out of my downstairs bedroom and warm up some leftover rolls with butter, turkey, and gravy tucked in each one. It might be easier to head to a restaurant, but you won’t regret spending a bit of time in the kitchen to make these homemade rolls. As a bonus, this same dough can be used to make phenomenal cinnamon rolls, as my mother does each Christmas morning.


Overnight Yeast Rolls

My rolls in the pictures below are a bit darker than normal because, for this batch, I used part wheat flour in an attempt to make these healthier. While they’re good either way, I’ll stick with all-purpose flour all the way next time around. No reason to mess with a good thing!

Overnight Yeast Rolls


Recipe By: Clyta Lundsford
Yields: Makes a big, rectangular pan and a half

Ingredients:

2 packages active dry yeast
2 1/2 cups lukewarm water (between 95 and 110 degrees F on a candy thermometer)
2 eggs
3/4 cup sugar
3/4 cup shortening, cut into cubes
2 1/2 teaspoons salt
8 cups all-purpose flour (You can use 5 cups all-purpose flour and 3 cups wheat flour for a slightly healthier, slightly less delicious version.)
1/2 cup butter, melted, for brushing over the tops

Directions:

Soften yeast in water for 10-15 minutes to activate it and be sure it foams (if it doesn’t, it might have died and you’ll want to start over with fresh yeast). Add sugar, salt, eggs, shortening and 4 cups of flour and mix until smooth. Let sit 1 minute, then add rest of flour and mix well. Cover tightly with plastic wrap and refrigerate overnight.

The next day, preheat the oven to 400 degrees F and spray a 9 x 13-inch baking dish and a 9-inch round cake pan (or an 8-inch square baking dish) with cooking spray. Pinch off dough and form into rolls, placing them in the pan. Cover the pans with a towel. Let rise for 1 hour (or until doubled in size) in a warm place, such as on top of the preheating oven. Bake at 400 degrees for 15-20 minutes. Let the tops get a little browner than you think they should to ensure the rolls aren’t doughy in the middle. Brush the tops with melted butter when the rolls are done to soften them (yes, use all the butter). Serve warm with softened butter (or honey butter!) and jam for spreading.


Dough rising in the refrigerator.


Rolls rising on top of the oven.

Cheddar Chive and Bacon Cupfakes with Avocado Frosting

This is one of those recipes that you should go make right now! It’s that delectable. It all started so innocently . . .

Well, not really! It all started with my love of cupfakery and my desire to create a delicious savory cupcake. I knew I wanted to use a creamy avocado frosting, and I just had to think of some complementary ingredients. It struck me that a cheddar bacon biscuit (one step up from a simple cheddar biscuit, and we all know that those are already delicious) would be perfect. And, hey, how about throwing in some chives? Some caramelized onions? Oh, yeah!


Cheddar Chive Bacon Cupcakes with Avocado Frosting


The base recipe here is for cheddar biscuits similar to those you find at Jim N’ Nicks, a barbecue chain. The recipe produces a savory muffin with some sweetness to it. If you don’t like jam on your biscuits or sugar in your cornbread, you might not be too fond of this base recipe. Feel free to cut down on the sugar or try a different cheddar biscuit base (Red Lobster’s recipe is delicious, but I’m not sure how it’ll work in the muffin pan) to mix your bacon, chives, and onions into.

The avocado is the perfect cool-down topping for the bold flavors of the biscuit. And really, apart from the delicious taste, I get a strange joy just from prepping an avocado.

the flesh of an avocado with no deep,
dense core (a knife
snapped into the orb,
which bleeds an orange pulp. the twist,
a clean break).
the flush from gentle lime to olive
to brown in reminiscence —

taking on the appearance of what you’ve lost,
like shrugging on a blue shirt . . .

The process of extracting the soft flesh from an avocado is peaceful and satisfying. If this is the first time you’ve worked with an avocado, here’s a nice tutorial. When you’re picking them up from the grocery, pick the darker fruits that are a little soft. These are ripe and ready to be mashed. And if you’re not an avocado fan, please do make the cupfakes without them; they’re delicious with or without their “frosting.”

Enjoy the delicious bacon smell in your kitchen after making these cupfakes, and don’t forget to save your bacon grease for flavoring other dishes later on. Mike and I enjoyed eating the cupfakes with dinner, just as you would eat regular dinner rolls or biscuits. Only these are tastier!


Cheddar Chive and Bacon Cupfakes with Avocado Frosting


Recipe By:

-Jim N’ Nicks (cheddar biscuits, tweaked)
-Me, with various internet inspiration (avocado frosting)

Yields: 15-17 cupfakes

Cupfake Ingredients:
1 1/2 cups flour
1/4 – 1 cup sugar (depending on desired sweetness)
1 cup shredded sharp cheddar
3/4 cup whole milk
1 egg, beaten
4 tablespoons butter, softened
1 1/2 teaspoons baking powder
1/4 teaspoon vanilla
5 strips bacon, cooked and chopped, divided
1/2 sweet onion, chopped finely
2 tablespoons of fresh chives, chopped finely
2 tablespoons olive oil

Avocado Frosting Ingredients:
4 ripe avocados
4 ounces cream cheese
1 teaspoon lemon juice
salt and pepper to taste

Directions:

Cupfakes: Cook bacon on stovetop or in oven. I bake on a foil-lined baking sheet at 400 degrees for 15-20 minutes, and drain on paper towels. Crumble 4 strips into small bits, leaving one strip whole for garnish.

In the meantime, pour 2 tablespoons of olive oil into skillet over medium high heat. Add onion and cook until caramelized, stirring occasionally. Set aside.

Preheat oven to 400 degrees. In a large bowl, mix flour, sugar, cheese, milk, egg, butter, baking powder, vanilla, chives, caramelized onion, and bacon bits. Pour into a greased (or paper-lined) muffin pan. Bake for about 20 minutes. Allow to cool for a couple of minutes in pan, and then transfer to a cooling rack. Frost only when completely cool.

Avocado Frosting: Mash avocado flesh well in bowl with the back of a spoon or fork. I processed mine in a food processor to ensure extra smoothness. Add in lemon juice and cream cheese, and mix until you have a smooth, creamy consistency. Frost cupcakes with a big star tip (I use 1M). Garnish with pieces of bacon.

NOTE on storage: Store cupcakes in airtight container in fridge when frosted. Place avocado pits in container along with cupcakes to discourage browning (but don’t fret if the frosting browns — it’s just oxidized, and still quite edible and yummy). You may even want to half the recipe if you’re just making these for your family, since they almost certainly won’t maintain they’re beautiful green overnight. For taking them to coworkers or friends, I would make the cupcakes ahead of time and frost immediately before the event.


Here are some photos of the process:


Bacon in the oven.


Caramelized onions, bacon, and chives.


Fresh from the oven.


Some very green frosting!


All frosted!


Enjoy!

Meatloaf “Cupfakes”

Mike typically likes his food to LOOK like what it TASTES like. While I understand his natural desire to know what he’s eating, I also have a great love of trickery. I love food that’s made to look like other food.

I saw this cute cupfake post on a blog the other day. Instantly, I was reminded of all of the fun meatcakes I’d seen before (here’s a great gallery!) I’d always wanted an excuse to make some, and the perfect excuse came Saturday. Mike had a hard day of GRE testing (he obtained a PERFECT score on his math section, by the way; Congratulations, Mike!) and I told him I’d make a surprise dinner. What’s more surprising than a platter of cupfakes? I baked these cuties up with two other kinds of real cupcakes: Peach Cobbler Cupcakes and Peach Lemon Cupcakes.


The whole meal together!

When he came in, I told him that his surprise was that we were skipping dinner and only eating dessert! I could tell he was a little disappointed, so I pointed to my cupfakes and asked what flavor he thought they were. He guessed chocolate, red, and green (okay, he’s not good at guessing) before finally giving up. I loved the look on his face when I made the big reveal — MEATLOAF cupcakes! He loved it!

The piping on these could have been a LOT better. I rushed a bit, and I made the mashed potatoes a bit too viscous. I also should’ve cut a larger corner off of my ziplock! Oh well, there’s always next time.

This meal is so fun, and so easy to make! If you make these, make sure to post about how your surprise goes over!

Currency Meatloaf “Cupfakes”


Recipe By: Oprah, according to my Mom’s recipe.
Yields: 2 loaves (or 12 meatcakes and 1 loaf, or 24 meatcakes)

Meatloaf Ingredients:
3 lbs. 97% lean ground beef
1 1/2 slices bread, torn
1 cup milk
2 eggs beaten
2/3 cup onion, chopped
1 teaspoon salt
1/2 tablespoon dried mustard
1 heaping tbs sage
1 tablespoon worcestershire sauce
2 tablespoons poultry seasoning
6 cloves garlic
1/2 cup green pepper, diced
3 stalks celery
pepper
1 can tomato paste, for top

Decorations:
instant mashed potatoes for “frosting”
grape tomatoes for “cherries”
salt
food coloring

Directions:

Preheat oven to 350 degrees. Mix meatloaf ingredients and put a heaping scoop in each of 12 greased cupcake wells. Do not pack. Spoon the rest of the mixture lightly into a greased loaf pan (preferably with racks, to allow fat to drain out). Spoon tomato paste on top of each cupcake well and the loaf. Bake meatcakes for 25 minutes and drain on paper towels. Bake loaf for 1 hour.

Once meatcakes are drained, place them carefully into cupcake papers. Frost with instant mashed potatoes in a ziplock bag (I added some garlic to mine for flavor, and you can add more milk to get the right consistency. I think I added too much!) Mix a tablespoon or so of salt with a drop of whatever food coloring you like, and sprinkle lightly on top. Top with a squirt of ketchup or a grape tomato for a cherry (my mother reminded me, and I still forgot!)


Nestled in their cute cupcake foil liners!


Finished (albeit with not-so-cute piping on my part)


Mike’s Cupfake Meal (with some delicious stuffed squash — let me know if you want the recipe!)

1 25 26 27