How to Make 27+ Cheesecakes and Look Awesome While Doing It

…or at least, feel like you look awesome while doing it?

Thank you so much for voting me into Project Food Blog Round 7 — I’m so grateful for your support! Challenge #7 was to create a video tutorial. I think you guys know by now that I’m a little obsessed with soupedup cheesecakes, so without further ado (okay, with a little more further ado), I’m about to show you how to create flippin’ awesome cheesecakes.

LIGHTS

What went into creating this video? Lots and lots of planning — dozens of pages worth! Lots and lots of time — 35+ hours worth! And lots and lots of fun — probably more than I should’ve had. Ahem. You’ll see.

CAMERA

Cheesecakes are incredibly customizable. In the video below, I’ll show you 3 different crusts, 3 different fillings, and 3 different toppings. By mixing and matching these components, you can feasibly create over 27 different cheesecakes! So, um, if you ever need 27 different cheesecakes . . . I got ya covered.

ACTION

Enough of the suspense! What do you get when you combine stop-motion animation, a music video, some ridiculousness, and a whole lotta cheesecake? Watch and see.

http://www.youtube.com/watch?v=7Dj3msQYjOQ&fs=1&hl=en_US&color1=0x402061&color2=0x9461ca

(please click here to see bigger version)

You can print the recipes for these cheesecakes here: Coffee Cookie Dough Fudge Cheesecake, Caramel Fudge Brownie Cheesecake, Chocolate Peanut Butter Bliss Cheesecake.

(Note: Voting is now open! I would so appreciate if you’d take a moment to pop over and vote for me by clicking the heart on this page once you’re signed into your Foodbuzz account. Registering for a Foodbuzz account is quick, easy, and free if you don’t have one already! Thanks, y’all!)

THE BLOOPER REEL

…wherein I prove that I’m basically tone deaf, drop my brownie layer in the floor, yell a lot at my piece-of-crap hand mixer, and eat bacon.

http://www.youtube.com/watch?v=a4D3hOu0DOM&fs=1&hl=en_US&color1=0x402061&color2=0x9461ca

(please click here to see bigger version)

STRIKE THE SET

After the video camera was tucked away, the tripods were folded up, and my smudgy lipstick had faded, there was still one itty bitty order of business to attend to. What the heck does one do with three cheesecakes?! Turns out there was something awesome to do with them!

My friend Carol has a heart the size of Jupiter. She’s worked with children with special needs for several years now, and recently, while browsing Reece’s Rainbow, a website that connects orphans with special needs to adoptive homes, she laid eyes on Quinton. Quinton is a tiny, precious baby boy in Eastern Europe with Downs Syndrome. At first, Carol half-jokingly asked her husband if they could adopt him. As time went on, though, it became clear that neither she nor her husband could stop thinking about Quinton.

They posted his picture on her refrigerator and decided they were going for it. They’re currently beginning the process to bring him home! This miracle is not without a cost — it will take thousands of dollars. I decided my huge, decadent cheesecakes were perfect for a little fundraising. I gave two of them away in return for donations to Quinton’s fund. I can’t tell you what an honor it is to be a tiny part of Carol’s journey — and how humbling it is to see other friends donating their time, goods, services, energy, and love to them! Little Quinton is already changing our lives. Would you like to help as well? You can see Quinton and donate to his adoption fund here.

ROLL THE CREDITS

A big thank you to: ALL Willow Bird Baking readers who have been so supportive, Sarah for the use of her camera, Kim for loaning me a second tripod, Byrd for being willing to hang out with me while I edited video for about a decade, Royalty-Free Music, Carol for already being an amazing mommy even though her little one is still across the world, my 7th grade students for inspiring my stop-motion animation, and everyone who helped me eat cheesecake!

P.S. – Did you have a chance to see my Teaser Video?
P.S. 2 – Dear Coworkers, if you make fun of me about this, no more cheesecake for you!

If you liked this post, please:
Subscribe to Willow Bird Baking
Follow Willow Bird Baking on Twitter
Follow Willow Bird Baking on Facebook
Give this post a thumbs up on StumbleUpon


ShareOther ways to share this post with friends!

Homemade Hot Chocolate & Marshmallows (Voting Now Open in Project Food Blog Round 6!)

Willow Bird Baking is a contestant in Project Food Blog, a contest comprised of a series of 10 challenges to find the next food blog star. Voting for Challenge #6 is now open! To vote for my special birthday picnic to win this round, register for a (free) Foodbuzz account. Once you’re registered, sign in and go to my round 6 entry here. To vote, click the heart next to the words “Vote for this Entry.” I am so grateful for your support!

Part of the Project Food Blog Round 6 challenge was to prepare a beverage to take with you on your road trip. Lemonade was the first thing that came to mind, but I quickly nixed it. Mike’s not big on lemons (I know, crazy!), and this meal was all about him! But all Mike drinks is water, and that didn’t seem very creative. I scanned my memory banks for some help.

Help came in the form of a memory I mentioned in my picnic post: a memory of a previous road trip Mike and I had taken to Gatlinburg and Sevierville, Tennessee. We’d gone so that I could introduce Mike to the apple orchards that my family has loved for years.

I wanted him to eat apple fritters and fried apple pie for breakfast, see the aviary in the middle of the Apple Barn restaurant full of flippant finches, walk by the creek with me while we waited to be seated for dinner. I wanted him to taste the sausages with peppers and onions from the street vendors in downtown Gatlinburg, bite into his first funnel cake, and ride the terrifying (to me — everyone else seems downright calm!) tramway up the mountain to see the black bear habitat. All the things I’d loved as a child.

When we arrived, I broke out some hot chocolate mix that I’d packed, but little did we know we’d have access to a fireplace! When we saw it, we were thrilled — for some reason, it seemed like the most romantic thing in the world to sit by a fireplace and drink hot chocolate. I still have the mugs we picked up from a corner drugstore to mix our cocoa in.

This memory decided it. I found a simple recipe for hot chocolate mix, heated some milk, and mixed the two in a thermos before packing it snugly into my Project Food Blog cooler. Two mugs and two spoons went into my box of dishes to cart along. I tucked homemade marshmallows (one of those amazing recipes that looks fancy but is actually quite simple) into a bag to add sweetness and fun to our nostalgic drink.

Now to share the memories with you! As the weather cools, I hope you’ll mix up your own hot chocolate, find your own fire somewhere, and enjoy a special night with family.

Reminder: Have you entered to win the cute chalkboard giveaway yet? If not, head on over and enter!

Homemade Hot Chocolate with Marshmallows


Recipe by: adapted from Martha Stewart (hot chocolate) and Joy of Baking (marshmallows)
Yield: about 31 servings of cocoa mix

Hot Chocolate Ingredients:
1 cup + 2 tablespoons + 2 teaspoons cups sugar
2/3 cup + 1 tablespoon + 1 teaspoon cocoa
1 teaspoon table salt
Whole milk for serving (you’ll need 1 cup warm milk per each 2-tablespoon serving of cocoa mix)

Marshmallow Ingredients:
1/3 cup cold water, divided
1 1/4-ounce envelope unflavored gelatin
2/3 cup granulated white sugar
1/3 cup light corn syrup
pinch salt
2/3 teaspoon pure vanilla extract (I eyeballed this measure – you can also add other flavorings and extracts here)


Directions:
Make marshmallows the day before you plan to serve your hot chocolate. Spray a 9-inch cake pan with cooking spray, line the bottom with parchment, spray again. Place about 3 tablespoons powdered sugar into the pan and shake it around to coat.

Place about 3 tablespoons of cold water into the bowl of your electric mixer (with whisk attachment) and sprinkle gelatin over the water to soften for about 15 minutes.

While the gelatin softens, place sugar, corn syrup, salt, and remaining water into a heavy saucepan over medium heat. Stir until the sugar dissolves and the mixture boils, and then cover the saucepan with a lid for three minutes to allow sugar crystals to dissolve. Remove lid and attach a candy thermometer to the saucepan. Turn heat up to high and let the mixture boil without stirring until it gets to 240 degrees F (after about 10 minutes). Remove from heat.

Immediately, with your mixer on low, pour the hot syrup in a thin stream down the side of the mixing bowl into the gelatin. Slowly increase the speed to high and beat for about 10 minutes, until the mixture is triple its original volume, thick, and stiff (like marshmallow cream). Add vanilla extract and/or any flavorings and beat about 30 seconds longer.

Using a spatula sprayed with cooking spray, spread mixture into your prepared cake pan. Smooth as best you can into a smooth layer. Sift 2 tablespoons powdered sugar over the top of the mixture and let marshmallows stand and dry uncovered about 12 hours.

When set, slide marshmallow disc out onto cutting board (use a greased knife to loosen it from the pan if it’s stuck). Use a cookie cutter sprayed with cooking spray to cut out shapes of marshmallows. After cutting each shape out, you can use a damp finger to make the sides sticky and dip the shapes in colored sanding sugar to create a fun border (I just mixed regular sugar with a few drops of red food coloring). Alternatively, Shake the marshmallows in a bowl of powdered sugar to coat them and then shake off excess. Store the marshmallows in an airtight container at room temperature for up to 2 weeks.

To make hot chocolate, heat 1 cup of milk in a microwave-safe mug until hot and mix in 2 tablespoons of cocoa mix. You can also heat large batches of milk over medium-low heat in a saucepan (being careful not to let the milk boil) to make cocoa in bulk. Serve with marshmallows on top!

If you liked this post, please:
Subscribe to Willow Bird Baking
Follow Willow Bird Baking on Twitter
Follow Willow Bird Baking on Facebook
Give this post a thumbs up on StumbleUpon


ShareOther ways to share this post with friends!

A Heartfelt Birthday Do-Over, Homemade Ravioli, and a Giveaway!

This weekend, I drove a total of 320 miles or 6 hours total for one magical road trip. It was inspired by a sweet gesture from Mike, and turned into a beautiful event for both of us. Let me tell you all about it.

I.  The Inspiration: A Childhood Dream Come True


Mike’s gift to me that inspired my road trip: a visit to the NC State Fair.

This weekend, Mike gave me a sweet gift: a do-over. He gave me the opportunity to revise a childhood memory from fifth grade.

My parents are going to kill me when they read this, because I’ve never told them anything about it. In fifth grade, my teacher scheduled a field trip to the State Fair in Raleigh, about 3 hours away. I’d never been to a fair, so I was thrilled to hear about the trip — until I heard the cost: $90. To my fifth grade brain, that might as well have been a million dollars.

I thought of my daddy going off to work third shift every night at the newspaper. I thought of my mom working late into the night to get her nursing paperwork completed. I thought of how we had to be careful to make ends meet each month despite all of their hard work.

I decided not to tell them about the field trip. I knew they would sacrifice to let me go, and I knew I’d rather stay home than let that happen. I sat at school while the other kids climbed aboard the bus to Raleigh. I’m sorry Mom and Dad — I know I should’ve given you the opportunity to send me! But my fifth grade mind was made up.

Imagine my surprise and delight when, a few weeks ago, Mike asked if I wanted to drive up and go to the State Fair. All of my fifth grade excitement came rushing back. Yes, I wanted a do-over! A second chance! A funnel cake!

In that spirit, this past weekend, Mike took me to my first fair. We ate copious amounts of fried food, petted fat billy goats, and definitely made up for lost time. It was better than it ever could’ve been in fifth grade, because Mike was by my side.


II.  Returning the Favor with a Road Trip: Mike’s Birthday Do-Over

I knew I wanted to do something special for Mike in return for what he’d done for me. Thankfully, Project Food Blog’s challenge for Round 6 was to pack up a meal and take a road trip (thank you so much for voting me through to this point). My road trip was designed to surprise Mike with his very own special do-over!


Mike’s surprise do-over.

On Mike’s birthday this past year, I really goofed. I made him handmade pumpkin ravioli — which probably sounds wonderful, except for the fact that he doesn’t like pumpkin and it tasted awful. This isn’t one of those “Oh, this could use more salt” things, y’all. It was gross.

For my road trip challenge, I decided to drive to Raleigh and throw Mike a heartfelt birthday do-over. Everything would be decorated in hearts and kisses and, most importantly, I’d make him a fantastic meal this time — one to drive all thoughts of pumpkin ravioli straight out of his mind.


The menu and decor. Note to PFB voters: the picnic basket was just for charm; all food was transported in my PFB cooler per challenge guidelines! Oh, and psst – you can enter to win this chalkboard below!

I chose to make the following dishes for our party:

-handmade, heart-shaped cheese ravioli in a meaty red sauce

-heart-shaped palmiers with goat cheese and homemade pesto

-red velvet cupcakes with heart cutouts

-giant red velvet kisses with special messages

-hot chocolate with homemade heart-shaped marshmallows


Cooler packed and ready to go!

Besides being delicious, some of the dishes had special significance. The red velvet cupcakes were planned to remind Mike of cupcakes I made for him one Valentine’s Day years ago, before I baked on a regular basis. He loved them so much that it inspired me to continue baking.

The hot chocolate represented sitting by the fire in Gatlinburg, Tennessee with him one December a couple of years ago. We hadn’t expected to have access to a fireplace on our trip, and for some reason, it made us so happy. We sat by it and sipped hot chocolate, loving every minute.


Handmade ravioli — now you see it, now you don’t.

I prepped and cooked for 3 days before hopping in my car and driving up the interstate. The venue I’d chosen for our birthday party picnic was Historic Yates Mill Park, and it turned out to be breathtaking. We spread a quilt under the shade of some gorgeous trees and ate while looking out over the mirror-like pond. Heart streamers danced in the wind beyond our picnic blanket, and a few industrious ants tried to join us for our meal. We brought books to read, but ended up having too much fun playing, talking, lounging, and walking around the mill.


Heart-shaped Pesto and Goat Cheese Palmiers.


I <3 Dessert! A giant red velvet kiss, red velvet cupcakes with heart cut-outs, and hot chocolate with homemade marshmallows.

Mike was coaxed into putting on the gigantic birthday hat I bought him. We blew birthday horns, I sang happy birthday, and he blew out his candles — all just as it should have been on his real birthday. This time, there was no pumpkin disaster to overshadow the moment — just me, Mike, and our little feast.


Normal Mike, and Julie-Made-Me-Wear-This-Stupid-Hat Mike

When all the food was packed away into the car again, we spent hours dwindling about the grounds. All told, four hours slipped past us like silt along the creek bed beside the mill. We decided picnics need to be a regular event for us.


Around the Historic Yates Mill: heart streamers, beautiful trees, and the mill itself.

Between fried cheesecake, corndogs, historic mills, and heart-shaped meals, Mike and I have had an amazing weekend. Thank you to Project Food Blog for my awesome cooler, and for inspiring my birthday party do-over. Most of all, thank you, my amazing readers, for voting for me in the last 5 rounds. I’d so appreciate your votes again in round 6!

Would you like to win the aqua chalkboard showcased in this post? Posh Pilfer is giving it away to one lovely reader (deadline for entering: Thursday, 10/28 at 6pm EST; winner will be chosen via random.org). To enter, answer the following question in the comment section: What memory do you wish you could “do-over”? Think about what you could do right now to make your do-over happen — and go for it!

Want an extra entry? Follow Willow Bird Baking on Twitter, tweet this message, and leave an extra comment telling me that you’ve done so: I just entered to win a cute chalkboard from @julieruble of Willow Bird Baking: http://bit.ly/cz2iLB

Handmade Cheese Ravioli in Meaty Red Sauce


Recipe by: Adapted from Annie’s Eats (pasta and ravioli); Sauce adapted from Strawberry Hedgehog
Yield: enough pasta to serve about 2 people

Ravioli Pasta Ingredients:
2 large eggs
1/2 tablespoon water, plus more as needed (I ended up using several full tablespoons)
1/2 tablespoon olive oil
1 3/4 cups sifted all-purpose flour
1/4 teaspoon salt

Filling Ingredients:
1/2 cup whole ricotta
1/4 cup goat cheese crumbles
fresh basil, chopped, to taste
1/4 teaspoon dried thyme, chopped, to taste
1/4 teaspoon dried oregano
salt and pepper, to taste

Sauce Ingredients:
about 3 links of Italian sausage, crumbled and browned
2 16-oz. cans tomato sauce
4 6-oz. cans tomato paste
1 tablespoon dried oregano
chopped fresh basil to taste
3 cloves garlic
1 tablespoon olive oil (optional)
salt and pepper to taste
1/2 cup Parmesan cheese

Directions:
Make the pasta: In a food processor, combine the eggs, water, olive oil and flour. Mix on low speed until the ingredients are well mixed and a dough begins to form. If the mixture is not coming together, add more water, 1 tablespoon at a time just until the dough is formed. Transfer the dough from the food processor to a work surface. Knead 1-2 minutes by hand. Cover with a clean towel and let rest for 20 minutes. Knead again for 1-2 minutes, or until dough starts to feel more supple and elastic. Let rest for another 20 minutes.

Divide the dough into two equal pieces. If you have a pasta machine, see instructions here for how to prepare the sheets of dough. If not, roll one piece of the dough out on a lightly floured surface, pressing hard and rolling diligently until the dough is very thin. Use a large heart-shaped cookie cutter to cut out ravioli pieces. Let these rest while you mix your filling.

Mix filling: Place all ingredients into a bowl and mix well. Taste and season accordingly.

Assemble ravioli: Place about 1 teaspoon of filling in the middle of half of the heart shapes, leaving a clear edge around the perimeter. Dip a finger in water and lightly brush around the edges of a heart topped with the filling. Place one of the remaining pasta hearts on top and press the edges of the pasta shapes together to seal around the filling, being careful to press out any excess air. Repeat with the remaining dough shapes.

Make sauce: While browning Italian sausage, mix all other ingredients together in a bowl. Add to sausage and cook until heated through. In the meantime, cook pasta: bring a large pot of salted water to boil. Cook the ravioli until al dente, about 4-5 minutes. Drain well and add ravioli to the sauce, tossing to coat. Serve with a spring of basil and shaved Parmesan.


At one point, my “Check Airbags,” “Low Tire Pressure,” and gas light were all lit. Glad I was only 5 minutes from my destination at this point!

If you liked this post, please:
Subscribe to Willow Bird Baking
Follow Willow Bird Baking on Twitter
Follow Willow Bird Baking on Facebook
Give this post a thumbs up on StumbleUpon


ShareOther ways to share this post with friends!

Pizzas Benedict and Deep Dish Pizza Cupfakes

YOU PEOPLE ROCK! Willow Bird Baking is one of only 72 blogs in Round 5 of Project Food Blog, and it’s all because of you! Virtual high-fives, y’all! I can’t say thank you enough.

Challenge #5 was to take a traditional dish, pizza, and remix it to create something inventive. I brainstormed for a week to find something creative, fun, delicious, and maybe even a little magical. I asked a billion (give or take a few) folks to weigh in with their pizza favorites. I laboriously googled (okay, that part was easy) and read recipe after recipe. Finally, I reached a conclusion. I appreciate your votes and I hate to let them go to waste, but . . .

FORGET PIZZA. I made cupcakes instead.

I’m tired, I’m whiny, I’m challenged-out, and cupcakes are tasty.

Just kidding, just kidding! ME, challenged-out? NEVER. The whiny part was true, but I’m always up for a challenge.

The title of this post probably gave me away — of course I made pizza . . . with a big twist. I chose to create two pizza remixes for this challenge, actually, representing two times of day when you aren’t “supposed” to eat pizza: dessert and breakfast.

I’ve been eating pizzas at all the wrong times since my childhood. Cold leftover pizza for breakfast was a delicacy. Midnight snack pizza was one of my favorites. What can I say? I’m a rebel. And I have a feeling more than a few of you are rebellious in the exact same way.

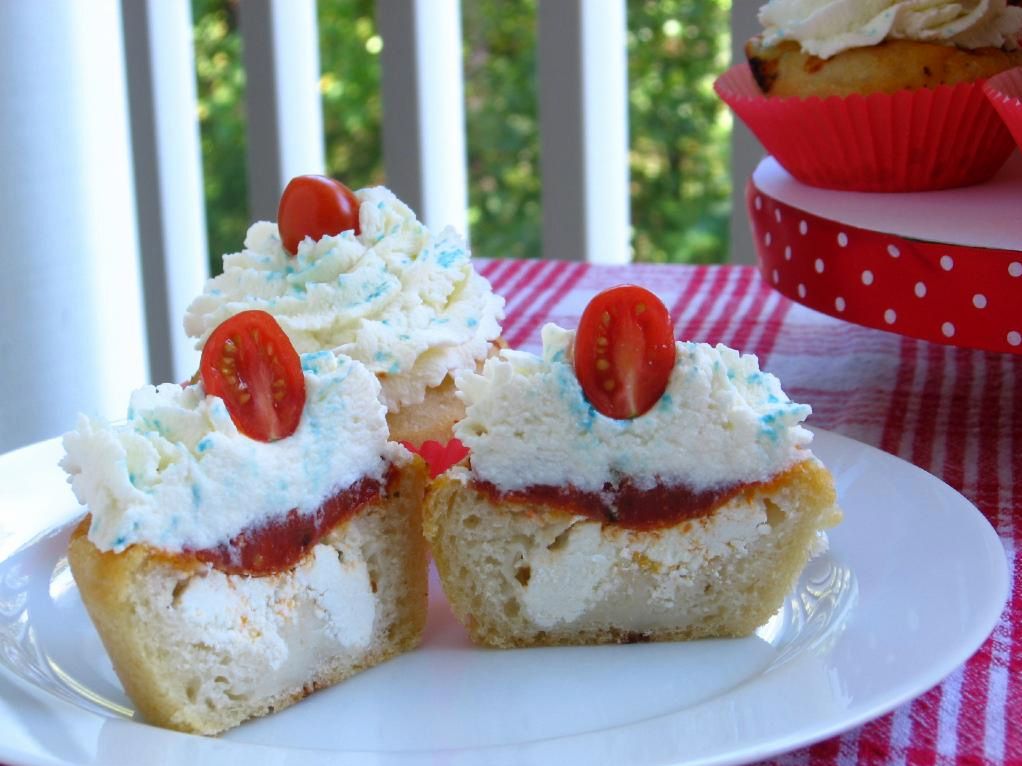
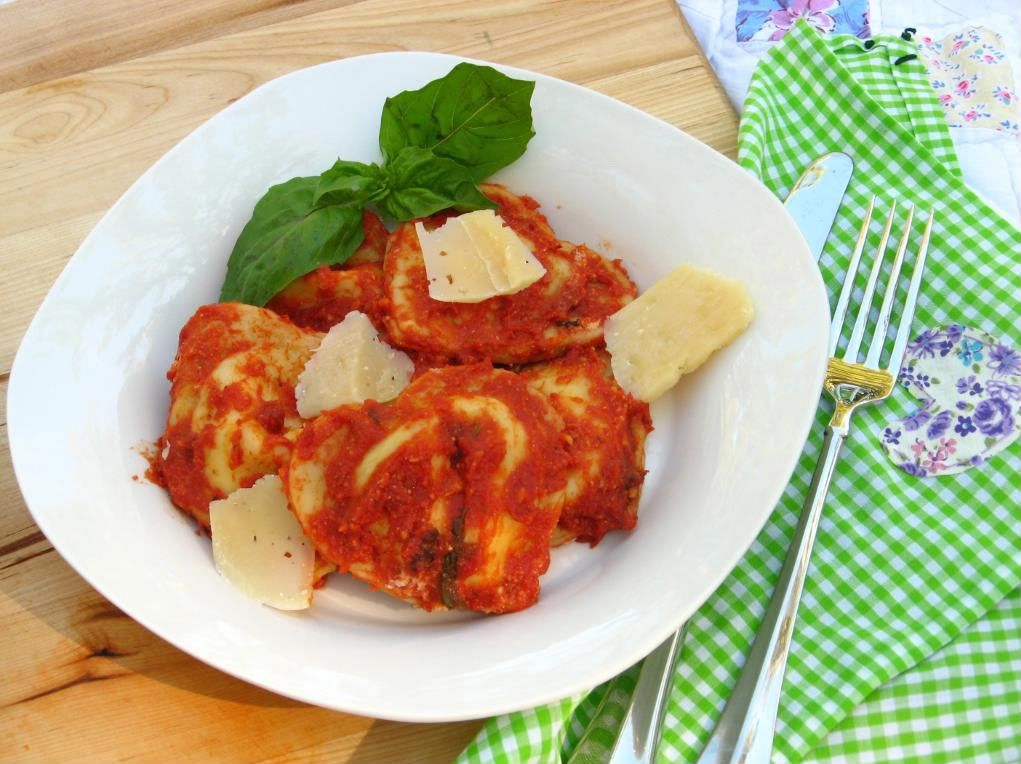
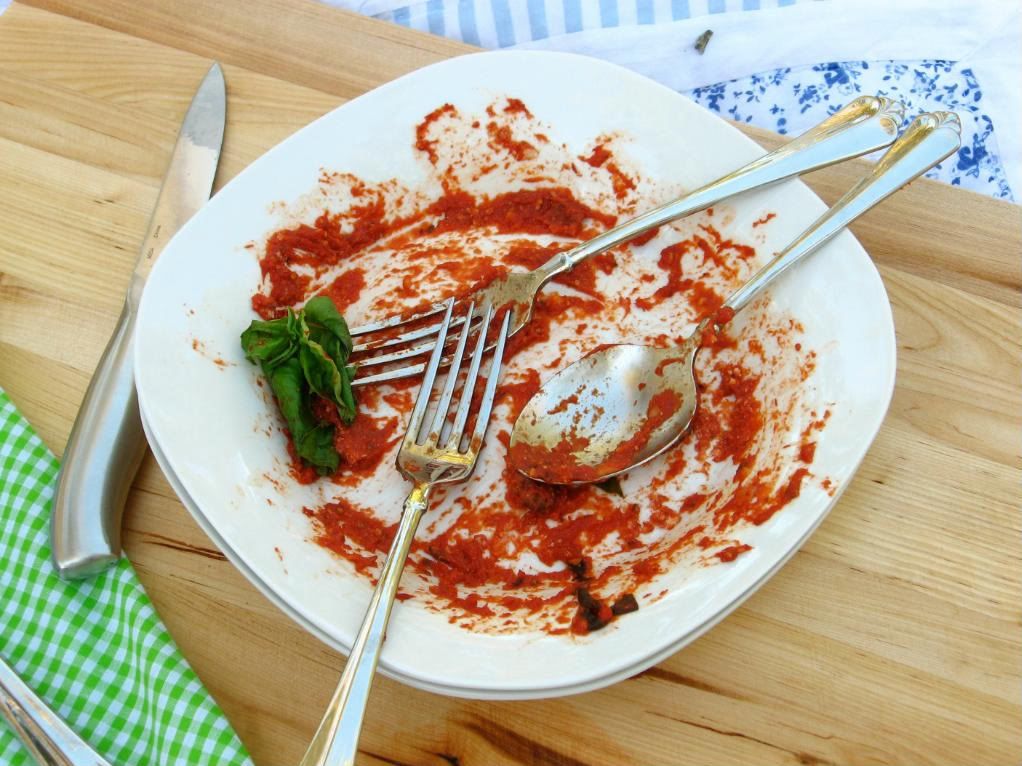
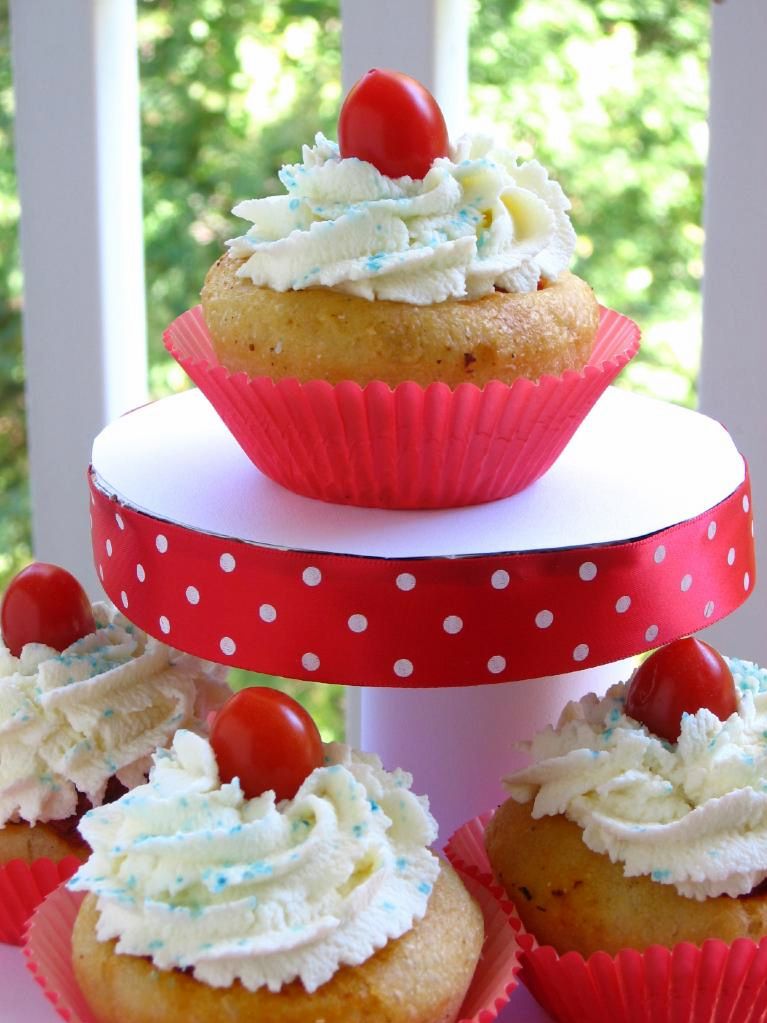
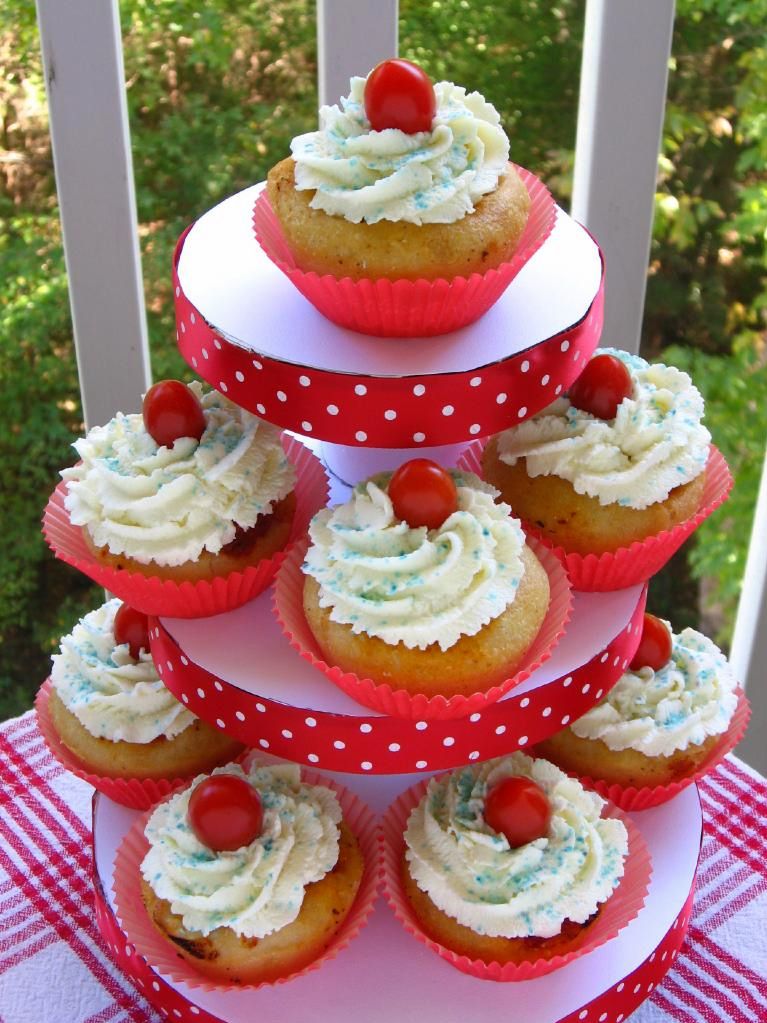
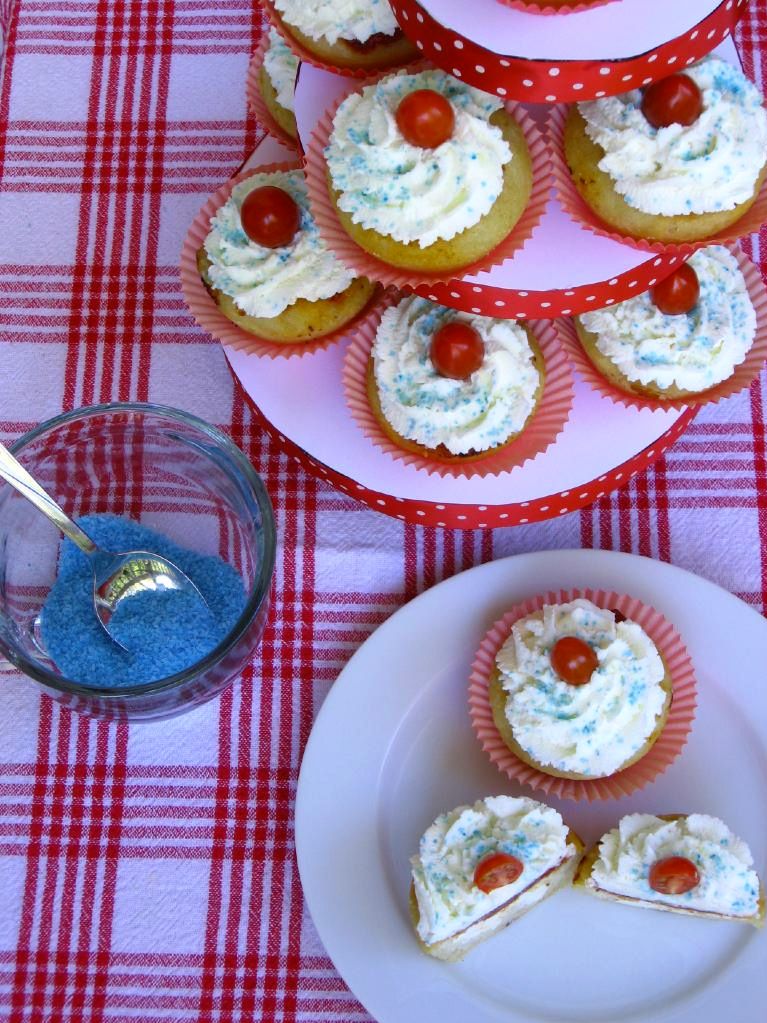
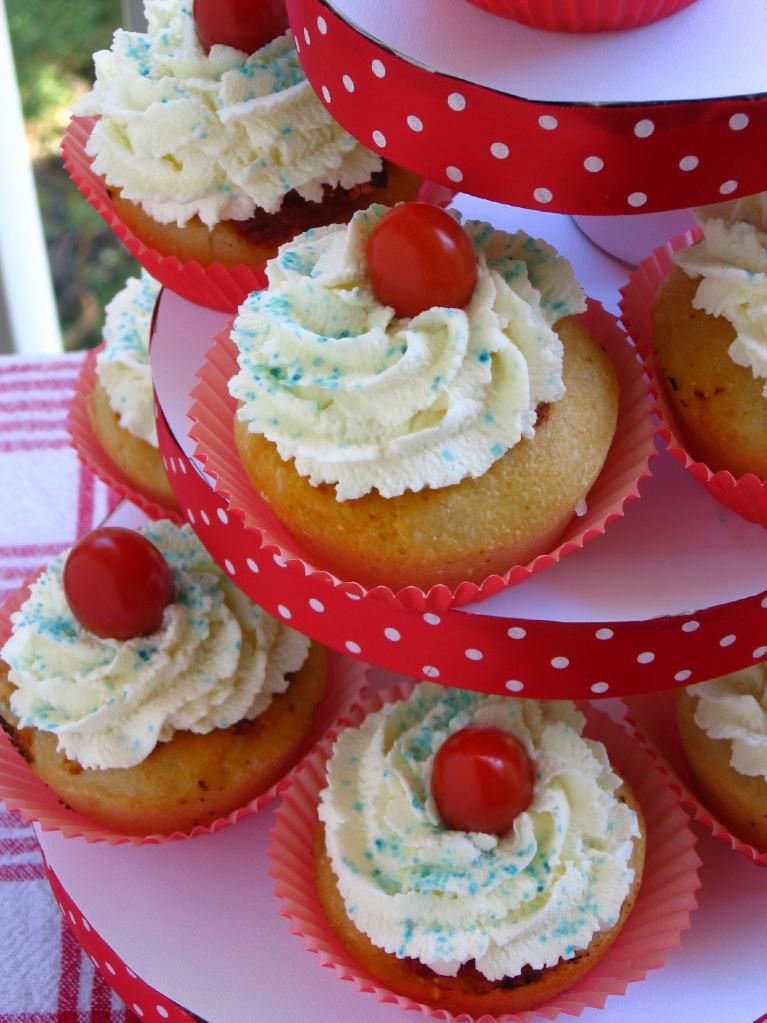
My “dessert” pizzas are a little sneaky, because they aren’t cupcakes at all — they’re cupfakes! They’re actually mini Chicago-style deep dish pizzas stuffed with mozzarella, goat cheese, pepperoni, and some of the best pizza sauce I’ve ever tasted. They’re then “frosted” with ricotta cheese, topped with colored salt sprinkles, and crowned with grape tomatoes in the place of cherries. Apart from being utterly delicious, they turned out to be the cutest little pizzas on the block!

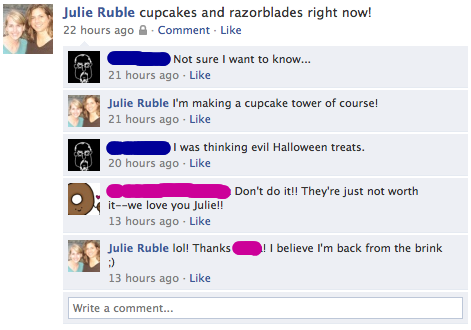
I broke out the razorblades, cardboard, ribbon, cardstock, and glue gun to create an asymmetrical cupcake tower to showcase these cuties. Cue amusing exchanges on Twitter and Facebook:

My favorite cupfake incident was when I took a few of these to my neighbor (hi, neighbor!) and asked if he’d like some leftover homemade pizza. He looked at what seemed to be a plate of cupcakes in my hand with a slight pause. I wasn’t sure if he was going to ask why I didn’t know the difference between a pizza and a cupcake or just assume I was crazy, so I quickly explained. Mustn’t have the apartment complex thinking I’m nuts — any more than they already do, that is!

I was originally only going to create the cupfakes, but this morning I woke up and decided that for Round 5 of this competition and with only 72 blogs left, I had to go all out. I made a whole new batch of pizza dough to create my breakfast pizzas and some even tinier deep dish pizzas for later. So three batches of dough, a whole package of mozzarella, and scads of pepperoni later, I’m ready to fall over.

It was worth it.

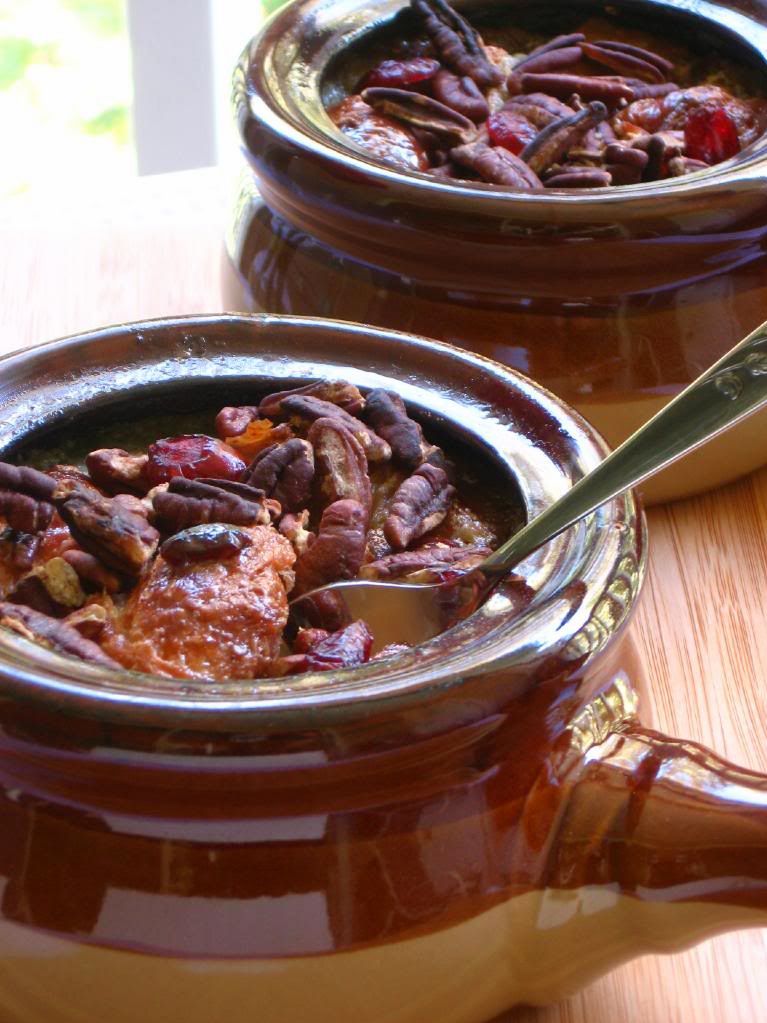
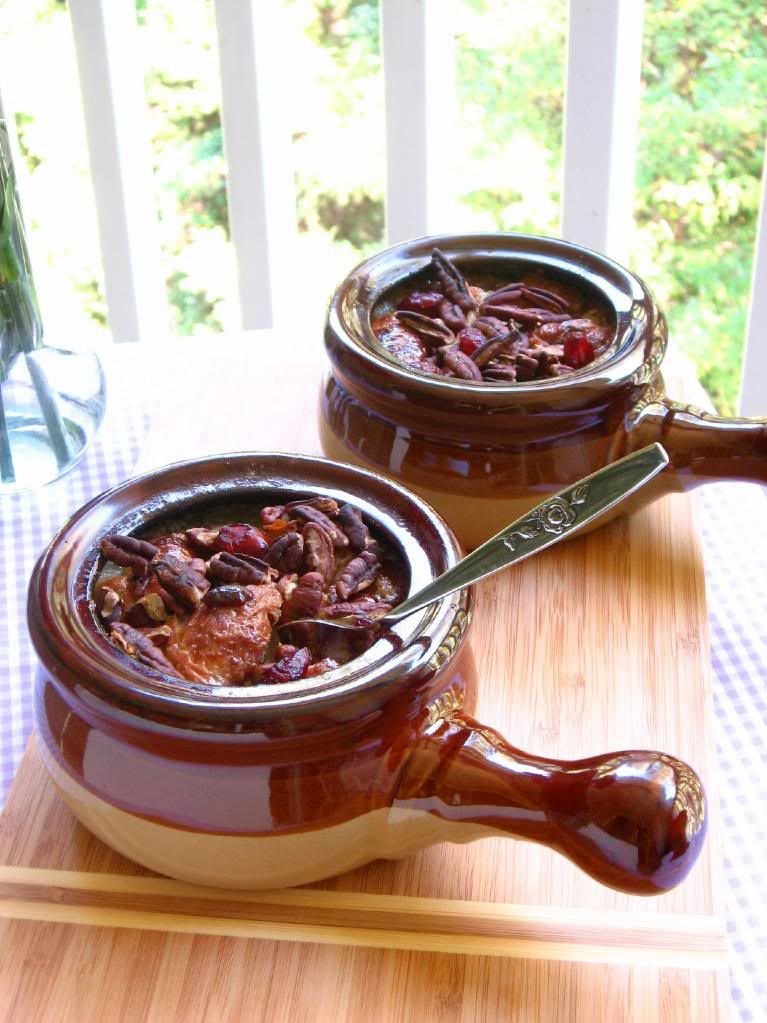
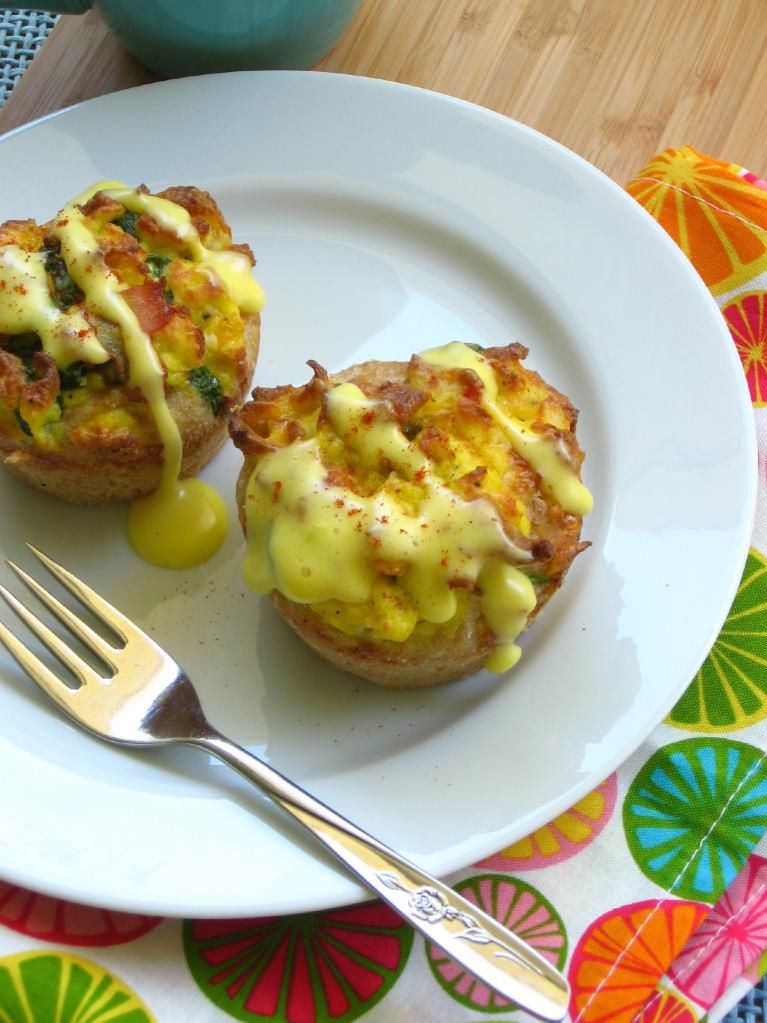
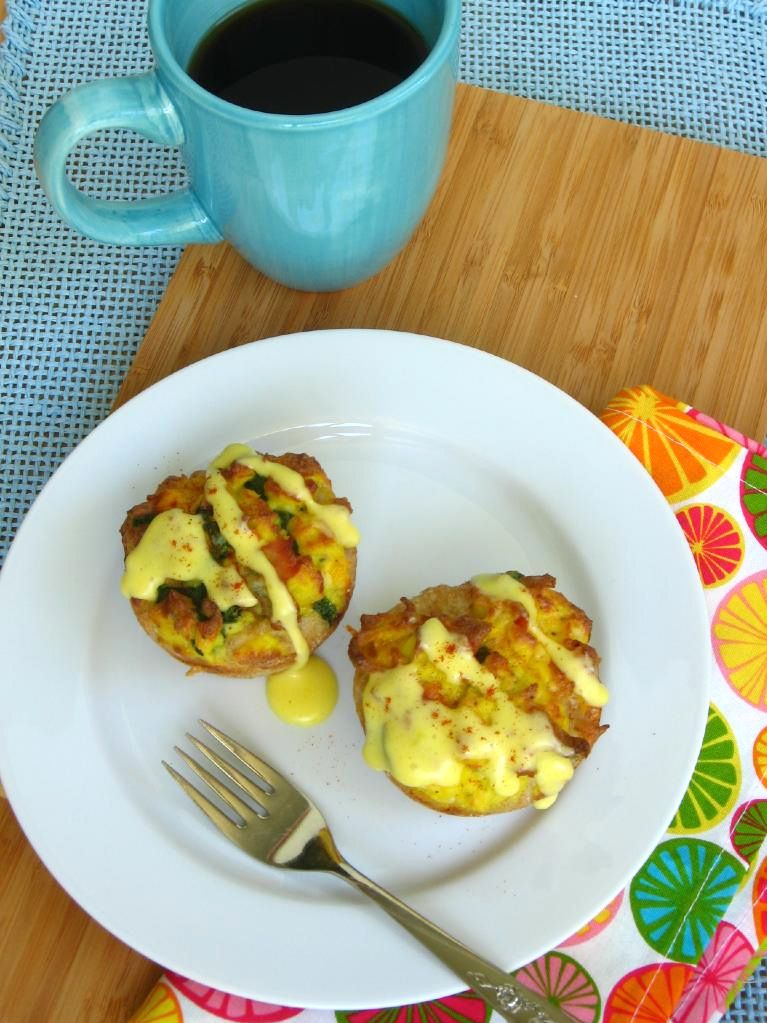
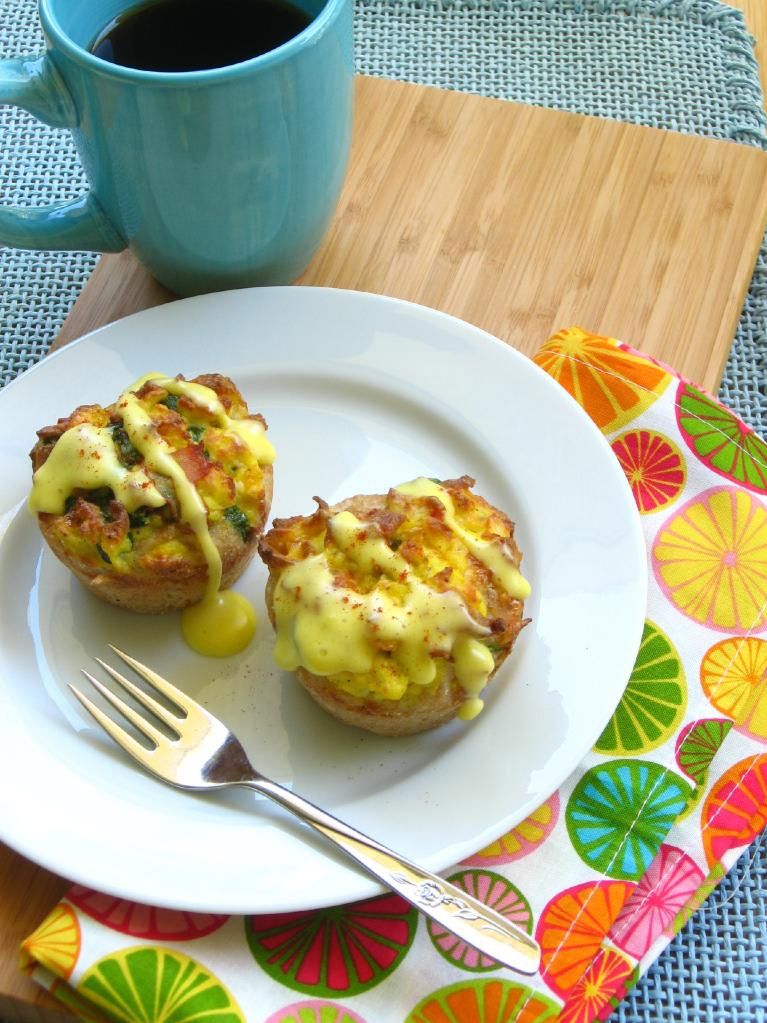
I’ve affectionately named my breakfast pizza Pizzas Benedict. These had a heartier crust made with part whole-wheat flour to mimic an English muffin (okay, it was because I thought I’d run out of all-purpose flour. I later found a bag of it in the living room because, you know, that’s where normal people keep their flour).

The Pizzas Benedict were stuffed with a mixture of scrambled eggs, spinach, bacon, goat cheese, and cheddar cheese, and topped with fresh Hollandaise sauce. The egg mixture didn’t stay stuffed into the crust like it was supposed to, so in some of the pizzas, it was more of a topping and the crust was like a muffin base — but they were still delicious! Next time I might add even more of the stuffin’.

This turned out to be an exhausting, dangerous challenge. I shattered a glass all over the kitchen floor and sliced my foot as I was mixing my first batch of dough — a batch that ultimately ended up in the trash. I was up until the wee hours of the morning with my razorblades and hot glue. And at one point, I looked up from creating my Chicago-style deep dish pizzas and realized that my New Yorker roommate was sitting on the couch watching a Yankees game.

Barbara is not just any New Yorker, y’all. She makes a yearly pilgrimage to New York for Italian food and baseball. She has Yankees paraphernalia all over her room. She has like 8 superstitious rituals she completes for each baseball game — including lighting tealight candles, snuggling under her Yankees blanket, and wearing her lucky necklace.

She’s going to kill me, but I told her there was no way I wasn’t going to tell you about the time she ran into my room in a panic, pleading, “Can you please help me get this necklace on?!” I thought she just really loved jewelry until I realized it was her Yankees necklace and the game was starting. Yeah. She’s that kind of New Yorker. And here I was busily creating some Chicago pizza in our kitchen. I started planning escape routes.

Turns out I needn’t have worried — Barb appreciates good food as much as she appreciates New York. She loved the pizza sauce and forgave the crust. She declared that you should vote for me — and she has such good judgment. I’m just sayin’.

In addition to being exhausting, dangerous, and sometimes painful, this challenge was amazing! It allowed me to tackle new techniques (making homemade pizza dough), which is something I’m passionate about. It also provided an arena to do the things I already know I love: playing with food, making it adorable, and making it fun.

I hope you’ll make some pizza cupfakes and surprise someone you love. Or why not have a pizza day, complete with a pizza breakfast, lunch, dinner, and “dessert”? Have fun!

Deep Dish Pizza Cupfakes


Recipe by: Willow Bird Baking, compiled and adapted from the following sources:

Recipe Pizza (crust) with help from Annie’s Eats
Strawberry Hedgehog (pizza sauce)

Yield: about 13 cupcake-sized cupfakes

Crust Ingredients:
1 package active dry yeast
2 teaspoon sugar
1 1/4 cups warm water
2 3/4 cups all−purpose flour
1/2 cup yellow cornmeal
3 tablespoons olive oil
1 teaspoon salt

Pizza Sauce Ingredients:
1/2 can tomato sauce (8 oz)
1 can tomato paste (6 oz)
1 tablespoon dried oregano
2 cloves garlic
1 tablespoon olive oil (optional)
salt and pepper to taste
1/4 cup Parmesan cheese

“Toppings”:
pepperoni
mozzarella
goat cheese
ricotta cheese
grape tomatoes
kosher salt mixed with a few drops of food coloring to create “sprinkles”

Directions:
To make dough, sprinkle yeast and sugar into the warm water in the bowl of a stand mixer (you can also use a hand mixer for this, or just mix by hand); allow stand until foamy, about 5 minutes. Add the flour, cornmeal, oil and salt to the yeast mixture and knead on a high speed for 7-10 minutes (you could also do this part by hand on a floured surface). You may need to add more flour here (I added about a cup and still had a wet dough, but I left it at that).

Turn dough into a large bowl coated with olive oil. Cover with a dish towel and let rise in a warm spot until it has doubled in size, about 1-1.5 hours. To create a “warm spot,” I turn my oven on to 100 degrees F for a few minutes and then turn it off and open the door. When it has cooled to just barely above room temperature, I place the dough in and close the door, eliminating the possibility of drafts.

Prepare a muffin pan. Preheat the oven to 475 (with a pizza stone in it, if you have one – I just used a baking sheet). Coat each well with olive oil and a sprinkle of cornmeal. Punch risen dough down. Transfer to a lightly floured surface and let rest for 10 minutes. Using floured hands, pinch off about 2-inch balls of dough and place them in each prepared muffin well (you can freeze any leftover dough in a ball). In each well, poke a few pearls or slices of mozzarella cheese, some goat cheese, one or two pepperoni, and, finally, a big spoonful of sauce. In fact, I’d layer the sauce between each topping and then really stuff as much as you can on top — it’s the best part! Push each topping down so that the crust rises around the side. I use a spoon to gently press the sauce down at the end, so the entire thing resembles a deep dish pizza. Bake for 15-17 minutes. Let cool in the pan for at least 5 minutes before cooling on a cooling rack. If you’re making cupcakes, let them cool completely (otherwise, serve them warm).

To “frost,” pipe ricotta cheese onto each cupfake. Top with a grape tomato and salt sprinkles. You can heat each cupfake about 30 seconds before serving it. Store them in an airtight container in the refrigerator.

Pizzas Benedict


Recipe by: Willow Bird Baking, compiled and adapted from the following sources:

Recipe Pizza (crust)
Tyler Florence (Hollandaise sauce)

Crust Ingredients:
1 package active dry yeast
2 teaspoon sugar
1 1/4 cups warm water
2 1/2 cups all−purpose flour
1/4 cup whole wheat flour
1/2 cup yellow cornmeal
3 tablespoons olive oil
1 teaspoon salt

“Toppings”:
about 8 scrambled eggs
spinach, torn into small pieces
cooked bacon, torn into small pieces
cheddar cheese
goat cheese
garlic
butter for scrambling eggs
salt and pepper to taste

Hollandaise Sauce:
4 egg yolks
1 tablespoon freshly squeezed lemon juice
1/2 cup unsalted butter, melted (1 stick)
Pinch cayenne
Pinch salt

Directions:
To make dough, sprinkle yeast and sugar into the warm water in the bowl of a stand mixer (you can also use a hand mixer for this, or just mix by hand); allow stand until foamy, about 5 minutes. Add the flour, cornmeal, oil and salt to the yeast mixture and knead on a high speed for 7-10 minutes (you could also do this part by hand on a floured surface). You may need to add more flour here (I added about a cup and still had a wet dough, but I left it at that).

Turn dough into a large bowl coated with olive oil. Cover with a dish towel and let rise in a warm spot until it has doubled in size, about 1-1.5 hours. To create a “warm spot,” I turn my oven on to 100 degrees F for a few minutes and then turn it off and open the door. When it has cooled to just barely above room temperature, I place the dough in and close the door, eliminating the possibility of drafts.

As dough rises, beat eggs, garlic, salt and pepper, and spinach together. Place a teaspoon or so of butter in a skillet over medium high heat and scramble egg mixture. Pour into a bowl and add cheddar cheese, goat cheese, and bacon.

Prepare a muffin pan. Preheat the oven to 475 (with a pizza stone in it, if you have one – I just used a baking sheet). Coat each well with olive oil and a sprinkle of cornmeal. Punch risen dough down. Transfer to a lightly floured surface and let rest for 10 minutes. Using floured hands, pinch off about 2-inch balls of dough and place them in each prepared muffin well (you can freeze any leftover dough in a ball). Place a heaping spoonful of egg mixture in the center of each well, pressing it down into the crust dough. Bake 15-17 minutes until crust is golden. Let cool in pan for at least 5 minutes. Serve warm with Hollandaise sauce.

Make the Hollandaise sauce while your pizzas bake: Whisk the egg yolks and lemon juice together in a stainless steel bowl and until it is thickened and doubled in volume. Place this bowl over a saucepan containing barely simmering water that does not touch the bottom of the bowl. Whisk rapidly and constantly, being careful not to let the eggs get so hot that they scramble. Drizzle melted butter in while continuing to whisk. Whisk until the sauce is thickened and doubled in volume. Remove from heat and whisk in cayenne and salt. Cover and place in a warm place until ready to use. If the sauce gets too thick, you can whisk in a few drops of warm water before serving.

Just for fun, here’s the list of ideas I considered for this challenge. Maybe you can grab one of these ideas and run with it!

  • Iconic Luxury Dish Pizza: Beef Wellington and Tiramisu Pizzas
  • Pizza Pie (a pie made with pizza ingredients – a take on tomato pie)
  • miniature pizzas with super accurate-looking toppings (e.g. tiny, tiny pepperoni!)
  • pizza pockets
  • dessert pizzas
  • a “pizza parfait” with layers of crust, sauce, cheese, toppings, basil in a parfait glass
  • a “waffled pizza” cooked on a waffle iron (this idea comes straight from the waffleizer blog, so not very original)
  • pizza cups — crust cups filled with sauce, cheese, and toppings and served as little appetizers
  • pizza muffins (muffins baked with cheddar cheese, pepperoni, etc. in them, and a mozzarella cheese ball in the center — sauce on top)
  • pizza nachos
  • pizza panini
  • fried pizza balls (not sure how I’d do this… somehow put pepperoni and cheese inside batter and fry the outside, and dip in sauce? Kind of just like mozzarella sticks, I guess)

What creative version of pizza can you think up?

If you liked this post, please:
Subscribe to Willow Bird Baking
Follow Willow Bird Baking on Twitter
Follow Willow Bird Baking on Facebook
Give this post a thumbs up on StumbleUpon


ShareOther ways to share this post with friends!

Individual Cranberry & Pecan Croissant Bread Puddings

You know those “wreck the dress” photography sessions? A newlywed who probably spent her entire wedding day vigilantly guarding every last inch of white floof on her dress dons her bridal whites again. Only this time, she goes nutso and jumps in a lake or climbs a tree or runs through the rain while a photographer snaps away. Whatever she loses in wedding dress cleanliness, the bride usually gains in some amazing, fun photos.

It’s an exercise in letting go, prioritizing things that really matter, allowing yourself to enjoy something temporary — all of those good things. I still don’t know if I’d be able to do it. I did take baby steps last weekend, though, with a “wreck the croissant” session.

Here’s the thing. When I make homemade croissants, I do not make them just to turn around and use them in other recipes. I do not make them to be shredded (perish the thought), toasted, or drenched with other ingredients. Imagining these things happening to my beautiful, pristine homemade croissants kind of makes me feel like hyperventilating a little.

I make them to EAT. To take pure, unadulterated bites of bliss — maybe with a smidge of butter and honey or jam if I’m feeling adventurous. But this weekend, something happened that changed all that.

Project Food Blog has pushed me out of my comfort zone on several occasions. I’ve been making dishes I’ve never made, hosting fancy dinner parties, and doing wacky phototutorials. I’ve been really pleased with how the competition has enriched Willow Bird Baking rather than detracting from its content — something I had vowed to monitor closely.

This is another one of those times. As much as I’d have loved to put my croissants under a bell jar in my living room to adore (until they disintegrated or got moldy, ew), I wanted to go the extra mile for the competition and show you a few croissant applications. So, with a heavy heart, I set about toasting croissants for Apple, Brie, and Toasted Pecan Panini and (eeek) soaking torn croissant pieces in custard for this bread pudding. I almost got teary. I think you can guess from the panini post, though (and these sweet individual bread puddings are no exception) — it was so worth the pain.

In fact, I would take my freshly baked croissants, shred ’em, and soak ’em again any day for this bread pudding. Each little bowl held a steaming, comforting combination of buttery, rich, creamy, hearty, nutty goodness. The cranberries added a festive flavor. In short, this was the perfect autumn dessert. I ate my whole bowl!

The original recipe was a little too sweet, so I’ve edited the version below to have the perfect amount of sweetness. One thing I particularly love about this “wreck the croissant” recipe is the fact that it makes two perfect-sized servings. You can always double it, but I was happy to make the exact amount I needed.

Happy wrecking!

Individual Cranberry & Pecan Croissant Bread Puddings


Recipe by: Adapted from Jessica Strand’s Cooking for Two: Perfect Meals for Pairs
Yields: 2 4-inch bowls of bread pudding

Ingredients:
1/4 cup dried cranberries
1/4 cup pecans, chopped
2 cups heavy cream
1 vanilla bean (or about 2-3 teaspoons vanilla extract)
4 large egg yolks
3/4 cup sugar
1/4 teaspoon salt
3 large day-old croissants (preferably homemade! You can use fresh instead of stale if you don’t have time)

Directions:
Preheat the oven to 350° F. Grease two ovenproof bowls (with 4-inch diameters) with canola oil or cooking spray.

Put the cranberries in a bowl and fill it with hot water. Let them sit for 20 minutes before draining. Toast the pecans: Place nuts in a dry skillet over medium-high heat and stir constantly. Once they begin to toast (when you start to smell them), shake pan to ensure all sides of the nuts are toasted evenly and none of them burn. Pour them out onto a plate and set aside.

Add the heavy cream to a medium saucepan and heat over low heat to a simmer. Add the vanilla bean: slice the bean in half lengthwise and scrape the seeds into the liquid; then add the pod (or just add extract). Simmer over low heat for 8 to 10 minutes before removing the vanilla bean pod.

Combine egg yolks, sugar, and salt in a medium bowl and whisk together. Slowly pour in the cream mixture while whisking quickly.

Tear the croissants into 6 pieces each and place in a medium bowl. Cover with the cream and egg mixture and allow the croissants to soak it up for about 10 minutes. Add the cranberries and mix gently. Separate the mixture evenly into prepared bowls and sprinkle toasted pecans over the top of each bowl. Place them on a baking sheet in the oven for 25 minutes or until set. Serve warm with whipped cream or ice cream, or with nothing at all!

If you liked this post, please:
Subscribe to Willow Bird Baking
Follow Willow Bird Baking on Twitter
Follow Willow Bird Baking on Facebook
Give this post a thumbs up on StumbleUpon


ShareOther ways to share this post with friends!

1 99 100 101 102 103 127