savory

Pasta Carbonara

I’ve been so antsy to share this recipe with you! It’s one of those I-put-a-bite-in-my-mouth-and-suddenly-my-eyes-widened-to-the-size-of-Pluto dishes. One of those I-stared-at-Mike-impatiently-waiting-for-him-to-take-a-bite-and-have-Pluto-sized-eyes dishes! One of those I-could-eat-a-Pluto-sized-bowl-of-this-stuff dishes!

I’ve been trying to redeem myself for Mike’s terrible birthday dinner disaster for awhile now. Sure, I’ve made some delectable things since then, but I knew my penance wouldn’t be truly complete until I made him some really good pasta.

I went hunting on my favorite places to hunt for recipes: Tastespotting and Foodgawker. I’m so visual when it comes to food — seeing a dish gives me a better idea of how it’ll taste than looking at ingredients lists — and I find the mini-descriptions on these sites force bloggers to succinctly convey how amazing a dish is. You’ll find some captions that say things like, “pretty good,” or emphasize the ease of a dish, and others that convey the kind of emotion I wanted to elicit from Mike with my pasta dish: “WOW, this is good!”

This recipe was one of the WOW ones I came across. The photo of the dish was submitted by Kate of Framed, who called it “extra special.” That — combined with her charge to throw out all your other carbonara recipes — gave me confidence. I’m not going to lie, something about her blog’s exuberant header photo probably also made be feel exuberant about linguine! Regardless of the reasons, I decided that this was the recipe I’d been searching for!

As if you needed any more encouragement to make this pasta, the original recipe is straight from Pioneer Woman’s site (a Pastor Ryan recipe, for those of you who follow her posts). P-Dub has never steered me wrong, and on top of that, she’s coming to Charlotte this Friday for a book signing! What a perfect time to make a meal from her blog.

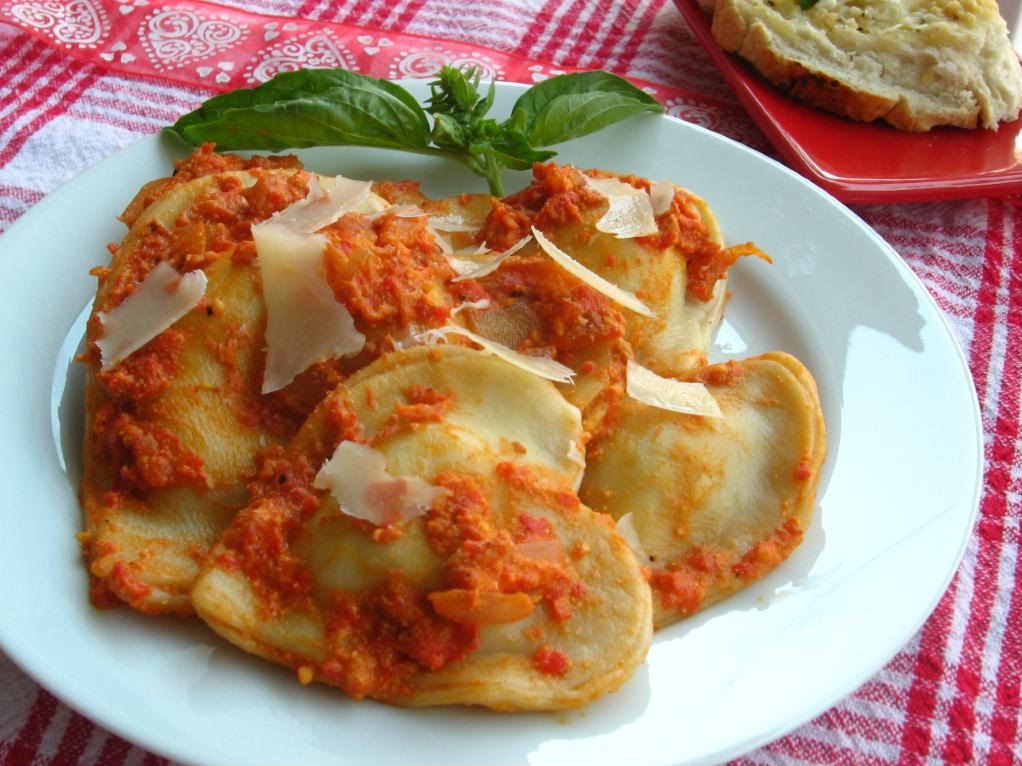
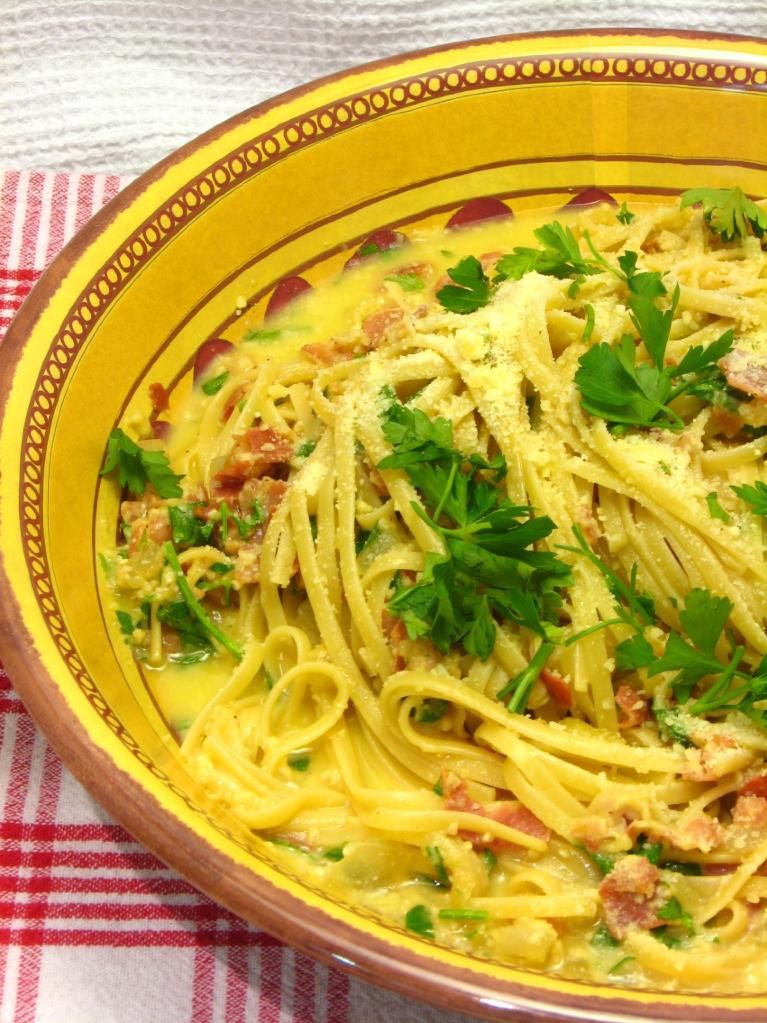
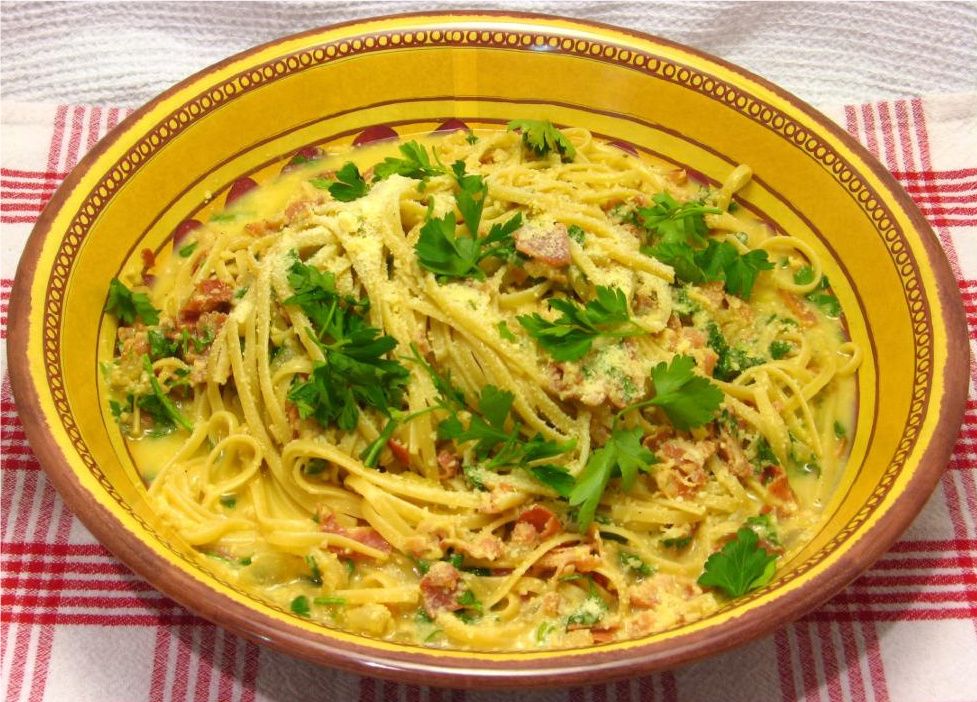
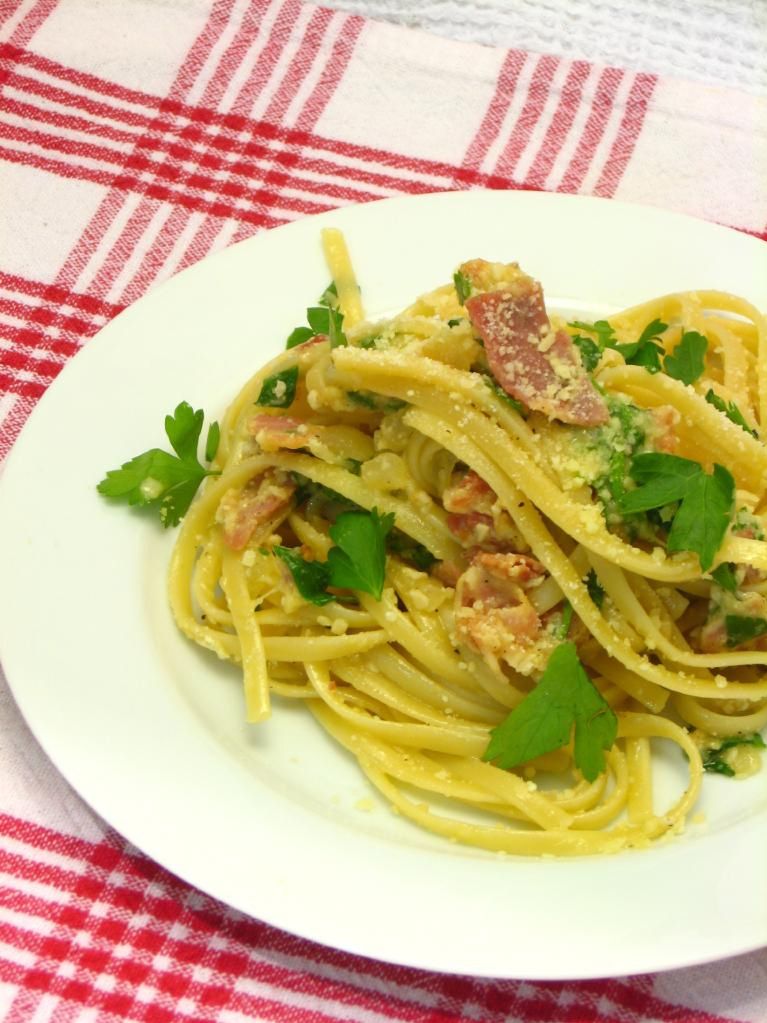
I guess the only thing left to tell you about is the most important part: the taste. The last time I ate pasta carbonara was in Little Italy in San Diego, so the creamy, rich, buttery sauce and the salty punch of the pancetta was a wonderful memory. I have to say, though, this rendition was even better than the one I remember. Bunches of torn parsley add a fresh note to the otherwise deep and indulgent pasta.

One flavor I noticed that stood out was the wine, so pick a good one — but don’t ask me how to do that! I picked my wine because it was white and had a penguin on the bottle. I got lucky, though, because it tasted perfect in the sauce. It was a Pinot Grigio, in case you want to replicate my random choice.

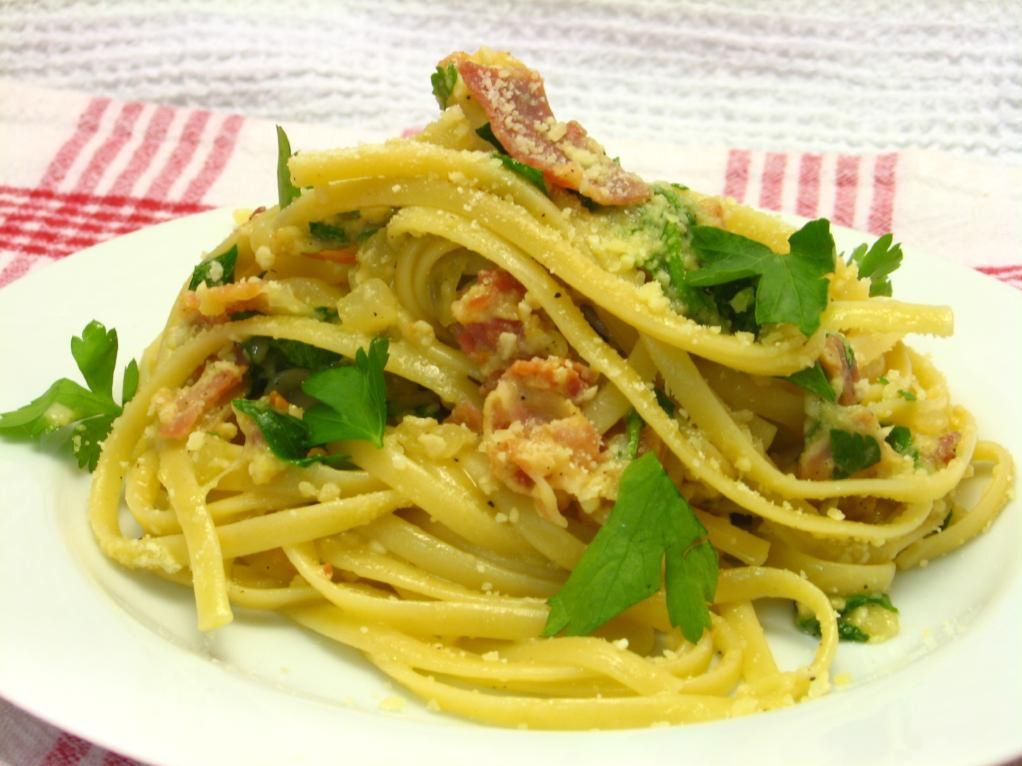
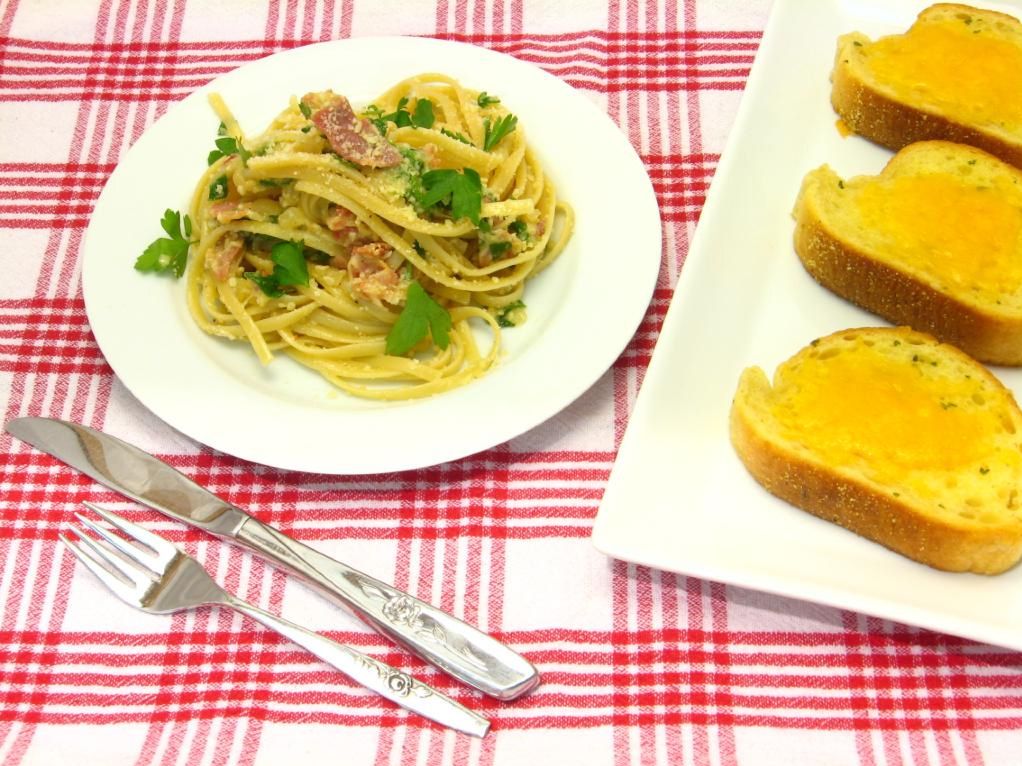
We paired our pasta with some cheesy garlic bread, and it was such a great combination. Actually, I considered making some big homemade garlic croutons to top the pasta itself, which would have been delectable if you want to give it a go. Make this as soon as you can manage to throw some linguine into your shopping cart. Bon Appétit!

Pasta Carbonara


Recipe by: Slightly adapted from Pioneer Woman’s blog by Framed
Yields: about 4 servings, if you’re us — perhaps 6 servings for normal folk.

Ingredients:
1 pound linguine pasta
4 eggs
1 pound bacon or pancetta (I used pancetta)
1 1/2 cups Parmesan cheese
8-12 cloves of garlic, sliced thin
1 large onion, chopped
1 cup chicken stock
1 cup white wine (or substitute another cup of stock)
1/2 stick of butter
1 handful of parsley
1-2 tablespoons black pepper

Directions:
1. Cut bacon into pieces about one inch wide. Cook until browned and crisp and set aside, saving bacon grease in the skillet.

2. Cook linguine in salted water until al dente.

3. Add chopped onions to bacon grease and let them cook down over a medium-high heat for a couple of minutes.

4. After the onions have cooked for a couple of minutes, throw in the garlic. Adding it after the onions have cooked a little will prevent the garlic from burning. After the onion and garlic have cooked for another couple of minutes, remove from the pan with a slotted spoon. Discard the grease.

5. Place the pan back on high heat until it starts to smoke a little. As soon as the pan begins to smoke, pour in the white wine (or chicken stock). Whisk until pan is thoroughly deglazed and all of the brown bits have come off of the bottom of the pan. Add 1 cup of chicken stock. Return onion and garlic to the pan. Let simmer over medium heat.

6. Crack four eggs into a large bowl. Add most of the Parmesan cheese, and roughly chop the parsley, adding it into the eggs as well. Leave a little Parmesan and parsley out for a garnish. Mix well with a fork.

5. Add the cooked hot pasta to the egg mixture and then add the onion mixture. Stir in ½ stick (1/4 cup) of butter and the cooked bacon. Mix it all together well. Pepper to taste. Garnish with parmesan and parsley. Throw out all previous carbonara recipes.


Enjoy!


Share Share this post with friends!

Pitiful Pumpkin Ravioli, or Mike’s Birthday Dinner Disaster

Every now and then I stumble on an ethereal recipe that melts on my tongue and makes me draw in deep, appreciative breaths between every bite. I post these recipes hastily and urge you all to run into your kitchens and get to mixing. I stamp little hearts next to their names on my Recipe Index. I bring them up in conversations with Mike long after the last morsel has been devoured. I even long to whip them up again — a significant sentiment, since I rarely make the same dish twice.

This is not one of those recipes.

Actually, this is one of those recipes where I, um, don’t post the recipe. Because I’m terrified someone will skip over all of these paragraphs where I reveal how awful it tasted and end up making it. I can only imagine the creative hate mail I’d receive after folks spent 3 or 4 hours in the kitchen prepping this disaster. It could get ugly.

Instead, I’ll just tell you the story. It all started at my desk at school, where I sat one day eating one of those low-calorie frozen meals. They’re typically flavorless concoctions of funky-textured “meat” and rubbery veggies, but at least they’re quick sustenance. This particular frozen meal was tasty, though: a slightly sweet pumpkin ravioli in a butter sage sauce with hunks of butternut squash and asparagus. I thought to myself (somewhat smugly), “I bet I could make this even better from scratch . . . .”

It turns out that I cannot make it better from scratch. It also turns out that I should not try risky, experimental recipes on Mike’s birthday. After hours of work (roasting the squash, making and kneading the pasta dough, rolling and filling the ravioli, cooking the asparagus, mixing the sauce and veggies and pasta, and photographing the whole thing), Mike and I took our first bites and made eye contact. In that one silent moment, our eyes said all there was to say. Mike’s eyes were panicking: “Oh crap, what can I say about this ravioli that isn’t insulting?!” and my eyes were remorseful: “Oh crap, I’ve ruined his birthday dinner, of all the dinners to ruin!”

What Mike actually said was, “It’s good,” while concentrating hard (a little too hard) on cutting the next bite. What I actually said was, “This stuff is disgusting. Maybe we should order pizza.” The sweet guy ended up eating every bite in his bowl (and, ahem, politely declining seconds) while I scarfed down the from-frozen garlic bread he had brought over. That’s right: the only edible part of the meal was the garlic bread I made MIKE buy on his way over for his own birthday dinner! Have I won the girlfriend of the year award yet?

In summary, do not make this pasta. The odd, bitter combination of pumpkin and parmesan in the filling was nauseating. The butter sage sauce was greasy and bland. The squash . . . well, okay, the squash was good. Go roast yourself a butternut squash and call it a day, y’all. I’m comforting myself with the fact that my homemade ravioli technique has improved (I rolled thinner, creating a better-textured pasta) and dessert was fantastic. Ah, dessert: a balm on dinner disaster wounds. Stay tuned and I’ll tell you all about it.


Share Share this post with friends!

Pioneer Woman’s Macaroni and Cheese

Permit me a few moments of fangirldom: Pioneer Woman is coming to Charlotte in May! Willow Bird Baking reader Jennifer M. told me about it a few days ago and my family’s been all abuzz since then. I was bummed that she didn’t swing by this-a-way on her last book tour, so I’m pleased as a plum that she’ll be here this time around. My mom, dad, and I are already planning to make some t-shirts, grab some dinner, and make a night out of going to see her. Mike has politely declined, citing the possibility of standing in line for hours. His loss!

In the meantime, I’ll make some macaroni from the PW blog. I was not actually in the market for a new macaroni and cheese recipe (except I would like to get the one Mike’s mom makes . . . mmm!). I have an old family favorite that I could eat every day. It’s more custardy than creamy, though, and Mike’s a creamy guy. So I thought I’d give the P-Dub’s recipe a whirl. (Can I call her that?? To her face? What do you SAY to Pioneer Woman, anyway?? Probably something gushy punctuated with a nervous laugh. We’ll see!)

Mmm, and is this mac and cheese creamy! It starts with a roux (cooked flour and butter), but actually isn’t that fussy. You add in some milk, dry mustard, and spices of your choice, cook until thickened, add your cheese, and voila: a rich, thick, creamy cheese sauce in which to dunk those little noodles up to their elbows (get it?). The creamy macaroni then goes into a baking dish, is topped with cheese, and bakes for 20-25 minutes. Pretty simple, very luxurious.

If you’re a creamy macaroni and cheese fan, this recipe’s for you. Just don’t undersalt! Pioneer Woman charges you with this command at least three times in her post, but I still undersalted mine. Go for it with that salt shaker! You don’t want to feel like you just took in a gulp of ocean or anything, but you do want to enhance the great flavors of the dish.

Pioneer Woman’s Macaroni and Cheese


Recipe by: Adapted from Pioneer Woman
Yields: 9 x 13 in. pan of baked macaroni (4 to 8 servings)

Ingredients:
4 cups dried macaroni
¼ cups (1/2 stick or 4 tablespoons) butter
¼ cups all-purpose flour
2-½ cups whole milk
2 teaspoons (heaping) dry mustard, more if desired
1 whole egg, beaten
1 pound cheese, grated
½ teaspoons salt, more to taste
½ teaspoons seasoned salt, more to taste
½ teaspoons ground black pepper
Optional spices: cayenne pepper, paprika, thyme

Directions:
Preheat oven to 350 degrees F. Cook macaroni until very firm. Macaroni should be too firm to eat right out of the pot (about 5 minutes). Drain.

In a small bowl, beat egg.

In a large pot, melt butter and sprinkle in flour. Whisk together over medium-low heat. Cook mixture for five minutes, whisking constantly. Don’t let it burn.

Pour in milk, add mustard, whisk until smooth, and turn heat up to medium-high. Cook for five minutes until very thick. Reduce heat to low.

Temper eggs: Take 1/4 cup of the sauce and slowly pour it into beaten egg, whisking constantly to avoid cooking eggs. Whisk together till smooth. Pour egg mixture into sauce, whisking constantly. Stir until smooth.

Add in cheese and stir to melt.

Add salts and pepper. Taste sauce and add more salt and seasoned salt as needed! DO NOT UNDERSALT (Would you believe I still undersalted mine, even with this warning? Don’t undersalt the macaroni and cheese, y’all!)

Pour in drained, cooked macaroni and stir to combine. Serve immediately (very creamy) or pour into a buttered baking dish, top with extra cheese and a sprinkle of paprika, and bake for 20 to 25 minutes or until bubbly and golden on top.


Enjoy!

P.S. Looking for something adorable for Easter? How about Chocolate Chickie Cake Balls or Lemon Burst Fairycakes?


Share Share this post with friends!

Billion Cheese Ravioli with Red Pepper Pancetta Sauce

Until a couple of days ago, I was planning a romantic takeout Thai feast for my Valentine’s dinner with Mike. Perhaps that seems lazy, but my Clementine Burst Cupcakes were a two-day affair, and I just couldn’t work up the motivation to make a fancy dinner to go with my fancy dessert. Well, at least not until I saw the sweetheart Four Cheese Ravioli over at Annie’s Eats. Food that is adorable can always motivate me.

I’ve had a hankerin’ to make homemade pasta for awhile now, but I don’t own a pasta machine. Some brilliant mind on the interweb recently made the point that old Italian grannies didn’t necessarily have pasta machines either, so when I saw Annie’s ravioli, I decided to throw rationality to the wind. That’s right! I was making pasta by hand!

You’ll hear horror stories about how difficult it is to do so, but I was surprised by how straightforward the process was. It involved some elbow grease (I rolled with all my might!) and some, um, wrist grease (kneading the night away!), but in the end, it was relatively easy. My little ravioli did end up a little tough, so I’ve adjusted the kneading time in the recipe below, and also recommend that you roll out your dough extremely thin. I cut mine into hearts to celebrate my sweetheart (who is currently in a carb coma), but any old shape will do. In fact, you can even grab a ravioli mold to make dozens of ravioli at a time. I can’t help it, though; I’m partial to hearts!

Even though they were a little toothsome (thanks, Kevin from Top Chef!), these little ravioli were the star of the Valentine’s show! Each petite parcel was stuffed full of fresh herbs and (as the title of this post suggests) about a billion cheeses. Specifically: Parmesan, mozzarella, asiago, fontina, Romano, provolone, ricotta, and goat cheese. Most of these were in the form of a 6-cheese blend I picked up at my grocery store — nice!

The sauce was a bit like Dr. Frankenstein’s monster — but what a tasty conglomeration! I wove odds and ends from two tempting recipes together to form a bright, sharp flavor that paired perfectly with the mellow, creamy cheese and herbs inside the ravioli. Delicious sauce calls for some bread for sopping, of course, so I also fixed up some garlic bread. I sliced a loaf of Italian bread from my grocery store’s bakery and sloshed on some melted butter, garlic, and basil. After heating it in the oven, I topped each slice with cheese and heated them again to melt. Cheesy garlic bread: the perfect accompaniment to our fresh pasta!

If you’ve been shying away from homemade pasta because you don’t have a pasta machine, today’s the day to go for it! The taste will be worth it, but the feeling of accomplishment when you bite into your sweet, handmade ravioli is even better.

Billion Cheese Ravioli with Red Pepper Pancetta Sauce


Recipe by: Adapted from Annie’s Eats (pasta and ravioli); sauce adapted from Pioneer Woman, and Lissi
Yield: enough pasta to serve about 2 people

Ravioli Pasta Ingredients:
2 large eggs
1/2 tablespoon water, plus more as needed (I ended up using several full tablespoons)
1/2 tablespoon olive oil
1 3/4 cups sifted all-purpose flour
1/4 teaspoon salt

Filling Ingredients:
1/2 cup whole ricotta
1 cup 6-cheese Italian blend
1/4 cup goat cheese crumbles
fresh basil, chopped, to taste
fresh chives, chopped, to taste
fresh thyme, chopped, to taste
1/4 teaspoon dried oregano
salt and pepper, to taste

Sauce Ingredients:
3 whole red bell peppers, roasted
3 tablespoons pine nuts
pancetta
3-4 tablespoons tomato puree
2 tablespoons olive oil
splash of wine or water
1/2 medium onion, finely diced
2 cloves garlic, minced
1/2 cup ricotta
splash heavy cream
Fresh Parmesan, shaved

Directions:
Make the pasta: In a food processor, combine the eggs, water, olive oil and flour. Mix on low speed until the ingredients are well mixed and a dough begins to form. If the mixture is not coming together, add more water, 1 tablespoon at a time just until the dough is formed. Transfer the dough from the food processor to a work surface. Knead 1-2 minutes by hand. Cover with a clean towel and let rest for 20 minutes. Knead again for 1-2 minutes, or until dough starts to feel more supple and elastic. Let rest for another 20 minutes.

Divide the dough into two equal pieces. If you have a pasta machine, see instructions here for how to prepare the sheets of dough. If not, roll one piece of the dough out on a lightly floured surface, pressing hard and rolling diligently until the dough is very thin. Use a large heart-shaped cookie cutter to cut out ravioli pieces. Let these rest while you mix your filling.

Mix filling: Place all ingredients into a bowl and mix well. Taste and season accordingly.

Assemble ravioli: Place about 1 teaspoon of filling in the middle of half of the heart shapes, leaving a clear edge around the perimeter. Dip a finger in water and lightly brush around the edges of a heart topped with the filling. Place one of the remaining pasta hearts on top and press the edges of the pasta shapes together to seal around the filling, being careful to press out any excess air. Repeat with the remaining dough shapes.

Make the sauce: Lightly toast pine nuts in a skillet. Puree peppers with pine nuts. Set aside. Lightly fry pancetta to release fat. Add onions and garlic and cook until soft. Slide this mixture to the side of the pan. Add 3-4 tablespoons tomato puree and cook until slightly caramelized. (I put my pasta water on to boil right around now). Add a splash of wine and scrape bottom of the pan to get all the good bits into the sauce. Pour in pepper puree and stir together, seasoning with salt to taste. Pour in cream and ricotta and stir to combine. Taste and add more salt, if necessary.

Cook the pasta: Bring a large pot of salted water to boil. Cook the ravioli until al dente, about 5 minutes. Drain well and add ravioli to the sauce, tossing to coat. Serve with a spring of basil and shaved Parmesan.


Valentine’s Day dinner for two.


Share Share this post with friends!

Taco Stuffed Crescent Rolls

Can you stand a little product placement? The truth is, Pillsbury isn’t paying me a dime or mailing me a single free biscuit (not that I’d mind a shipment if the doughboy happens to be reading!), but I’m still going to brag on their crescent rolls. If you’ve only been making little bread rollups with these, you’re missing out!

Pillsbury has plenty of creative ideas on their website for how to make better use of the crescent, but I’ve never tried a single one of them. That’s because every time I get a can of crescents (and to be honest, I sometimes buy the generic brand — are you rescinding my biscuit shipment, Pillsbury?), I have to make Taco Stuffed Crescent Rolls.

It’s funny (and a little depressing) that after all the hours I’ve spent in the kitchen making things from scratch — fresh puff pastry? a full traditional lasagna? homemade yeast bread? — these little Tex-Mex treats are some of Mike’s absolute favorites. He loves these things! And for good reason: the flaky, buttery crescents are stuffed with a creamy, gooey, cheesy, spicy, meaty mixture and topped with toasted cheddar. They’re so simple to make, too! Perfect for a busy weeknight or a last-minute supper.

Not a fan of cans? No problem; any leftover yeast roll dough will serve just fine to bake up a batch of these crescents. Serve them with salsa, sour cream, guacamole or fresh avocado slices, and a sprinkle of cilantro. Or just burn the tarnation out of your tongue eating them straight off the baking sheet! By the way, this is just the beginning — think of all the possible sweet and savory crescent stuffings! Pizza crescents, apple pie crescents, Mediterranean crescents, ham and cheese crescents, spinach and feta crescents . . . what would you stuff in your crescent?

Taco Stuffed Crescent Rolls


Recipe By: Willow Bird Baking
Yields: 16 large crescent rolls

Ingredients:
1 lb. ground beef (or a little less)
1 packet McCormick’s cheesy taco seasoning (or taco seasoning of your choice)
6 oz. cream cheese, softened
2-3 heaping tbsp. salsa
1/4 cup shredded cheddar cheese
2 cans giant crescent rolls (I usually use “big and buttery” or “big and flaky” crescents)

Directions:

Preheat oven to 375 degrees (or whatever is listed on crescent roll package). Brown ground beef, drain, and return to pan. Add packet of taco seasoning with a bit of water and cook until combined. In a separate bowl, combine cream cheese, salsa, and cheddar cheese. Add ground beef mixture to the bowl (which will melt the mixture a bit) and stir to combine.

Spoon about 2 tablespoons of ground beef mixture onto each crescent roll (I pressed them out a bit to make them bigger) and roll up like normal, carefully sealing the openings. Sprinkle a bit of cheddar cheese on top of each roll. Bake 11-13 minutes (or whatever is listed on crescent roll package), watching carefully. Rolls should be a golden brown to make sure they’re done inside.

Notes: This recipe actually makes more filling than needed, but it would be delicious in tacos or burritos, on a taco salad, or eaten with a spoon. Seriously!


Gathering all of my ingredients and mixing the taco filling.


Stuffing, rolling, and baking.


Big pile o’ stuffed crescents and one ridiculous serving suggestion: yes, Mike and I actually ate a dinner that consisted of stuffed crescents and oven-baked macaroni and cheese. Carbs, anyone?


Taco Stuffed Crescent Roll love!


Share Share this post with friends!

1 23 24 25 26 27