cream cheese

Pumpkin Pecan Streusel Breakfast Braid

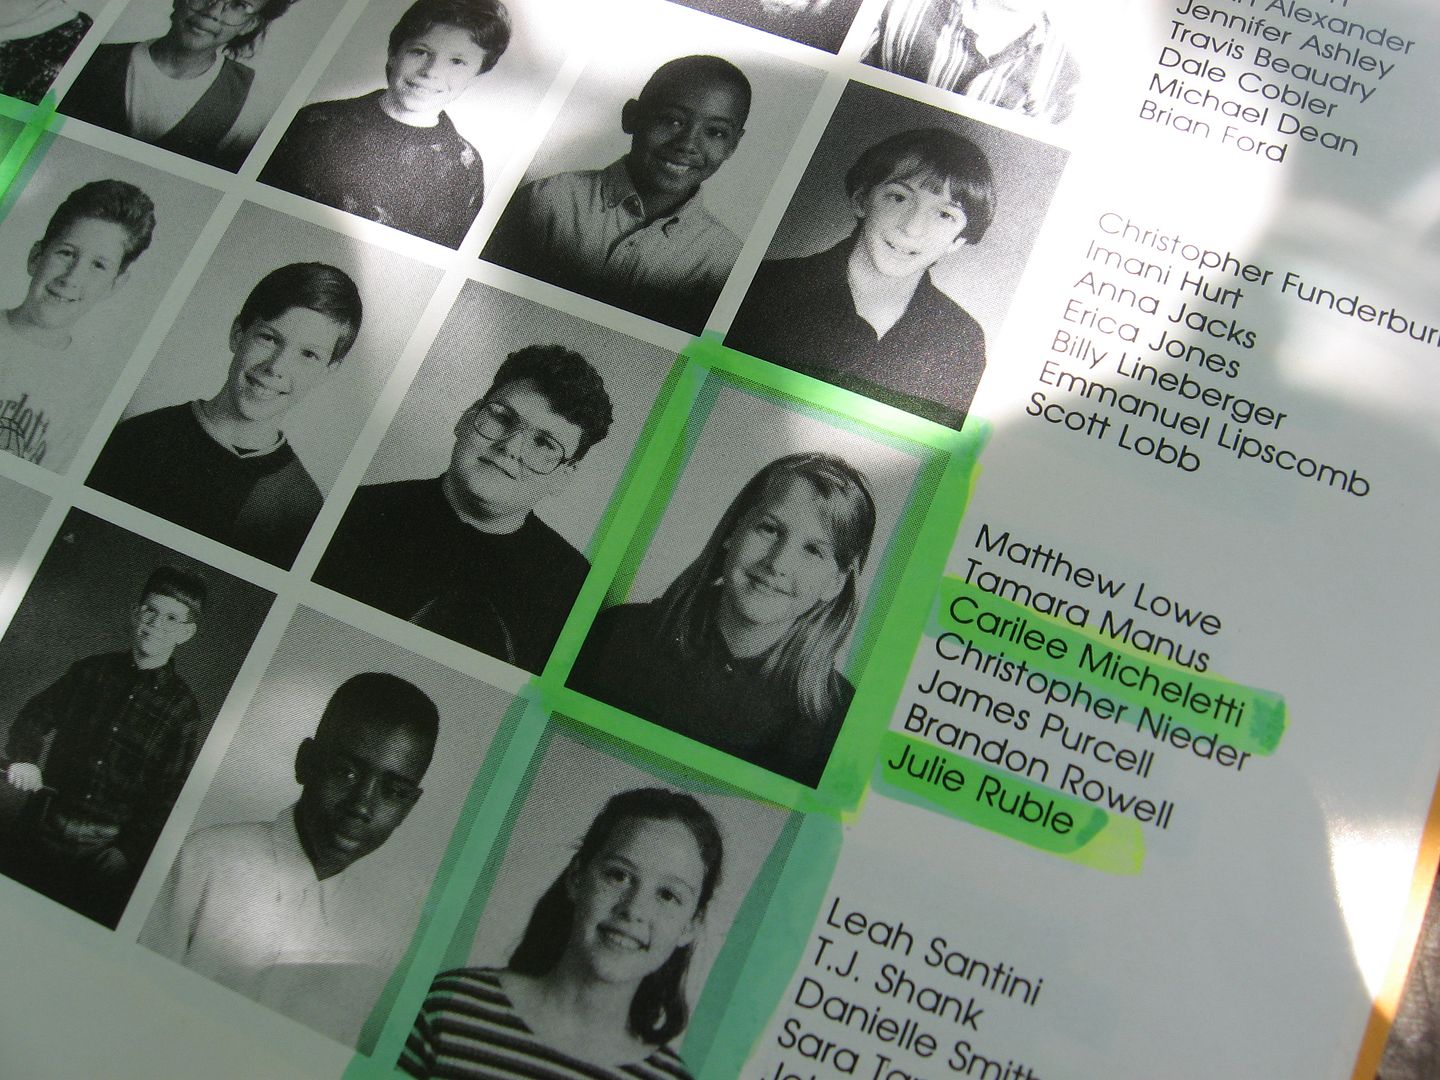
Today is “Nerdy Day” at Woodlawn, the school where I work. All of my students are sporting taped glasses, suspenders, pants hitched up to their eyeballs, pocket protectors, and bow ties. They asked me why I didn’t dress up and I replied honestly, “What do you mean? I did.”

I don’t need a pocket protector to dress like a nerd. I’m naturally a nerd, through and through. Like I told my students: I love to read. I love to write. I love technology. I love obscure art. I love learning. I write essays for fun. I annotate the books I read in my spare time. I often ruminate on literary theory, politics, and feminism. I was born a nerd and I’ll die a nerd. Amen.


Ooh. Amen!

Such was my nerdiness as a child that I detested the outdoors and was a bit of a cave-dweller. Have you ever met a kid like that? My friends usually wanted to play some wildly active (often destructive) game outdoors: Who can run down this hill the fastest, completely oblivious of oncoming traffic? Who can climb to the very highest, most excruciatingly tenuous limb of this tree? Who wants to tumble pell-mell through snakes and venomous spiders in the woods?

Not me. I was a pale, chubby child who preferred to sit and read in an air-conditioned, artificially lit corner. I always bossily petitioned for an orderly indoor game: a board game, perhaps, or a polite game of snack-eating.

My aversion to the outdoors and to all athletic activity was particularly strong when it came to my dreaded elementary P.E. class. Far from “educating” me on much besides torture and pain, my Physical Education class struck fear deep into the air-conditioned depths of my heart. For one thing, we went outside all the time (much to the glee of most other students). For another, I was a klutz.

I remember standing on a dusty, grassless kickball field one hot day in May. My friend and I were watching the game cynically and whining about our circumstances. First off, we were hot, sweaty, and red-faced. Worse still was the fact that we were almost up to the plate. Unless we got another “out” — and fast! — we were going to have to try to kick the ball in front of all of our classmates (including all of the cute boys in class). We’d then have to walk back to the team in shame, enduring their fervent, angry shouts about our athletic ineptitude.

I suggested we try to imagine ourselves jumping into a cool swimming pool. The power of visualization and positive thinking, I noted to my friend, was immense. We both scrunched up our eyes and started to visualize with all our might. One of our teammates kicked the ball into the outfield. We visualized harder. Another teammate kicked the ball even farther. We visualized with all our might. Another teammate kicked the ball into the stratosphere.

We gave up with a sigh, and I walked up to the plate. Lame.

Kickball wasn’t the worst, though. The worst activity — the one that sent chills of absolute terror down my lazy little spine — was the mile run. What sort of sadist decided to try and make us run an entire mile?

Y’all, I don’t care if I were getting chased by a gigantic black bear. I don’t care if he were breathing down my neck with bloody bear fangs and breath that smelled of my impending doom. I don’t care if he were as hungry as a hippo with razor claws and rabies. If my only hope of salvation were to run a mile, I would plop myself down on a plate and sprinkle some salt and pepper on my head.

I hate running.

As it was, I did get chased, so to speak, by my rabid elementary P.E. teacher. She was fit as a fiddle and always barked encouragement at us from the sidelines as we dragged ourselves around the track. I remember talking to myself out loud (more nerd points?) as I struggled to put one foot in front of the other. My monologue went something like this: “If I just keep pushing myself, I’ll pass out and probably die. But then at least I’ll never have to do the mile run again. In fact, they’ll probably ban the mile run from schools everywhere. If I can just run hard enough to pass out, that can be my legacy: eliminating the mile run for the children of the future.”

If that seems twisted, you ought to have heard me at home the night before the mile run. I would literally plead with my parents to somehow break my toe. Stomp on it, perhaps? Run over it with the car, maybe? Does that sound drastic?

I figured a broken toe wouldn’t be that inconvenient, and it would heal before too long. In the meantime, though, my quality of life would increase a thousandfold as a result of missing the mile run. I lay in the floor and whined when my parents refused. Didn’t they realize they were consigning me to pass out in the middle of a gigantic dirt field? Didn’t they want to spare me all of my anguish? Didn’t they LOVE me?

I may be 27 years old now, and I may have started to appreciate the outdoors, but I still maintain that my fragile constitution was built for reading, writing, and recipes — not for running. In fact, I’d still prefer an injury to an athletic event. This coming Friday, at the end of Woodlawn’s spirit week, there’s a faculty vs. students soccer game, and you can imagine my utter terror when I was asked to participate. All of these years thinking I was finally free from that school field . . .

Thankfully, though (I’m so weird), the other day I was stretching and I felt something twist in my knee. My first thought was, “Ow!” followed immediately by, “Ooh, now I don’t have to play in the soccer game!” Some things never change.

I’ll settle for being a clumsy nerd. Some of my students are geniuses on the soccer field, some are geniuses on horseback, some are geniuses in ballet shoes, some are geniuses on stage. I’ll settle for being at home with a book, at home with words, and at home in the kitchen. We all have our talents, right?

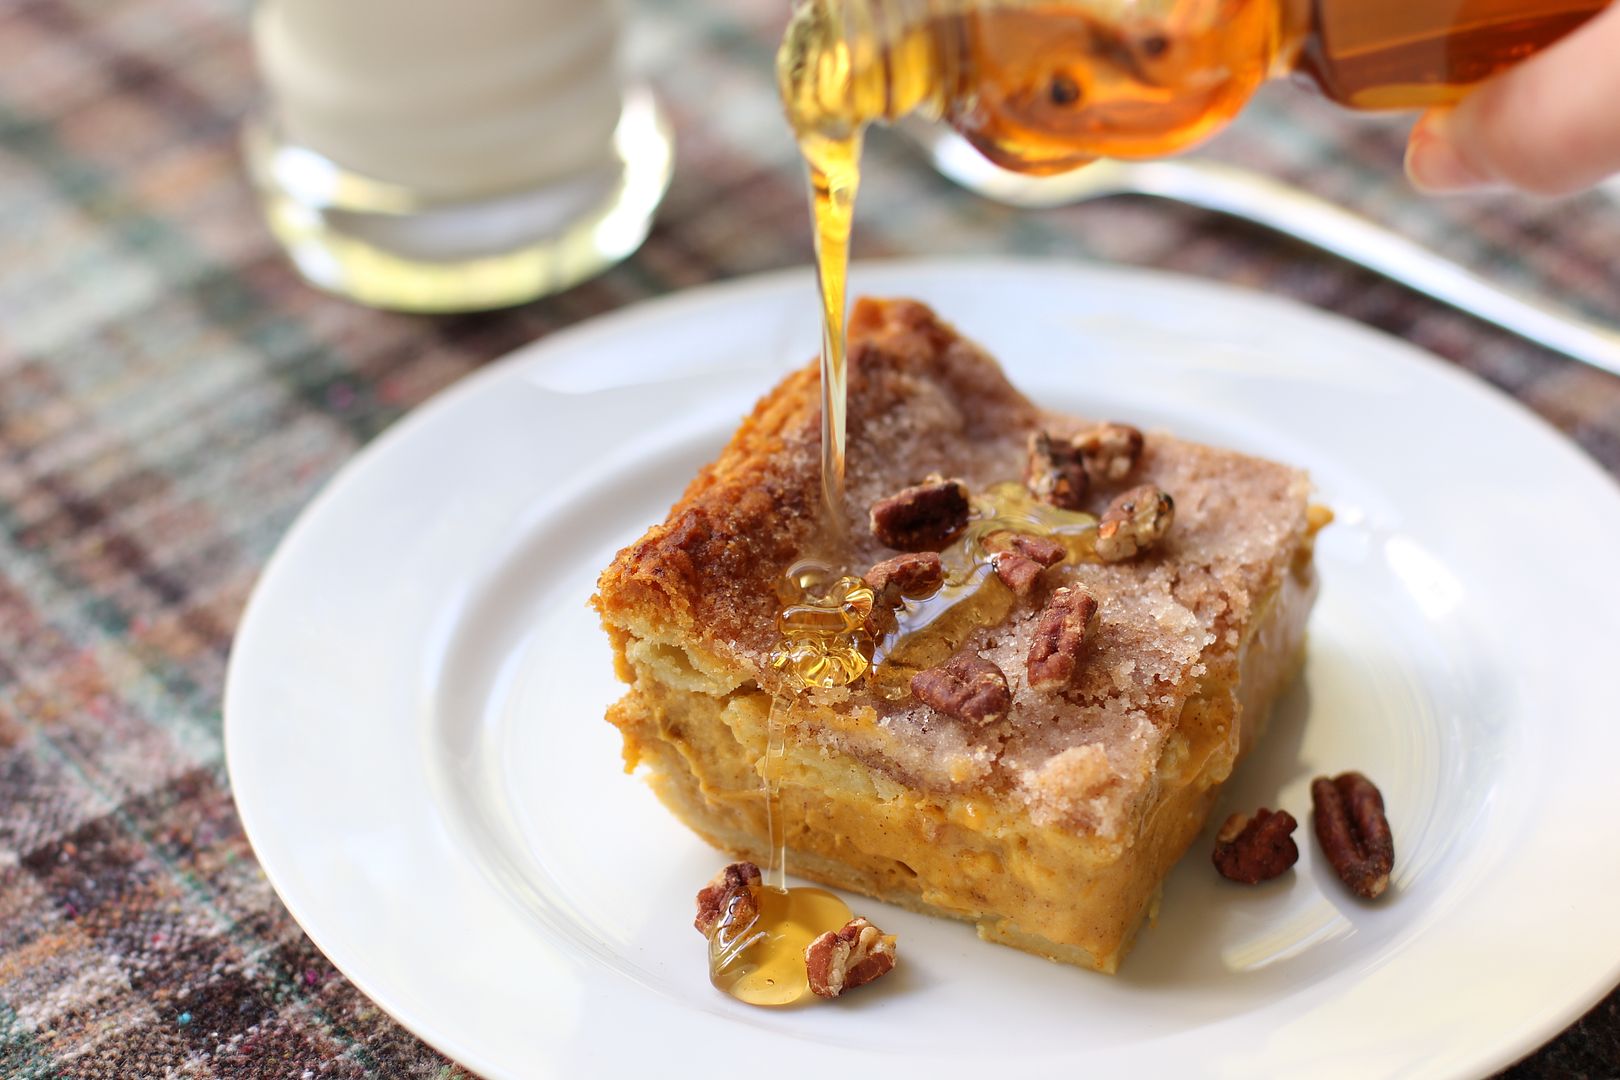
In that spirit, I offer you not my soccer savvy (hahahahaha, for which you should be thankful) but my breakfast braid. I couldn’t wait to tell you about this recipe! I dreamed about posting this braid the entire time I was baking it, photographing it, transporting it to Raleigh, and eating it with Mike while watching past episodes of Parks and Recreation and drinking lots of milk.

What I most want to emphasize about this recipe is that it’s EASY! The first time I made a breakfast braid with this dough, I fell in love. It’s the perfect beginning pastry, since it doesn’t involve any yeast or rise time, or even much kneading. It’s not sticky or stubborn. If you’ve ever used canned crescent rolls, this dough is a textured a lot like that.

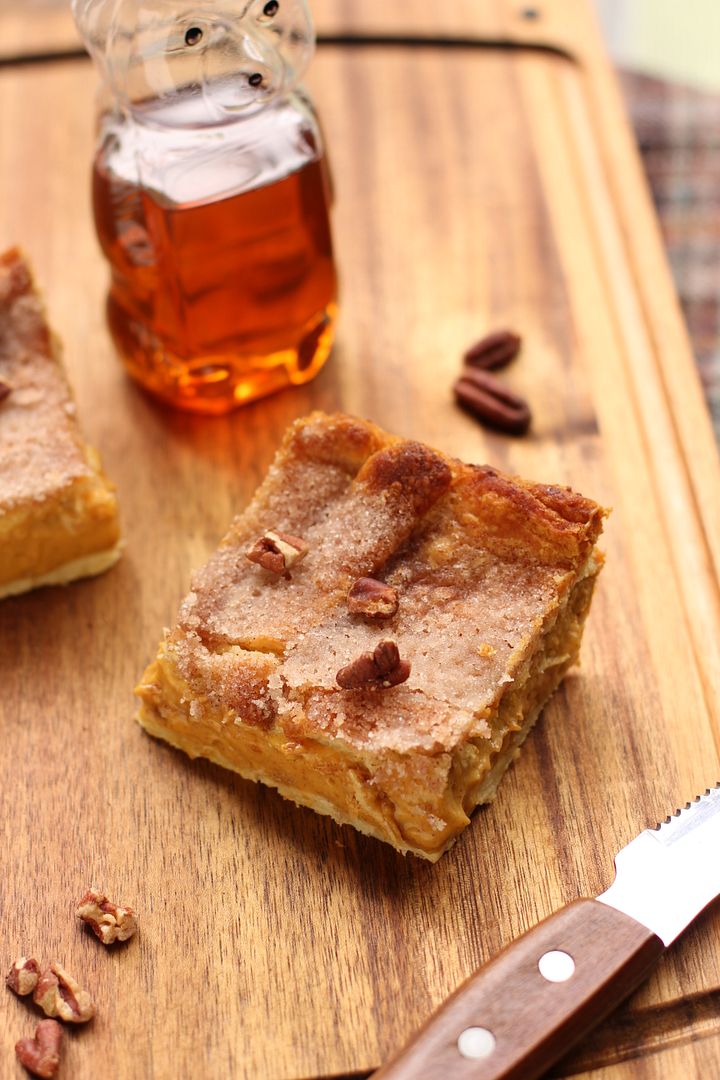
Naturally, in addition to being easy (SO EASY. DID I MENTION HOW EASY?), it was delectable. I call it a breakfast braid, but it’s an eat-anytime-you-can-possibly-shove-it-in-your-face braid. It’s a mind-blowing combination of flaky pastry, autumn pumpkin, cinnamon and spice, buttery streusel, toasted pecans, and a rich maple brown sugar glaze. I may not be able to kick a soccer ball, but I can make a mean pumpkin braid. That’s good enough for me.

Are you nerdy?

Pumpkin Pecan Streusel Breakfast Braid with Maple Brown Sugar Glaze


Recipe by: Willow Bird Baking. Inspired by The Luna Cafe, with glaze from Caitlin Cooks
Yield: About 4-5 servings of 2 slices each

In this breakfast braid, tender, flaky, almond-scented pastry envelops a delicious pumpkin pie custard topped with buttery cinnamon pecan streusel. An addictive maple brown sugar glaze and toasted pecans top the whole shebang, creating a perfect autumn breakfast (or dessert, or lunch, or dinner…!) This braid looks fancy, but don’t be fooled. It’s one of the easiest things I make. The dough is lovely to work with — it doesn’t need to rise, barely needs any kneading, and isn’t sticky or finicky. I’m always amazed that such gorgeous results can be achieved with such little effort.

Easy Dough Ingredients:
2 cups all-purpose flour, sifted
1 teaspoon baking powder
1/2 teaspoon salt
1/2 cup unsalted butter, cold and cut into cubes
3 ounces cream cheese, cold and cut into cubes
1/2 cup milk, minus 1/2 teaspoon
1/2 teaspoon almond extract

Pumpkin Pie Filling Ingredients:
(this makes a little more filling than you need)
6 ounces cream cheese, softened
3/8 cup sugar
3/4 cup pumpkin puree
3/4 teaspoon vanilla extract
1 egg
1 1/8 teaspoons cinnamon*
1/4 teaspoon nutmeg*
1/4 teaspoon ginger*
1/8 teaspoon allspice*
*You could probably substitute a teaspoon or so of pumpkin pie spices for these.

Pecan Streusel Ingredients:
1/8 cup firmly packed light brown sugar
1/8 cup all-purpose flour
1/2 teaspoon cinnamon
1 tablespoon cold butter
1/2 cup chopped pecans

Maple Brown Sugar Glaze Ingredients:
1 tablespoon butter
2 tablespoons milk
1/4 cup brown sugar
1 tablespoon real maple syrup
pinch salt
3/4 – 1 cup powdered sugar
cinnamon for sprinkling

Directions:
NOTE: To prepare this braid in advance, complete all steps and assemble the braid but do not bake. Cover the braid on its parchment lined baking sheet with plastic wrap and refrigerate overnight. Set out in the morning as you preheat the oven and then bake as usual.

Preheat the oven to 350 degrees F.

Make the creamy pumpkin pie filling. In your electric mixer, or with a hand mixer, beat the cream cheese until smooth. Add the sugar and beat until fluffy and smooth. Add the pumpkin, egg, and vanilla extract, cinnamon, nutmeg, ginger, and allspice and mix until combined. Set in fridge while you make your braid.

Toast your pecans. Spread them out in a single layer on a baking sheet and toast for about 6 minutes or until fragrant, stirring about halfway through the cook time. Transfer nuts to a plate to cool. Raise oven temperature to 425 degrees F.

Make your pastry dough. In the bowl of a food processor, mix the flour, baking powder, and salt. Add the cream cheese and butter into the flour mixture and pulse to cut the fat into the flour (about 6 pulses). Add the milk and almond extract and blend into a loose dough.

Turn the dough onto a sheet of lightly-floured parchment paper and knead very lightly for just 4-5 strokes (be careful not to overwork the dough or it’ll be tough! Don’t worry about getting it smooth — just knead for these few strokes and let it stay a little rough.)

Very lightly flour the top of the dough and place another sheet of parchment paper on top. Between two sheets of parchment paper, roll the dough to an 10- by 12-inch rectangle (I lift the paper off every now and then and flip the dough and repeat on the other side, to ensure the dough isn’t sticking). Remove the top sheet of parchment and discard. Measure and mark the dough lengthwise into thirds. Glop your creamy pumpkin pie filling down the middle third of the dough — try to keep your filling about 1/4 inch from the mark on both sides. I piled it up a bit (not so much that it was overflowing, but plenty!)

Make the streusel topping. Combine the flour and brown sugar in a medium bowl and using two knives or a pastry cutter, cut in the butter until you have crumbly streusel. Mix in 1/4 cup of toasted pecans (save the rest for decorating the finished braid). Sprinkle streusel over top of pumpkin mixture in center of dough. Really pile it on!

Continue assembling the braid (see photos at the bottom of this recipe, which show the process of marking and assembling a raspberry almond braid, for guidance). Make diagonal cuts at 1-inch intervals on each the long sides. Do not cut into the center pumpkin-filled area. Fold strips, first one from one side and then one from the other side in a rotating fashion, over the filling. It will now resemble a braid. Don’t worry if it doesn’t completely hide your filling — it’s actually nice when the filling is peeking out. Use the sheet of parchment to carefully transfer your braid to a baking sheet (at this point, you can brush the pastry with a mixture of 1 beaten egg and a teaspoon of water if you want it darker than mine. I didn’t bother). Bake in the 425 degree oven for 12-15 minutes, until the dough is cooked through, the pumpkin filling is set, and the top is lightly browned. Let the braid cool slightly while you make your glaze.

Make the Maple Brown Sugar Glaze. Combine the butter and milk in a small saucepan over medium heat. When the butter melts, whisk in the brown sugar, syrup, and salt, stirring until the brown sugar melts. Remove the pan from the heat and whisk in the powdered sugar, starting with 3/4 cup and adding more to thicken per your preference (taste as you go to ensure you don’t oversweeten). Drizzle the glaze over the top of your braid. Sprinkle the braid with toasted pecans and a dusting of cinnamon. Serve immediately. Refrigerate leftovers in an airtight container and microwave for about 20 seconds to serve.


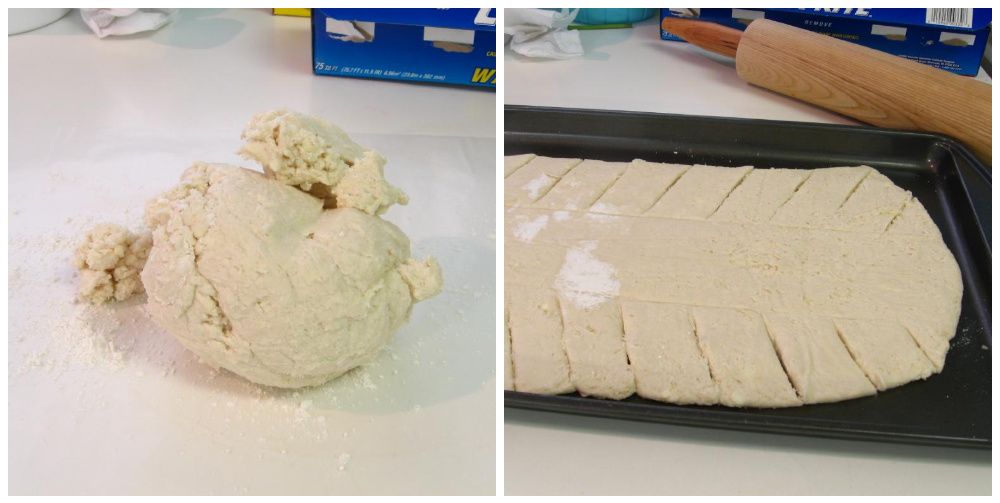
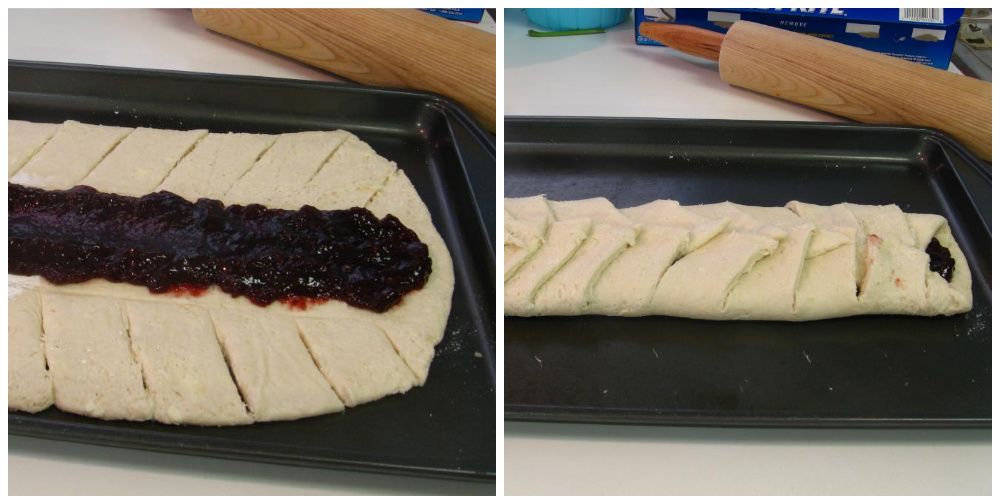
Example of how to cut and assemble braid.

Other breakfast braids you’ll love:
Raspberry Almond Breakfast Braid
Blueberry Cream Cheese Almond Breakfast Braid

If you liked this post, please:
Subscribe to Willow Bird Baking
Follow Willow Bird Baking on Twitter
Follow Willow Bird Baking on Facebook
Give this post a thumbs up on StumbleUpon


ShareOther ways to share this post with friends!

Pumpkin Cheesecake Stuffed Snickerdoodles

A few evenings ago I was driving home on Harris Boulevard straight into the hot-gold sunset. The windows were rolled down — enough so that the tepid autumn air rushed into the car across my forehead, but not enough to assault me with a face full of blonde tangles. My favorite 80s song tumbled out of the speakers and vibrated the swirling air around me.

I acquiesced: okay, fall.

I’m a summer girl. Cold air feels like a heavy restraint: every trip outside with Byrd involves shrugging on two coats, two pairs of pajama pants, a scarf, and some mittens. I have to wrangle her into her snuggie (what? don’t act like you don’t own a dog snuggie) and wrap her in my scarf. It feels like I’ve doubled in weight as I lumber down the stairs like an abominable snowperson (with an abominable — but adorable — little snowdog in my arms).

It’s harder to move. The ice-edged air is harder to breathe. It takes longer to get up the gumption to do something as simple as take a walk.

Besides the discomfort, there’s that slate winter sky. Every day is a sloshy gray, and the sky seems lower somehow. Some summer days breeze in with mountainous clouds; their enormity makes the ocean of blue sky seem endless. In winter, though, the clouds form a heavy wool blanket that seems to sit just overhead. All summer we drift about in miles of free space; all winter we’re squashed like heavily-clothed little bugs.

I dislike winter so strongly that even on the most oppressively hot days this summer, I refused to complain. Sweat? Okay. Sunburn? No problem. Heat stroke? I’ll deal. Because the alternative is disgusting, wet, despicable, muddy, gray, depressing winter.

Facebook friends pined all summer for cooler weather and it was all I could do to avoid responding, “If you wish away my summer, I will find a way to haunt you all. winter. long.”

I dislike winter so strongly that every year, I initially dislike fall. Fall is a premonition of winter’s evil, marching stolidly across the globe toward us, indifferent to our terrified screams–

Okay, well that’s a little much. But fall means winter’s coming, and that makes me sad. Instead of accepting the advent of cooler air, I hang on to summer as long as possibly.

Others get out their boots while I stubbornly continue wearing my bohemian beach flip flops. I wear tiny sundresses, budging in my resolve only to slip on a sweater with a scowl when the temperature drops to 40 degrees each evening. I heat my house like the tropics and continue wearing my beloved nightgowns. I eat ice cream sundaes.

But every year, things start to happen that weaken my resolve. I’ll realize that I can light my fir tree and cinnamon spice candles at the same time and make my apartment smell like Christmas. I’ll see that the Southern Christmas Show (only my favorite event of the year!) is coming to town. I’ll remember the awesome sweater I was sad to put away last spring.

And finally, most importantly of all, I’ll realize there’s a whole new season of recipes to be created. Y’all know I bake anything and everything with pumpkin as soon as the first can hits the shelf. I love apples and nuts and cranberries, but there is no ingredient that winterizes the summery cockles of my heart (wait, that doesn’t sound like a good thing?) as much as that gourd.

Eventually there comes a moment when I accept the inevitable. Jamming out in my car a few evenings ago, I finally welcomed fall. And you know, I might have even been a little joyful to do so.

Whether you’re still having trouble accepting the change of seasons or not, these cookies will make you joyful. I don’t say this often because it totally ruins your street cred if you just throw it out there about every recipe you create, but these cookies are one of the best things I’ve ever made. Warm snickerdoodles are already the cinnamony, sugary bees’ knees, but when you stuff them plumb full of an autumn-spiced pumpkin cheesecake mixture, they become otherwordly. Who needs summer?

What’s your favorite season?

Pumpkin Cheesecake Stuffed Snickerdoodles


Recipe by: Willow Bird Baking, cobbled together from Whole Foods (filling) and Sunset, 1998 (via Bakergirl) (cookies)
Yield: about 30-35 large cookies

Make these cookies as soon as you can — they are incredible! Warm, cinnamon-sugar snickerdoodles surround a creamy ball of pumpkin cheesecake spiced with graham cracker and gingersnap crumbs. These cookies are crumbly, buttery, melt-in-your-mouth nuggets of autumn love. Sure, they have a lot of fat and a lot of sugar — so reserve them for a special occasion. But don’t skimp! They’re worth it. Also, while the cookies look fancy, they’re quite simple to make. Store leftovers in an airtight container in the fridge and heat them for 20-30 seconds or so before serving them with a tall glass of milk.

Snickerdoodle Ingredients:
1 cup butter, softened
1 cup vegetable oil
3/4 cup granulated sugar
1 cup powdered sugar
2 large eggs
4 1/4 cups all-purpose flour
1 teaspoon baking soda
1 teaspoon cream of tartar
1/2 teaspoon salt
1/2 cup granulated sugar + 1 tablespoon cinnamon for rolling cookies

Filling Ingredients:
2 cups white chocolate chips (about 10 ounces)
1 cup pumpkin puree
1 1/2 cups finely ground gingersnaps
1 1/2 cups graham cracker crumbs
4 tablespoons powdered sugar
1/2 teaspoon ground cinnamon
Pinch of orange zest (I used a dash of orange extract)
1 (8-ounce) package cream cheese, softened

Directions:
First, make the pumpkin spice truffle filling. Melt the white chocolate chips in the microwave on half power. Start with 1 minute and stir. Continue to heat the chocolate in 15 second intervals, stirring well after each to aid the melting, until it is smooth (be careful not to overheat). Set this aside to cool slightly. In the meantime, mix the pumpkin, gingersnap and graham cracker crumbs, confectioners’ sugar, cinnamon, orange zest or extract, and cream cheese together. Add the white chocolate and mix well until thoroughly combined. Transfer the mixture to the refrigerator to chill and firm up. In the meantime, make the snickerdoodle dough.

Mix together the butter, vegetable oil, granulated sugar, powdered sugar, and eggs in a large bowl. In a separate large bowl, whisk together the flour, baking soda, cream of tartar, and salt. Add the flour mixture into the butter mixture in 3-4 additions, mixing until just combined between each. Place the finished dough in the refrigerator to chill. While the cookie dough chills, roll pumpkin mixture into balls and place the balls on a wax paper lined baking sheet. Cover, and freeze until firm (about 1 hour).

In a small bowl, whisk together 1/2 cup granulated sugar and cinnamon. Preheat oven to 375 degrees F. Take a few pumpkin balls out of the freezer at a time to work in small batches (so they stay firm). Scoop out about a tablespoon of chilled cookie dough. Press a frozen pumpkin cheesecake ball into the center, then cover with another bit of dough, working the dough around the whole ball. Roll in cinnamon-sugar and place on a greased baking sheet. Repeat the process, placing cookies 3-4 inches apart. If cookie dough gets too soft, re-chill it for a bit and continue working. I made sure to stick it back in the fridge during any downtime (like when the cookies were in the oven).

Bake for 12-15 minutes, or until edges are slightly browned. Let the cookies cool on the pan for a few minutes before removing them to a cooling rack to cool completely.

If you liked this post, please:
Subscribe to Willow Bird Baking
Follow Willow Bird Baking on Twitter
Follow Willow Bird Baking on Facebook
Give this post a thumbs up on StumbleUpon


ShareOther ways to share this post with friends!

Easy Sopapilla Pumpkin Cheesecake Bars

There’s a banner that hangs above the whiteboard at the front of my classroom. It’s about six feet long and so high that you can see it from anywhere in the room — unless you’re hiding under my desk, I guess, but why would you be doing that? You’re just asking for a behavior tally.

I made the banner by hand, writing its message (which comes from a book I read before I started teaching) in huge blue block letters: THERE ARE NO SHORTCUTS.

For most of my students, middle school is just the right time to be confronted with this reality. New 6th graders walk into my classroom fresh from the cottony, comforting cocoon of elementary school. Their elementary school teachers did a little more hand-holding, offered a little more amnesty. It’s not because they were softies; rather, it’s because students aren’t typically ready to be independent learners at that point in their development. Some of my 6th graders aren’t ready when they first meet me, either — but it’s my job over the course of two years to get them there.

Sometimes it happens the hard way. I can see the surprise in their eyes when I give them their first zero on a homework assignment. They stammer, “But my printer was broken! I couldn’t print it!” I ask if they followed the advice given at the beginning of the year to find a “printer buddy,” a classmate willing to print for them in case of technical difficulties. The blank stare I get in response speaks volumes. I pencil in the zero, and as I move along briskly to the next student, there’s a heavy lesson being learned in my wake.

They don’t quite know what hit them, but if they asked, I could tell them: it’s responsibility. The whole weight of it just fell on their little shoulders! It feels like a heavy load, but actually, they can manage that zero. In doing so, in fact, they get used to managing (and working to prevent) discomfort, disappointment, and failure. They get used to making their own choices and experiencing the results. They become independent learners.


This was supposed to be a drizzle, but I got carried away.

Teaching them that there are no shortcuts (you just have to buckle down and complete the work, study for the tests, take ownership of your learning experience) is invaluable, but I also work with some kids who need a different message.

There are a few kids every year who come in with everything color coded. Their handwriting is perfect. They create mile-high stacks of flashcards before every quiz. It’s a teacher’s dream — until you notice the tiny cracks in their morale that are widening under pressure. You hear that they’re agonizing over their homework for hours to make it perfect, or you see them tearing up over a few missed points on a quiz. You feel their tension when you confer with them about their essay. These kids are the perfectionists. I empathize with them because I’m a perfectionist, too. I know what a heavy load it is to bear.


Drenched. This is too much honey, but it looks nice.

Perhaps this sounds hypocritical considering the first half of this post, but for the perfectionists, my message is often: THERE ARE SHORTCUTS. While it’s not a message I’d want to post on the wall of my classroom (the perfectionists are a small minority, after all), it’s a crucial one to convey.

These are children who need to be given permission to give 80% rather than trying their “best,” which is often overkill. They need help scaling their efforts down for smaller assignments with lower point values, and saving their ardor for important endeavors. They sometimes need advice, believe it or not, on how to relax.

One of my college English professors said it best — and I repeat this to my students every year — when he said something to the effect of, “Your cat will still love you if you don’t make an A.” The perfectionists need to know that there’s life beyond working hard for the sake of working hard. This literally didn’t sink in for me until after college, when I tried my hardest at something and for the first time, failed miserably — but that’s a story for another day. For now, I just want to tell you: THERE ARE SHORTCUTS.


I ate this.

Last winter I bought some pumpkins to chop in half, seed, roast, and strip for pumpkin puree. It was lovely to work with the pumpkins, but I did it mostly for the sake of having made the dish completely from scratch. I was in the middle of Project Food Blog and certainly didn’t want to take any unnecessary shortcuts. There’s nothing wrong with that — except that it was another hour in the kitchen, another mess to clean up. Did I really have to do all of that just to be “perfect”? Probably not: America’s Test Kitchen determined with taste tests that people can’t really differentiate between canned and fresh pumpkin in a recipe.

It’s not that there’s no point in ever making things from scratch. Apart from being able to fully control how you nourish your body, you gain confidence by making something beautiful from a collection of raw ingredients. Every now and then, though, when a simple and satisfying dessert is your primary goal, there are shortcuts. In this recipe, for instance, two cans of premade crescent roll dough and some canned pumpkin make a gorgeous autumn treat in 40 minutes flat. Enjoy a restful recipe now and then.

Where do you take shortcuts?

Easy Sopapilla Pumpkin Cheesecake Bars


Recipe by: Willow Bird Baking, using adapted versions of Pillsbury’s Sopapilla Cheesecake Bars and Philadelphia’s No-Bake Pumpkin Cheesecake
Yield: about 15-20 bars

I first saw the recipe for Sopapilla Cheesecake Bars on Cookies and Cups and decided to give them some pumpkin love. In these bars, two layers of premade crescent roll dough sandwich a thick layer of simple pumpkin cheesecake — it couldn’t get easier and quicker! The top bakes into a crisp, buttery cinnamon-sugar “sopapilla.” I served the bars heated up a few seconds (just to remove the chill), sprinkled with toasted pecans, and drizzled with a little honey.

Bar Ingredients:
2 cans crescent rolls
2 (8-ounce) package cream cheese, softened
2 cup canned pumpkin
5/8 cup sugar
2 teaspoon vanilla extract
2 teaspoons ground cinnamon*
1/4 teaspoon ground allspice*
1/2 teaspoon nutmeg*
1/2 teaspoon ginger*
*or substitute 2 teaspoons of pumpkin pie spice for these spices.

Topping Ingredients:
6 tablespoons butter, melted (for topping)
1/2 cup sugar (for topping)
1 teaspoon cinnamon (for topping)

Optional Extras:
honey
toasted pecans (see directions below)

Directions:
Preheat oven to 350 degrees F. Grease a glass 9×13 inch baking dish. Unroll one can of crescent roll dough (all in one piece) and lay it in the dish, pressing it out to cover the bottom and pinching any seams together.

In a large mixing bowl, beat together the cream cheese and sugar until light and fluffy. Add pumpkin, vanilla, cinnamon, ginger, nutmeg, and allspice, and beat to combine. Spread this mixture over the crescent roll dough in your pan. Unroll the other can of crescent roll dough and lay it over top of the pumpkin cheesecake mixture (I actually found it easier to lay it on some plastic wrap secured over a cutting board — this gave me a surface on which to pinch the seams closed and make it into one big rectangular sheet. I then used the plastic wrap to “flip” it carefully over onto the cheesecake mixture).

In a small bowl, whisk together 1/2 cup sugar with 1 teaspoon cinnamon. Pour melted butter over top of crescent roll dough and sprinkle cinnamon and sugar mixture evenly across the surface. Bake for 30 minutes or until golden brown. While the bars bake, you can also toast the pecans on another rack — just spread them out in a single layer on a baking sheet and toast for about 6 minutes or until fragrant, stirring about halfway through the cook time. Transfer nuts to a plate to cool.

Let bars cool completely before covering them and placing them in the refrigerator to chill for at least a couple of hours (I left mine overnight). Cut into squares, heat for just about 20 seconds to take off the chill, and serve with a drizzle of honey and a sprinkle of toasted pecans.

If you liked this post, please:
Subscribe to Willow Bird Baking
Follow Willow Bird Baking on Twitter
Follow Willow Bird Baking on Facebook
Give this post a thumbs up on StumbleUpon


ShareOther ways to share this post with friends!

Strawberry & Cream Cupcakes and Cake Pops

It’s Cupcake Week on Willow Bird Baking! Cupcake Capers was a 5-day summer camp I conducted last week wherein 5 middle school girls learned to bake, fill, and frost cupcakes. We eschewed pedestrian cupcake flavors in favor of creative combinations that I now get to share with you! Every day this week I’ll be posting fun memories and recipes from Cupcake Camp.

On Day 4 of Cupcake Camp, things got a little silly. I’ve talked before about the moment toward the end of the school year when teachers realize they’ve controlled their classes as long as they can, and that the powder keg of summer frenzy is about to blow. Turns out cupcake camp has that moment, too!

On Day 4, everyone went a little crazy in their own personal ways. Energetic Erica played the Carrot Song until I felt sure I was going to throw a cupcake at someone. Elbow Grease Ella decided she was going to decorate her cupcake with polka dots and then wash every bowl by hand (okay, so her particular method of going crazy happened to be awesome).

Meticulous Mary Rood and I convinced everyone to watch the YouTube video of the sneezing baby panda (no seriously, go watch it). And then there were Pistachio Peyton and Elaborate Elizabeth.

They decided to become architects.

Measuring powdered sugar can get messy. Like, whole-cups-of-powdered-sugar-spilled-on-the-counter messy. Instead of cleaning this up like ordinary children, Pistachio Peyton and Elaborate Elizabeth decided to be extraordinary. They carefully constructed a perfect block of powdered sugar that they then manipulated with a table knife into various shapes and messages. Because, you know, that’s what you do at Cupcake Camp, right?


They may have gotten a little territorial.

I finally convinced the girls to clean off the counters despite their insistence that the powdered sugar sculpture should remain as an eternal (ahem) monument to Cupcake Camp. And believe it or not, in between watching crazy YouTube videos and playing with our food, we actually made some cupcakes!

These Strawberry & Cream Cupcakes were the perfect cool, sweet treat for summer. Tender strawberry cakes were filled with easy vanilla mousse and topped with a creamy, delicious strawberry cream cheese frosting. We had leftover cupcakes, too, so can you guess what we did?

We made cake pops! We crumbled the cupcakes up and mixed them with some of the frosting, rolled them into balls, chilled them overnight, and dipped them in pink candy melts.

If you’ve ever made cake pops, you know that dipping them is the hardest part (see my video tutorial at the bottom of the recipe). I loved watching the girls develop their own dipping techniques as they got the hang of it.

Pistachio Peyton dipped her pops and then rolled them in the spoon to get full coverage. Elbow Grease Ella used the spoon to drizzle candy melts over her cake pop. Elaborate Elizabeth was a pro at turning cake pops into cake balls if they fell off of their pretzel sticks (I love using these instead of lollipop sticks) by draining them on a couple of forks.

Despite a few inevitable cake pop missteps, the campers all successfully rolled, dipped, and ate! The cake pops were a tasty addition to our cupcake picnic.

With Day 4 complete, the girls dropped off their aprons and recipe notebooks and headed home. I’m pretty sure that I went home and collapsed into a cupcake coma (or maybe just a long nap). One more day left of cupcake camp!

What’s your favorite funny YouTube video?

Strawberry & Cream Cupcakes


Recipe by: adapted from Annie’s Eats
Yields: 18-24 cupcakes

Cupcake Ingredients:
2 ½ cups cake flour
1 teaspoon baking soda
¼ teaspoon salt
½ cup unsalted butter
1 ½ cups sugar
2 eggs
1/3 cup buttermilk
¼ cup oil
1 teaspoon vanilla extract
2 cups chopped strawberries

Vanilla Mousse Filling Ingredients:
1 cup milk
1 cup heavy cream
1 (4 serving) package vanilla Instant Pudding Mix (not Cook & Serve)

Strawberry Cream Cheese Frosting Ingredients:
½ cup strawberries
1 (8-ounce) package cream cheese, at room temperature
1 ½ sticks unsalted butter, at room temperature
4-5 cups powdered sugar, sifted
½ teaspoon lemon juice
1 tablespoon vanilla
pink sanding sugar, if desired

Directions:
*Note: This recipe makes twice as much mousse as you need for filling the cupcakes. If you want to use half the pudding pack and save the rest for later, just measure it out and do so. Or use the extra mousse for another project (you know, like eating it with a spoon).

Make cupcakes: Line two muffin tins with paper liners. Preheat oven to 350°F. Onto a sheet of parchment or wax paper, sift flour, salt and baking soda. Set aside. In a large bowl, cream butter and sugar until light, fluffy, and pale yellow (several minutes). Add eggs one at a time, mixing after each. Scrape down the sides of the bowl as needed. Mix in buttermilk, oil and vanilla. Pick up both ends of the parchment/wax paper and use it to add dry ingredients into the bowl and stir until just combined. Fold in the chopped strawberries (you could toss these with a few tablespoons of the dry ingredients first, if you were worried about them sinking to the bottom).

Fill each liner about 3/4 full of batter and bake for 15-20 minutes, or until a toothpick inserted into the center of several cupcakes comes out with just moist crumbs. Let cool completely.

Make mousse: To make the vanilla mousse, combine milk, cream, and pudding mix in a medium bowl. Beat with a mixer until you reach soft peaks, or a thick whipped cream consistency (this takes a few minutes). Refrigerate mousse until you’re ready to use it.

Make frosting: To make the frosting, puree the strawberries in food processor and then strain them through a fine mesh sieve to remove the seeds. In a separate bowl, beat the cream cheese and butter until fluffy and smooth before adding the lemon juice, vanilla, and sugar (start on the low side with the sugar and add more until the frosting reaches your desired consistency). Add the amount of puree needed to achieve your desired consistency and color (I do this before I’ve added all the sugar, so I can adjust both as needed). This is a loose frosting and benefits from sitting in the fridge for awhile after you make it with a damp cloth covering it.

Assemble cupcakes: To fill the cupcakes, use the Cone Method: cut an upside-down cone out of the top of each one. Cut off the tip of the cone (and eat it, if you wish) leaving just the “lid.” Fill the cavity with mousse using a piping bag or zip-top bag with the corner cut off, and then replace the “lid” to give you a relatively smooth surface to frost. Use a piping bag or zip-top bag to pipe on the frosting. Dust with pink sanding sugar if you wish.

Strawberry & Cream Cake Pops


Recipe by: adapted from Annie’s Eats
Yields: probably around 40-50 cake pops

Cupcake Ingredients:
2 ½ cups cake flour
1 teaspoon baking soda
¼ teaspoon salt
½ cup unsalted butter
1 ½ cups sugar
2 eggs
1/3 cup buttermilk
¼ cup oil
1 teaspoon vanilla extract
2 cups chopped strawberries

Strawberry Cream Cheese Frosting Ingredients:
1/4 cup strawberries
4 ounces cream cheese, at room temperature
6 tablespoons unsalted butter, at room temperature
2-2 1/2 cups powdered sugar, sifted
1/4 teaspoon lemon juice
1 1/2 teaspoons vanilla

Other Cake Pop Ingredients:
pretzel sticks
pink candy melts or candy bark
sprinkles or pink sanding sugar, if desired

Directions:
*NOTE: We made our cake pops with leftover cupcakes, so I’m printing instructions for making them with cupcakes here. I’m not sure how this recipe would work if you tried baking this as a cake to save liners, so I don’t want to recommend that, but let me know if you try it.

Make cupcakes: Line two muffin tins with paper liners. Preheat oven to 350°F. Onto a sheet of parchment or wax paper, sift flour, salt and baking soda. Set aside. In a large bowl, cream butter and sugar until light, fluffy, and pale yellow (several minutes). Add eggs one at a time, mixing after each. Scrape down the sides of the bowl as needed. Mix in buttermilk, oil and vanilla. Pick up both ends of the parchment/wax paper and use it to add dry ingredients into the bowl and stir until just combined. Fold in the chopped strawberries (you could toss these with a few tablespoons of the dry ingredients first, if you were worried about them sinking to the bottom).

Fill each liner about 3/4 full of batter and bake for 15-20 minutes, or until a toothpick inserted into the center of several cupcakes comes out with just moist crumbs. Let cool completely, and then crumble your cupcakes into a large bowl. Set aside.

Make frosting: To make the frosting, puree the strawberries in food processor and then strain them through a fine mesh sieve to remove the seeds. In a separate bowl, beat the cream cheese and butter until fluffy and smooth before adding the lemon juice, vanilla, and sugar (start on the low side with the sugar and add more until the frosting reaches your desired consistency). Add the amount of puree needed to achieve your desired consistency and color (I do this before I’ve added all the sugar, so I can adjust both as needed).

Make cake balls: Mix about 3/4 cup of frosting into your crumbled cake, adding more frosting if the mixture is still too crumbly. You want it to reach a sort of stiff play-dough texture so you can shape it into balls. Prepare a sheet pan with a sheet of wax paper on it. Shape your banana mixture into balls and line them on the wax paper. Chill these in the refrigerator overnight. I don’t freeze mine like some sites suggest, because I find chilling them in the fridge instead reduces cracking after I dip them.

Mount and dip cake balls: After cake balls have chilled overnight, melt your candy melts or chocolate bark according to the package directions. I keep my bowl of candy melts situated in a bigger bowl of hot water to keep them warm and fluid, but be careful no water gets into the melts! To mount each cake ball, take a pretzel stick and dip the end in candy melts. Gently but firmly push the end of the pretzel stick into the cake ball. Put these back on their silicone mat or wax paper to chill. Repeat until all cake balls are mounted and chill for about 30 minutes.

After chilling, you’re ready to dip! Dip each cake ball into the candy melts, using a spoon to help coat them. After dipping, hold your cake ball over the bowl and gently bounce to drain the excess off. Turn the pop as you drain. When well-drained, sprinkle some sprinkles on top and gently place the pop in a foam block to continue drying. I placed mine in the fridge to reduce drying time. Once they’re dry, you’re ready to eat them! These keep great in an airtight container in the fridge.

Never made cake pops before? I made this video tutorial to show you some techniques involved.

All Cupcake Week Recipes:
Day One: Chocolate Pistachio Cream Cupcakes
Day Two: Banana Split Cupcakes and Cake Pops
Day Three: Creamsicle Cupcakes
Day Four: Strawberry & Cream Cupcakes and Cake Pops
Day Five: Apple Cinnamon Cream Cupcakes

If you liked this post, please:
Subscribe to Willow Bird Baking
Follow Willow Bird Baking on Twitter
Follow Willow Bird Baking on Facebook
Give this post a thumbs up on StumbleUpon


ShareOther ways to share this post with friends!

Foodbuzz 24×24: School’s IN for Summer!

My students and I wait all year to hear the words, “School’s out for summer!” but this year is a little different for me, because I was chosen to host a June Foodbuzz 24×24 party. The Foodbuzz 24×24 “highlights unique meals occurring around the globe during a 24-hour period.”

For my unique meal, I wanted to create a whimsical, nostalgic picnic celebrating my memories of elementary school. The best part was the guest list: a handful of ladies I went to elementary school with and hadn’t seen since! School’s IN for Summer!

It was the early 90s. I was in elementary school, jamming out to Ace of Base on my walkman, collecting everything that had anything to do with cats, and rocking one-shoulder-unhooked overalls. I’m not even going to bother apologizing for those, because I know you were wearing them, too. And probably poofy bangs. So shut up.


Don’t, like, do your hair for picture day or anything, Julie.

My entrepreneurial spirit was strong even back then — over the years I created a stuffed animal school, a stuffed animal savings bank, and a lotion company (wherein I mixed several of my mother’s lotions together and sold the result with a handmade label. Sorry, mom.)

I was also already a writer (albeit of questionable quality). I started writing a collection of stories on my toy typewriter called Julie and the Strawberry Point Patrol that I was sure would eventually be a profitable series of detective novels. I also, in all seriousness, sent off a handwritten/drawn book manuscript to Harper Collins. I was That Kid. If only I’d had some thick coke-bottle glasses.

Those were definitely days worth remembering, but more importantly, there are so many people worth remembering. That’s why this past weekend, I threw an elementary school mini-reunion picnic and invited three lovely ladies I hadn’t seen in years. I wish all of Lebanon Road Elementary School class of 1996 could’ve been there, too, because it was so much fun.

I set the picnic table in bright primary colors with sunflowers, foam ABCs, striped party straws, and gigantic candy jars full of nostalgic treats: Ring Pops, Pixie Stix, Dubble Bubble gumballs, Pez dispensers, Nik-L-Nips, and Tootsie Pops. A homemade party banner and some balloons stretched over our picnic table. Everyone brought childhood photos, elementary school yearbooks, mementos, and tons of fun memories to share.

The Cast of Characters:

Amber was a pint-sized dynamo in elementary school. She was tiny, but she took gymnastics and could do all sorts of amazing things. I remember thinking Amber was the sweetest friend in 4th grade, when we were both in Ms. Oatman’s class together.


Amber, then and now.

Now, Amber is married to her high school sweetheart, Patrick. She’s a nurse and lives in Charlotte with her zoo: 4 dogs and 2 cats!


Amber in elementary school.

Oh, yeah, and she’s still a dedicated athlete. Amber’s now a powerlifter, and, um, she could totally kick your butt:


Photo by Jeff “Boomer” Alred

Alisha was my BFF from second grade until distance finally got the best of us: she moved away in the middle of fifth grade. We lived down the street from each other, so almost every day would find me scuttling off to her house to play with her and her sister, Lauren. Her mom, Loretta, is also so important to me — she drove me to church youth events with Alisha when I was little, in addition to driving us home from school, driving us to get ice cream, driving us to the moon and back. You get the idea.


Alisha lovvvved Bradley Hood — well, most of the time.

Alisha and I were the perfect pair of friends: she was the cute, social one and I was the strategic, nerdy one. When our powers combined, we could tackle anything. I still remember the day 6 or 7 years ago when she called me and told me she was going to be a mommy! Here was the girl I’d played in the creek with at 7 years old, and she was going to have a baby of her own. Now Alisha and her daughter Olivia live in Mt. Pleasant, where Alisha works at an eye doctor’s office.


Alisha and Olivia

Ashley was so sweet in elementary school (and still is)! She lived down the street from my friend Tamara, and in fifth and sixth grade I’d go over to their neighborhood and we’d all hang out. She jokes that she had horrible hair in elementary school, but I always thought her hair was adorable.


Ashley, then and now.

Today, Ashley works in sales at a software company and is married to — get this — a guy we went to elementary school with! His name is Scott, and he was my buddy in second grade, before he moved to another school. Though he and Ashley are both from North Carolina, they actually reunited in Georgia after college. Now that they’re married, they live with their dog and their pet pig, Clyde.


Ashley and her future husband, Scott, in elementary school.

The Menu: School Lunch Redux

I set a nice table and invited a fun bunch, but a picnic’s not a picnic without the food! To make the menu match the theme, I took foods you might remember from your cafeteria tray or lunchbox and updated them for adult tastes. Thanks to my coworker Anne for this fun idea!

Here’s the lineup:

Cardboard-like, square lunchroom pizza became a homemade Fig and Prosciutto Pizza topped with fresh arugula and shaved Parmesan. Instead of a classic peanut butter and jelly sandwich, I made a bright Italian Pressed Sandwich. Baggies of grapes and potato chips morphed into Pickled Grapes with Goat Cheese and Savory Sour Cream and Fig Cookie Spirals, slathered with whipped cream cheese and fig jam. Fruit Roll-Ups and Hostess Cupcakes became homemade Straw-Raspberry Basil Fruit Leather and Fauxstess Cupcakes. We drank lemonade and root beer with our updated lunchroom fare.

During the picnic, we shared scores of memories. We talked about Terilyn Cunningham, our sweet friend who died from an asthma attack after elementary school. I remember her having an attack one day in gym class and the teacher asking me to walk with her to the classroom to get her inhaler. On the way, she explained what it felt like to be unable to breathe. In just a year or two, she was gone.

On happier notes, we laughed at our sixth grade newsletter, The Leopard’s Roar, written on an early 90s Word Processor with a big block font. Alisha recalled the field trip when I called out to Bobby Joe (and his dad, who was chaperoning) that she liked him. Oops. We remembered teachers and administrators — Mrs. Shaughnessy! Ms. Oatman! Mr. Meserve! Mrs. Foster! Mrs. Hildreth! Ms. Horne! Mrs. Borders! Mrs. Taylor! — as well as friends who’ve been flung far and wide over time.

The Inevitable Near-Disaster

Right smack in the middle of our meal, though, this happened:

Picnics and parties never seem to go off without a hitch, and this one was no exception. Though I’d made a point to check that the picnic area we were using hadn’t been reserved, turns out it had been! After all the work setting everything up, we had to quickly shuffle everything back into my car and relocate to another picnic table to finish up.

The girls didn’t miss a step before pitching in, and a helpful park employee assisted. In no time at all, we were laughing about the mess, eating, and picking up our conversation where we left off. The new picnic table might not have been decked out quite as nicely, but it was in the shade and turned out to be the perfect place to continue the festivities. All’s well that ends well, right?

And things did end well! The huge candy jars I filled for table centerpieces doubled as party favors. At the end of the picnic, each of us grabbed a treat box to fill full of candy. It might have been easier to sort through the candy when it was sitting on a pretty picnic table, but at this point, we weren’t above scrounging through the jars in the parking lot. Not even a little bit.

I had so much fun with these interesting, successful, strong, lovely ladies, and I can’t wait to see them again soon! Despite a few obstacles, the elementary school throwback was a fantastic blast from the past, and worth every ounce of this:


Tons of picnic planning.


Over the coming weeks, the following recipes and crafts will appear on Willow Bird Baking. I hope you enjoy these updated cafeteria classics as much as we did!

School’s IN for Summer:
Recipes and Crafts

  1. Homemade Red Berry Basil Fruit Leather
  2. Pickled Grapes with Goat Cheese
  3. Savory Sour Cream Fig Spiral Cookies
  4. Fig and Prosciutto Pizza
  5. Italian Pressed Sandwiches
  6. Fauxstess Cupcakes
  7. Easy Homemade Party Banner

P.S. A special thanks to Taylor Mathis for bringing his pretty blue tablecloth and gigantic diffuser to help me out!

What’s your favorite elementary school memory?

If you liked this post, please:
Subscribe to Willow Bird Baking
Follow Willow Bird Baking on Twitter
Follow Willow Bird Baking on Facebook
Give this post a thumbs up on StumbleUpon
Buzz this post up on Foodbuzz’s 24×24 site!


ShareOther ways to share this post with friends!

1 10 11 12 13 14 20