cheese

Winter Breakfast Chili Over Eggs in Sourdough Bowls


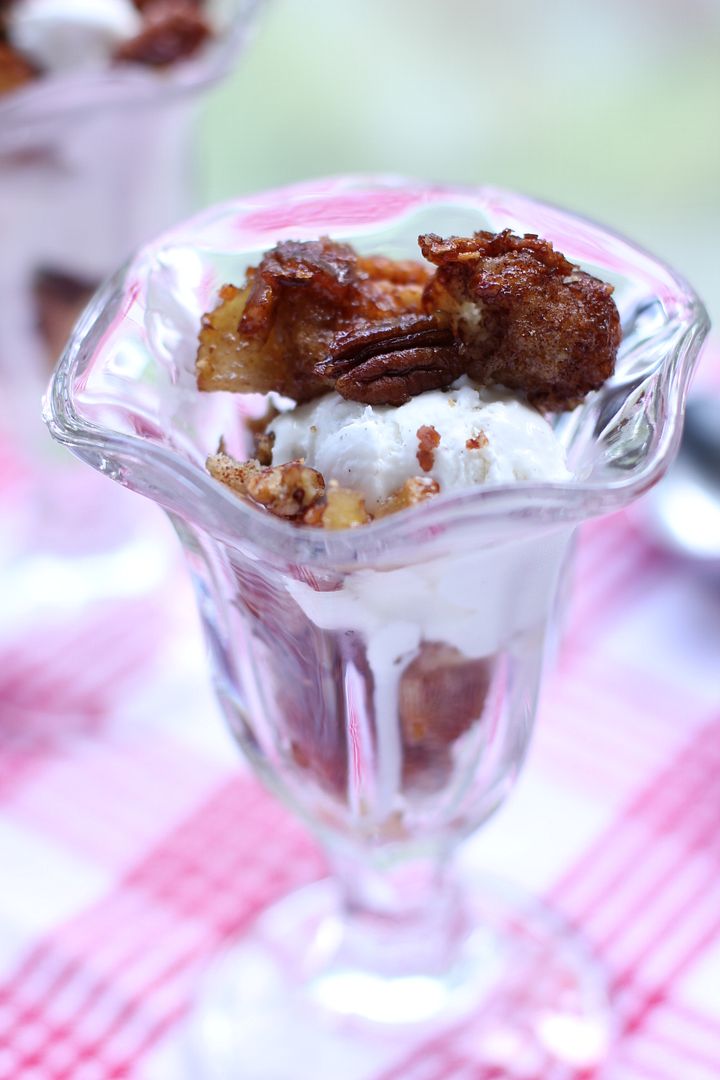
winter breakfast chili: spicy chili served over fluffy scrambled eggs in sourdough bowls

My 6th graders’ faces lit up deviously. It was a cold, gray morning hardly worthy of delight, but they seemed delighted nonetheless.

I was standing at the front of the room sipping the day’s second diet Sunkist while I issued instructions for the assignment they were about to begin. They double-checked: “So we don’t put our name on it anywhere? Can we disguise our handwriting? Can we give you a letter grade?”

The assignment was something I affectionately call Ms. Ruble’s Progress Report.

It was only fair, I had explained to them, for students to give me a grade since I got to give them one. And since I wanted them to feel comfortable honestly evaluating my performance, they could complete the entire progress report anonymously.

The ardor with which they began furiously scribbling comments — some writing in careful cursive or big block caps to hide their identity — made me a tad bit nervous. One after another finished with a flourish and shuffled their paper into the growing stack at the front of the room.

You may think I’m a little nuts. And every trimester when I give a gaggle of 12- and 13-year-olds the power to anonymously evaluate me, I kind of wonder if I’m a little nuts as well. But even though I may get one or two angsty comments, I learn something about how my students are feeling from every insight they offer. And beyond that, every single time I’ve completed this exercise with them, I’ve been overwhelmed not by how snarky they are, but by how kind.

For instance, from my most recent evaluations:

“I like your singing and your happiness.”

“I like having individual chats about my essays or projects.”

“I know you care about me because you always take the time to make class fun and equal for every student.”

“I really liked making haiku and working outside.”

“Ms. Ruble only gets mad when necessary.” (Ha!)

“I like how organized everything is and how we read a lot.” (Lots of them asked for even more reading time!)

“I love the creative projects we do because they really entertain me.”

“Ms. Ruble is always helping me with things I don’t understand.”

“You can tell she has put thought into each lesson and really wants you to enjoy it.”

“I really enjoyed making the paper cranes and doing the anime project. I have learned a lot so far this year about China and Japan.”

“I like that language arts challenges you, makes you want to put forth all of your potential and effort. Awesome teacher.”

“Ms. Ruble is fair because she gives proper instruction for everything we do and constantly includes our opinions about activities.”

“I like that Ms. Ruble is funny and that makes the class fun. I also like that she adds her own touch to the lesson.”

“Class is strict to keep it running smoothly and that’s what I like the most.”

“There is never a day that is boring from just note taking off the board.”

“I know that Ms. Ruble cares about me because she gives us lots of tips and is always trying to make us better at everything.”

“I think Ms. Ruble sees so much potential in every one of us. She thinks we all can succeed.”

. . . Wow, right? I’m getting a little teary compiling these just like I did while reading them.

Honestly, these comments say a lot more about my students than they say about me. I’m no different from any other teacher who works hard and tries to give her class a valuable experience. But my students, given complete freedom, anonymity, and voice — a soapbox to gripe about homework! to call me a witch! to rip apart my policies! to complain about having to write essays! — are the ones who chose words full of kindness.

If you’re surprised that when given the opportunity to say anything, these tweens chose to be sweet, I understand. We hear about the cyberbullying and the “mean girls,” very real issues, but we don’t often hear about kids’ kind hearts. The day after I read these evaluations, I stood in front of class and tried not to get choked up as I thanked them for their suggestions, critiques, and most of all, for their thoughtfulness.

Sometimes folks are skeptical about this claim, but I’ll say it again: middle schoolers are great little people.

. . .


Speaking of things that have warmed my soul lately, this Winter Breakfast Chili was another pleasant surprise. I’d never toasted and ground chiles to make my own chile paste before, but believe me, I’ll never go back. First, it was easy — I found cheap, big bags of the dried chiles I needed right in my local grocery store (in the small Hispanic foods section). Second, this chili is flippin’ awesome — it’s the best I’ve ever tasted hands down.

You may be curious about the concept of a breakfast chili. The idea was borne from my desire to create a winter breakfast that was warm and filling, full of protein and just a bit of heat. This chili includes bacon and chorizo and is served over fluffy scrambled eggs in sourdough bread bowls from my local bakery. It turned out to be a phenomenal breakfast reminiscent of spicy, comforting huevos rancheros. And since the chili can be prepared in advance and refrigerated, it’s also the perfect special breakfast for a busy holiday morning.

What’s warmed your soul lately?

Winter Breakfast Chili Over Eggs in Sourdough Bowls


Recipe by: Recipe adapted from Cooks’ Illustrated, as found on Brown Eyed Baker
Yield: 4 servings

The layers of flavor in this chili come from the toasted dried chiles used to make the chile paste, the savory chorizo and bacon, and the addition of some yeasty beer. It’s a rich, deep, slightly spicy dish that shines on a breakfast or dinner table. For breakfast, serve it over fluffy scrambled eggs in a sourdough bowl with broiled cheese on top. Since the chili can be prepared in advance, it makes the perfect dish for a busy holiday morning.

Chili Paste Ingredients:
3 dried ancho chiles (about 7/8 ounces), stems and seeds removed, and flesh torn into 1-inch pieces
1-2 dried árbol chiles, stems removed, pods split, seeds removed
1 tablespoon plus 1 1/2 teaspoons cornmeal
1 teaspoon dried oregano
1 teaspoon ground cumin
1 teaspoos cocoa powder
1 1/4 cups chicken broth, divided

Chili Ingredients:
1/4 pound dried pinto beans (about 1/2 cup), rinsed and picked over
Table salt
1 medium onions, cut into ¾-inch pieces (about 1 cup)
1 1/2 jalapeño peppers, stems and seeds removed, cut into ½-inch pieces
1 tablespoon plus 1 1/2 teaspoons vegetable oil, divided
2 garlic cloves, minced
1/2 (14.5-ounce) can diced tomatoes
1 teaspoon light molasses
3 ounces chorizo, with casings removed
a few strips of bacon
1/2 (12-ounce) bottle milk lager (I don’t know anything about beer, so I just used Red Stripe and it came out perfectly)*
4 eggs for scrambling
1 tablespoon butter
4 sourdough boules (about 4 inches in diameter)
1 cup sharp cheddar cheese, shredded
sour cream and cilantro for serving
*If you don’t cook drink alcohol (I don’t, either), you should know that according to this chart, only about 5-10% of alcohol will remain in the entire dish by the time you’re done. The beer is very important to the flavor and I don’t recommend skipping it.

Directions:
Note on scheduling: This chili can be fully prepared in advance and stored in the fridge for a few days. You can hollow out fresh bread boules the day before serving and wrap them tightly to keep them soft. When ready to eat, reheat the chili in the microwave for a few minutes, stirring periodically. Scramble your eggs, assemble the dish, broil the cheese on top, and serve.

Other notes: Make sure to wear gloves when working with chiles and avoid touching your eyeballs (or other people’s eyeballs. But why would you be doing that? Weirdo.) You can substitute 1/4 cup chili powder and 1/8 to 1/4 teaspoon cayenne pepper if you don’t want to use the dried chiles, but I highly, highly recommend you give it a try. It’s so easy, and very gratifying.


Soak the beans: In a large stock pot or Dutch oven, bring 8 cups of water, beans, and 1 1/2 teaspoons salt to a boil over high heat. Once boiling, remove the pot from the heat and cover it. Let it stand for 1 hour before draining and rinsing the beans and rinsing out the pot.

Prepare chile paste: Preheat the oven to 300 degrees F. Toast ancho chiles in a skillet over medium-high heat, stirring frequently, until they’re fragrant (4 to 6 minutes). Reduce the heat if they start to smoke. Place the chiles into the bowl of a food processor and let them cool. Leave the skillet unwashed for future use.

Add the árbol chiles, cornmeal, oregano, cumin, cocoa, and 1/4 teaspoon salt to the food processor with the ancho chiles and pulverize for about 2 minutes, or until finely ground. Then, with the food processor still running, slowly add 1/4 cup of chicken broth until a smooth paste forms (about 45 seconds). Use a spatula to scrape the sides of the bowl as needed. Transfer the paste to a bowl and set aside.

Make the chili: Put the onions in the food processor and pulse them until they’re chopped (about 4 pulses). Add the jalapeños and pulse until the mixture reaches the consistency of a chunky salsa, about 4 more pulses, scraping the bowl if needed.

In your stock pot or Dutch oven, heat 1 1/2 teaspoons of vegetable oil over medium-high heat. Add the onion mixture and cook, stirring occasionally, until the veggies are softened and the moisture has cooked off, about 7 to 9 minutes. Then add the garlic and saute until it’s fragrant, just about 1 minute. Add the chili paste, tomatoes, and molasses and stir to combine thoroughly. Add the remaining 1 cup of chicken broth and the drained beans and bring the whole mixture to a boil before reducing the heat to simmer.

Meanwhile, cook the bacon over medium-high heat in your skillet to your desired crispiness. Remove it to drain on a paper towel lined plate. In the same skillet, cook the chorizo until browned through (add 1 1/2 teaspoons of vegetable oil if needed to supplement the bacon grease). Use a slotted spoon to transfer the chorizo to the Dutch oven. Discard any liquid in the skillet (but don’t rub off the stuck-on bits!) and return to the heat. Add 1/2 of the bottle of lager to the skillet, scraping the bottom of the pan with a wooden spoon to loosen any browned bits, and bring it to a simmer. Pour the lager into the Dutch oven. Stir to combine and return the mixture to a simmer.

Cover the pot and transfer it to the oven. Cook until the meat and beans are fully tender, 1½ to 2 hours (I kept test-tasting the beans, since they took the longest — mine actually took longer than 2 hours). While the chili cooks, hollow out 4 sourdough bread boules for serving. If you’re not serving the chili today, wrap these tightly to preserve their freshness for the next day. Otherwise, set them aside.

When the chili is finished, let it stand, uncovered, for about 10 minutes. Stir the chili well and season to taste with salt. (Afterwards, you can store it in a tupperware in the refrigerator if you’re not eating it right away.)

Assemble the dish: When you’re ready to serve your chili, heat 1 tablespoon butter in a skillet over medium heat. Scramble 4 eggs and distribute them evenly between the bread boules. Ladle chili over the eggs in each boule. Top with shredded cheddar and place on a baking sheet covered in foil. Broil on high for a couple of minutes, watching closely, until cheese is melted and bubbly. Serve immediately with cilantro, avocado, chopped onions, and sour cream.

If you liked this post, please:
Subscribe to Willow Bird Baking
Follow Willow Bird Baking on Twitter
Follow Willow Bird Baking on Facebook
Give this post a thumbs up on StumbleUpon
Pin It


Shareother ways to share this post with friends

The “Just Trust Me” Fried Bologna Breakfast Doughnutwich

When Mike and I went to the North Carolina State Fair last year, I had two goals: pet as many dirty, adorable barnyard animals as possible, and eat as much ridiculous, unhealthy food as possible. High on my list was the Krispy Kreme burger, an admittedly gimmicky new sandwich being marketed (and mocked) across the country. The burger was just like any other burger, except that it was served on two Krispy Kreme doughnuts in the place of a bun. I was sure I was going to absolutely love every bite.


YES.

My first goal was readily accomplished. Mike and I stumbled around until we spotted the closest pettable livestock, whereupon we bought a bag of carrots and subjected our fingers to great peril. We fed goats, sheep, llamas, and even a camel or two. Is it weird that I think there may have been a buffalo in there? I might’ve made that part up.

Anyway, the animals pranced around, joyously accepting our scritches until we ran out of carrots. During this fiasco, I may or may not have illicitly scaled a fence to feed a goat that had been head-butted out of the way by his siblings. Put it this way: I didn’t get caught. Or head-butted.

My second goal turned out to be more complicated. We nibbled around the fair — corn dogs, cheesesteaks — until we finally found the vendor selling the notorious Krispy Kreme Burger. We slipped in line and waited our turn for greatness. When I got up to the booth, the cashier asked me what I’d like on the burger. That was the first sign of trouble.

I hate being asked what I want on my sandwich. Before you decide I’m one of those insufferably picky diners (okay, you might decide that anyway), let me explain. I go to a restaurant to taste a dish someone else has conceived of and prepared. I want the creator of a sandwich to decide what ingredients should be on it to create the right overall flavor. I don’t know what to put on my sandwich to make it taste like the dish they envisioned! And if I wanted to taste my own vision — to create my own sandwich — by golly, I wouldn’t have bothered coming to a restaurant to do it! (Side note: This is why I never go to Subway anymore.) (Side note #2: I think italics make people sound snootier. Don’t you agree?)

So when the cashier asked me to construct my own version of the Krispy Kreme Burger, I was understandably nervous. Would it taste okay with lettuce and tomato? Would mayonnaise be appropriate on it? Mustard? How about cheese? I was stumped and a little miffed, but I ordered the burger with lettuce, tomato, and mayonnaise. Mike and I fought the crowds and found a seat by a kiddie ride to enjoy our culinary adventure.

Mike lasted two bites before he handed me the sandwich. I thought he was just giving me a turn, but it turns out he was down for the count. “I don’t like it,” he declared, wiping doughnut glaze off his fingers with an air of finality.

Really? After hours of waiting and pushing through sweaty throngs of people, you give the sandwich two bites’ worth of a chance? I wasn’t going to be discouraged so easily. I grabbed that sandwich, took a giant bite, and–

It was okay.

The pulsing carnival music from the ride in front of us suddenly seemed a little louder, a little more grating. After hours of waiting and pushing through sweaty throngs of people, the Krispy Kreme Burger was just OKAY?!

I debated in my head: would it have been better without the lettuce and tomato? Was it the mayo that made it so-so? I polished the sandwich off pensively, still disappointed with its mediocrity. Mike and I headed off defeated, in search of better treats (don’t worry, some deep-fried cheesecake later cheered us up).

The other day, though, I had a stroke of inspiration. I was planning on creating a fancy breakfast for Mike and I’d been craving a delicious Southern staple: fried bologna biscuits. Before you start in about how you don’t like bologna: I don’t like bologna either. But fried bologna is an entirely different experience (particularly with little cheese, some yellow mustard, and for breakfast, a fried egg). I knew I didn’t have time to squeeze biscuit making into my schedule, though.

Like a flash of brilliance straight from the heavens, I realized that these flavors — fried bologna with cheese and a gooey fried egg — were the exact sort of flavors that would’ve rocked that Krispy Kreme bun. Instead of the muddy, inexact flavor profile of the State Fair burger, this sandwich would have a bold salty and sweet combination in addition to the gooey, mild saucing of the egg. Far from a gimmicky novelty item you might dare your friends to eat, this sandwich was gonna be delicious.

And it was. In fact, unlike its burger cousin, it was more delicious in real life than it was in my imagination. I’d wait in line behind a thousand other sweaty fair-goers for this baby. Thankfully, though, I don’t have to. It takes about 5 ingredients and maybe 15 minutes to make your own in the comfort of your kitchen.

So listen, JUST TRUST ME! I know it sounds a little weird. I know it packs a caloric-punch. But I promise it’s an incredible breakfast treat. Pick a special weekend, scope out the “Hot Doughnuts Now” sign at your local Krispy Kreme, and try it for yourself.

What’s your favorite weird indulgence?

The “Just Trust Me” Fried Bologna Breakfast Doughnutwich


Recipe by: Willow Bird Baking
Yields: 2 doughnutwiches

This breakfast “doughnutwich” has the absolute perfect balance of salty and sweet. Pillow-light Krispy Kreme glazed doughnuts act as a bun for savory fried bologna, a slice of cheese, and a gooey fried egg. Make this your new special occasion breakfast. It’s a little out of the ordinary, but so incredible!

Ingredients:
2 eggs
4 Krispy Kreme original glazed doughnuts*
2 tablespoons butter
2 slices bologna
2 slices American cheese

Directions:
Lay 2 doughnuts out on a plate. Cut a slit from the middle of each slice of bologna to the edge (so it won’t curl). Heat a skillet over medium-high heat and melt 1 tablespoon of butter in it. Place the slices of bologna in the frying pan. Laugh at how they start to look like little PacMen. Fry them until they’re browning on one side and then flip them. Add a slice of cheese to the top of each piece of bologna and continue frying until bottom is browned. Place the slices briefly onto a paper towel-lined plate to drain off the excess butter, and then place them onto the 2 waiting doughnuts.

Melt the last tablespoon of butter in your skillet. Break one egg at a time into the pan and fry it to your desired doneness (I’d like to make a pitch for over-easy or -medium, since the gooey yolk is delicious in this sandwich!) Place the fried egg briefly on the paper-towel lined plate to drain off the excess butter, and then place one on top of each slice of bologna and cheese. Top each doughnutwich with another doughnut as the “top bun” and serve immediately.

*Note: Feel squeamish about eating 2 doughnuts in one sitting? Carefully split one in half with a serrated knife to use as your bun. I don’t have this issue myself…!

Edited to add: Oh by the way, someone just asked in the comments if Mike liked it. Of course you’d want to know if it was Mike-approved. I’m happy to report that he loved every bite!

Edited to also add: I didn’t receive any compensation or product from Krispy Kreme — I just love ’em.

Foodbuzz 24×24: Cheap and Simple Taco Pockets

i sat watching a flower as it was withering;
i was embarrassed by its honesty.

-bright eyes

This is not a diary. I can’t smudge ugly, unfiltered thoughts into this blog and tuck it deep under a virtual mattress. This is a place for tidy stories that have fully played out in my life — or at least enough to have lost the raw, unfinished edge of uncertainty.

Otherwise, things just get sloppy.

But I’m going to get a little sloppy here for a bit: this has been the hardest year of my life.

I feel embarrassed saying that, because I know some of you are dealing with things that are so much harder, things that make my year look like a fairy tale. There are people right now losing their homes and carefully rationing their cash to afford the week’s groceries. So I hope you’ll forgive me my lesser struggle — that we can have the grace of being in different places and loving each other where we are.

For me, this year has been a mountain to climb — the air is thinning, and I’m not sure I ever wanted to reach the top in the first place.

Last November, as you may remember, I broke up with Mike, my boyfriend of almost 12 years. It took me two months to get up the gumption to write to you about it, but the struggle wasn’t over.

Month after month went by and I found I couldn’t get used to my new world, which had turned inside out and taken on a pallor. Daily life felt like stumbling through a thick wall of cotton. My grief became a dressing room in which I tried on all different Julies, searching for who I was without Mike. Everything I put on was too tight, too abrasive, too loose, too heavy.

Recently, though, a couple of you noticed and commented that I’ve been mentioning Mike here and there. It’s true — we’re slowly, carefully spending time together again. Feeling out the next steps. There’s just not time to waste when you love someone, and it feels like we’ve already wasted so much.

So there it is. This isn’t exactly a great time to tell you what’s up. This is not a diary, like I said, and I’m hesitant to share such a new, uncertain development. But first off, I know I’m among friends. Second off, Foodbuzz issued a 24×24 challenge this month that I knew I wanted to dedicate to Mike.

The 24×24 is usually an opportunity to showcase 24 fun dinner party ideas, but this month, Foodbuzz challenged us to create a meal using only pantry staples. Scraping together something passable from the pantry wouldn’t have been too hard; people do it every day for their families. But as I thought about what I usually have available — some ground meat, cheese, salsa, baking supplies — I realized I wanted to create something truly special.

One of Mike’s favorite dishes during our time together was a silly convenience meal. These Taco-Stuffed Crescent Rolls are delicious, but also based on a can of crescent rolls, for goodness’ sake. Nevertheless, I made them for him throughout our relationship as a quick way of saying, “I love you (and I want some carbs.)”

For the Foodbuzz 24×24, I invited Mike over and recreated this meal — this time with a homemade yeast dough. I wanted to turn my quick I love you into an earnest I love you. The things I took for granted, I can’t take for granted anymore, and I think he feels the same. What we’re working on between us is worth more than a can of crescent rolls. It’s worth adding flour bit by bit. It’s worth waiting the hour for the dough to breathe and rise. It’s worth the messy counter, the sticky shaping, the extra step of egg washing. I would slice avocados for years. I would clean my dough hook a million times over.

The beauty of this meal is that it’s homemade from scratch, but still simple and convenient. The recipe made plenty of dough for taco pockets with enough leftover to dress up as Apple Cinnamon Monkey Bread Sundaes (I’ll share how I did this in an upcoming post). Also, since you can prepare both dishes a day in advance, you have enough time to floof your hair and vacuum the apartment the day your long-lost boyfriend is coming over. Nice.

Oh, by the way, your fear of yeast called and told me to tell you it’s not working out. You’re just going to have to get over him. I’m stocking you up with simple yeast dough recipes so you’ll have a good place to start.

Speaking of good places to start, for me and Mike, this is as good a place as any. I don’t know how things will go, but no one ever does. I’m just going to hitch up my skirts and petticoats and keep on climbing.

I told you my secrets, now tell me yours. What new developments are coming your way these days?


Me and Mike via photobooth, a couple of years ago.

Cheap and Simple Taco Pockets


Recipe by: Willow Bird Baking (yeast dough recipe from Our Best Bites)
Yield: about 26 3-inch long crescent pockets, or 5-6 servings (or you can use half for pockets and half for making monkey bread!)

These Taco Pockets are pillowy yeast rolls filled with a creamy, cheesy, spicy Tex-Mex filling. I like to serve them with an array of accoutrements — sour cream, guacamole, salsa, and fresh cilantro. As a time-saver, you can wrap this cheesy filling in premade crescent rolls and bake per the package instructions, but don’t do it just because you’re afraid of yeast! This is a simple yeast dough that’ll help you conquer your fears. If you’d like, make taco pockets with half the dough and use the rest to make simple Monkey Bread Sundaes for dessert — two dishes for the price of one!

Dough Ingredients:
1 1/2 cups warm water (105-115 degrees – use a candy thermometer to check)
1 tablespoon sugar
1 tablespoon yeast
1/2 teaspoons salt
3-4 1/2 cups flour
1 egg and a splash of water (for egg wash)

Filling Ingredients:
1 pound ground beef
1 packet McCormick’s cheesy taco seasoning (or taco seasoning of your choice)
6 ounces cream cheese, softened
2-3 heaping tablespoons salsa
1/4 cup shredded cheddar cheese
sprinkle of cheddar cheese for the top of pockets

Directions:
Notes on making this in advance: There are two points at which you can stop this recipe and refrigerate it overnight. The first is just before the first proof. Instead of letting the dough proof, cover the bowl with plastic wrap and then a clean, damp cloth. Place it in the refrigerator for 1-5 days, keeping the cloth damp. When ready to roll, let it sit out until it comes to room temperature and doubles (about 2 hours). Another point at which you can leave the recipe overnight is after the pockets are filled and shaped. Instead of allowing them to rise another 30 minutes, cover them and refrigerate them overnight. In the morning, allow them to come to room temperature and rise (about 2 hours) before egg washing and baking.

Make dough: Mix the warm water, sugar, and yeast in a large bowl (such as in the bowl of your stand mixer, if you have one) and let it sit for 5-10 minutes until it foams. Add the salt and 1.5 cups of flour and mix. While kneading on a low speed, gradually add more flour (I added about 1 1/2 more cups) until the dough is pulling away from the sides of the bowl and barely sticks to your finger.

Spray a large bowl with cooking spray and place dough in the bowl for the first proof. Cover and place the dough in a draft-free place (many use the inside of a turned-off oven) to rise for 45 minutes or until doubled in bulk.

Make filling: While dough rises, brown ground beef, drain, and return to pan. Add packet of taco seasoning with a bit of water and cook until combined. In a separate bowl, combine cream cheese, salsa, and cheddar cheese. Add ground beef mixture to the bowl (which will melt the mixture a bit) and stir to combine.

Shape and Bake: Spray a cookie sheet with cooking spray or line it with parchment paper. Remove dough from bowl and place on a lightly-floured surface. I placed a damp, clean cloth over some of the dough while I tore off pieces to work with. Tear off golf ball sized portions (or maybe a little larger) and roll each portion out to about 1/4-inch thick (moving it around as you roll to ensure it’s not sticking, and reflouring your surface as needed). Use a large round cookie cutter (or a knife) to cut out circles about 3 or 4 inches in diameter. Spoon about 1-2 tablespoons of ground beef mixture onto each circle. Fold the circle over on itself, wetting and pressing the edges to seal. Poke each pocket with a knife to give it a steam vent, dust the excess flour off of it with a dry pastry brush, and place it on the prepared baking sheet.

Once all pockets are shaped, cover them with a clean dish towel and let them rise for another 30 minutes. When you have about 20 minutes left, preheat oven to 350 degrees F. Whisk egg and water together and brush over pockets just before baking. Sprinkle each pocket with a bit of shredded cheddar cheese. Bake pockets for 15-20 minutes or until golden. Let cool on sheet pan for a few minutes and serve warm.

Note: I received a stipend from Foodbuzz for creating this meal.

If you liked this post, please:
Subscribe to Willow Bird Baking
Follow Willow Bird Baking on Twitter
Follow Willow Bird Baking on Facebook
Give this post a thumbs up on StumbleUpon


ShareOther ways to share this post with friends!

World’s Best Grilled Cheese (Sharp Cheddar & Caramelized Onions on Beer Bread)

You’ve been shipwrecked on a desserted — ahem, I mean deserted — island. Your food options are limited to a sandwich (minus the “wich” part) and a very peevish looking saltwater crocodile who doesn’t seem to want you gnawing on him. After awhile your beard begins to rival that of Tom Hanks’s in Castaway, only there’s no Wilson to keep you company.

You’re hungry. You’re alone.

You’re gonna die.

Okay, sorry; that was an unpleasant beginning for a post, wasn’t it? And there’s that big knife up there underscoring the point.

I promise it gets better. Well, not too much better — you’re still gonna die. But something amazing happens first!

One day you’re wasting away on the beach entertaining fond memories of pizza while chewing on a piece of driftwood. Suddenly, a tiny Tiki Fairy appears. You know this is probably a brief hallucination indicating that an agonizing death is imminent, but you indulge your brain and greet her.

What do you know, she has a surprise for you! Drifters who find themselves starving to death on her island get to choose one last meal. Filet mignon? Truffle burger? Mom’s macaroni and cheese? You name it, you get it.

Ah, the question! It’s been posed to everyone from 50 famous chefs to death row inmates: what would you want your last meal to be?

Photographer Melanie Dunea is the one who had the brilliant idea to email 50 great chefs this question and compile their responses in her book, My Last Supper. Some of the chefs go fancy: caviar and spit-roasted pigs would be in Gary Danko’s final spread. Others prefer simple, comforting food from their childhood: Marcus Samuelsson wants gravlax with a dill mustard sauce in his last hours.

Funnily enough, the death row inmates seem to divide along similar lines. There are cost (and other) limitations to ensure the inmates’ meals don’t become extravagant, but some still think big! One, for instance, asks for two steaks, two burgers, a sliced turkey breast, bacon, two baked potatoes, one chef’s salad, one ear of corn, one pint of ice cream, and four sodas. Others cling to small pleasures; one asks only for cool whip and cherries.

Personally, I’m torn. I want comfort food. I want my mom’s chocolate sheet cake, macaroni and cheese, and yeast rolls for sure. I want a pimiento cheese sandwich on white bread, Dad’s chicken and dumplings, and at least a dozen Coke Zeros.

But I also want luxury! I could go for some fresh lobster tail and fried softshell crab. I want a thick Wagyu rib eye. I want this cheeseburger. I want this ice cream sundae.

Can I also have some Chinese pork buns?

Oh, and one more thing. A grilled cheese sandwich wouldn’t ordinarily make my list, but this isn’t your average grilled cheese — it’s the World’s Best Grilled Cheese.

In fact, Sommer from Mama With Flavor (have you seen her blog? hilarious.) started all of my “last meal” daydreams when she responded to my tweet about this sandwich. She proclaimed it “last meal worthy.” And worthy it is: sharp cheddar cheese and sweet caramelized onions are piled high and toasted between two slabs of buttery, freshly baked beer bread.

Trust me, this sandwich would be a far better companion on your deserted island than any anthropomorphized volleyball. With the very first bite I took, I knew I’d struck genius. Lunch (or dinner, or midnight snack, or breakfast, or even dessert) just doesn’t get much better than this. And with a recipe for fresh bread that consists of only four ingredients, it doesn’t get much simpler than this either.

You know what I have to ask for my parting question — and I can’t wait to read your answers! What would your last meal be?

Sharp Cheddar, Caramelized Onions, and Beer Bread Grilled Cheese


Recipe by: Adapted from Catherine Bienik (beer bread) and Simply Recipes (caramelized onions)
Yields: one loaf of beer bread (up to about 4-5 sandwiches)

Bread Ingredients:
3 cups self-rising flour
scant 1/2 cup sugar
12 ounces beer (I used Guinness)*
3 tablespoons butter, melted

Caramelized Onion Ingredients:
4 onions, sliced thinly
salt to taste
olive oil

Other Sandwich Ingredients:
about two tablespoon of butter per sandwich desired
sharp cheddar cheese

Directions:
Make bread: Preheat oven to 375. Grease a loaf pan or line it with greased parchment paper. Mix flour, sugar, and beer until combined and pour batter into pan. Cook for 40-45 minutes, or until top is well browned and loaf feels firm (you can also stick a toothpick in; if it comes out clean, the loaf is ready). When the loaf is close to done, brush the top thoroughly with melted butter and let the loaf bake for 3 minutes. Remove to a cooling rack to cool for about 20 minutes before removing it from the pan and cooling completely.

While bread is baking and cooling, caramelize onions: Put a few tablespoons of olive oil into a skillet over medium-high heat. Once the oil is translucent and shimmering, add onions and cook for about 10 minutes, stirring every few minutes. Add salt to taste and continue to cook, stirring every few minutes, for 30 minutes to an hour. The goal is to let the onions sit long enough that they start to cook down and caramelize, but not to let them burn. If they seem to be sticking or burning at any time, you can do any of the following: add some more oil to the pan, turn down the heat slightly, or add some water to the pan. Once the onions are a rich brown, remove them to a container to cool slightly before use. Store extra onions in an airtight container in the refrigerator.

Assemble your sandwich: Once the bread has cooled, use a serrated knife to cut it into slices. In a skillet over medium heat, melt one tablespoon of butter. Place a slide of bread into the skillet and pile on sliced cheese and caramelized onions (note: you can brush the underside of the bread all over with melted butter first if you want to ensure even browning). Place another slice of bread on top.

Cook until the bottom slice of bread is well toasted (peek every now and then by lifting a corner) and then gently flip, using your hand to brace the top slice of bread as you do so. You can add more butter if your skillet looks dry, lifting the sandwich to allow the butter to run underneath. When both sides are golden and toasted, remove sandwich to a serving plate and microwave for 30 seconds to insure melty cheese. Repeat these steps to make as many other sandwiches as you want! Serve immediately.

*NOTE: I don’t drink, so I wasn’t sure what sort of beer to use. This recommendation from a friend was outstanding, though! For information about how much of the alcohol cooks out of a given dish, please see this chart. In this particular recipe for beer bread, only about 30% of the alcohol remains in the entire loaf after cooking.

If you liked this post, please:
Subscribe to Willow Bird Baking
Follow Willow Bird Baking on Twitter
Follow Willow Bird Baking on Facebook
Give this post a thumbs up on StumbleUpon


ShareOther ways to share this post with friends!

April Fool’s Day Cupfakes

Ah, April Fool’s Day! The perfect occasion to show someone you love them by playing nasty tricks on them and guffawing as they stand, bewildered, trying to figure out what just happened.

Orrrr you could play a sweet (well, savory) trick instead! Cupfakes are adorable, savory treats masquerading as their sweet cousins. At one time or other, I’ve had people mistake each one of the dinnertime cupfakes below for dessert! In reality, though, Deep Dish Pizza Cupfakes are fun Chicagoan deep dish pizzas topped with fluffy ricotta and a cherry tomato. Meatloaf Cupfakes are moist meatloaf with mashed potato “frosting” and colored salt sprinkles. Finally, my favorite: Cheddar, Chive, and Bacon Cupfakes with Avocado Frosting are slightly sweet, cornbready dinner muffins full of goodies.

One warning: when people are expecting to bite into a sweet cupcake and it turns out to be a cupfake, their brains do a little backflip of revulsion no matter how good your treats taste. It’s probably best to reveal your trick right before they take a bite!

Deep Dish Pizza Cupfakes

Meatloaf Cupfakes

Cheddar, Chive, and Bacon Cupfakes with Avocado Frosting

P.S. Only 1 week left in my Cheesecake Challenge! Choose any one of 9 cheesecake recipes to prepare within the next month. Email a photo to me by 4/5/2011 to be featured on Willow Bird Baking! Get more details about the challenge here.

If you liked this post, please:
Subscribe to Willow Bird Baking
Follow Willow Bird Baking on Twitter
Follow Willow Bird Baking on Facebook
Give this post a thumbs up on StumbleUpon


ShareOther ways to share this post with friends!

1 8 9 10 11 12 16