cake

Lemon Triumph Cake

The looming summertime has given me the perfect excuse to indulge my love of lemons. Oh! Lemons! The pungent aroma of lemon juice on my fingers from a fresh squeeze! The bright yellow, spoked discs dripping with juice! The tang! The sweetness!

I was thrilled when my mom was pondering what sort of cake she wanted for her birthday and mentioned lemon. She made a fantastic lemon and lemon cream jellyroll cake awhile back from a cake mix and thought she might like something similar. I put on my Dr. Frankenstein hat and began piecing recipes together to oblige.

My first dilemma was how to make a cake from scratch that tasted like a cake mix cake. I always get a kick out of foodies who disdain the taste of cake mix. Being an avid baker, I have news for those folks: many of us are constantly trying to attain a cake-mix-like level of moistness and buttery flavor. There are definitely downsides to cake mix (preservatives and the fact that you don’t get all the fun of baking from scratch, of course!) but in terms of taste . . . yeah, they’re pretty good at that.

So how to make a delicious, preservative-free yella cake that was just as moist and scrummy as a cake mix? While considering this conundrum, I happened to see this recipe for a homemade cake mix and decided to give it a try. It smelled buttery and magnificent while mixing it up, just as it was supposed to, and baked into a lovely lemon cake with a bit of additional flavoring.

Now about that lemon cream. I decided I wanted to do a lemon mousse instead, and had my heart set on a big ol’ fancy mousse layer cake. I was going to buy a cake ring and build the cake with two cake layers sandwiching a thick layer of mousse. Only problem? Well, that first part . . . the part about the cake ring. You let me know if you find one, but after visiting three stores, I’ve come to the conclusion that there aren’t any cake rings in Charlotte. Lame.


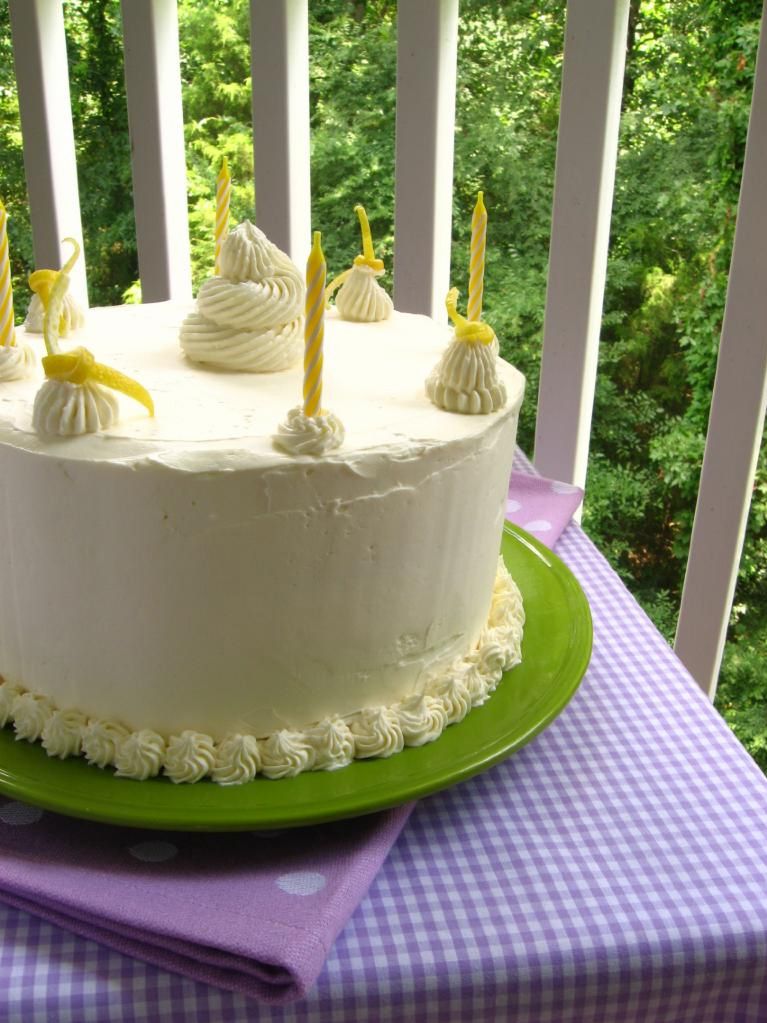
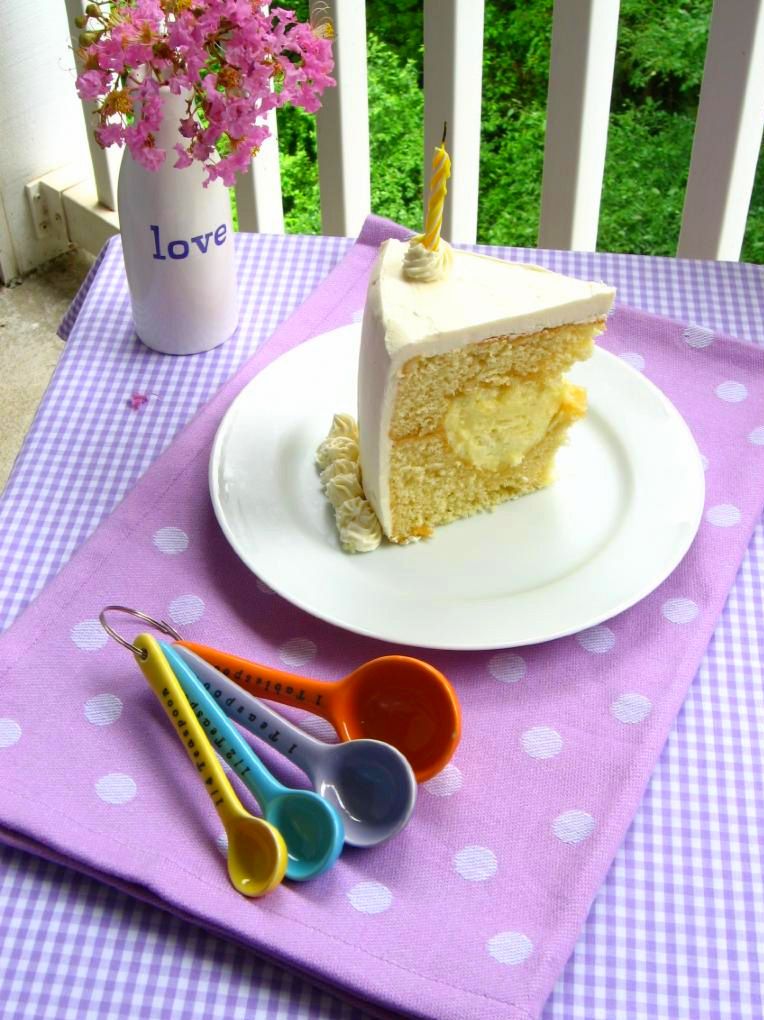
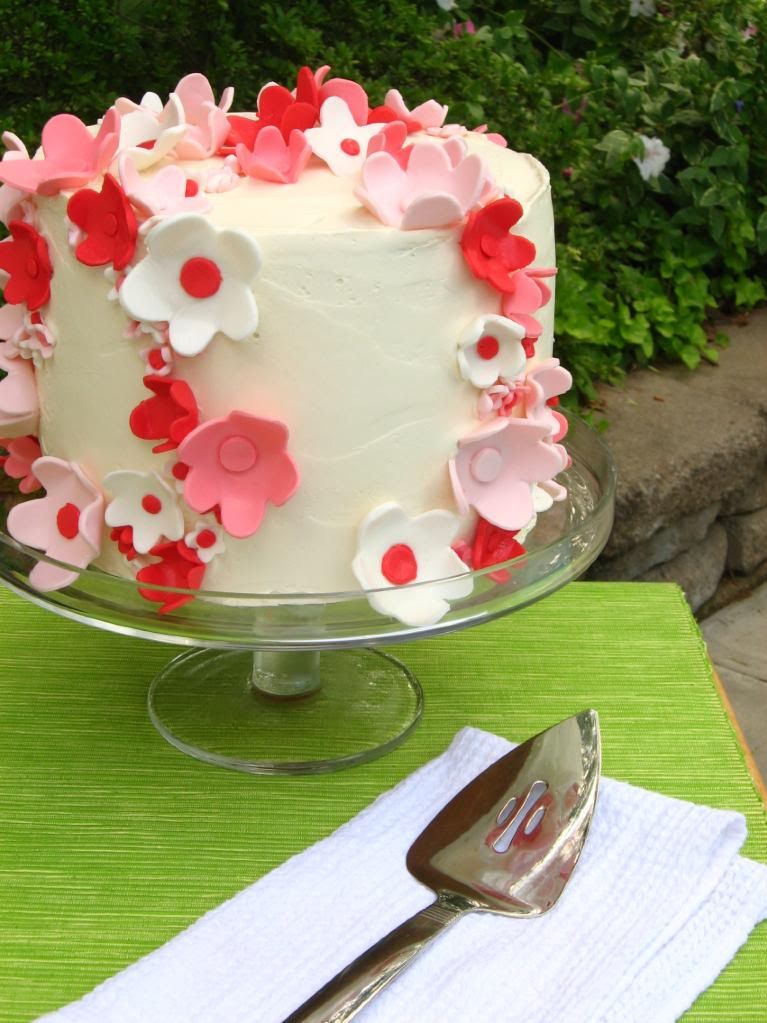
And again, with candles!

Well, kind of lame, but kind of awesome, because it gave me an excuse to buy this Wilton Heart Tasty-Fill Pan I’ve had my eye on for months (Note to calm your fears: I always mention if I’ve been asked to review a product or have received something for free to review, but that’s not the case here. Wilton, y’all are welcome to send me free pans and all, but I bought this pan with my own hard-earned money and decided to share it without being asked). I am so excited about this pan! All the filling possibilities! I’m already pondering: banana cake with caramel cream filling, chocolate cake with caramel cream filling, yellow cake with chocolate mousse filling . . . but I digress! Back to the Lemon Triumph Cake at hand.

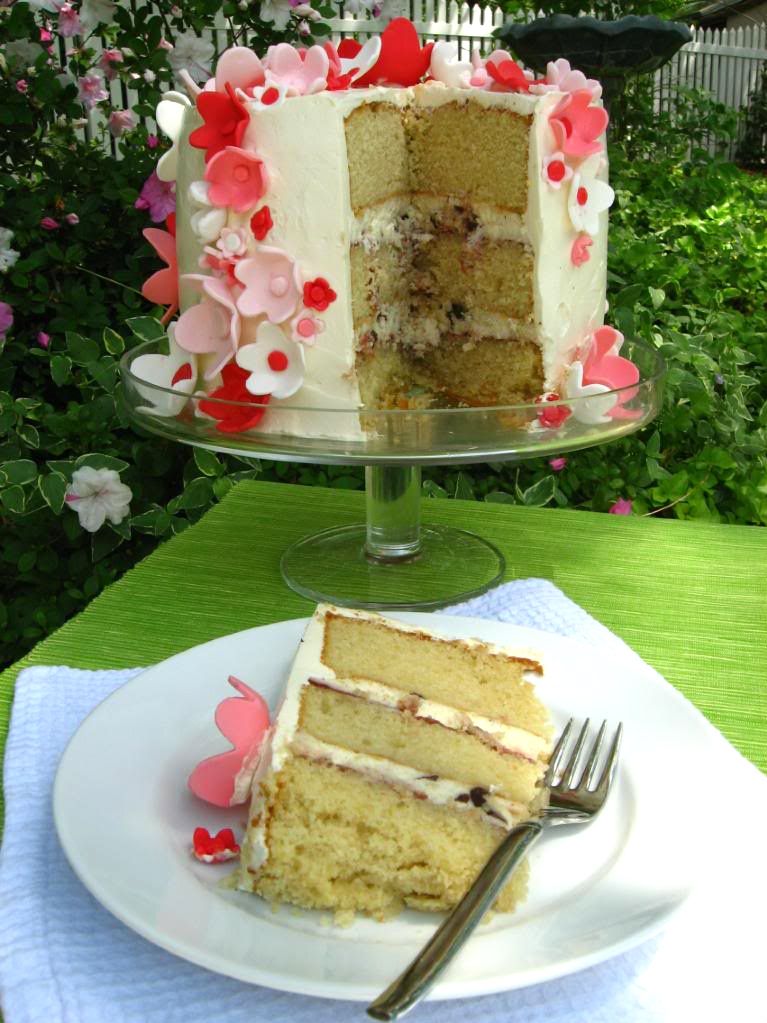
I did love the Wilton pan, but I think it’ll take a bit of practice to get used to. As you can see in some of the pictures, the heart wasn’t aligned correctly on one side of the pan. This has to do with me forgetting to trim the sides of the cake so that the top and bottom were even. I feel like it might be a bit difficult to get it lined up straight, though, and it’s hard to know until you cut into it . . . at which point (after 8 hours of baking, in the case of this cake) you don’t really want to know if something’s wrong. I’ll let you know next time I use it (which will hopefully be soon!) if it’s easier to align, having had a bit of practice.


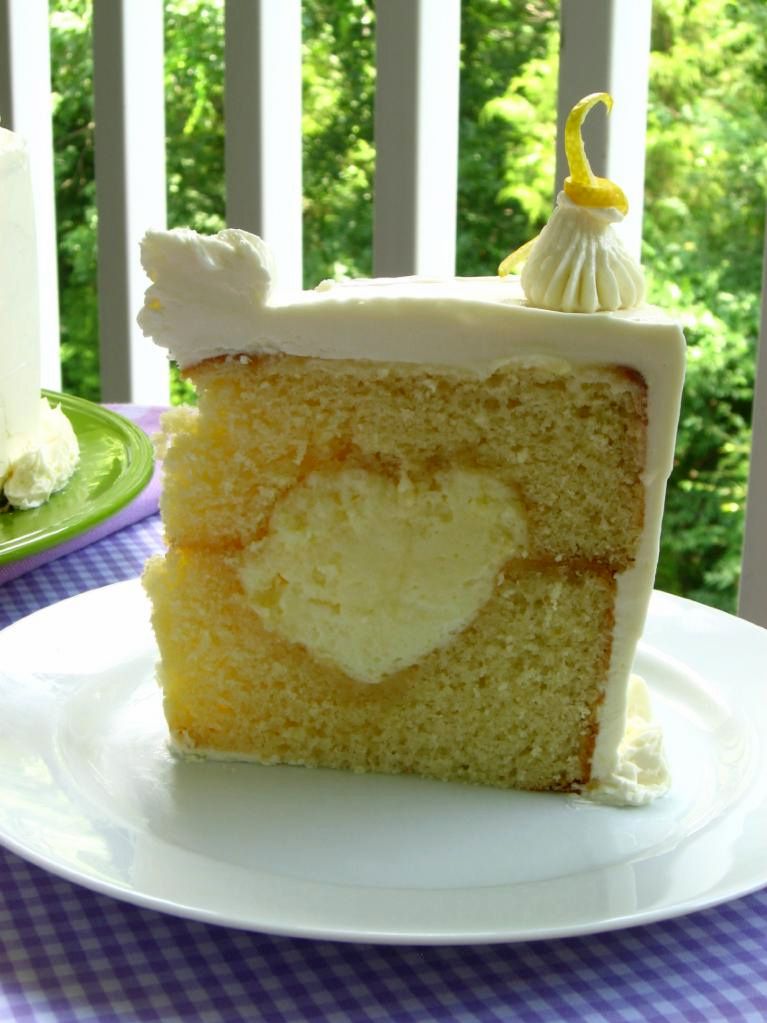
Crooked heart this time around!

If you don’t have the Tasty-Fill Heart Pan, don’t worry! You can make this as a regular mousse cake using a cake ring per my original plan. Just layer a 9-inch cake on the bottom and a thick layer of mousse on top of that. Chill until the mousse is firm and place another 9-inch layer of cake on top. Chill again before frosting, taking care around the mousse layer not to mix the frosting and mousse. Alternatively, if your city also has no cake rings, serve this as a regular two-layer lemon cake with the mousse on the side.


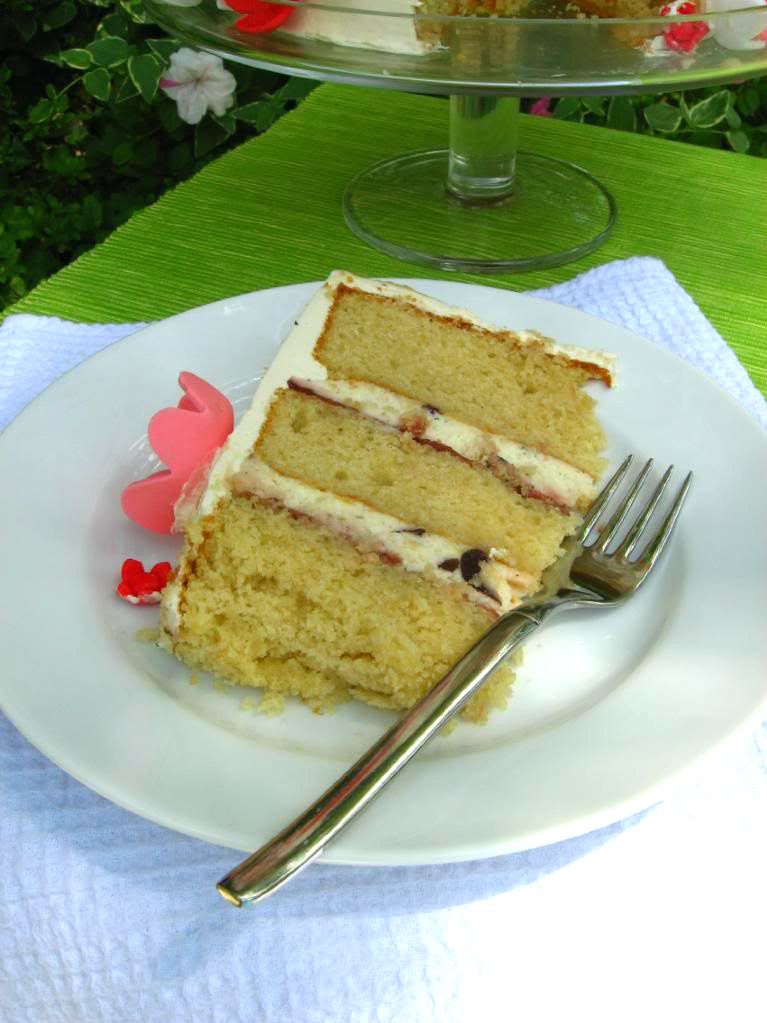
Better <3 on this side of the cake.

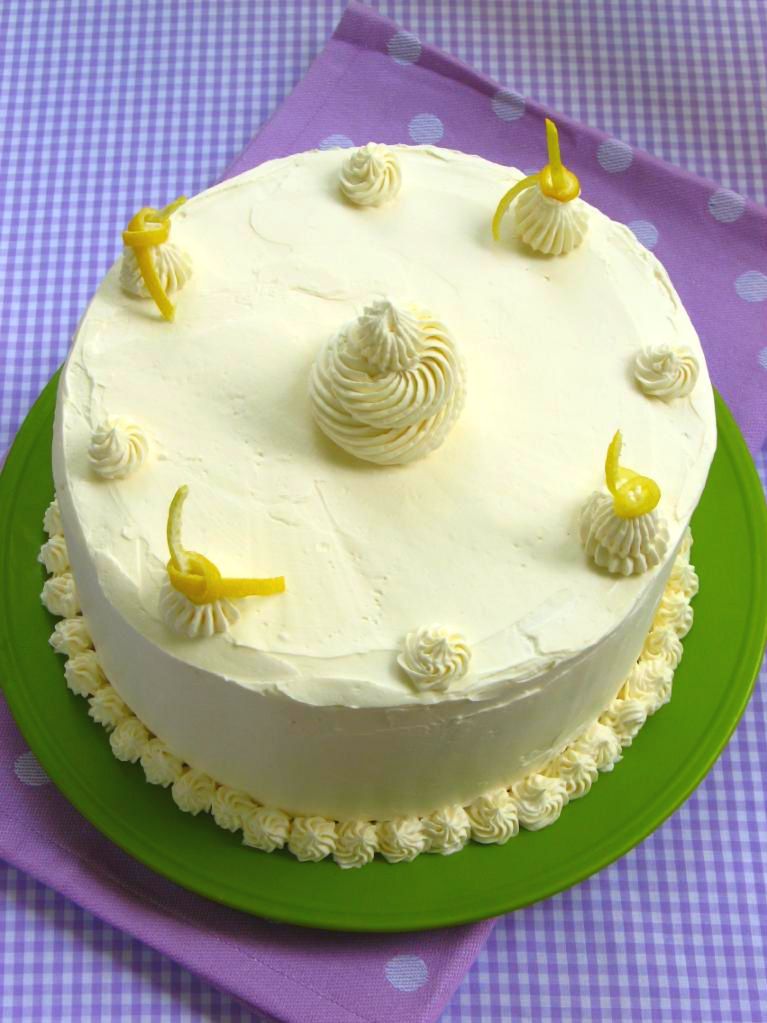
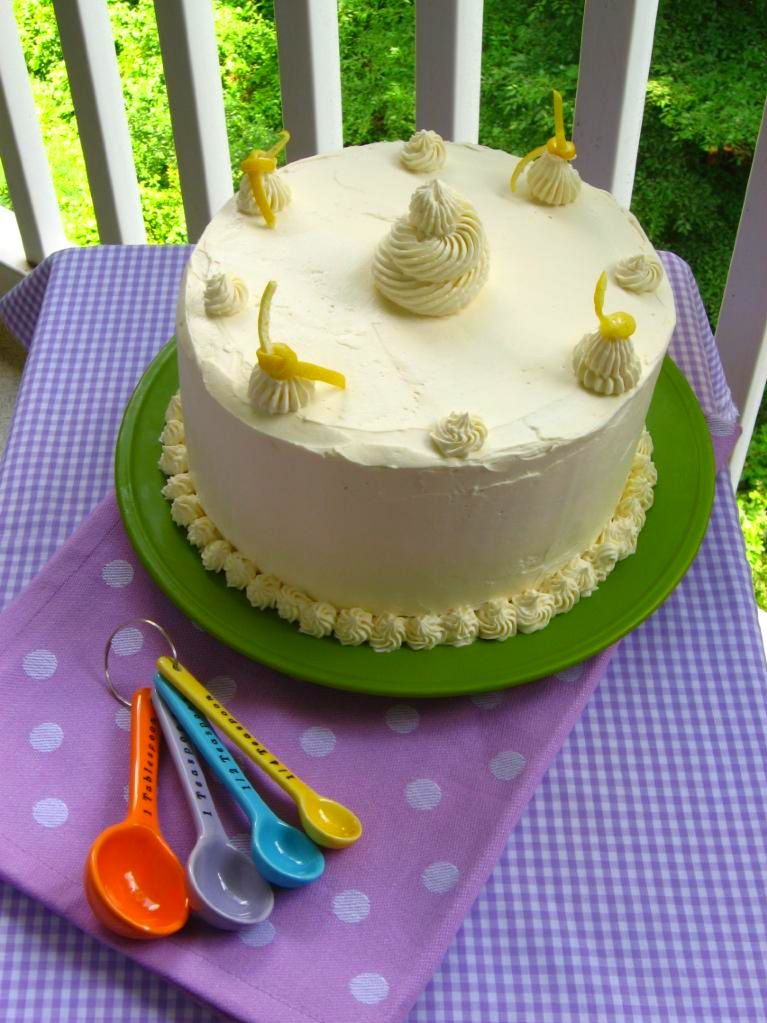
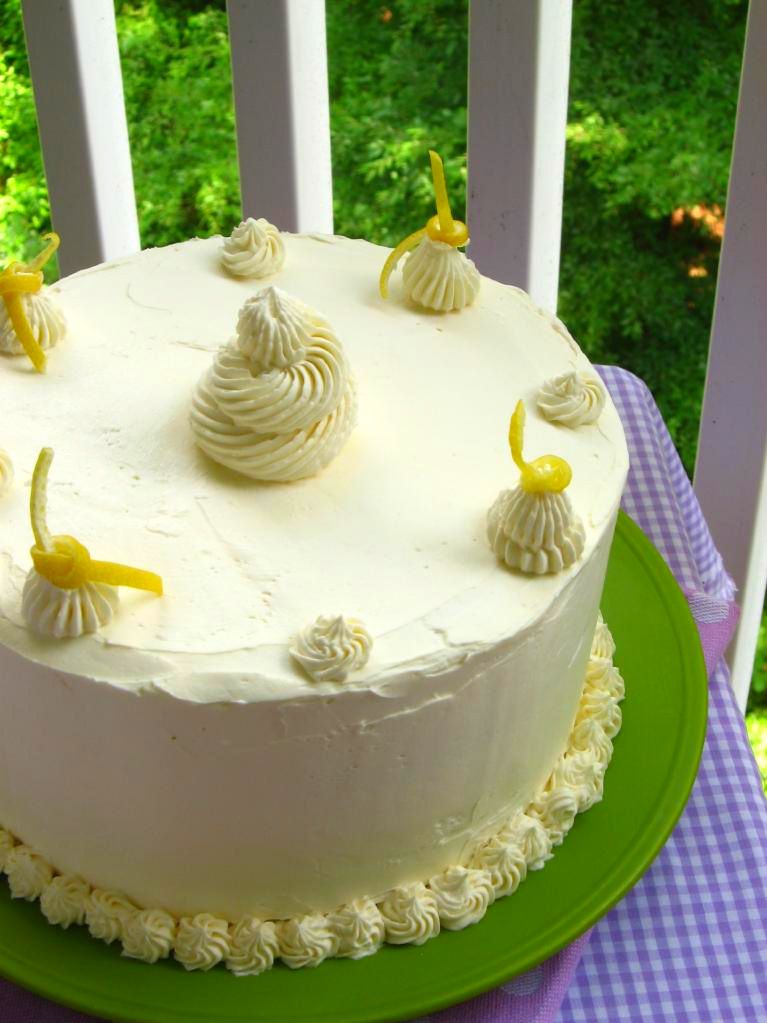
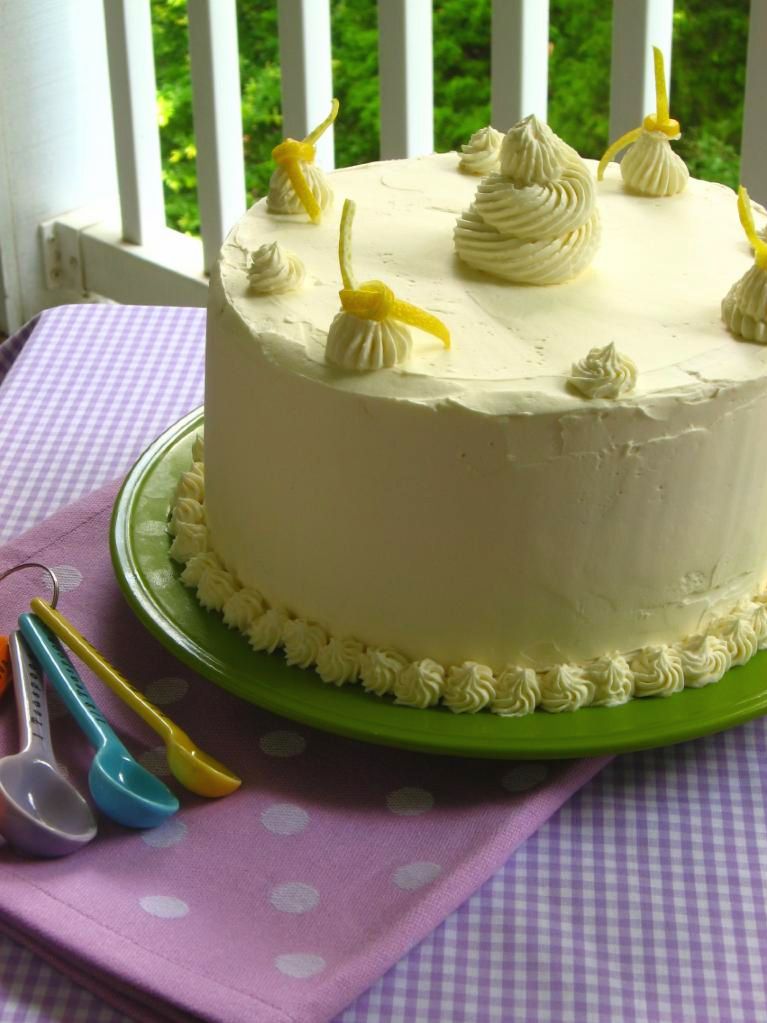
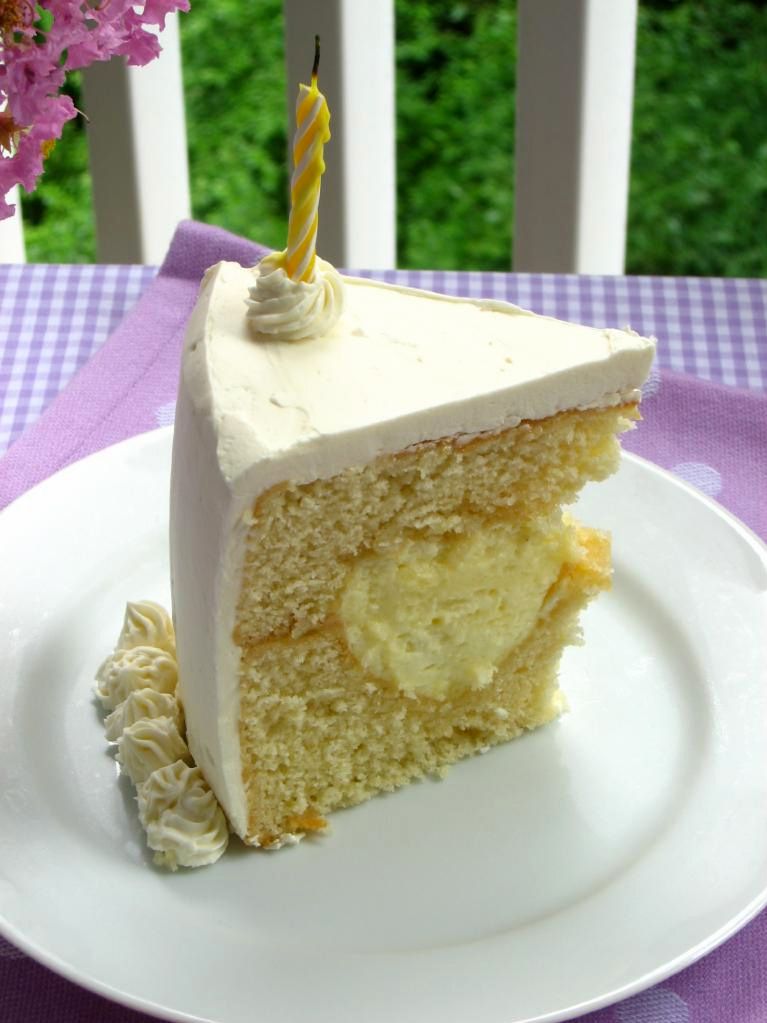
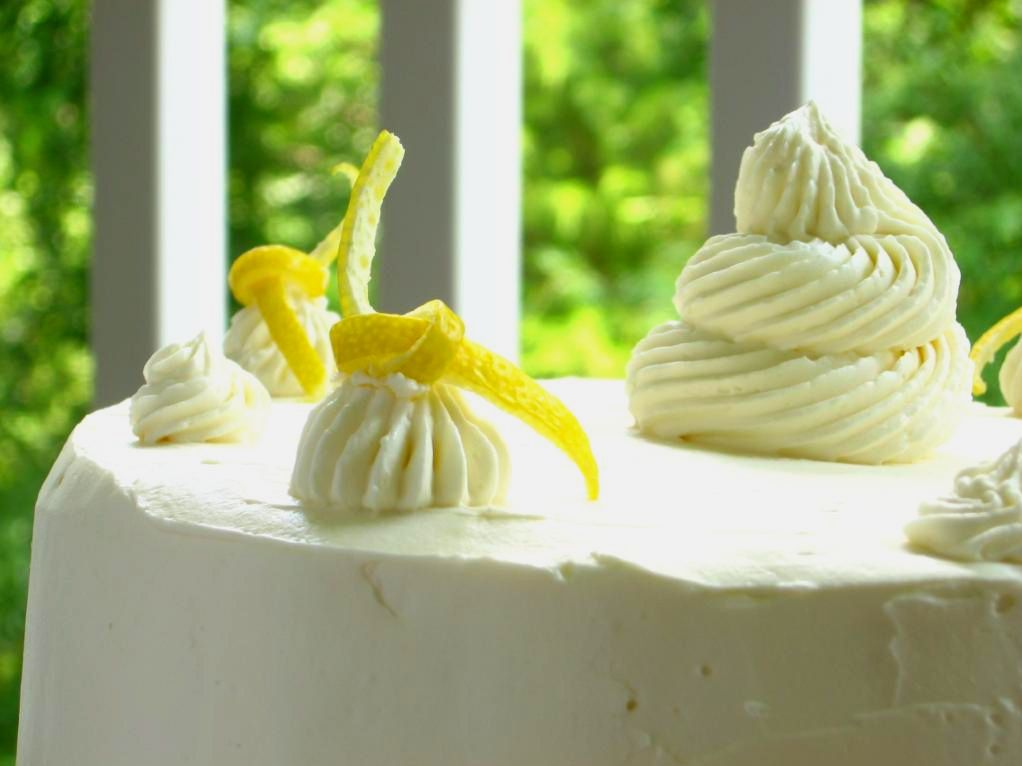
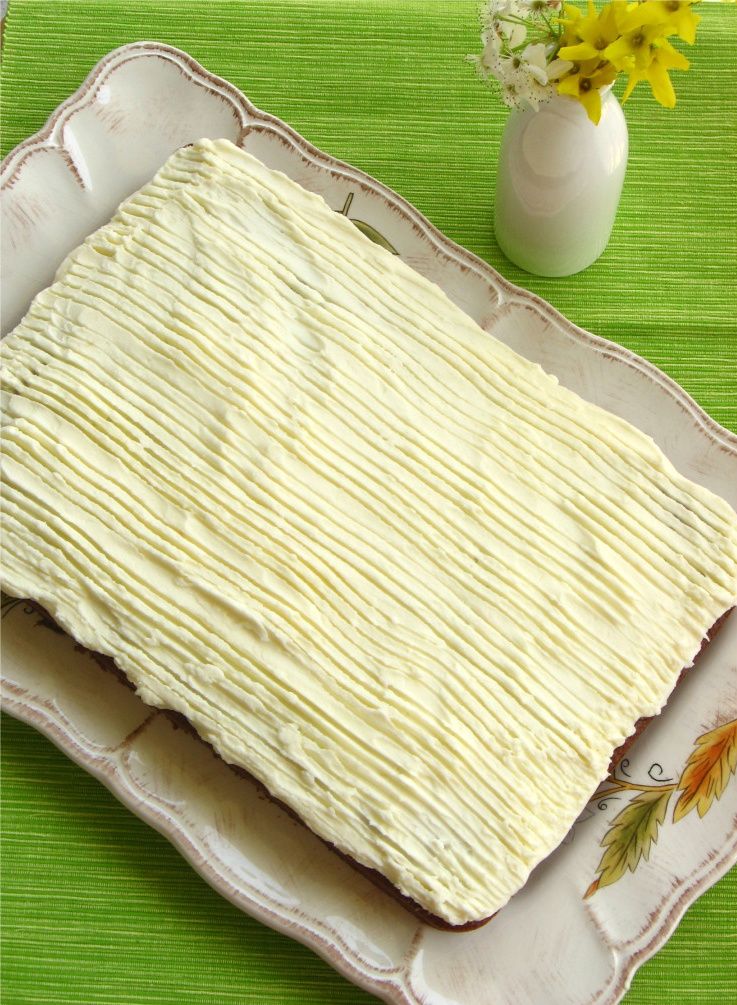
Nevertheless, crooked hearts notwithstanding, this cake was worth the effort. The yellow cake drenched in lemon syrup was moist and buttery, just like I hoped. This method of making Swiss buttercream produces hands-down the fluffiest, smoothest, silkiest, tastiest frosting I’ve ever had the pleasure of licking off my spatula. And the lemon mousse was, well, a triumph! Lemon curd folded into mousse that sets up like a bright, creamy-tangy cloud in the middle of the cake. Close your eyes and imagine a satisfying summer day — birdsong, sprinklers, green grass, sunshine, lemonade, lounge chair, long naps and good books — with a little sophistication mixed in. That’s what this cake tastes like. If that doesn’t make you want a slice, I don’t know what will!

Lemon Triumph Cake


Recipe by: Willow Bird Baking, compiled from Fine Cooking (lemon curd), Giada DiLaurentis (lemon syrup, adapted), Gina DePalma (Swiss buttercream, adapted), Bon Appétit (lemon mousse), My Kitchen Cafe (homemade cake mix)
Yields: one 9-inch, two layer cake

Yellow “Cake Mix” Cake Ingredients:
2 cups granulated sugar
1 1/2 cups all-purpose flour
1 1/2 cups cake flour
1/2 cup nonfat dry milk powder
1 tablespoon baking powder
1 teaspoon salt
16 tablespoons butter (2 sticks), cut into 1/2-inch pieces and chilled
1 tablespoon vanilla extract
1 tablespoons lightly packed finely grated lemon zest
1-2 teaspoons lemon extract
strands of lemon peel for garnish

Lemon Curd Ingredients:
6 tablespoons unsalted butter, softened at room temperature
1 cups sugar
2 large eggs
2 large egg yolks
2/3 cup fresh lemon juice
1 teaspoon grated lemon zest

Lemon Mousse Ingredients:
1 recipe lemon curd (above)
2.5 tablespoons water
2 teaspoons unflavored gelatin
3 large egg whites
3/8 cup sugar
3/4 cups chilled heavy whipping cream

Lemon Syrup Ingredients:
1/2 cup sugar
1/8 cup water
1/8 cup lemon juice

Lemon Swiss Buttercream Ingredients:
1 cup sugar
4 large egg whites , at room temperature
24 tablespoons (3 sticks) unsalted butter, at room temperature
2 teaspoon vanilla extract
1 teaspoon lemon extract

Directions:
Note on scheduling: I might schedule this cake baking in the following way. Make lemon curd and refrigerate two days in advance. Bake cake and coat with lemon syrup one day in advance, wrapping carefully and freezing. On day of serving, make mousse, trim and fill cake (much easier with frozen layers!), make frosting, and assemble.

To make lemon curd: In a large bowl, beat the butter and sugar with an electric mixer, about 2 min. Slowly add the eggs and yolks. Beat for 1 min. Mix in the lemon juice. The mixture will look curdled, but it will smooth out as it cooks.

In a medium, heavy-based saucepan, cook the mixture over low heat until it looks smooth. (The curdled appearance disappears as the butter in the mixture melts.) Increase the heat to medium and cook, stirring constantly, until the mixture thickens, about 15 min. It should leave a path on the back of a spoon and will read 170°F on a thermometer. Don’t let the mixture boil.

Remove the curd from the heat; stir in the lemon zest. Transfer the curd to a bowl. Press plastic wrap on the surface of the lemon curd to keep a skin from forming and chill the curd in the refrigerator. The curd will thicken further as it cools. Covered tightly, it will keep in the refrigerator for a week and in the freezer for 2 months.

To make cake: Process sugar, flours, milk powder, baking powder, and salt in a food processor for 15 seconds to combine. Add butter and vanilla and pulse until the mixture resembles coarse meal (you want this much finer than, say, a pie crust). Freeze the dry mixture in a zipper-lock bag for up to 2 months or use immediately.

To make the cake, adjust an oven rack to the middle position and preheat the oven to 350 degrees. Grease and flour two 9-inch cake pans (the Tasty-Fill pans, if you’re using those).

With an electric mixer, beat the prepared cake mix, 1 1/4 cups warm water and 2 large room-temperature eggs until the mixture is smooth, about 2 minutes. Scrape the batter into the prepared cake pans and bake until a toothpick inserted in the center comes out clean, about 25-27 minutes for two 9-inch layer cakes. Cool the cakes in pans for 10 minutes, then turn them out onto a wire rack. Poke holes in them and spoon lemon syrup over generously. Cool for about 30 more minutes before placing cake layers in freezer for at least 30 minutes. This helps a ton with trimming, filling, and decorating!

To make lemon syrup: In a small saucepan, combine the sugar, water, and lemon juice over medium heat. Bring to a boil, reduce the heat, and simmer until the sugar has dissolved, about 5 minutes, stirring occasionally, Remove the pan from the heat and allow the syrup to cool, about 20 minutes.

To make the mousse: Pour 2.5 tablespoons water into small saucepan. Sprinkle gelatin evenly over. Let stand until gelatin softens, about 15 minutes. Meanwhile, place 7/8 cups lemon curd in large bowl. Stir 3/8 cup curd in another small saucepan over medium-low heat until very warm.

Stir gelatin mixture over medium-low heat until dissolved and liquid is clear (do not boil). Whisk warm gelatin mixture into 3/8 cup warm curd. Gradually whisk gelatin-curd mixture into curd in large bowl. Using electric mixer, beat egg whites in medium bowl until soft peaks form. Gradually add sugar, beating until whites are thick and glossy. Fold whites into curd mixture in 3 additions. Using same beaters, beat cream in another medium bowl until peaks form. Fold into egg white-curd mixture in 3 additions.

To make lemon Swiss buttercream icing: Combine sugar and 1/2 cup water in a small saucepan and bring to a boil over medium-high heat, stirring to dissolve sugar. Boil without stirring until syrup reaches 240° on a digital thermometer, about 5 minutes.

Meanwhile, in a stand mixer with whisk attachment, beat egg whites on medium-high speed until soft peaks form. With mixer on medium speed, gradually pour in hot syrup in a thin stream; avoid pouring syrup on whisk. Increase speed to medium-high and beat until stiff peaks form and mixture is cool, about 8 minutes. Reduce speed to medium and add butter 1 tablespoon at a time, beating after each addition. (If at any time buttercream appears curdled, beat on high until smooth, then reduce speed to medium and continue beating in butter.) Once all butter is added, beat on high speed until buttercream is smooth and fluffy, about 1 minute. Beat in vanilla and lemon extract.

To assemble the cake: Level the layers using a long serrated knife. If using a Tasty-Fill Heart Pan, align heart and then trim sides of cake to make them even. Fill both sides of the heart with mousse, leveling it off using a spatula (see instructions in the note below for making this a regular mousse cake).* Place the top layer on the bottom layer, aligning the heart. Cover cake with a thin coat of icing as a crumb coat and chill until the icing is set, 20 minutes or so. Frost cake and decorate with slices of lemon peel. Store, covered, in refrigerator. Set out about 10 minutes before serving to soften the icing.

*NOTE: Make this as a regular mousse cake by using a cake ring. Layer a 9-inch cake on the bottom and a thick layer of mousse on top of that. Chill until the mousse is firm and place another 9-inch layer of cake on top. Chill again before frosting, taking care around the mousse layer not to mix the frosting and mousse. Alternatively, serve this as a regular two-layer lemon cake with the mousse on the side.
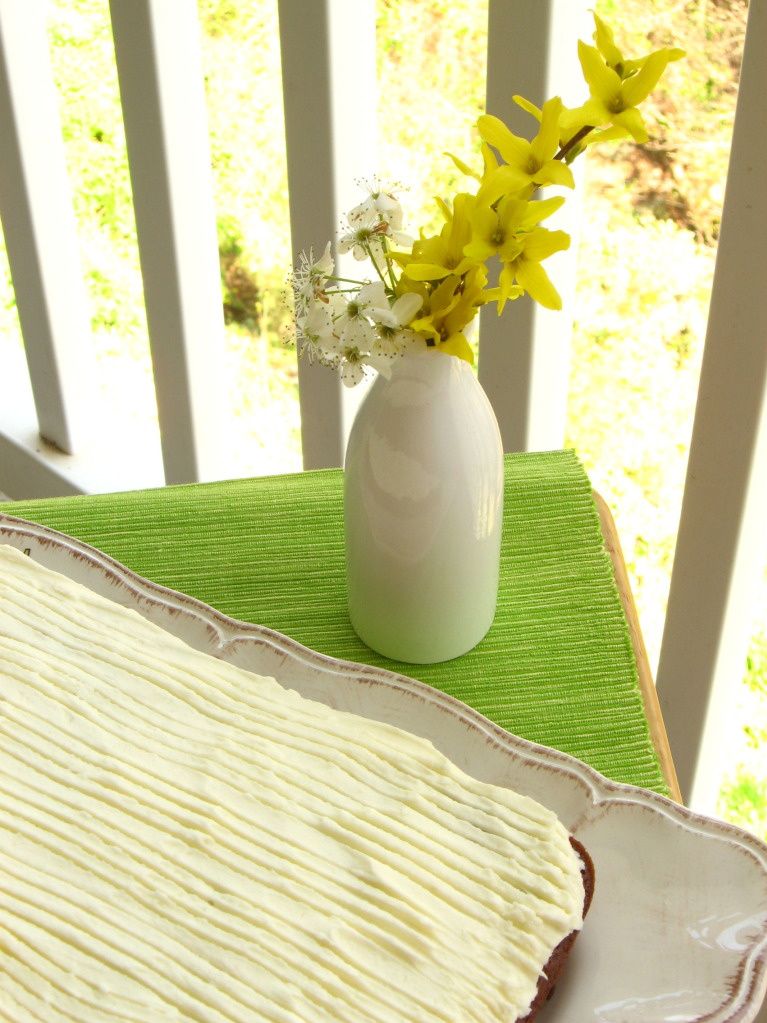

Share Share this post with friends!

Lemon Raspberry Cake

Willow Bird Baking is the namesake of my darling little noodle (read: poodle), Byrd. As I sit here writing this post (and listening to the cooing of mourning doves outside my window), she is at the veterinary hospital recovering from a double knee surgery. Judging by her exuberance about riding in the car yesterday morning, she wasn’t really expecting it.

Apparently both her little kneecaps were popping out of place, and she couldn’t do some of her favorite things (fetching, jumping) without limping. Poor puppy pumpkin. The vet tech just called and said she is standing, but won’t try to walk, and won’t eat a thing. No wonder, since she’s in a strange place without her mama. We go pick her up at 12:30 today, so keep us in your prayers.


Get it? It’s decorated to look like a lemon.

Because of this unexpected $2,400 surgery, my finances have not been my friends lately. I’ve been cutting back: we haven’t been eating out, I’ve been trimming my grocery budget, and the last time I got my hair cut or colored was last August — I’m about ready to pick up some scissors myself. In addition to limiting my spending, another issue needed to be addressed: waste!

I’ve been a bad steward of my kitchen for too long. Buying a bag of cheese with the best intentions, but letting it mold. Buying a bag of fresh herbs, using them once, and letting them brown in the back of my fridge. Buying expensive ingredients (hello, pancetta, I’m talking to you) with the intention of using every last hunk, only to open my fridge drawer a month later and guiltily remember that broken resolution.

So, I’ve been trying to be better. Leftover creams, frostings, and doughs from one pastry become the basis for the next. I survey the fridge for unused ingredients before deciding what to make for Saturday dinner. It’s not perfect, but it’s better than it was!

This past weekend, leftover raspberry curd, nine egg whites left from making the curds, and some extra lemons provided my inspiration.

After buying only some butter, some fresh raspberries, and some white chocolate bark, I whipped up this cool, bright, summer dessert: Lemon Raspberry Cake. The cake itself is my favorite white cake recipe because it’s moist with the perfect crumb. Each layer is brushed with lemon syrup for moisture and tang before being coated in a luxurious raspberry curd. The frosting is rich and decadent, and even the white chocolate decorations added a nice dimension to the overall flavor of each slice.

My “lemon” decoration broke as I was trying to release it from the wax paper I piped it on, so I pieced it together on top of the cake. It’s a little crooked! I’m sure you can do better. I also completely forgot the poppy seed until I made the third cake layer (I mixed it separately), so you’ll notice that only my middle layer has the seeds. Oh well! Crooked citrus or not, seeds or not, we all loved the refreshing taste of this layer cake! Happy eating!

Lemon Raspberry Cake


Recipe by: compiled from adaptations of The Way the Cookie Crumbles (white cake), Notes from my Food Diary (frosting and raspberry curd), Bon Appétit (lemon syrup)
Yields: 12 servings

Cake Ingredients:
3 3/8 cups cake flour, plus more for dusting the pans
1 1/2 cups + 3 tablespoons whole milk, at room temperature
9 large egg whites, at room temperature
3 teaspoons almond extract
1 1/2 teaspoons vanilla extract
2 1/4 cups + 3 tablespoons granulated sugar
6 teaspoons baking powder
1 1/2 teaspoons table salt
18 tablespoons unsalted butter (2 sticks and 2 tablespoons), softened but still cool
1 1/2 tablespoons poppy seed (optional)

Lemon Syrup Ingredients:
1/2 cup sugar
1/2 cup boiling water
1/4 cup fresh lemon juice

Raspberry Curd Filling Ingredients:
1/2 cup (1 stick) unsalted butter
Two 1/2-pints ripe raspberries or one 12-ounce package frozen raspberries, thawed
5 large egg yolks, lightly beaten
3/4 cup sugar
Pinch of salt
2 to 3 teaspoons fresh lemon juice

Lemon Buttercream Frosting Ingredients:
1 cup (2 sticks) unsalted butter, at room temperature
2 tablespoons finely grated lemon zest (I opted for a teaspoon or two of lemon extract instead)
3 cups sifted confectioners’ sugar
3 tablespoons fresh lemon juice

Directions: Make raspberry curd: Melt the butter in a large saucepan over medium heat. Add the raspberries, egg yolks, sugar, and salt and cook, mashing the berries and stirring frequently at first and them constantly at the end, until thickened, about 10 minutes (this took longer for me — about 15+). Pour this mixture through a coarse strainer, pressing to get out the maximum amount of liquid. Add in lemon juice to taste. Allow this to cool and then cover (with plastic wrap touching surface of curd to prevent skin from forming) and refrigerate until ready to use.

For the Cake: Set oven rack in middle position. (If oven is too small to cook both layers on a single rack, set racks in upper-middle and lower-middle positions.) Heat oven to 350 degrees. Spray three 9-inch round cake pans with nonstick cooking spray; line the bottoms with parchment or waxed paper rounds. Spray the paper rounds, dust the pans with flour, and invert pans and rap sharply to remove excess flour. (I brush my pans with Wilton’s cake release, then add the parchment circle and brush again. Be sure the parchment circles reach to the edges of your pan to ensure easily release).

Pour milk, egg whites, and extracts into 2-cup glass measure, and mix with fork until blended.

Mix cake flour, sugar, baking powder, poppy seed, and salt in bowl of electric mixer at slow speed. Add butter; continue beating at slow speed until mixture resembles moist crumbs, with no powdery streaks remaining.

Add all but ½ cup of milk mixture to crumbs and beat at medium speed (or high speed if using handheld mixer) for 1½ minutes. Add remaining ½ cup of milk mixture and beat 30 seconds more. Stop mixer and scrape sides of bowl. Return mixer to medium (or high) speed and beat 20 seconds longer.

Divide batter evenly between prepared cake pans; using rubber spatula, spread batter to pan walls and smooth tops. Arrange pans at least 3 inches from the oven walls and 3 inches apart. (If oven is small, place pans on separate racks in staggered fashion to allow for air circulation.) Bake until thin skewer or toothpick inserted in the center comes out clean, 23 to 25 minutes.

Let cakes rest in pans for 3 minutes. Loosen from sides of pans with a knife, if necessary, and invert onto wire racks. Reinvert onto additional wire racks. Let cool completely, about 1½ hours.

Make lemon syrup: Place sugar in small metal bowl. Add 1/2 cup boiling water; stir to dissolve sugar. Stir in lemon juice.

Make frosting: Beat the butter and zest with an electric mixer on medium speed in a medium bowl until light and fluffy. Gradually add the sugar and beat until light and fluffy. Add the lemon juice and beat for 1 minute longer.

Assemble the cake: I love Smitten Kitchen’s Layer Cake Tips — especially the one about freezing your layers before working with them. It makes it so much easier.

When cakes are completely cool, level each layer using a long, serrated knife. Use a little frosting to attach your bottom layer to a cake board or serving platter. Brush layer generously with lemon syrup. Spread a scant 1/2 cup raspberry curd on the layer (I may have used a little more). Continue building the layers this way, with syrup and curd, until all three layers are stacked. Frost with lemon buttercream frosting. I used white chocolate to create decorations for the sides and top of my cake. Cut into wedges and serve with fresh raspberries. Store in refrigerator.


Enjoy!


Share Share this post with friends!

Toasted Almond Cake with Mascarpone Cream and Amarena Cherries

Don’t worry — I did go see my wonderful mom on Mother’s Day and take her a special gift. But (despite the fact that Mother’s Day is now over), I also thought it would be nice to brag on her here a bit and show you the decadent birthday cake she made me. I’ve loved reading blog posts all over the internet about why others’ mothers were so great. Now it’s my turn!

Why do I love my mom?

1. She made me this cake. Enough said (but you know I’ll say more)! This three-layer dessert was a masterpiece of toasted almond, slightly tart cherry, and light-as-a-feather buttercream. Many joyous exclamations were uttered while we plowed through our three-story pieces.

2. She went back to college with four kids (insert appropriate gasp!) in the 80’s to earn her nursing degree. Even with four kids, she managed to graduate magna cum laude from UNCC’s nursing program.

3. She sews: she has created special quilts for me and my siblings, as well as other family members. She also makes clothes for my niece and nephews. Look for a picture of my quilt at the end of this post!

4. She taught me how to cook. It was under her auspices that I made my first Chocolate Sheet Cake, my first pan of Oven Baked Macaroni, and she is always on-call for cooking emergencies. As I mention on my About page, she is my main culinary influence, and I learn new things from her every meal.

5. She (and my little brother — Hi, Alex!) hung out with me for 3-4 hours while waiting for Pioneer Woman to sign our books last week. More on the Pioneer Woman booksigning later!

6. She’s beautiful.

7. She crafts: lately, her creative craft has been homemade chalkboards from antique or recycled frames. See her handiwork at her Etsy store, Posh Pilfer.

8. She decorates. She and my dad have single-handedly (well, double-handedly, I guess) renovated and redecorated their home to be a gorgeous oasis. Once again, photo evidence at the bottom of this post!

9. She cares about her children. A few years ago, she wrote each one of us poems. Every April Fools’ Day, she makes my little brother a wacky meal to celebrate. She has bandaged wounds, baked cakes, worked hard, and sacrificed to make us happy.

10. She rose above a difficult childhood to become an amazing mother of 5 children.

…And did I mention that she made me this cake? This heavenly confection is truly a “special occasion” cake: it’s expensive, it’s time consuming and involved, and it’s positively dreamy. If you want to feel like you’ve been transported to an almond-cherry cloud of joy, you should invest in some fancy Italian cherries and make this baby. It was the grand finale to a fantastic birthday meal, which I’ll share with you soon!

Toasted Almond Cake with Mascarpone Cream and Amarena Cherries


Recipe by: Gina DePalma
Yields: 12-16 servings

Cake Ingredients:
2 cups almond flour
3 cups unbleached all-purpose flour (not self-rising)
1 1/2 teaspoons kosher salt
3/4 teaspoon baking powder
3/4 teaspoon baking soda
1 1/2 cups sugar
1 can or tube (7 to 8 ounces) almond paste, cut into small chunks
24 tablespoons (3 sticks) unsalted butter, at room temperature
6 large eggs, at room temperature
1 cup whole milk, at room temperature
1 tablespoon Amaretto liqueur
Finely grated lemon zest (from 1 lemon, about 2 teaspoons)
2 teaspoons vanilla extract

Mascarpone and Amarena Cherry Filling Ingredients:
1 1/2 cups mascarpone
1 cup heavy cream
1/4 cup sugar
1/2 vanilla bean, split and seeds scraped
2 tablespoons kirsch or grappa
1 cup amarena cherries in syrup, well drained and coarsely chopped
3/4 cup cherry jam

Buttercream Ingredients:
1 cup sugar
4 large egg whites, at room temperature
24 tablespoons (3 sticks) unsalted butter, at room temperature
4 teaspoons vanilla extract

Directions:

Note: Amarena cherries are a sweet-sour varietal from Northern Italy. DePalma uses Agrimontana’s and also recommends those from Fabbri, available at Amazon.com. Almond flour is available on Amazon.com and at specialty grocers. This recipe is for a classic, one-tiered layer cake.

To make cake: Adjust 2 oven racks to divide oven into thirds. Preheat oven to 350°. Grease 3 (9″ x 2″) round cake pans. Line bottoms with parchment paper; grease paper and dust pans with flour, tapping out excess. Spread almond flour on a rimmed baking sheet and bake until toasted, stirring once, 8 to 10 minutes. Let cool.

In a large bowl, whisk together almond flour, all-purpose flour, salt, baking powder, and baking soda; set aside. Combine sugar and almond paste in a food processor and blend until almond paste is finely ground, with the texture of fine sand.

In a stand mixer with paddle attachment, combine almond paste mixture and butter. Beat on medium speed until light and fluffy, about 2 minutes, scraping bowl occasionally. Beat in eggs one at a time until well blended. With mixer on low speed, beat in milk, Amaretto, lemon zest, and vanilla until well blended. Beat in flour mixture, scraping bowl. Beat on medium speed until well blended, about 30 seconds. Divide batter among prepared pans and spread evenly. Stagger pans on 2 racks in oven so pans are not directly above one another. Bake 30 to 40 minutes, rotating pans halfway through, or until a toothpick inserted in center of cakes comes out clean. Let cool in pans 10 minutes. Run a knife around sides of pans and turn cakes out onto wire racks. Remove parchment paper and flip again; cool completely.

To make filling: In a stand mixer with whisk attachment, combine mascarpone, heavy cream, sugar, vanilla bean seeds, and 1 tablespoon kirsch or grappa. With mixer on low speed at first and increasing to medium, beat just until firm peaks form; do not over beat. Fold in cherries. Refrigerate 30 minutes. In a bowl, stir together cherry jam and remaining 1 tablespoon kirsch or grappa.

To make buttercream icing: Combine sugar and 1/2 cup water in a small saucepan and bring to a boil over medium-high heat, stirring to dissolve sugar. Boil without stirring until syrup reaches 240° on a digital thermometer, about 5 minutes.

Meanwhile, in a stand mixer with whisk attachment, beat egg whites on medium-high speed until soft peaks form. With mixer on medium speed, gradually pour in hot syrup in a thin stream; avoid pouring syrup on whisk. Increase speed to medium-high and beat until stiff peaks form and mixture is cool, about 8 minutes. Reduce speed to medium and add butter 1 tablespoon at a time, beating after each addition. (If at any time buttercream appears curdled, beat on high until smooth, then reduce speed to medium and continue beating in butter.) Once all butter is added, beat on high speed until buttercream is smooth and fluffy, about 1 minute. Beat in vanilla.

To assemble cake: Spread 1 side of 2 of the cake layers with jam and let stand 10 minutes, so cakes absorb some of jam. Place 1 cake layer, jam-side up on cake stand or plate. Spread with half of mascarpone filling. Top with second cake layer, jam-side up. Spread with remaining filling. Top with third cake layer, top-side up. Frost cake with about 1 cup buttercream to crumb coat cake; refrigerate 1 hour. Frost cake with remaining buttercream. Serve immediately or refrigerate; if refrigerated, let stand at room temperature 1 hour before serving.

Note: My mother’s cake is decorated with marshmallow fondant flowers in various shades of pink.


Clockwise from upper left:My mom, my dad, and the family toy poodle, Abbey; the quilt mom made for me; mom’s redecorated bedroom; Mom on Christmas morning, 2007.


Happy (late) Mother’s Day!


Share Share this post with friends!

A&P Spanish Bar Cake

In case you were wondering: No, I cannot eat all these desserts by myself. First of all, I’d rather not weigh 400 pounds — I just don’t think that’d be a very fun way to live. Secondly, even if I developed some wonderful condition that kept me trim regardless of how much pie I ate, baking is no fun unless you can share it with people you love. For me, one of the most rewarding parts of being a food blogger is watching people enjoy the things I’ve made (that sounds creepy, like I sit and stare at them as they eat, but I’m sure you know what I mean).

One group of folks I love to bake for is Mike’s family. Each Sunday evening we gather at their house for dinner and I bring whatever dessert I’ve whipped up. His mom is a fantastic cook, so the meal is always devoured enthusiastically. Many times I almost don’t think I have room for dessert! I say almost, because y’all know that there is always room for dessert.

Yay, SPRING!!

One reason I love to bake for Mike’s family is because they’re always encouraging — even if the results of my culinary efforts that week are not perfect! Don’t you love the people in your life who take one look at your runny pie and say, “Nevermind, it tastes delicious!” My own family deserves this praise as well, since they were served Coconut Cream Soup for Thanksgiving and ate it with cheerful smiles and compliments. Yep, those kind of folks are the keepers!

Because Mike’s family has been so supportive of my baking, I jumped at the chance this past weekend to create something a little special for them. A couple Sundays ago, Mike’s dad mentioned a cake his dad used to bring home from the old A&P store. The cake was called Spanish Bar Cake, and he described it as a dark brown cake with raisins and a creamy white frosting. I was so excited to recreate the memory that I started googling around that night.

What did I find? Well, first off, Mike’s dad is not the only one by far who wants to recreate the cake! Many online forums had pages of nostalgic posters describing their childhood experiences with the cake. They discussed every facet of their vivid Spanish Bar Cake memories : the color, the texture, the pattern on the frosting, the shape, the packaging . . . ! I also found many copycat recipes that boasted an identical taste and appearance to the original.

Not having tasted Spanish Bar Cake myself, I found it difficult to settle on a recipe! There were a few key disparities I had to evaluate. First, some recipes used cocoa powder, while some were a more traditional spice cake. After asking Mike’s dad to describe the color again, I decided to use the recipe that included the cocoa.

Another difference in the recipes I viewed was the frosting. Some used a standard cream cheese frosting, while others used white buttercream. I chose the latter, though I love cream cheese frosting. I reasoned that if the cakes were not refrigerated and had groove marks in the frosting, chances are the frosting would need to be safe when stored at room temperature and relatively stiff. Hence, buttercream. There were other, smaller decisions to make — things like nuts or no nuts (I chose no nuts), one layer or two (I chose one) — and then I was ready to bake!

One bonus of this cake is how simple it is to make! I must be on an easy cake kick. It’s a two-bowl process (one for the cake and one for the frosting). In a nutshell, you mix the dry ingredients, add the wet, bake, cool, mix the frosting, frost. No fuss.

If you have fond memories of this old A&P cake, bake one up for yourself and enjoy a blast from the past. I’ll add a note tomorrow to let you know how close to the original this recipe is, based on Mike’s dad’s reaction!

UPDATE: Score! Mike’s dad said as soon as it touched his tongue, the memories came flooding back! Apparently this is it, folks! He even said it seemed a bit moister than the original. Hurray!

Spanish Bar Cake


Recipe by: compiled from various internet sources
Yields: one 9 x 13 in. cake

Cake Ingredients:
2 cups flour
1 1/2 cups sugar
1 1/2 teaspoons baking soda
1 tablespoon cocoa (I used Dutch process)
1 teaspoon cinnamon
1 teaspoon salt
1 teaspoon nutmeg
1 teaspoon allspice
1/2 cup vegetable oil
2 cups applesauce
2 eggs
1 1/2 cups raisins, soaked in warm water until plump and drained

Buttercream Frosting Ingredients:
1 cup white shortening
1 cup butter, softened
8 cups confectioner’s sugar
1 teaspoon pure vanilla extract (can use clear if you want the frosting to be snow white)
4-6 tablespoons milk for thinning to desired consistency

Directions:
Preheat oven to 350 degrees F. Prepare a 9 x 13 in. baking pan with cooking spray (or butter and flour). Plump the raisins in warm water (I do this in a measuring cup that I’ll use for wet ingredients later — one less dish to clean).

In a large bowl, whisk all dry ingredients together. Add oil, applesauce, and eggs. Mix well. Add in raisins and stir to combine. Pour batter into prepared pan, rapping 3-4 times on a counter to release trapped air bubbles. Bake for 30-35 minutes or until a toothpick inserted into the center comes out with only a few moist crumbs. Let cake cool completely before frosting.

To prepare frosting, mix all ingredients until well combined. Add more milk if needed for consistency. Frost completely cool cake. Use a fork to rake grooves into the frosting to resemble A&P’s cake presentation.


Share Share this post with friends!

Oatmeal Cake with Broiled Icing

It was hard to get my baking accomplished this weekend, but if I could go back and do it all again, I wouldn’t change a thing. I just spent the weekend with 8 of the sweetest 6th graders on the planet. My church holds a youth conference each year called Disciple Now. Students travel to the homes of generous church members to spend two days worshiping God, studying His Word, and having fun. I was a family group leader, responsible for leading the gals through Bible studies and refereeing the occasional pillow fight.

My short time with those bright, silly, beautiful, brilliant young ladies was so rewarding — partly because at first, it didn’t feel like it was going very well. They were exhausted Friday when we arrived home after worship, and were in no state for the Bible study we had planned. Sleepiness, pointed watch-checking, and delirium ensued. I lay in bed that night and reiterated the prayer I’d prayed upon arriving at the event earlier in the afternoon: Lord, I know Your strength is made perfect in my weakness, and right now, I’m feeling very weak! Please come make this work for Your glory.

The next day, I spoke with other group leaders who had experienced that very same moment of brokenness late Friday night. My Bible study leader revealed that she had woken up at 3 am that morning with the urge to pray for us. I’m so thankful for her prayers and the faithfulness of God — because the fantastic time spent with the girls Saturday was not my doing, but His! Apart from wheelbarrow relay races, crabwalking, screaming contests, an obstacle course, and a whole lot of giggling, we had an amazing discussion of what it means to live a “backwards life” for Christ (here is a site where you can download a free copy of the devotional book we worked through on this topic). The girls revealed their hearts — friends they were praying for, their struggles in faith. At one point, we made a list of daring ways to share the gospel (“good news”) of Christ with our loved ones.

I’m adding one to my own personal list — posting the good news on Willow Bird Baking! You are all on my list of “loved ones”! You may not be a believer, but I challenge you to read and consider this message either way, in the spirit of allowing me to share something that’s important to my heart.

The central message of Christianity is this simple truth: we are all sinners, separated from God by our sins. We cannot remedy this by ourselves, but God so loved us that He sent His Son Jesus to live a perfect life and die in our place — paying the price for sin. Jesus was then resurrected to triumph over sin and death. If we confess with our mouth and believe in our heart that Jesus did this for us, we accept His free gift of what Christians call “salvation”: salvation from the price of sin, and an eternal relationship with God, who is a wonderful Father.

If this is the first time you’ve heard or understood what Christ did for you, will you take a moment right now and tell Him you’re accepting His gift? If you’re already a believer, will you take a moment and thank Him again? Lastly, if you’re reading this right now and have questions, please leave me a comment with your email address.

Okay, I know you’re ogling the pictures of the amazing Oatmeal Cake with Broiled Icing and wondering . . . how does Christ relate to Oatmeal Cake? Well, my jam-packed weekend resulted in a rushed baking session on Sunday. I needed a quick and simple recipe that I could make while bleary due to sleep deprivation. I cut calories during the week to splurge on the weekends, so I also wanted a recipe that could be easily devoured before Monday morning. This cake more than fit the bill — especially the easily devoured part!

This recipe is heavenly, y’all (pun intended)! The cake is incredibly moist and delicate, with a mesmerizing blend of cinnamon, nutmeg, and oats. The broiled icing is insane: toasted coconut and pecans bound by a gooey almost-caramely mixture created by the broiled butter and brown sugar. On my Recipe Index, small hearts denote Willow Bird Baking favorites — the recipes I’m over the moon about. This hearty, filling cake has more than earned its heart!

One of the best parts is that it truly is a quick and easy recipe as well. The icing is spread on while the cake is warm, meaning that the entire recipe can be easily accomplished within an hour (not including cooling time). If I got through the entire process without a hitch while half-asleep, caffeinated, sore, and frazzled, it should be a breeze for you! Happy eating!

Oatmeal Cake with Broiled Icing


Recipe by: America’s Test Kitchen*
Yields: one 8-inch square cake (about 9 pieces)

Cake Ingredients:
1 cup (3 ounces) quick-cooking oats (see note)
3/4 cup water , room temperature
3/4 cup (3 3/4 ounces) unbleached all-purpose flour
1/2 teaspoon baking soda
1/2 teaspoon baking powder
1/2 teaspoon salt
1/4 teaspoon ground cinnamon
1/8 teaspoon ground nutmeg
4 tablespoons (1/2 stick) unsalted butter, softened
1/2 cup (3 1/2 ounces) granulated sugar
1/2 cup packed (3 1/2 ounces) light brown sugar
1 large egg, room temperature
1/2 teaspoon vanilla extract

Broiled Icing Ingredients:
1/4 cup packed (1 3/4 ounces) light brown sugar
3 tablespoons unsalted butter, melted and cooled
3 tablespoons milk
3/4 cup sweetened shredded coconut
1/2 cup (2 1/2 ounces) pecans, chopped

Directions:
1. FOR THE CAKE: Adjust oven rack to middle position and heat oven to 350 degrees. Cut two 16-inch lengths aluminum foil and fold both lengthwise to 5-inch widths. Spray 8- by 8-inch metal baking dish with nonstick cooking spray. Create a foil sling for the pan: cut two 16-inch lengths of foil and fold them to widths of 5 inches each. Fit foil pieces into baking dish, one overlapping the other, pushing them into corners and up sides of pan; allow excess to overhang pan edges. This creates a sling that will help you remove the cake after baking and cooling. Spray foil lightly with nonstick cooking spray.

2. Combine oats and water in medium bowl and let sit until water is absorbed, about 5 minutes. In another medium bowl, whisk flour, baking soda, baking powder, salt, cinnamon, and nutmeg together.

3. In bowl of standing mixer, beat butter and sugars on medium speed until combined and mixture has consistency of damp sand, 2 to 4 minutes, scraping down bowl with rubber spatula halfway through mixing. Add egg and vanilla; beat until combined, about 30 seconds. Add flour mixture in 2 additions and mix until just incorporated, about 30 seconds. Add soaked oats and mix until combined, about 15 seconds.

4. Give batter final stir with rubber spatula to make sure thoroughly combined. Transfer batter to prepared pan and lightly tap against counter 3 or 4 times to dislodge any large air bubbles; smooth surface with spatula. Bake cake until toothpick inserted into center comes out with few crumbs attached, 30 to 35 minutes (careful: mine only took 28 minutes), rotating pan halfway through baking. Let cake cool slightly in pan, at least 10 minutes.

5. FOR THE BROILED ICING: While cake cools, adjust oven rack about 9 inches from broiler element and heat broiler. In medium bowl, whisk brown sugar, melted butter, and milk together; stir in coconut and pecans. Spread mixture evenly over warm cake. Broil until topping is bubbling and golden, 3 to 5 minutes.

6. Let cake cool in pan 1 hour. Following illustration 2, transfer cake to serving platter, then discard foil. Cut cake into squares and serve.

*ATK’s notes: Do not use old-fashioned or instant oats for this recipe. Be sure to use a metal baking dish; glass pans are not recommended when broiling. If you have a drawer-style broiler (underneath the oven), position the rack as far as possible from the broiler element and monitor the icing carefully as it cooks in step 5. A vertical sawing motion with a serrated knife works best for cutting through the crunchy icing and tender crumb.


Enjoy!

P.S. Reader comment: “Seriously this is the best cake I have ever baked or eaten. […] I cannot thank you enough for posting this. It is seriously amazing!” Hurray! GO MAKE THIS CAKE!


Share Share this post with friends!

1 25 26 27 28 29