other

Sweet and Spicy Pickled Grapes with Goat Cheese

First, I just want to take a moment to send love to Jennifer Perillo of In Jennie’s Kitchen who lost her husband Mikey this past week, and Kristen Doyle of Dine & Dish, who lost her brother after his struggle with cancer. I can’t begin to imagine the unthinkable heartbreak each woman is trying to navigate. I hope the huge wave of love their loss has inspired across the internet (have you seen the peanut butter pies? Mine’s coming next week) is just one tangible way God is embracing them during this time.

These tragedies come in the same year that Mara (I Made Dinner) lost her father and father-in-law and Erika (Ivory Hut) lost her home in a fire. This has been a hard year for so many blogger friends. The whole blogging community is grieving with and praying for these ladies, who deserve every ounce of the outpouring they’re receiving — and more. May God bless and keep you during your hard times.

I sat in a coffee shop last night with a friend chatting about submarines (what?) and drinking Pomegranate Hibiscus Ginger Ale. It was unfiltered, and the ginger burned my throat with spice every time I took a sip. The burning reminded me of eating rum cake, each bite of which is literally heartwarming. I love that sensation.
The ginger prickle in my throat also reminded me of pickled grapes. This intriguing recipe boasts a surprising flavor combination. I know the words “pickled grapes” may initially conjure up visions of dilly, sour grapes and the urge to upchuck one’s lunch (can I say that kind of thing on a food blog?), but hear me out.

As Deb said in the original recipe, these are a desserty sort of pickle. The brine itself is spicy with peppercorns, mustard seed, and cinnamon, and the grapes take on a deep, sweet warmth that the vinegar doesn’t overpower.
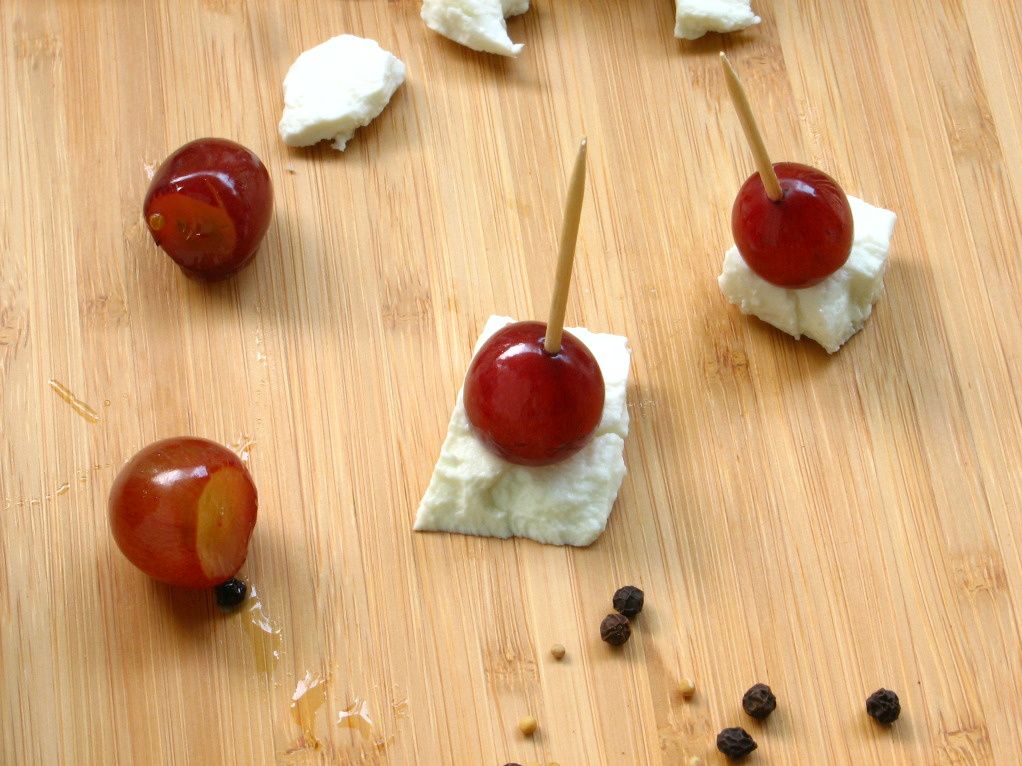
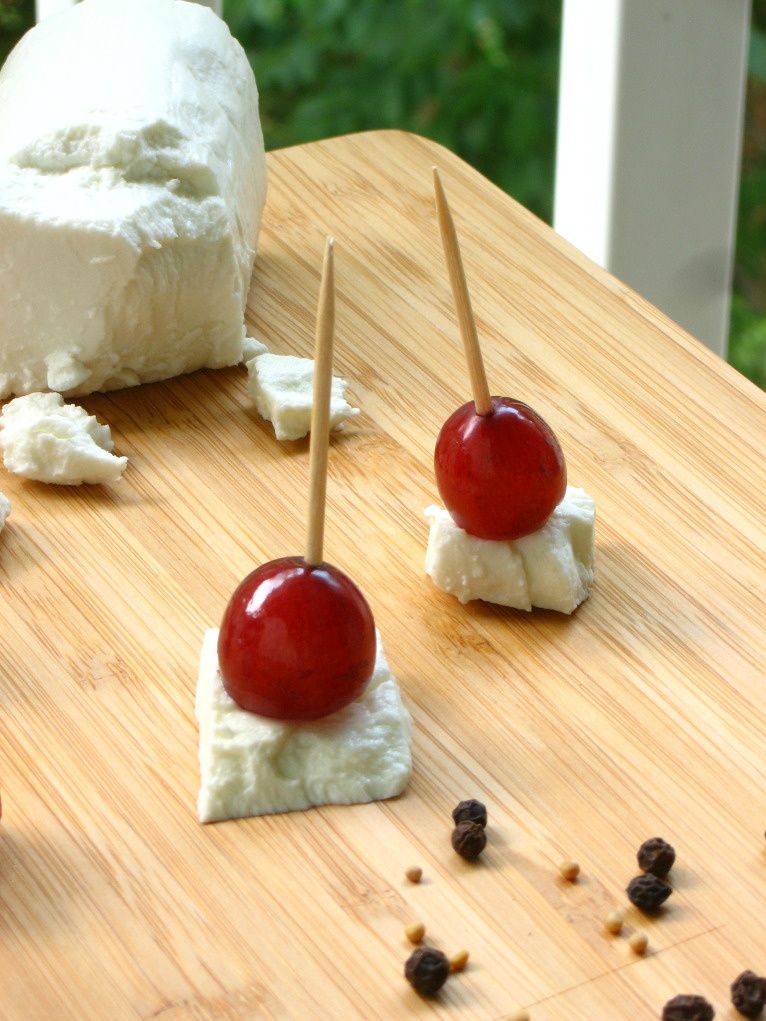
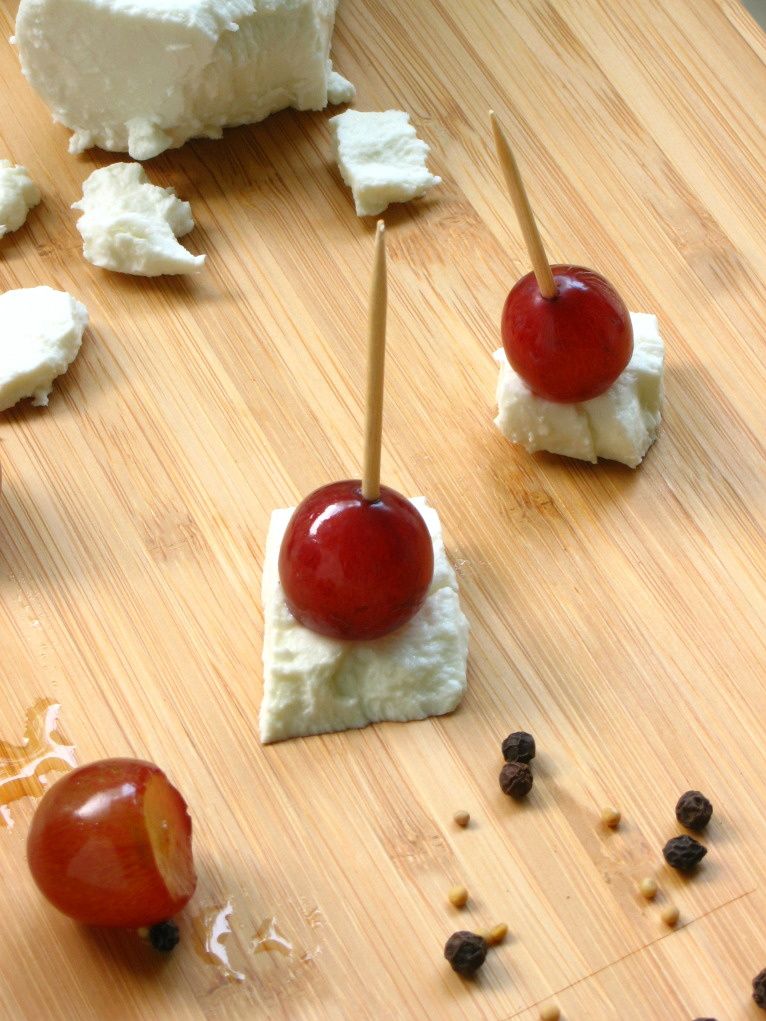
I served these in a little dish with wells for the grapes, goat cheese hunks, and toothpicks. Friends at my elementary school throwback picnic would grab a toothpick, skewer a grape, skewer a cheese hunk (that sounds like the kind of guy I want to meet — a cheese hunk. ha ha), and devour. Pairing the grapes with creamy goat cheese grounded their tangy flavor and, for me, made them the perfect appetizer.
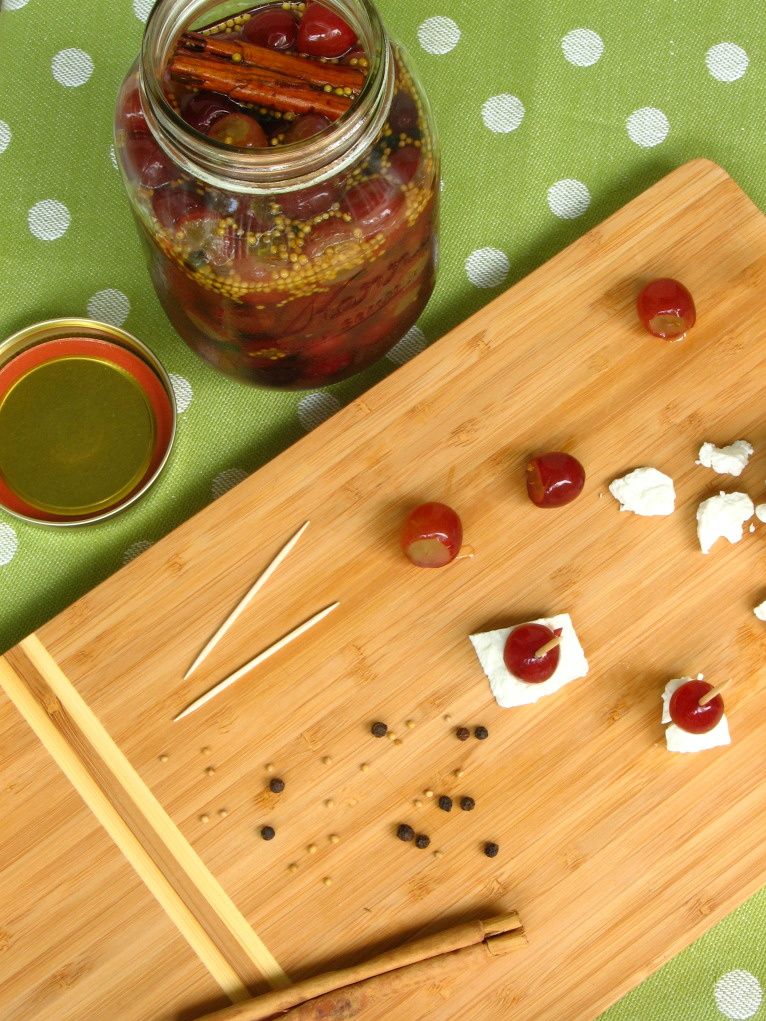
As you might expect, these meet mixed reviews. I have a friend who tried the recipe with green grapes and didn’t love them. Some folks can’t get past the idea of a pickled fruit. But I really enjoyed the ease of preparation, their convenience as an appetizer, and the taste! If you like trying new things and have an open mind (and palette), give ’em a shot!
What kinds of things do you pickle?

Sweet and Spicy Pickled Grapes with Goat Cheese


Recipe by: Adapted from Smitten Kitchen
Yields: about 3 cups of pickled grapes

Ingredients:
1 pound red or black seedless grapes, washed and with stems removed
1 cup white wine vinegar
1 cup granulated sugar
1 1/2 teaspoons mustard seeds
1 teaspoon whole black peppercorns
1 (2 1/2-inch) cinnamon stick
1/4 teaspoon salt
goat cheese for serving (optional)

Directions:
Cut off the very end of each grape, exposing a bit of the inner flesh (which will help the pickling solution infiltrate the grapes). Place the grapes in a clean mason jar.

Bring the remaining ingredients to a boil in a saucepan over medium heat. Either pour the hot brine over the grapes and let them cool together or let the brine cool and then pour it over the grapes (Deb notes the difference: “The original recipe has you pour the bring mixture over the grapes and let them cool together. I personally prefer a cold brine on certain foods, not wanting to wilt the fresh fruit, so I cool the brine completely before pouring it over. The former will yield a more tender pickle, and it will pick up the brine’s flavor faster. The latter will take a bit longer to souse, but the grapes will stay more firm.”) I chose to mostly cool my brine first.

Once your grapes and brine are cool, chill in the jar for at least 8 hours or overnight. Serve cold with hunks of goat cheese.

P.S. Are you thinking up your own filled cupcake for the Willow Bird Baking Cupcake Challenge? Bake your creation and email photos to juruble ‘at’ gmail.com by Wednesday, September 7, 2011. I’ll feature your cupcake on WBB! Find more details and some cupcake inspiration here.

If you liked this post, please:
Subscribe to Willow Bird Baking
Follow Willow Bird Baking on Twitter
Follow Willow Bird Baking on Facebook
Give this post a thumbs up on StumbleUpon


ShareOther ways to share this post with friends!

Fig, Prosciutto, and Arugula Pizza

Can we all agree that the Harry Potter series is about the best thing since sliced bread (and while we’re at it, that sliced bread isn’t all that amazing)? The plot was fantastic, surreal, colorful, and riveting. The characters were fantastic. The series inspired this parody of “Fly Like a G6.” All in all, Harry Potter is superb.

For awhile, though (like for a decade, if I’m being honest), I wasn’t interested.

When the first few books came out and people at school loved them, I was skeptical. I thought, “You guys also freak out about, like, the Backstreet Boys, so I’ll be okay without your little trends, thanks.” (Sorry BSB fans — maybe it’ll make it better if I reveal that I secretly like this song).

Then people I respected started wearing round glasses and striped scarves to midnight premieres. That gave me pause, but I’d already made this proclamation about how I was way too savvy for silly fads, so I continued to snark and scoff. Harry Potter was probably lame! They were all just a little more impressionable than I’d given them credit for!

Eventually I realized something, though. If everyone insists the sky is blue and you’re the only one looking up and seeing hot pink, you might be wrong. Not always, mind you (there was that whole Twilight thing, and yes, I actually read the books before deciding they were awful this time), but usually. So I decided to flippin’ read Harry Potter already. But I didn’t get to it . . . and didn’t get to it . . .

Finally, the seventh book came out and all Harry-Potter-heck broke loose. Forget midnight premieres; people were dressed like Harry Potter at the midnight book release. When’s the last time people have lined up at midnight at a book store? Clearly, the awesomeness could not wait any longer. I borrowed all the books from my little brother and devoured them in no time flat.

And felt really dumb. Sorry, Harry Potter fanatics, that I ever doubted you.

I’ve gone through a similar transition with homemade pizza. I never considered it a fad, per se, and I knew it was probably good — but I just didn’t get to it. Okay, everyone was raving about their favorite toppings and how easy it was to slap a crust together and all that, but I just didn’t get to it. And okay, then everyone was grilling pizza and making dessert pizza and that sounded cool, but I just didn’t get to it.

And then one day I decided to throw my elementary school throwback picnic with a menu of updated childhood favorites, and I knew the time had come. And now I feel really dumb.

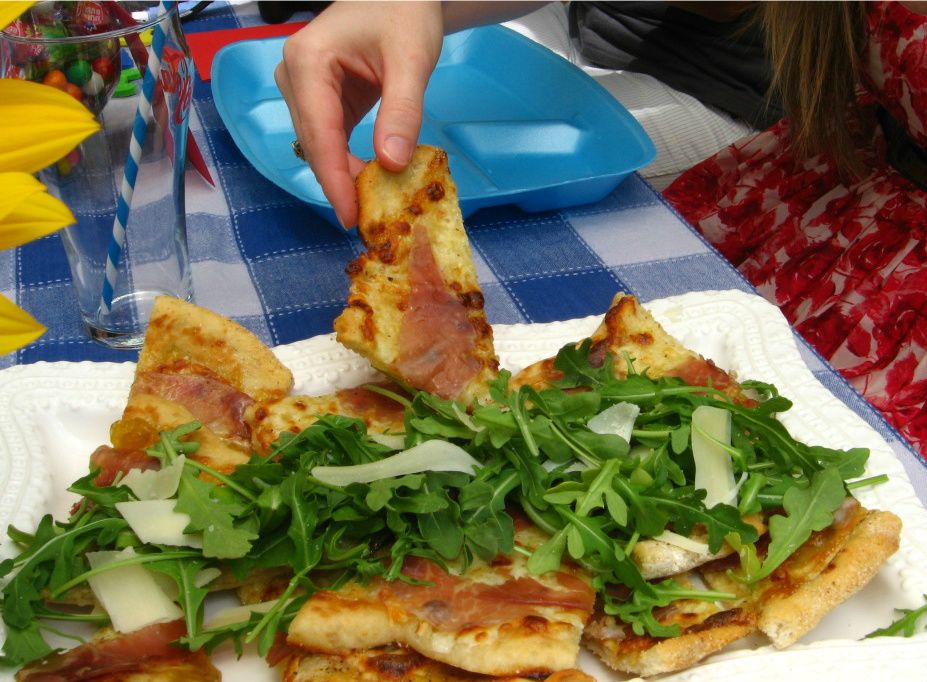
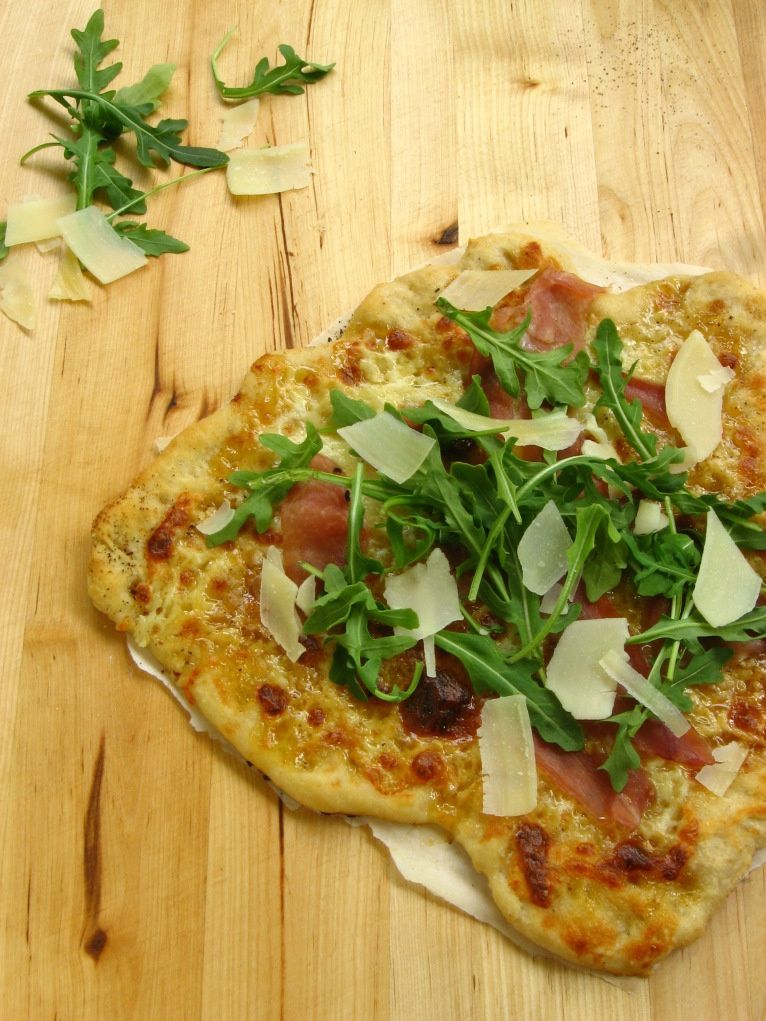
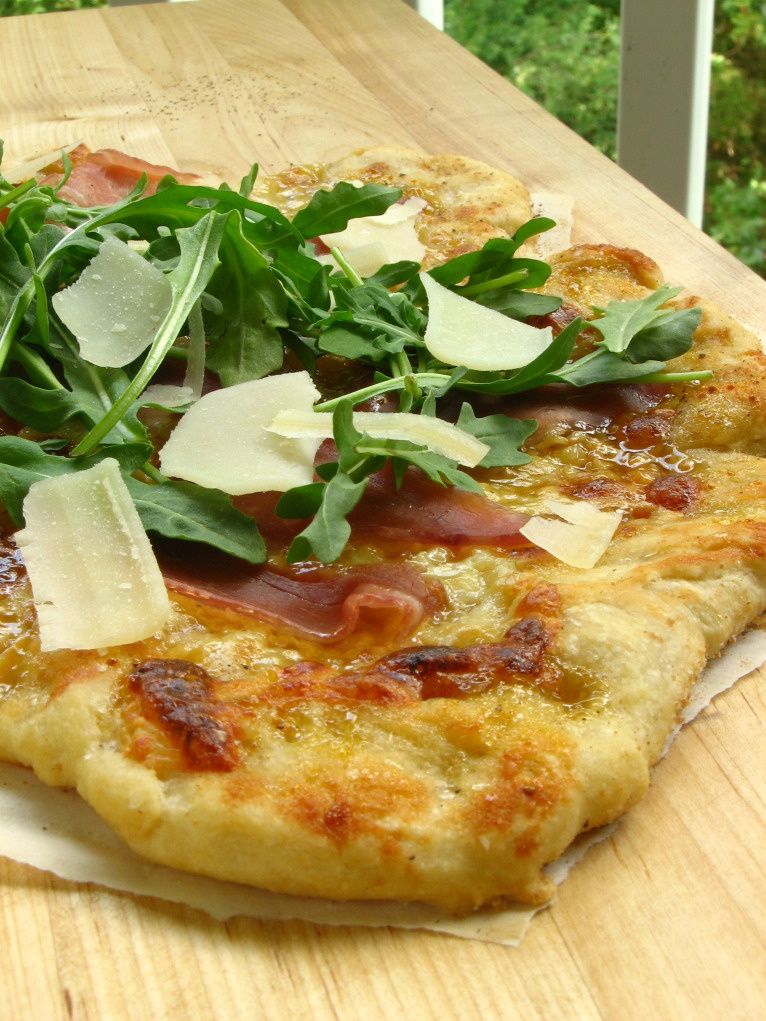
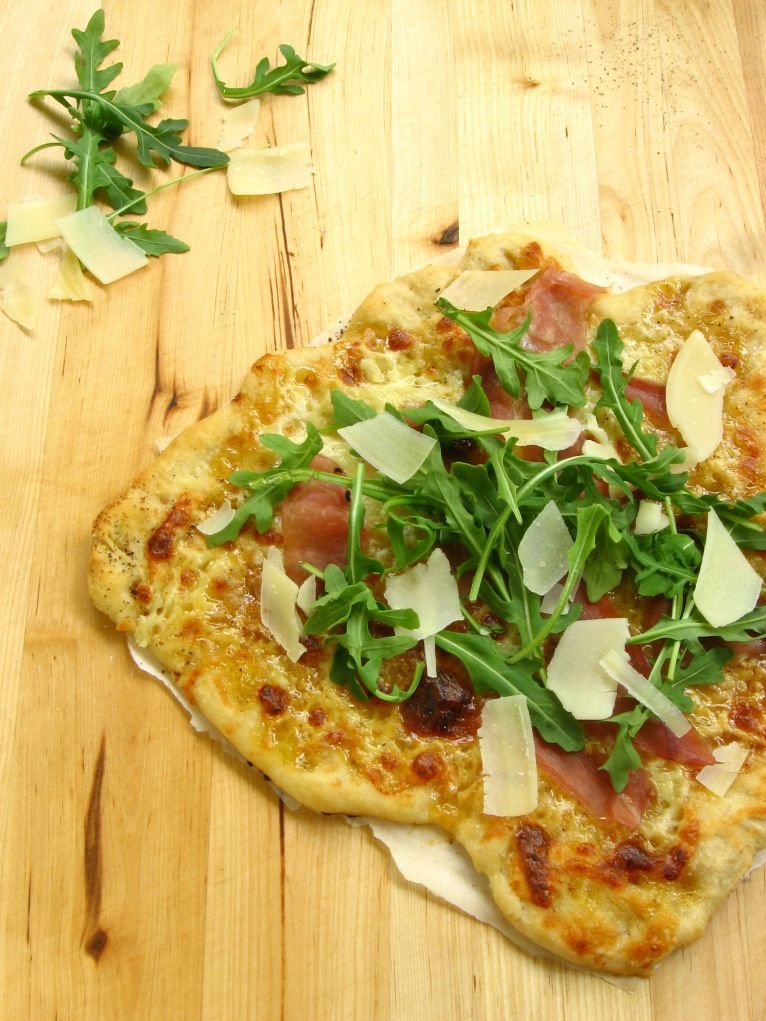
‘CAUSE HOMEMADE PIZZA IS AWESOME! This one, especially. I love Pioneer Woman’s crust dough, because you literally mix it up, throw it in the fridge, and forget about it for 3 or 4 days until you pull it out, stick some toppings on it, and bake. Speaking of toppings, these were the best of the best — a sweet fig jam, melty mozzarella, salty prosciutto, and a bunch of fresh, crisp, arugula piled right on top. It’s the Nimbus 2000 of pizza, y’all. Get to it!

P.S. I think I’d get sorted into Ravenclaw. How about you?

P.S. 2 – Starting Monday, I have a surprise for you! A week full of goodies. Just wait and see!

Fig, Prosciutto, and Arugula Pizza


Recipe by: adapted from Pioneer Woman
Yield: about 8 2-slice servings

Crust Ingredients:
1 teaspoon active dry yeast
4 cups all-purpose flour
1 teaspoon kosher salt
1/3 cup olive oil

cornmeal for sprinkling

Toppings:
2 tablespoons olive oil
4 tablespoons of fig jam (I just sort of eyeballed this)
kosher salt to taste
12 ounces fresh mozzarella, sliced thin
6 ounced prosciutto, sliced thin
a bunch of arugula
freshly ground pepper
1/2 cup shaved Parmesan

Directions:
*NOTE: this crust recipe makes 3 times the dough needed for this pizza — you can use it for other pizza recipes or just triple the toppings.

Sprinkle yeast over 1 1/2 cups of warm water. While the yeast foams for a few minutes, combine flour and salt in a mixer. Drizzle in olive oil with the mixer on low speed, until ingredients are combined. Pour in yeast mixture and mix until combined. Coat a medium mixing bowl with olive oil and plop the dough out into it. Cover this and put it in a draft-free area (like your closed oven) to rise for about an hour. Then scoop it out onto plastic wrap, wrap it up, and stick it in a ziplock bag (don’t skip this, because it will burst it’s plastic wrap). Throw it in the fridge (okay, or gently set it) for at least 24 hours, or (better yet) 3 or 4 days.

When you’re ready for pizza, preheat oven to 500 degrees (with a pizza stone in it, if you have one. I don’t, so I preheated mine with a pizza pan inside). On a sheet of parchment sprinkled with cornmeal, pat the dough out as thin as possible (using greased fingers). Drizzle the crust lightly with olive oil. Spread a thin (but not too thin) layer of fig jam all over the surface and sprinkle with kosher salt. Lay sliced mozzarella all over the pizza and sprinkle these slices lightly with kosher salt. Grind pepper over the pizza. Bake for 12 to 15 minutes, until crust is golden brown and cheese is bubbling and gooey and oh dear.

Remove the pizza from the oven and lay the prosciutto all over it while it’s still hot. Right before you’re going to serve it, pile on cold arugula and sliced Parmesan. Cut into pieces and enjoy!

If you liked this post, please:
Subscribe to Willow Bird Baking
Follow Willow Bird Baking on Twitter
Follow Willow Bird Baking on Facebook
Give this post a thumbs up on StumbleUpon

ShareOther ways to share this post with friends!

Pretty Italian Pressed Sandwiches

Pressed —

— the air on East Bay Street was the wing of a pinned insect: dry and crisp, humming with vibrations (sound? wind?) as if still animate. The man approached us on the sidewalk with a swagger a few degrees too severe to be confidence, two hooks for hands, a face that blended into the darkness. Did we want to buy some flowers? My instinct was no-thank-you, but you uncrumpled a few dollar bills and suddenly we had a little bouquet: a peach rose haloed in anonymous blue blooms and holly berries, with the stems wrapped in tin foil.

We were still cynical in the darkness — were the hooks real? a ploy for sympathy? Later I unwrapped the bouquet to put the flowers in a plastic soda bottle filled with water from the hotel sink, and we saw the tears from the hooks in the tinfoil. Eight years later, the flowers are pressed in a bag in the back of my closet somewhere I won’t happen upon them and be injured.

Pressed —

— a late September night when I was five, when summer hadn’t yet given up the ghost. Both my mother and father were both at work. My sisters and I knew that the weather was growing more sinister. What warned us? Was it the lightning? A phone call from my halo-haired mother at the hospital? A screeching report on the news? I don’t remember, but I remember the odd mix of fear and excitement as we realized a hurricane was coming.

I had vague notions about what to do in severe weather — something about getting on your knees in a school hallway, building a fortress for your vital organs with your spine, your little hands crossed over your head. Or something about being in a basement, which we didn’t have, or in a room without windows, or was it mirrors, or was it both? The hall closet in the center of the first floor housed a hot water heater I felt sure would burst and boil us all in the middle of the storm.

My sisters conferred and decided we would take shelter under the daybed in their room, nevermind that it was upstairs and nevermind that my scrawny five-year-old arms could’ve probably lifted it. Suddenly, their clutches were on me and I was being pushed, prodded, pressed under the bed — the first one under, destined to be pinned in by the wall in front of me and both of their bodies behind me.

As I felt myself being entombed by the bed frame, a bag of bricks settled on my lungs and thick claustrophobia blanketed my esophagus — suddenly I was clawing, kicking, screeching. After a few moments of intense struggle, my battered sisters gave me up for lost and climbed under the bed themselves, probably vowing to kill me themselves if the hurricane left me unscathed. I ran into the living room with a rebellious heart, opened the blinds, and stood in front of the window as if it were a movie screen, watching the weather bend the city.

Pressed —

— the crush as I fell off the end of the slide into the dirt, the crunch as the boy behind me brought his heavy shoe down on my nose, the splatter of blood on the hopscotch court and on my pink nylon windbreaker —

Pressed —

— full body weight on bone, a long night of pain, the eventual sling, the osteal memory: an ache along a marrow corridor.

— the pressure of “using the body to eliminate the body,” the weight of no weight, the bottomless glass of chocolate milk that was the road out.

— my hands pressed under the tiny basil plant, ensuring his baby roots made contact with the new soil beneath.

— freshly made ricotta cheese unceremoniously hanged in cheesecloth, mass and gravity pressing the extra water out toward the center of the Earth,

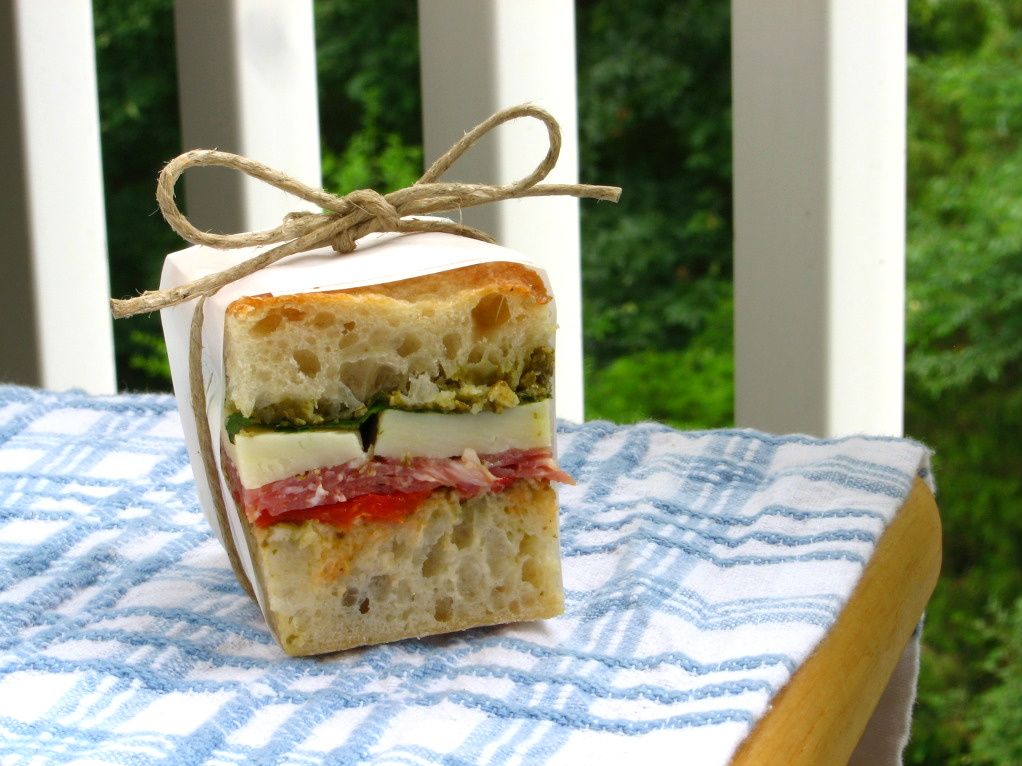
— a new cast-iron skillet placed on top of the wrapped sandwich and then, when the weight still seemed too slight, a cast iron grill pan added as well. The mass of cast-iron compressing the thick, crusty ciabatta down into a rainbow of provolone, salami, roasted peppers. The pesto negotiating a seductive path through the bread’s caverns.

What are your memories of pressure?

Pretty Italian Pressed Sandwiches


Recipe by: adapted from The Cilantropist
Yields: about 5 servings

Ingredients:
1 loaf ciabatta bread
roasted red peppers or tomatoes
sliced hot salamis
sliced provolone cheese
fresh or deli pesto
fresh basil leaves

Directions:
Note: Make this sandwich a day in advance so it has time to press, but don’t leave it for much longer or it will get soggy. When adding each ingredient layer to the sandwich, your goal should be to ensure there’s complete coverage of the previous layer so that when you cut your sandwiches, the colors will be distinct and complete, with no gaps.

Use a long serrated knife to slice the loaf of ciabatta lengthwise. Spread on a thin layer of pesto (don’t saturate the bread) and then lay out a layer of roasted peppers or tomatoes. Next, add about 3 layers of salami (overlapping slices) and a thick layer of cheese on top of that. Top with a layer of fresh basil leaves. Spread more pesto on the top slice of ciabatta and settle it on top of the sandwich. Wrap the sandwich tightly in plastic wrap and refrigerate with a weight on top — I used a cast-iron skillet and a cast-iron grill pan. When ready to serve, use a serrated knife to slice into pretty squares.

P.S. This recipe was part of my elementary school throwback picnic! Visit that post to see more picnicky fun.

If you liked this post, please:
Subscribe to Willow Bird Baking
Follow Willow Bird Baking on Twitter
Follow Willow Bird Baking on Facebook
Give this post a thumbs up on StumbleUpon


ShareOther ways to share this post with friends!

Straw-Raspberry Basil Fruit Leather

I’m a writer, personally and professionally. I write poetry (my first literary love), I keep a journal, I write essays and articles. I even have this blog — I don’t know if you’ve heard of it — where I write about food and stuff. Cough.

I love well-chosen words, purposeful syntax, concrete images, a sturdy grammatical infrastructure. I even love the thoughtful absence of words, the careful economy of constructing meaning.

But in second grade, let’s just say I didn’t know what syntax was just yet. And I was a twerp.

By twerp, I mean I was one of those flippant kids who think they’re immeasurably witty. You’ve probably run across a twerp or two in your own life. Hopefully you’ve resisted the urge to kick them, or at least haven’t gotten caught doing so.

My beloved second grade teacher, Mrs. Shaughnessy, was adept at resisting the urge to kick me. In fact, that amazing woman seemed to genuinely love me and want me to explore my talents.

Our daily journal assignment was supposed to give me the opportunity to do so. We’d all receive a sheet of that burlap-brown paper ruled with inch-wide lines — the only kind hospitable to the malformed block letters second grade hands produce. It was the sort with a blank space up top for an illustration, so the required length of our journal entries was automatically halved. Apparently, though, having to fill 3 whole lines with text was too fussy for me.

Every single day, I’d grab my sheet of paper and my great big honkin’ pencil — which had both the girth and color of a dingy school bus — and write some variation (ha ha, pun intended) of the following:

Today I was very, very, very, very, very bored.

The number of veries (verys? “very”s?) changed depending on how large I was writing that day — I’d just keep adding them until I filled up the page. Then I’d slap a half-hearted illustration of a teddy bear or a heart on that baby and stick a fork in myself, ’cause I was DONE. Time to color.

God bless my teachers.

One day, Mrs. Shaughnessy addressed the subject of my journal writing strategy by hacking off its legs. With a stern look, she declared that I was officially limited to two veries per page. The end. No arguments. I would just have to find it within myself to meet the length requirements without my crafty adverbs, and I might even have to, like, actually describe my day or something. The horror.

I look back now and think this shows saintly restraint on her part. If I’d been her, I might have also added, “And stop saying my class is boring, and stop drawing hearts just because they’re easy, and stop being such a twerp!”

Okay, okay, I guess I’d nix the twerp part.

Ah, second grade. The year of twerpitude, of learning that shortcuts don’t pay off, of Mrs. Shaughnessy’s encouragement. And the year of fruit roll-ups.

Really, I loved all of the tangy, sweet incarnations of processed fruit leather throughout my childhood: old school fruit roll-ups, fruit roll-ups with shape cut-outs, fruit-by-the-foot. I’d unroll them from their thin plastic wrappers and stuff a huge hunk in my mouth, pick the sweet stickiness out of my teeth with my tongue for a few minutes, and then repeat the process.

Because of all of my fond fruit snack memories, I knew my recent elementary school throwback picnic wouldn’t be complete without a grownup version of the fruit roll-up.

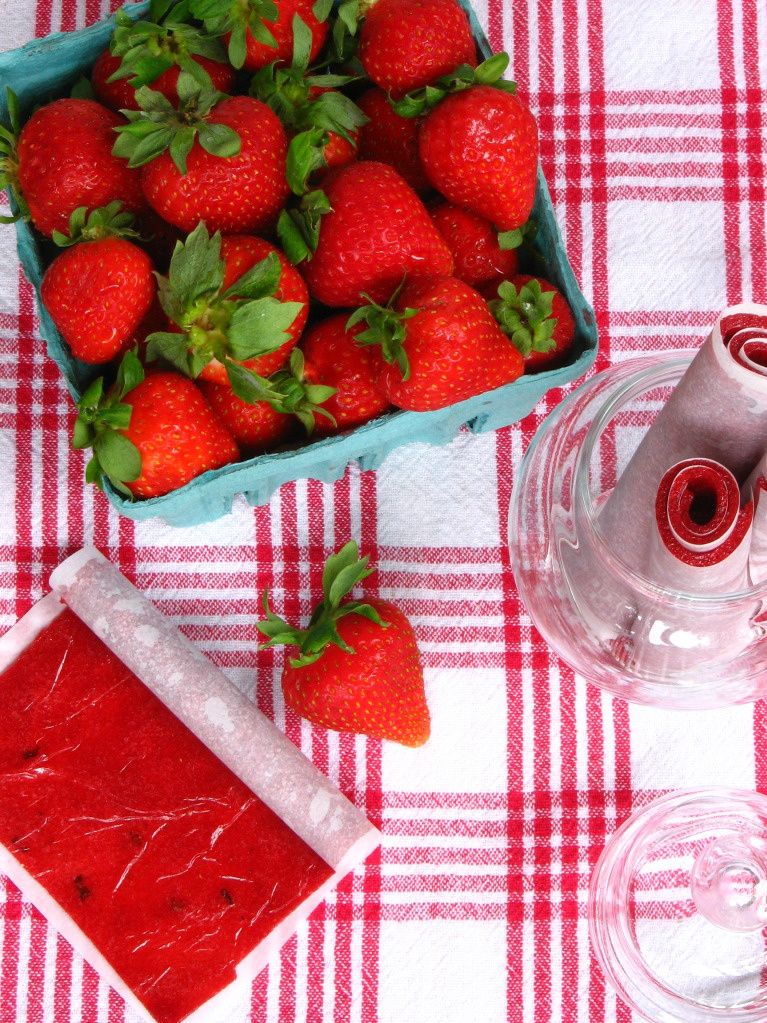
This recipe uses a combination of strawberries and raspberries with some minced basil thrown in for herbal brightness. The resulting fruit leather tastes more like a burst of tangy fruit than the processed kind. The recipe does take quite awhile (though not too much active work time) and only produces about 5 fruit roll-up sized portions, so you may want to work on two pans at once.

I’m not sure that I’d make this all the time given the amount of fruit required, but I enjoyed the fun results. I also love that it packs a ton of fruit into a single snack; if I had children, being able to control what was in their lunchboxes might motivate me to make it more often.

Were you a twerp as a child? Know any twerps? Do tell.

P.S. Dear Mrs. Shaughnessy, your class was very, very, very, very, very, very engaging. I promise.

Straw-Raspberry Basil Fruit Leather


Recipe by: adapted from Gourmet, with tips from Simply Recipes
Yield: about 5 “fruit roll-up” sized squares

Ingredients:
about 3 cups halved strawberries
about 1 cup raspberries
spritz lemon juice
1 tablespoon minced fresh basil
scant 1/2 cup sugar

Directions:
Preheat the oven to 200 degrees F and line a sheet pan with microwave-safe plastic wrap.

Place berries, spritz of lemon juice, and sugar in a food processor or blender and purée. Strain into a heavy saucepan using a fine-mesh sieve and bring it to a boil, stirring occasionally. Reduce heat to medium-low and simmer for about 10 minutes, continuing to stir occasionally. Stir in the basil and simmer for about 10 more minutes, stirring more frequently towards the end.

Pour the purée onto prepared baking sheet and use an offset spatula to spread it out as thinly and evenly as possible. Dry in oven for 2 to 3 hours until it’s slightly tacky but doesn’t stick to your fingers. At this point I turned the oven off and left it in for about 5 more hours. Then take it out and let it continue drying on a cooling rack for up to 19 more hours until completely dry and set. If some still-sticky purée exists around the edges where the plastic wrap prevented drying, just scrape that off and discard.

Lay a sheet of parchment or wax paper on the counter and invert sheet pan onto it. Slowly and carefully peel plastic wrap off of the back of the fruit leather and then roll it up in the parchment/wax paper, cutting it into portions if you’d like. Store in a sealed bag at room temperature for up to 1 month, or in the fridge.

If you liked this post, please:
Subscribe to Willow Bird Baking
Follow Willow Bird Baking on Twitter
Follow Willow Bird Baking on Facebook
Give this post a thumbs up on StumbleUpon

ShareOther ways to share this post with friends!

Easy, Cheap DIY Party Pennant Banner

Every now and then I post a food related craft that I hope will add some joy to your family meals, parties, and picnics. Full disclosure: I know I’ve said this before, but just to reiterate, I am not a crafty person. When it comes to crazy fabricky, gluey, scissory things, I give up.

First off, I have tremendous patience in my kitchen. Said patience does not extend to cutting out finicky shapes or hand-stitching for five hours. Second off, nothing I make turns out better than something I can buy (food is obviously excluded from this statement, y’all. Don’t be cheeky.)

But for my picnic last week, I wanted a pennant banner.

In addition to being impatient, I’m always dirt poor. Poking around on Etsy for a pennant banner to purchase, I noticed that these triangles attached to string literally cost $20 and up. Don’t get me wrong; some of them were nice triangles attached to string. Fancy fabrics, lettering, etc. But not nice enough to make me spend $20. On triangles. Attached. To. String.

Enter felt, staples, liquid stitch, and string. This craft was literally one of the easiest I’ve ever attempted, as evidenced by the fact that I was successful at it.

I did the whole thing in an hour or so, and the only reason it took me that long is because America’s Got Talent was so enthralling that night. Did you guys see the girl on the Russian barre? The woman with the long blonde braids and the operatic voice? The silver-clad pole danc– uh. Okay, well. Back to crafting.

This pennant banner would work with any color of felt squares (e.g. red, white, and blue for Independence Day). It’d also be easy to cut out felt letters to liquid-stitch onto each of your triangles for a “Happy Birthday” or “Welcome Home” banner.

Best of all, the whole project costs about $8 — and since I bought a big spool of string, packs of felt rectangles with extra colors, and a whole tube of liquid stitch, I can actually make 2 or 3 more banners with the materials I have left! Perfect.

Easy Party Pennant Banner


Yields: about 24 feet

Supplies needed:
spool of hemp string
stapler
Liquid Stitch or similar product
15 felt triangles*
scissors

Directions:
*Note on triangles: I bought 5 packs of multicolored 8″ x 5″ felt rectangles at the dollar store and then cut just the red rectangles into triangles — saving the black, blue, and green for another project! You could do this or buy sheets of felt and cut out the triangles. You want a base of at least 5 inches and a height of about 8 inches to achieve the look shown above.

1. Leave about 2 feet of string empty before you add your first triangle — this gives you some space to tie your banner onto a hook or column.

2. Place the base (the long end, not the point) of your first triangle under your string with just about 1/4 inch of felt sticking up beyond the string. Staple both corners to the string (see photos above).

3. Squeeze a line of Liquid Stitch under the string between the two staples and hold the string against it for a few seconds until it begins to set. It’s best to go the full length of the string so the triangles won’t bunch up (I realized this too late. Oh well. I just have to do a little triangle fluffing before I hang mine.)

4. Measure about 4 inches from the corner of your attached triangle and lay your next triangle under your string (I actually placed a sheet of paper on my workspace and marked off a 4 inch space so I didn’t have to measure each time). Repeat steps 2 and 3.

5. Continue until all triangles have been added. Leave about 2 feet of empty string after your last triangle for tying.

6. Let dry overnight. Store your banner wrapped around something that can act as a spool (I used a mini plastic shelf, but have used empty cereal boxes, etc., in the past) like you would store Christmas lights, so it doesn’t get tangled.

If you liked this post, please:
Subscribe to Willow Bird Baking
Follow Willow Bird Baking on Twitter
Follow Willow Bird Baking on Facebook
Give this post a thumbs up on StumbleUpon

ShareOther ways to share this post with friends!

1 49 50 51 52 53 69