Month: January 2010

Strawberry Walnut Ricotta Muffins

I’m detecting a pattern here: something about cold weather makes me want a big, hot breakfast. Usually my breakfast is a small, rushed affair: a couple of turkey sausages and I’m on my way. This weekend, though, promised inches of snow and icy conditions in Charlotte. Breakfast had to stand up to the cold!

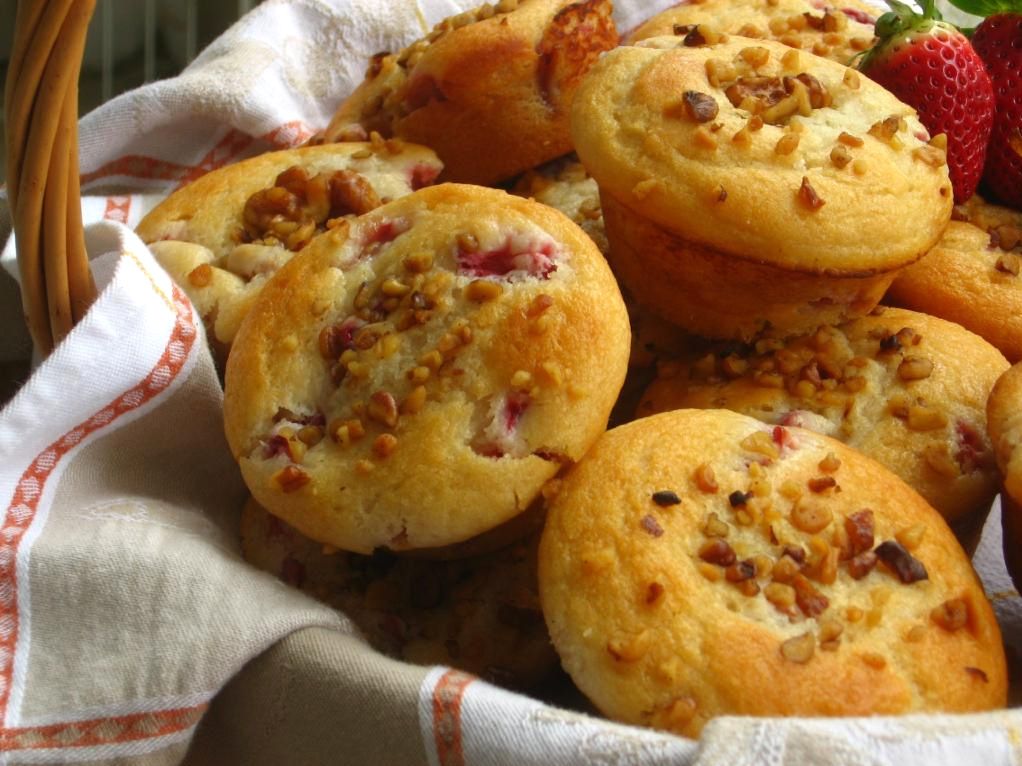
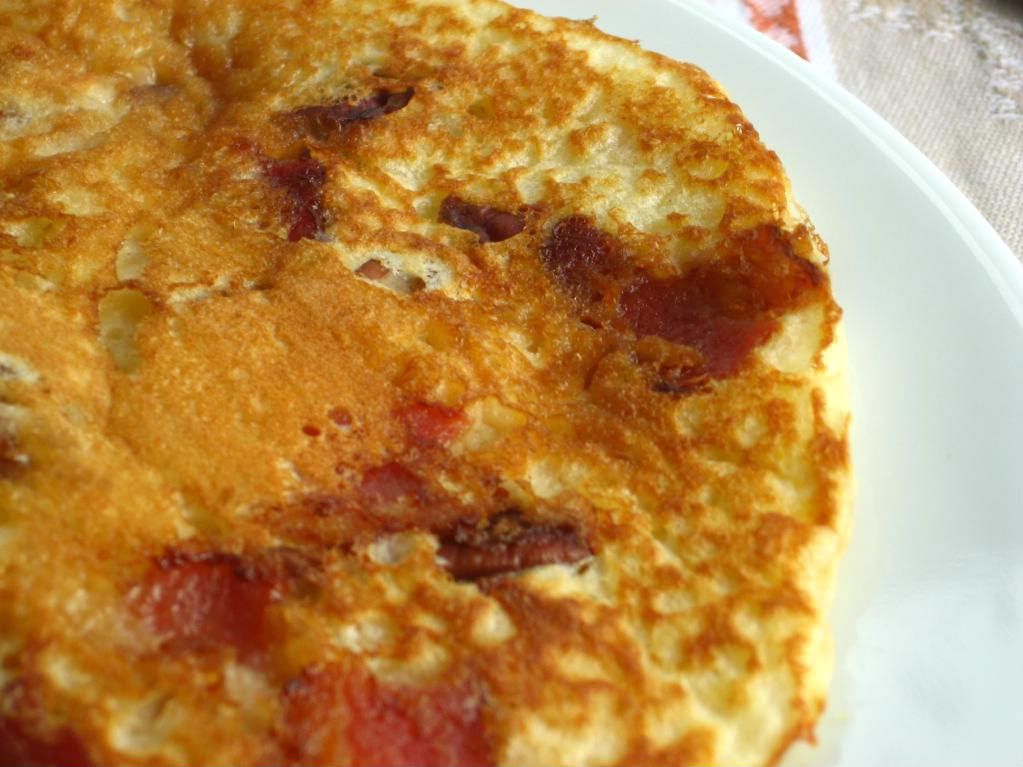
Thankfully, Smitten Kitchen had recently equipped me with a killer muffin recipe. Deb posted these fantastic-looking Ricotta Muffins last week. They were billed as a very slightly sweet, nutty muffin with a surprising hint of fennel. Very intriguing, but I fiddled with the idea a bit to produce more what I was craving. I ditched the fennel, sweetened these babies up a bit, and added in some fresh strawberries. The result is really a whole different beast: sweet, fruity, light, cheesy, nutty, hearty . . . a breakfast superstar!

…but a beast, nonetheless. These things are fussy. The ricotta and sour cream filling is runny (as Deb mentions in her post, perhaps it’d be different if you were to use fresh ricotta and crème fraiche), so the batter has to be piped on top of it, which is quite a mess.

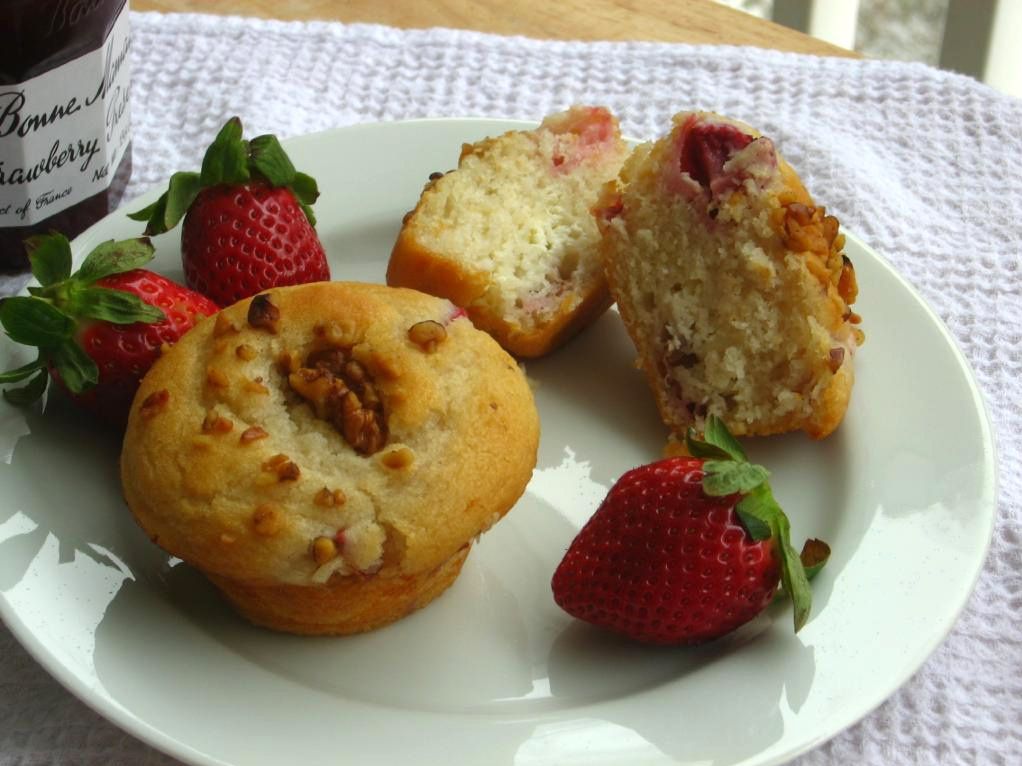
The muffins are also very tender (what with the ricotta mixture in the middle, as well as strawberries breaking up the muffin, in my case) and so they can’t be scooped out of their wells. Instead, I had to let them cool in the pan for about 20 minutes before inverting them onto the cooling rack. They cooled with their cute little muffin bottoms in the air, and finally, they were firm enough to turn over and stick in the fridge. My kitchen was a disaster area — bowls, beaters, pans, cutting boards, berries — but I wouldn’t be writing this if they weren’t worth it.

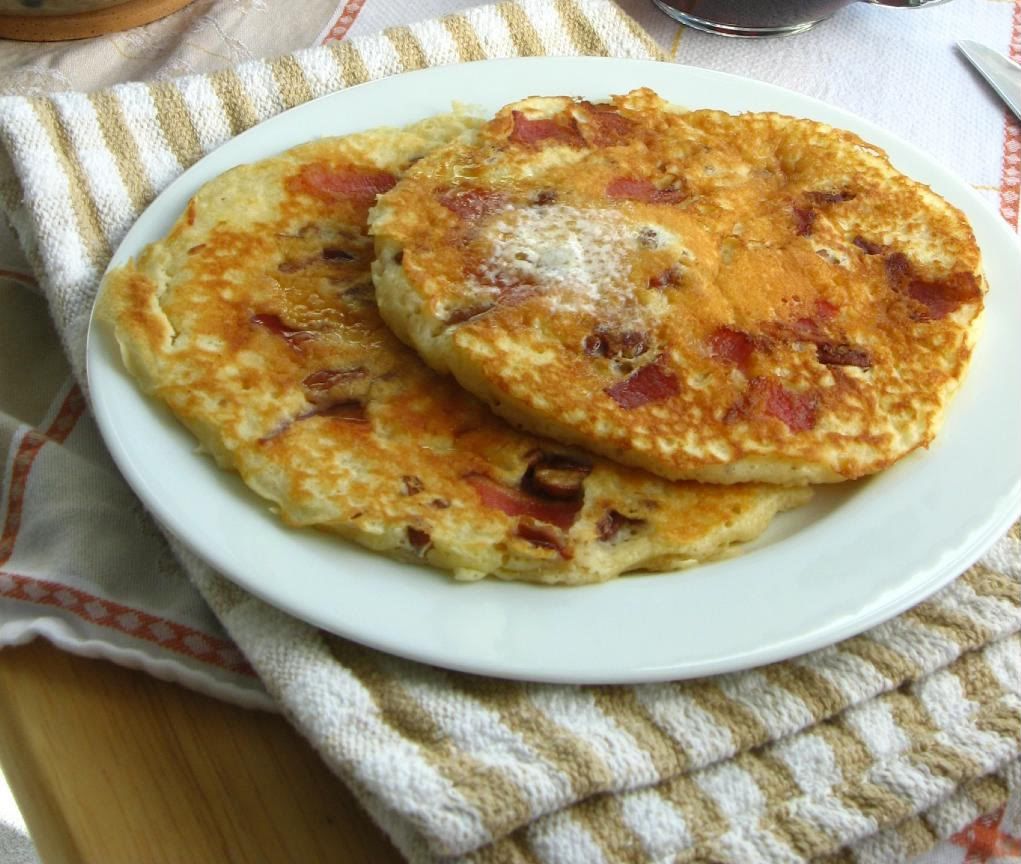
Like so many fruity baked goods, these were amazing after being refrigerated overnight. Wonderful news, because you probably don’t want to spend the time and effort required to make these first thing in the morning. I popped them into the microwave for 30 seconds before Mike and I managed to devour, oh, 11 of them. Full disclosure! The two of us ate ELEVEN MUFFINS! I told you they were worth the trouble. The ricotta makes for a fluffy, moist, gooey muffin, and the strawberries were lovely with the tang from the yogurt and sour cream. They weren’t too sweet — perfect for breakfast (though who am I kidding . . . I can definitely do dessert for breakfast on occasion).

Muffins freeze well, too, so why not make a double batch and freeze up a few for later? I actually intended to do just that (my double batch made 27 muffins), but at the rate Mike and I are going . . . yeah, we’ll see how many of these make it to the freezer! I hope you’re enjoying some hearty, warm breakfasts of your own this winter (and for all my friends enjoying summer across the globe right now, run through a sprinkler or two for me!)

Strawberry Walnut Ricotta Muffins


Recipe by: Pastries from La Brea Bakery (adapted by Smitten Kitchen, and then by Willow Bird Baking)
Yields: 12-14 muffins

Ingredients:
1/2 cup (2 ounces) walnuts (can substitute pecans)
3 cups unbleached pastry flour or unbleached all-purpose flour
3/4 cup granulated sugar
1 tablespoon plus 1 teaspoon baking powder
3/4 teaspoon baking soda
1 1/2 cups plain yogurt
3/4 cup vegetable oil
1/2 cup (4 ounces) ricotta cheese
6 tablespoons crème fraîche or sour cream
3 tablespoons confectioners’ sugar
1 1/4 cup chopped strawberries
Kosher salt, to taste

Adjust the oven rack to the center position and preheat oven to 325°F. Lightly butter a 1/2-cup capacity muffin tin (I used Cake Release. Butter and flouring the tin will also work. Make sure that when you invert the pans, these babies are going to come out!)

Spread the nuts on a baking sheet and toast in the oven until lightly browned, about 8 to 10 minutes. Shake the pan halfway through to ensure that the nuts toast evenly. Cool, chop finely and set aside. Turn the oven up to 350°F.

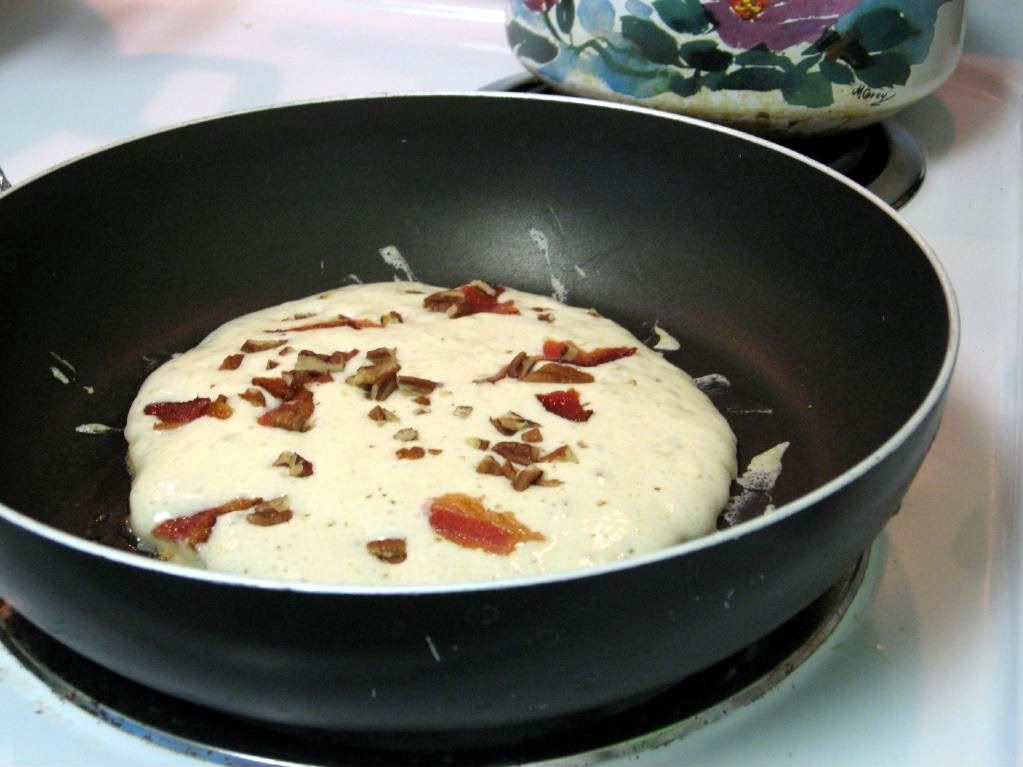
In a large bowl, sift the flour, sugar, baking powder and baking soda together to combine. Make a large well in the center and pour in the yogurt and oil. Whisk together the liquids and gradually draw in the the dry ingredients, mixing until incorporated. Fold in chopped strawberries.

To prepare the filling: Place the ricotta in a mixing bowl and, if stiff, break it up wtih a rubber spatula to loosen. Stir in the sour cream or crème fraîche, confectioners’ sugar, and a pinch of salt.

Using a pastry or plastic bag with the corner cut off, fill each muffin tin one-third of the way with batter. Place one tablespoon of the ricotta filling into the center of each muffin. Pipe the remaining batter into the cups, filling them to just below the rim (resist the urge to overfill). Sprinkle about 1 teaspoon of the nuts over the top of each muffin.

Bake for 25 to 30 minutes, until lightly brown and firm to the touch. Let cool in pan for about 15-20 minutes before inverting over a cooling rack. Let cool upside down. When completely cool, refrigerate in an airtight container until it’s time to eat! Heat for a few seconds in the microwave before eating.


Mixing up the batter and some overfilled muffins fresh from the oven.


Cooling off upside down, and then getting packed up for the fridge.


See that snow in the background? Brrr!


Share Share this post with friends!

Nanaimo Bars

You know those commercials where a thin, statuesque model takes a bite of chocolate and all her troubles melt away (usually dramatized by a fancy silk sheet blowing through the scene)? Let’s briefly ignore the physical ironies and textiles, because I have great news: that kind of trouble-melting food does exist! It’s a Nanaimo Bar! Who knew?

The folks in Nanaimo probably did. Nanaimo (pronounced nuh-NYE-moh) is a beautiful town on Vancouver Island famous for a very sweet treat. Local folklore says that around 35 years ago, a woman from Nanaimo entered her bars into a competition, naming them after the city. They were a sensation, and the Nanaimo Bar was born.

The January 2010 Daring Bakers’ challenge was hosted by Lauren of Celiac Teen. Lauren chose Gluten-Free Graham Wafers and Nanaimo Bars as the challenge for the month. The sources she based her recipe on are 101 Cookbooks and http://www.nanaimo.ca.

I love Lauren — her blog is full of delicious recipes and lovely photos. If you haven’t already checked out Celiac Teen, you should — especially if you’re looking for gluten-free goodness!

Nanaimo Bars sound to me like the result of one of those urges (do you ever get these? I do.) to combine as many amazing-tasting things as possible into one dish, and then eat yourself silly. They have a thick, indulgent bottom layer of chocolate-bound pecans, coconut, and crushed graham crackers.

Not just any graham crackers, mind you! We’re daring bakers after all, so we have to add a little oomph. They were homemade graham crackers in this case — yeah, that’s how we roll! No, literally . . . I was rolling, rolling, rolling out dough into the night to bake up my stack of golden crackers. The crisp, fresh, mild crackers were worth the effort, though, and I can’t wait to use the leftovers to make s’mores this weekend! Lauren provides a recipe below for gluten-free graham crackers, which I would’ve loved to make, but I settled for the wheat version this time around due to flour costs. If you’re in a hurry, use some store-bought graham crackers in your Nanaimo Bars. The result will be just as delicious.

The other two layers of a Nanaimo Bar are similarly heavenly. A middle layer of rich vanilla custard balances the chocolate overload, and a thin layer of hardened chocolate on top completes the bar. Each bite has a little crunch, a little cream, and a LOT of sweet, rich, chocolatey goodness.

Graham Crackers


Recipe by: 101 Cookbooks and GF adaptations by Celiac Teen
Yields: varies depending on size of crackers (~10 large)

Ingredients:
2 ½ cups plus 2 tablespoons all-purpose wheat flour, or wheat pastry flour*
1 cup dark brown sugar, lightly packed
1 teaspoon baking soda
3/4 teaspoon kosher salt
7 tablespoons unsalted butter (cut into 1-inch cubes and frozen)
1/3 cup honey (mild-flavored, such as clover)
5 tablespoons whole milk
2 tablespoons pure vanilla extract

Directions:
1. In the bowl of a food processor fitted with a steel blade, combine the flour, brown sugar, baking soda, and salt. Pulse on low to incorporate. Add the butter and pulse on and off, until the mixture is the consistency of a coarse meal. If making by hand, combine aforementioned dry ingredients with a whisk, then cut in butter until you have a coarse meal. No chunks of butter should be visible.
2. In a small bowl or liquid measuring cup, whisk together the honey, milk and vanilla. Add to the flour mixture until the dough barely comes together. It will be very soft and sticky.
3. Turn the dough onto a well-floured surface and pat the dough into a rectangle about 1 inch thick. Wrap in plastic and chill until firm, about 2 hours, or overnight.
4. Divide the dough in half and return one half to the refrigerator. Sift an even layer of sweet rice flour onto the work surface and roll the dough into a long rectangle, about 1/8 inch thick. The dough will be quite sticky, so flour as necessary. Cut into 4 by 4 inch squares. Gather the scraps together and set aside. Place wafers on one or two parchment-lined baking sheets. Chill until firm, about 30 to 45 minutes. Repeat with the second batch of dough.
5. Adjust the rack to the upper and lower positions and preheat oven to 350 degrees Fahrenheit (180 degrees Celsius).
6. Gather the scraps together into a ball, chill until firm, and reroll. Dust the surface with more sweet rice flour and roll out the dough to get a couple more wafers.
7. Prick the wafers with toothpick or fork, not all the way through, in two or more rows.
8. Bake for 10-12 minutes, until browned and slightly firm to the touch, rotating sheets halfway through to ensure even baking. Might take less, and the starting location of each sheet may determine its required time. The ones that started on the bottom browned faster.
9. When cooled completely, place enough wafers in food processor to make 1 ¼ cups of crumbs. Another way to do this is to place in a large ziplock bag, force all air out and smash with a rolling pin until wafers are crumbs.

*For gluten-free graham crackers, substitute the following flours for the all-purpose flour (and beware that no cross-contamination occurs):
1 cup sweet rice flour (also known as glutinous rice flour; plus more for dusting)
3/4 cup tapioca starch/flour
1/2 cup sorghum flour

Baking time will increase to around 25 minutes with these adjustments.

Nanaimo Bars


Recipe by: City of Nanaimo
Yields: About 13-14 bars depending on size

Bottom Layer Ingredients:
1/2 cup unsalted butter
1/4 cup granulated sugar
5 tablespoons unsweetened cocoa
1 large egg, beaten
1 1/4 cups graham cracker crumbs (see recipe above)
1/2 cup almonds (finely chopped) *I used pecans here.
1 cup coconut (shredded, sweetened or unsweetened)

Middle Layer Ingredients:
1/2 cup unsalted butter
2 tablespoons and 2 teaspoons heavy cream
2 tablespoons vanilla custard powder or vanilla pudding mix
2 cups icing or confectioners’ sugar

Top Layer Ingredients:
4 ounces semi-sweet chocolate
2 tablespoons unsalted butter

Directions:
1. For bottom layer: Melt unsalted butter, sugar and cocoa in top of a double boiler. Add egg and stir to cook and thicken. Remove from heat. Stir in crumbs, nuts and coconut. Press firmly into an ungreased 8 by 8 inch pan.
2. For middle layer: Cream butter, cream, custard powder, and icing sugar together well. Beat until light in colour. Spread over bottom layer.
3. For top layer: Melt chocolate and unsalted butter over low heat. Cool. Once cool, pour over middle layer and chill.


A few tips from Willow Bird Baking: Line your pan with parchment paper (not wax, which may melt onto the warm bottom layer) for a quick and easy removal. As opposed to trying to scoop bars out of the pan (we all know how that goes), you’ll be able to pull them out and cut them neatly on a cutting board.

Use white chocolate or white candy melt to create a marbling effect. Pipe on thin stripes and, while still wet, drag a clean toothpick through the stripes in different directions. Wipe toothpick between each “drag.”


Preparing graham crackers.


Assembling Nanaimo Bars and marbling the top layer.


Top marbled, and then Nanimo Bars all chilled and ready to eat!


Enjoy!

Check out the Daring Bakers Blogroll to see other fantastic Nanaimo Bars!


Share Share this post with friends!

Valentine’s Truffle Heart

Sometimes I ask Mike to carry my dog down three flights of stairs only to have her patently refuse to piddle in the freezing cold. Sometimes I ask Mike if he will please clean the inevitable piddle on the carpet in the corner. Every now and then, I ask Mike if he will help scrub the pile of dirty dishes that have built up while I’ve been barricaded in my room grading. And periodically, I’ll admit, I ask Mike to do the acrobatics necessary to feed my handsome humblebee of a (sharp-clawed) turtle.

Mike’s a good guy. He’s a GREAT guy.

The least I can do is fuss over him a bit, especially on holidays. I love making a big impressive feast for his birthday, our anniversary . . . and Valentine’s Day. Oh, are you one of those Valentine’s Day haters? Eschewing the greeting card industry, scoffing at the idea of commercialized love, decrying the superficiality of a Necco®-hearts-based love-fest? I’m not. True, we don’t have a fancy celebration, but Mike and I do value the day for what it is: an excuse to love on each other through small gifts, thoughtful gestures, and food. That’s right . . . it’s an excuse to EAT. An excuse to eat cake truffles!

In case you’re hunting for sweet food ideas for your sweetheart, I thought I’d share with you the fun gift I made for Mike last year: a heart-shaped box filled not with candy, but with Red Velvet Cake Truffles and Oreo Truffles. Apart from being indulgent, rich, moist, and delicious, the truffles were a personal, handmade gift — always the best kind! This Valentine’s Day present was a sweet treat for my students, too, since they got to eat the original candy from the heart-shaped box.


Can you find Byrd in the background?

I have a few ideas jangling around for this Valentine’s Day, but they’re top secret for now! What about you? What fun meal or treat are you planning for the people you love?

Red Velvet Cake Truffles / Cake Balls


Recipe by:

Bakerella (truffles)
– Mom (cake)
Paula Deen (frosting)

Yields: about 50 balls.

Cake Truffle Ingredients:
1 9 x 13 in. Red Velvet Cake (see recipe below)
About 1.5 – 2 cups cream cheese frosting (see recipe below)
White chocolate bark / White candy coating (not baker’s chocolate)

Cake Ingredients:
1/2 cup vegetable shortening
2 eggs
2 tablespoons cocoa
1/2 teaspoon salt
1 1/2 cups sugar
1 teaspoon vanilla
1 cup buttermilk
2 1/2 cups flour
1 teaspoon soda
1 tablespoon white vinegar
2 ounces red food coloring

Frosting Ingredients:
1 pound cream cheese, softened
2 sticks butter, softened
1 teaspoon vanilla extract
4 cups sifted confectioners’ sugar

Directions:
For the cake: Preheat oven to 350 degrees F. Cream Crisco, sugar, and eggs. Make a paste of the cocoa and coloring and add to the Crisco mixture. Add salt and vanilla. Add buttermilk alternately with the flour, beginning and ending with flour. Mix vinegar and soda right before using and add to mixture by folding in. Pour batter into a 9 x 13 in. pan and bake at 350 degrees for 25-30 minutes. Cool completely.

For the frosting: In a large mixing bowl, beat the cream cheese, butter and vanilla together until smooth. Add the sugar and on low speed, beat until incorporated. Increase the speed to high and mix until very light and fluffy.

For the cake balls:
1. After cake is cooked and cooled completely, crumble into large bowl.
2. Mix thoroughly with 1 can (or about 1-2 cups if you’re using homemade — add some and mix it, and continue adding a little and mixing it until it reaches a playdough like consistency) cream cheese frosting. (It may be easier to use fingers to mix together, but be warned it will get messy.)
3. Roll mixture into quarter size balls and lay on cookie sheet. (Should make 45-50. You can get even more if you use a mini ice cream scooper, but I like to hand roll them.)
4. Chill for several hours. (You can speed this up by putting in the freezer.)
5. Melt chocolate in microwave per directions on package.
6. Roll balls in chocolate and lay on wax paper until firm. (Use a spoon to dip and roll in chocolate and then tap off extra.)

The hardest part of this is definitely the dipping. If you use white candy coating like I did (Candyquik), be prepared to double dip them to get them nice and white. After heating the white coating, I sat its bowl in a larger bowl of hot water to keep it melted. I then held the cake ball on a toothpick and spooned the white coating over it. To prevent the cake ball from having a huge “foot” from puddling coating, you have to let the excess drip off for quite awhile before wiggling it off the toothpick onto the wax paper. You find a groove. Eventually. The chocolate drizzle was applied with a ziplock bag that had the tiniest bit of its bottom corner cut off.

I only used half of my red velvet cake for the cake balls. With the leftovers, I made a little heart-shaped cake. You could also freeze any you didn’t want to use immediately for future cake ball exploits!

Oreo Truffles


Recipe By: Bakerella
Yields: about 36 truffles.

Ingredients:
1 package oreo cookies (divided… use cookie including the cream center)
1 8oz. package cream cheese (softened)
white chocolate bark

Directions:

1. Finely crush 7 cookies in a food processor or place them in a ziploc bag and crush into a fine consistency. Reserve for later (Julie note: I skipped this part)
2. Crush remaining cookies and stir in softened cream cheese. Use the back of a large spoon to help mash the two together.
3. Roll the mixture into 1″ balls and place on wax paper covered cookie sheet.
4. Melt chocolate as directed on the package and then dip balls into chocolate, tap off extra and set aside on wax paper covered cookie sheet to dry. You can sprinkle the tops with the 7 crushed cookies for decoration. (I usually eat mine before they make it to this stage.)
5. Once dry, refrigerate and enjoy!

I used the chocolate candy coating (Candyquik) for this. Once again, the white drizzle was applied with a ziplock bag that had the tiniest bit of its bottom corner cut off.


Mixing and forming red velvet cake truffles.


Red velvet truffles dipped and drying; oreos being crushed (a food processor makes this even easier).


Forming oreo truffles.


The finished (personalized!) present.

Need some other Valentine’s Day ideas? How about Red Velvet and Oreo Kisses? Red Velvet Cupcakes with Cream Cheese Frosting and Chocolate Hearts? Fancy French macarons? A dozen Mango Raspberry Rosecakes? Take a look at the Recipe Index for more ideas.


Share Share this post with friends!

Pecan Maple Bacon Pancakes

I don’t care what my Buffalonian roommate says, it has been cold in Charlotte. She chokes back laughter as I layer on two pairs of pants, a nightgown, a long-sleeve tee, my rubber duckie bathrobe, a scarf, mittens, and fuzzy socks to take Byrd out in the 20 degree weather every morning. A winter coat would be nice right about now, but I don’t own one. Thankfully, you can usually get by with a thick jacket and a scarf in the Carolinas.

Then again, I’m “that girl” who used to wear flip-flops all winter. One day I looked down at my exposed toes standing in the few inches of snow we’d accumulated and thought to myself . . . well, it was something like, “I am stupid.” So maybe I’m just not a good judge of what sort of clothing one should have on hand. At any rate, I was not prepared for this icy blast. I’ve been Grumpy McGrumpster carrying a snuggie-wrapped Byrd down three flights of stairs every morning (she hurt her wittle knee, and so she is now transported everywhere like a princess).

After a week of shivering, I needed a big, hot breakfast on Saturday. I found a fantastic collection of pancake tippery over at Deb’s Smitten Kitchen and invited Mike over for a pancake marathon. I got a little sassy and decided to make Pecan Maple Bacon Pancakes: fluffy, light flapjacks filled with chopped pecans, shreds of freshly cooked bacon, and a drizzle of maple syrup cooked right in. They were the perfect sweet and savory breakfast treat.

Of course, pancakes aren’t pancakes without a little customization. We also indulged in Pecan Chocolate Chunk, Peanut Butter, Peanut Butter Chocolate Chunk, and finally, Peanut Butter Bacon Pancakes — all of which were well-received! I loved the idea of freezing my freshly cooked, cooled pancakes for a homemade alternative to packaged convenience breakfasts, but it didn’t work out. Oh, they froze beautifully in their ziplock bag, separated by sheets of waxed paper . . . but we got hungry again Saturday night, ripped them open, and devoured them all! Perhaps I’ll make a bigger batch next time around.

Our pancakes were lovely served with maple sausage on the side, but next time, maybe I’ll cook it right into the pancakes as well! Oh, and I’m not the only one who had a craving for breakfast this week, according to my Google Reader. For delicious breakfast ideas to accompany your flapjacks, try Barbara Bakes’ Breakfast Hashbrown Casserole, Lick The Bowl Good’s Banana Pecan Butter Buns, or My Baking Addiction’s Breakfast Parfaits. Great minds bake alike!

Pecan Maple Bacon Pancakes


Recipe by: Martha Stewart’s Original Classics Cookbook, with adaptations from Smitten Kitchen and Willow Bird Baking
Yields: about 9 6-inch pancakes

Ingredients:
2 cups all-purpose flour
2 teaspoons baking powder
1 teaspoon baking soda
1/2 teaspoon kosher salt, or slightly less table salt
3 tablespoons sugar
2 large eggs, lightly beaten
3 cups buttermilk
4 tablespoons unsalted butter, melted, plus 1 tablespoon extra for brushing griddle
6-7 slices brown sugar bacon
1/2 cup pecans, chopped (and toasted, optionally)
maple syrup for drizzling

Directions:
1. Preheat oven to 400°F. Place bacon on a foil-lined baking sheet and bake for 15-20 minutes or until crispy. Allow to cool and crumble on a paper towel. If desired, toast pecans in a dry skillet over low-medium heat, shaking constantly.
2. Preheat an electric griddle to 375°F, or place a griddle pan or cast-iron skillet over medium-high heat. Whisk together the flour, baking powder, baking soda, salt, and sugar in a medium bowl. In a separate bowl, mix the eggs and buttermilk. Pour the buttermilk mixture and 4 tablespoons melted butter into the dry ingredients and whisk until just combined. The batter should have small to medium lumps.
2. Test the griddle by sprinkling a few drops of water on it. If the water bounces and spatters, the griddle is hot enough. Using a pastry brush, brush the remaining 1/2 teaspoon butter onto the griddle. Wipe off the excess with a folded paper towel.
3. Using a 4-oz. ladle, about 1/2 cup (for a 6-inch pancake), pour the batter in pools 2 inches apart. Drop some pecans and some bacon crumbles onto each pancake. Using a spoon, drizzle a small amount of maple syrup over the top of the pancake.* When the pancakes have bubbles on top and are slightly dry around the edges, about 2 1/2 minutes, flip over. If any batter oozes, push it back under with your spatula. Cook until golden on bottom, about 1 minute.
4. Repeat with the remaining batter. You can keep the finished pancakes on a heat-proof plate (or baking sheet) in the oven at 175°F. Serve warm with butter and maple syrup.

*NOTE: Other delicious toppings include berries, chocolate chunks, other nuts, peanut butter chips, or cinnamon chips. We love a variety, so we made several Pecan Maple Bacon Pancakes and then went crazy with the rest of the batter!


Fresh bacon sizzling, and then a Pecan Maple Bacon Pancake waiting for a drizzle of maple syrup and a flip!


Good Morning, Sunshine!


Share Share this post with friends!

Pumpkin Cheesecake Bread Pudding

For those of you still earnestly hanging on to New Year’s diet resolutions, grappling with temptation like Indiana Jones wrestling a greased wild boar . . . I’m sorry about this! Really! Because I did, indeed, just say pumpkin. And cheesecake. And bread pudding. All in the same dessert, y’all. You’re going to want to step away from the rice cakes and start slicing up some brioche right about now.

This is how it all began. I have a new cookbook I’ve been carting around with me and fawning over: Heirloom Baking with the Brass Sisters. I actually bought it as a Secret Santa gift for my Sunday school Christmas party, but then couldn’t go at the last minute. So I kept it. And was secretly really glad that I got to keep it. That sounds terrible, doesn’t it? Let me explain!

Heirloom Baking is “more than 100 years of recipes discovered from family cookbooks, original journals, scraps of paper, & grandmother’s kitchen.” You know the box in your kitchen stuffed full of your great aunt Ida’s best dishes, scrawled down in her own lilting handwriting? Or the dusty, well-worn church recipe album from 1982 that includes pictures of every church member — thick-framed glasses, 80s hair and all? Those recipes are some of the best: loved and fiddled with by generations of family cooks, served annually for decades, passed down verbally or jotted on scrap paper. If you’ve ever wished you could round up all of your family recipes and solicit your friends for theirs, you’ll love Heirloom Baking, because that’s exactly what the Brass sisters have done for you.

Obviously, I am in love with this charming book. Recipes include Brass family favorites as well as personal recipes from collections the sisters found at flea markets, yard sales, used bookstores, or friends’ houses. Scattered throughout the book are gorgeous images of the original recipes, dated cookbooks, and antique bakeware. Mike and I amused ourselves for an hour flipping through pages, perusing lovely images of handwritten recipes from decades and centuries past, and drooling over the full-page photographs of delicious baked goods. Let me stop being quite such a fangirl and just say, simply, that the book was nominated for a James Beard Foundation Baking and Dessert Book Award for good reason.

Book Stats: 312 pages, $29.95 list price ($19.77 on Amazon), indexed.
Accessibility: Enough information for a beginning baker.
Examples of Recipes: Auntie Dot’s Dutch Apple Cake, Chocolate Bread and Butter Pudding with Plum Jam, Louise Zimmerman’s Cookies Without a Name, Ida’s Cheese Turnovers, and various other assortments of cookies, cakes, puddings, breads, pastries, and pies.
Overall Impression: Fun to read because of such intriguing subject matter and engaging anecdotes. Full of exciting recipes and photos.
Overall Rating: 5 out of 5 stars

In case you’re wondering how I managed to convince Mike to enjoy a cookbook with me for longer than a millisecond, it has a little something to do with my offer to make him anything he chose from its pages. I’m not above a little strategic bribery! It was a difficult decision, but he settled on this rustic and beautiful Pumpkin Cheesecake Bread Pudding. You already knew he had good taste, right? I hear he’s got a pretty awesome girlfriend. Just something I heard . . .

Truth is, this pudding was fantastic. Bread pudding is the soul food of dessert for me: humble, dense, and gorgeous. It’s a peasant dish in its thrift and convenience; it makes use of sometimes stale bread or cake scraps by soaking them and baking them into a filling new dish. It’s also a dish fit for royalty: luxurious, silky, warm, and indulgent. The toasty, custardy texture reminds me of the milk toast my family used to covet for breakfast each morning: buttered toast topped with cinnamon-spiked, buttery hot milk. But this bread pudding takes bread to a whole new level.

Pumpkin, spice, and cream cheese form the delicious custard base poured over and around sliced brioche (or in my case, a firm loaf of fresh-baked Italian bread from my local grocer). The best part of the pudding, though, is definitely the buttery brown sugar topping that crisps up on the top layer of bread, forming a gorgeous, golden brown layer of cinnamon toast!


Before and after baking.

The flavor combination couldn’t have been more perfect — the pumpkin was light and balanced by the cream cheese custard. Even Mike’s granddad, who is not enamored with pumpkin, said he loved the pudding. I whipped up some fresh cinnamon whipped cream (2 cups heavy cream, 1 teaspoon cinnamon, icing sugar to taste) to heap on each serving. Ice cream would also be delightful, or just pour a little cold heavy cream over your puddin’ and dig in.

Pumpkin Cheesecake Bread Pudding


Recipe by: Heirloom Baking with the Brass Sisters
Yields: 20 servings

For bread layers:
14 to 16 1/2-inch slices brioche or firm white bread, trimmed of crusts and cut in half
1 1/2 cups butter, melted (I only needed about a cup)

For custard:
2 8-oz. packages cream cheese, at room temperature
1 cup sugar
6 eggs
1 15-oz. can (about 1 3/4 cups) pumpkin
2 cups milk
1 cup heavy cream
1 teaspoon vanilla
1/4 teaspoon salt
1 teaspoon allspice
1 teaspoon ginger
1 teaspoon nutmeg
1 teaspoon cinnamon

For topping:
1/2 cup brown sugar, packed
2 tablespoons butter, melted

Directions:
1. Set the oven rack in the middle position. Preheat the oven to 350 degrees F. Coat a 9-inch by 13-inch ovenproof glass baking dish with vegetable spray. Set aside a larger metal baking pan and rack for the water bath.
2. To prepare the bread: Brush each slice of brioche on both sides with melted butter.
3. To make the custard: Combine cream cheese and sugar in a bowl and mix until smooth.
4. Combine eggs, pumpkin, milk, heavy cream, vanilla, salt, allspice, ginger, nutmeg, and cinnamon in the bowl of a standing mixer fitted with the paddle attachment (Note: I used my hand mixer without difficulty). Beat until smooth. Add cream cheese mixture and combine.
5. Pour 1/2 cup pumpkin custard in bottom of baking dish. Tilt and swirl dish until bottom is completely covered with a thin layer of custard. Layer 6 slices of brioche on top of custard. Pour half of remaining custard over brioche. Add remaining brioche and custard in layers.
6. To add the topping: Use a knife to cut 8 slits through layered pudding. Cover top of pudding with plastic wrap and press down gently with your palm. Let stand 15 minutes. Remove plastic wrap and sprinkle brown sugar over top of pudding. Pour melted butter over sugar.
7. Place baking dish on rack in large metal pan. Pour hot water from a glass measuring cup into the outer pan until water level rises halfway up sides of baking dish. Place carefully in oven. Bake 1 hour to 1 hour and 15 minutes, or until top is nicely browned and custard has rise to top of baking dish (Note: I covered very loosely with foil to prevent top from getting too brown, but did not crimp foil down so as to avoid steaming the crisp topping). Check water bath occasionally and add more water if needed. Do not let the water evaporate form the water bath.
8. Carefully remove baking dish from oven and water bath. Allow pudding to cool on rack 1 hour. Serve slightly warm or cold with whipped cream or vanilla ice cream. Store covered with a paper towel and plastic wrap in the refrigerator.

Reprinted from Heirloom Baking with the Brass Sisters by permission of Black Dog & Leventhal Publishers, Inc. © Copyrigh 2006 Marilynn Brass and Sheila Brass.


Soaking bread, and then the whole pudding in the oven.


Enjoy!


Share Share this post with friends!