meat

Tumbleweed Burger

I’m not always a burger fan. I have to be in a mood, and even then, it has to be the right sort of burger with the right sort of fixins. A few weeks ago, I got a hankerin’ — but not for just any burger.

I wanted a burger with flavor the size o’ Texas (can you hear my cowgirl twang?), a mile high and a mile wide, with cheese runnin’ down the sides like the Rio Grande.

Too much? Okay, I’ll stop.

But I wanted a really good burger, y’all. And so I started dreaming. And I reckon this here Tumbleweed Burger (oops, I said I’d stop, didn’t I?) is what I dreamed.

I knew I wanted to season the meat, and dry seasonings are best to ensure you can still form a nice patty. I chose fresh cilantro and my favorite taco seasoning (you can make your own, but I’m not sure you can make it taste as good as this), McCormick’s Cheesy Taco. In case you’re wondering, McCormick’s isn’t compensating me to brag about their seasoning and I had to pay for that little packet o’ love straight out of my own bank account. Worth every penny of $1.09.

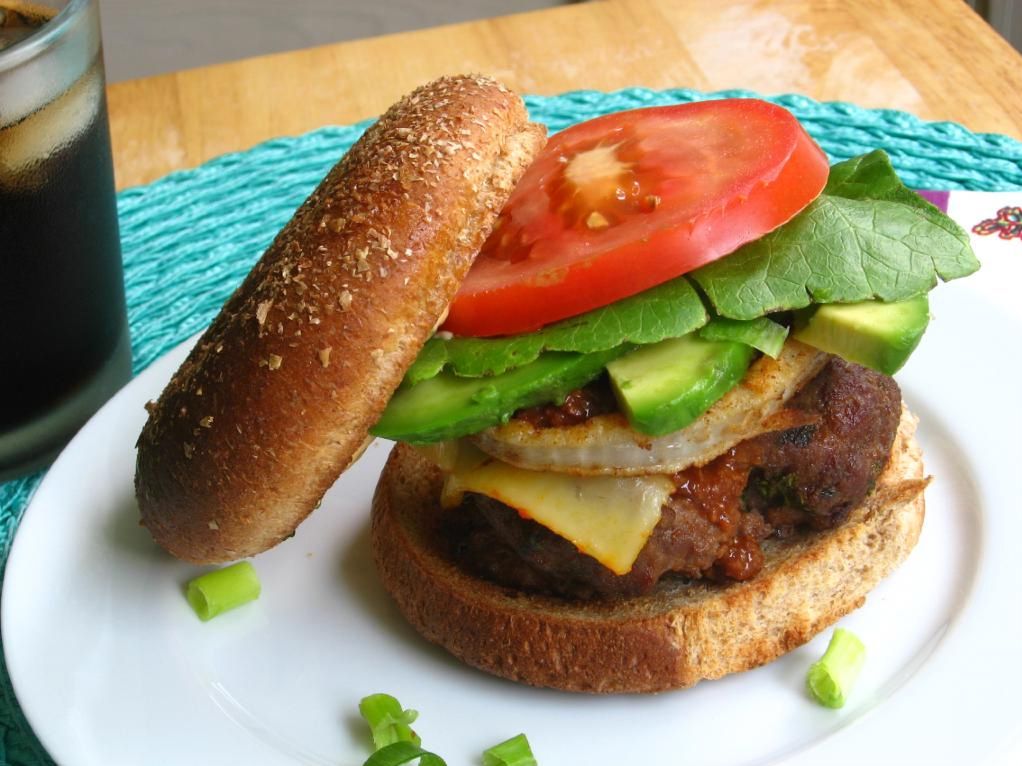
The patties were the best part. They were mouthwateringly juicy, and had such an amazing Tex-Mex flavor. The toppings sent it over the edge: tangy spicy mayonnaise, ripe tomato, dripping hot dog chili, smooth avocado, melty meunster cheese, and crispy fried onions.

Okay, actually, the fried onions might not have made it. They might have burned instantaneously because I didn’t measure the temperature of my oil. There might have only been one fried onion rescued from the carnage. I might have put it on the burger in this photo to salvage my reputation. But I might have too much integrity to let you believe my fried onions worked. So, um. You can skip the fried onions if, like me, you’re not a fan of frying. Or, if you do try them and they work wonderfully, you can email me and gloat (just make sure to tell me how they taste).

Failures happen. But they don’t have to ruin everything!

I served the burgers on Nature’s Pride buns that I was sent (to review, at no cost to me) as part of Foodbuzz’s Tastemaker program. They were 100% whole wheat, which was nice nutritionally and aesthetically — there’s something about brown bread that just feels tasty to me! I thought they were perfect for the burger once they were buttery and toasty.


Dad said he thought the avocado slices would be better served on the side — I tried it both ways and couldn’t decide!

Now I have to let you in on a little secret. My goal on Willow Bird Baking is to encourage you to get in the kitchen and make something you never dreamed you could make. I do it all the time, and sometimes fail, but when I succeed, I feel like I’ve “leveled up” in my kitchen confidence; I want you to feel that too. None of that is the secret, though. The secret is . . . this was the first time in my life I’d made a burger.

That shouldn’t shock you — most of the dishes I post are first tries for me — but maybe it does, since maybe everybody on the planet has made a burger before. I might not mention it at all, except that maybe there’s someone out there who also has a secret, who also hasn’t given burgers a shot. Maybe you thought you needed a grill, or just weren’t sure how to go about it. Maybe you thought they’d turn out tough. Maybe you gave up and went to a fast food drive-through instead.

If that’s you (I won’t tell anybody), I want you to make this burger! I’ve included detailed instructions below, and I’ve tested it out for you — I promise it’s a tasty one! What have you got to lose? Tell me, readers: are you a burger master, a burger beginner, or somewhere in between?

Tumbleweed Burger


Recipe by: Willow Bird Baking (spicy mayonnaise adapted from White on Rice Couple)
Yields: 6 burgers

Ingredients:
1.5 pounds ground beef
4-6 tablespoons taco seasoning (I use McCormick’s Cheesy Taco and highly recommend it)
1/4 cup cilantro, chopped
6 slices muenster cheese
hamburger buns
butter for toasting buns

Spicy Mayonnaise Ingredients:
3 tablespoons mayonnaise
1 tablespoon sriracha (chile sauce)
1 teaspoon lemon juice
fresh cilantro to taste

Burger toppings:
fried onion rings, if desired
hot dog chili (I used Texas Pete brand, warmed in the microwave)
tomato, avocado, romaine lettuce, chopped green onions

Directions:
Mix ground beef, taco seasoning, and cilantro and form into 6 patties (handling as little as possible, so you don’t toughen the meat). Broil for around 9 minutes until checking for doneness by splitting one of the thickest patties in half and examining the meat. You want them to be slightly pink in the middle (see how to tell if a burger is done). Place muenster cheese on each patty to melt when you pull them out of the oven.

While broiling, melt butter in a skillet and toast buns (alternatively, brush melted butter onto buns and broil them to toast, keeping a close watch so as not to burn them).

Assemble the burger: Mix spicy mayonnaise ingredients together. Spread generously onto toasted bun, topping with cooked burger, fried onion rings, avocado slices, tomato slice, a leaf of romaine lettuce. Enjoy!

If you liked this post, please:
Subscribe to Willow Bird Baking
Follow Willow Bird Baking on Twitter
Follow Willow Bird Baking on Facebook
Give this post a thumbs up on StumbleUpon


ShareOther ways to share this post with friends!

Pulled Pork Sandwiches, Creamy Coleslaw, and Summer Bean Salsa

Yesterday was a special day on Willow Bird Baking — my one year blogiversary! Considering a given blog post can take upwards of 10 hours to produce including baking, photographing, and writing, this blog now represents over 500 hours of my crazy kitchen capers! I’m humbled by how much WBB has grown, from 450 views in June of 2009 to an average of 65,000+ views per month in April and May of this year. Your readership means so much to me, and I want to sincerely thank you for joining me on this fun, tasty adventure. But as excited as I am about my blogiversary, there is something much, much more important to tell you about today!

My daddy! Tomorrow is Father’s Day and I’ve been holding on to one of my Dad’s special recipes to share with you in honor of the occasion. We’re a family of barbecue lovers. We love it all — from pulled pork sandwiches at Charlotte’s annual Mallard Creek Barbecue to sticky ribs at Gastonia’s Hillbilly’s Barbecue. But my favorite pulled pork sandwich comes right off my dad’s grill!

The grillmaster up there uses a fantastic barbecue rub on a big pork butt, and cooks it all day until it’s fork tender. We shred it onto buns for juicy, fresh pulled pork sandwiches! I top mine with a heaping spoonful of my mom’s creamy coleslaw — it’s got the perfect amount of sweetness to complement the slightly-sweet pork rub, and the whole sandwich just melts in your mouth. When accompanied by a side of fresh, bright bean salsa (sort of like a tangy pico de gallo), this is a fantastic summer meal.

Besides the fact that he can create amazing dinners at the grill, there’s a lot I want to tell you about my dad this Father’s Day! There’s really no way to describe what my dad means to me, but in typical Willow Bird fashion, I’ve decided to give it my best shot with a list. I love my dad because:

1. When I was a little girl, he’d sing songs to me. From “Don’t Worry, Be Happy” to “Julie, Do You Love Me?” he always had a song to make me smile. I always thought he had made the latter song up himself, and was surprised to learn otherwise as an adult! Who would’ve thought there’d be a song ready-made with my name in it?

2. He has always worked so hard for our family. He’s often worked 3 jobs at once to provide for us, without ever complaining about the stress. He currently works 2 jobs.

Best Barbecue Rub


Recipe By: Chris Schlesinger

Ingredients:
2 tablespoons salt
2 tablespoons sugar (or use splenda for low-carb BBQ)
2 tablespoons brown sugar (or use brown sugar substitute for low-carb BBQ)
2 tablespoons cumin
2 tablespoons chili powder
2 tablespoons black pepper
1 tablespoon cayenne pepper
4 tablespoons paprika
2 tablespoons garlic powder

Directions:
Mix together. To use, rub into meat and let sit overnight (or as long as possible) before grilling.

3. His incredible kindness inspires everyone he meets. I once walked into his workplace, where he is a manager. Someone heard me ask for him and took the time to come over and say, “Are you Rick’s daughter? He is a great man” — as if I didn’t already know!

4. He got me ready for school when I was little. Every morning he would blow-dry my hair, comb it into a (sometimes lopsided) ponytail, and place a big bow in it.

5. In addition to getting me ready for school, he took us to school every morning for over a decade. We listened to country music in the car. We didn’t have a ton of extra money, but every day he’d give me my lunch money and 35 cents extra. When school let out, I’d walk across the street and use my 35 cents to buy a cherry coke at the Bi-Lo. I’d sit and drink my soda waiting for him to pick my sisters up and then come to get me.

Creamy Coleslaw


Recipe by: Mom
Yields: about 6 servings

Ingredients:

1 head cabbage, shredded with food processor
1 onion, shredded with food processor
1 carrot, shredded with food processor
6 tablespoons sugar (or splenda)
4 tablespoons white vinegar
2 teaspoons salt
1/2 teaspoon black pepper
dash cayenne pepper
1-2 tablespoons mayonnaise to taste

Directions:

Put cabbage, carrot, and onion through food processor. Mix sugar, vinegar, salt, pepper, and cayenne pepper and coat slaw in it well (slaw will lose volume as it sits, so this will be enough dressing). Refrigerate and add 1-2 tablespoons of Hellman’s mayonnaise when ready to serve, if desired. Can add green pepper or other items to change it up.

6. When my mom went back to college in the ’80s, Dad would periodically pile us in the car and, to my great joy, take us to McDonald’s!

7. Speaking of food, Dad and I share the same food favorites. He introduced me to all sorts of Charlotte culinary wonders: the Chicken Box, Price’s Chicken Coop, Town ‘n Country, the late great Coffee Cup, and the aforementioned Hillbilly’s Barbecue. He’s one of the only people in my family (other than me) who doesn’t wince at the thought of getting a juicy grilled hot dog from a gas station.

8. He has always showered love on us in acts of service. He used to bring me lunch each Friday when I worked across the street from him. He files my taxes for me. He’s always available to listen and assess weird car noises or change my oil.

9. When he worked third shift, I would fall asleep in bed next to my mom. Every night he would pick me up and carry me to my bed. Even when my sleeping quarters moved downstairs, he’d dutifully pick me up and carry me down!

10. He was so courageous throughout his battle with cancer — even though I wanted to support him, he often supported me and the rest of our family and tried to assuage our fear.

Summer Bean Salsa


Recipe By: Jeannie and my mom

Ingredients:

1 15-ounce can black beans, drained and rinsed
1 15-ounce can black eyed peas, drained and rinsed
1 15-ounce can whole kernel corn
1/4 cup cilantro, chopped
1/4 cup green onions, chopped
2 fresh tomatoes, chopped
1/2 cup green pepper, chopped
2 cloves fresh garlic, minced
1 can jalapeƱo peppers, chopped
Italian salad dressing, to taste

Directions:

Mix all ingredients together, cover, and refrigerate for a day. Serve with tortilla chips.

And most importantly . . .

11. He is a man of God who taught me about Jesus. One day when I was a little girl riding in his old red car, he asked me if I wanted to pray and ask Jesus to be my Savior. I told him I did, and he helped me pray to receive Christ. A decade later, I would come downstairs early in the morning to find him in his big reading glasses reading the Bible with his breakfast.

I truly wish everyone could have a dad like mine. Many people around Father’s Day say that they have the best dad in the world, but of course, I think mine takes the cake (or maybe the pulled pork sandwich). Dad, you mean so much to me. Thank you for all you do and for who you are! I love you!

Readers, tell me about your dads!


Share Share this post with friends!

Taco Stuffed Crescent Rolls

Can you stand a little product placement? The truth is, Pillsbury isn’t paying me a dime or mailing me a single free biscuit (not that I’d mind a shipment if the doughboy happens to be reading!), but I’m still going to brag on their crescent rolls. If you’ve only been making little bread rollups with these, you’re missing out!

Pillsbury has plenty of creative ideas on their website for how to make better use of the crescent, but I’ve never tried a single one of them. That’s because every time I get a can of crescents (and to be honest, I sometimes buy the generic brand — are you rescinding my biscuit shipment, Pillsbury?), I have to make Taco Stuffed Crescent Rolls.

It’s funny (and a little depressing) that after all the hours I’ve spent in the kitchen making things from scratch — fresh puff pastry? a full traditional lasagna? homemade yeast bread? — these little Tex-Mex treats are some of Mike’s absolute favorites. He loves these things! And for good reason: the flaky, buttery crescents are stuffed with a creamy, gooey, cheesy, spicy, meaty mixture and topped with toasted cheddar. They’re so simple to make, too! Perfect for a busy weeknight or a last-minute supper.

Not a fan of cans? No problem; any leftover yeast roll dough will serve just fine to bake up a batch of these crescents. Serve them with salsa, sour cream, guacamole or fresh avocado slices, and a sprinkle of cilantro. Or just burn the tarnation out of your tongue eating them straight off the baking sheet! By the way, this is just the beginning — think of all the possible sweet and savory crescent stuffings! Pizza crescents, apple pie crescents, Mediterranean crescents, ham and cheese crescents, spinach and feta crescents . . . what would you stuff in your crescent?

Taco Stuffed Crescent Rolls


Recipe By: Willow Bird Baking
Yields: 16 large crescent rolls

Ingredients:
1 lb. ground beef (or a little less)
1 packet McCormick’s cheesy taco seasoning (or taco seasoning of your choice)
6 oz. cream cheese, softened
2-3 heaping tbsp. salsa
1/4 cup shredded cheddar cheese
2 cans giant crescent rolls (I usually use “big and buttery” or “big and flaky” crescents)

Directions:

Preheat oven to 375 degrees (or whatever is listed on crescent roll package). Brown ground beef, drain, and return to pan. Add packet of taco seasoning with a bit of water and cook until combined. In a separate bowl, combine cream cheese, salsa, and cheddar cheese. Add ground beef mixture to the bowl (which will melt the mixture a bit) and stir to combine.

Spoon about 2 tablespoons of ground beef mixture onto each crescent roll (I pressed them out a bit to make them bigger) and roll up like normal, carefully sealing the openings. Sprinkle a bit of cheddar cheese on top of each roll. Bake 11-13 minutes (or whatever is listed on crescent roll package), watching carefully. Rolls should be a golden brown to make sure they’re done inside.

Notes: This recipe actually makes more filling than needed, but it would be delicious in tacos or burritos, on a taco salad, or eaten with a spoon. Seriously!


Gathering all of my ingredients and mixing the taco filling.


Stuffing, rolling, and baking.


Big pile o’ stuffed crescents and one ridiculous serving suggestion: yes, Mike and I actually ate a dinner that consisted of stuffed crescents and oven-baked macaroni and cheese. Carbs, anyone?


Taco Stuffed Crescent Roll love!


Share Share this post with friends!

Creamy Chicken and Green Chile Enchiladas with Mexican Sausage Rice

I guess this is supposed to be a Thanksgiving post, but . . . it’s not. I had the best intentions! See, there was major pot luckage scheduled for tonight: a Thanksgiving potluck with my Sunday school class including all of the traditional turkey day fixins. I tried to sign up to bring a dessert, but wouldn’t you know, they started the sign-up sheet on the other end of the class and three people tackled dessert before it got to me. I signed up for sweet potatoes instead and started making great plans: I was going to make my mom’s marshmallow-topped sweet potatoes, and for anyone crazy enough not to love those, Ezra Pound Cake‘s Rosemary Roasted Sweet Potatoes. I was prepared! And then . . . suddenly . . . I was sick. SICK. I could whine about this for paragraphs, but suffice it to say, I have been one sore-nosed, tickly-throated, marathon-sneezing unhappy camper. So . . . I raised the white flag and canceled my RSVP to the potluck.

Something did raise my spirits, though. Something decidedly un-Thanksgiving-dinneresque. Barbara Bakes posted a provocative picture of a cheesy, saucy enchilada that revved up such a strong craving that Barbara might have almost acquired a new roommate. Or at least nightly dinner guest. I started making new plans. While I may have been too sniffly for a large festive gathering, I could at least invite Mike over for a Mexican feast: Creamy Chicken and Green Chile Enchiladas with Mexican Sausage Rice.

These enchiladas are pure comfort food. They’re gooey with a sumptuous, tangy, creamy, salsa verde-based sauce. Mike and I are thrilled to have over half a pan to devour as leftovers! They’re also so simple to make. I used a store-bought rotisserie chicken instead of roasting my own, cutting down on the cooking time (cut me some slack — or I’ll start whining again). These amazing enchiladas are definitely on the “make again” list.

The Mexican Sausage Rice was also good, though perhaps it needed a little spice punch. Right off the stove it seemed a bit mellow in flavor, but it did begin to taste bolder as the flavors were allowed to meld. I’m looking forward to eating some heaping scoops of it with lunch tomorrow after it’s been refrigerated overnight. The corn adds the perfect sweetness to contrast the sausage, chili powder, and chiles. You should also know that there’s a whole truckload of optional add-ons at the end of the recipe (see below) that I forgot to add — toasted pumpkin seeds, cheese, lime — all of which might’ve brightened the flavor. I’ll have to give them a try tomorrow.

Where’s the dessert, you ask? You’ll have to wait for that one! You see, I didn’t just lie in bed and whine this morning (that was only the first couple of hours). I also completed my November Daring Bakers challenge, which Mike and I enjoyed after our Mexican feast. Dessert definitely derailed the nationality of our meal, but I can’t say another word about it. Check back in soon to see! In the meantime, go assemble some of these simple, rich, comforting, cheesy enchiladas.

Creamy Chicken and Green Chile Enchiladas


Recipe by: Dinners for a Year and Beyond
Yields: about 12 enchiladas

Ingredients:
4 bone-in chicken breasts or purchased already cooked rotisserie chicken
olive oil
salt
pepper
1 medium onion, thinly sliced
3 cloves of garlic, chopped
1 teaspoon cumin
1/3 cup flour
2 cups chicken stock
1 cup salsa verde
1/2 cup light sour cream
1/2 cup cilantro, chopped
12 6-inch corn tortillas (I used flour tortillas)
3 cups shredded light Mexican blend cheese

Directions: Preheat oven to 375 degrees. Place chicken on a large baking sheet and drizzle with olive oil and sprinkle with salt and pepper. Roast in oven for about 40 – 50 minutes or until the internal temperature is about 170 degrees. Remove from oven and let cool. When cool enough to handle, shred chicken into bite-sized pieces and place in a bowl. Set aside.

Meanwhile, heat a large saucepan to medium high and add 2 tablespoons of olive oil and the onions. Saute for 8 – 10 minutes or until the onions are lightly browned. Add the garlic and cumin and saute for an additional minute. Stir in the flour until blended and cook for a minute. Slowly pour in the chicken stock and bring to a boil. Cook for 2 – 4 minutes or until thickened. Add the salsa verde, sour cream, and cilantro. Stir to combine. Season the creamy green chile sauce with salt and pepper.

Add about 1 cup of the creamy green chile sauce to the shredded chicken and stir to combine.To assemble enchiladas get a large baking dish and spray with cooking spray. Dip a tortilla into the creamy green chile sauce and put it on a cutting board. (You can also put tortillas in the microwave for a few seconds to make them easier to work with.) Put a big scoop of the chicken mixture in the center, sprinkle with a little of the cheese, and roll up the tortilla to enclose the filling. Place the enchilada in the baking dish. Continue to fill all of the tortillas and put them in the baking dish. Pour the remaining creamy green chile sauce over the top and sprinkle with the remaining cheese.

Bake uncovered for about 20 – 25 minutes until bubbly and the cheese is melted. Serve hot with sour cream.

Mexican Sausage Rice
Recipe By: Jimmy Dean
Yields: about 8 cups

Ingredients:
1 pkg. Regular Flavor Jimmy Dean Pork Sausage
1/2 cup chopped onion
1 cup uncooked long grain rice
1 pkg. (10 oz.) frozen whole kernel corn, thawed
1/2 teaspoon ground cumin
1/2 teaspoon chili powder
1 can (10 oz.) diced tomatoes & green chilies, with liquid
1-1/2 cups water or chicken stock
1/4 teaspoon salt
1 can (15 oz.) cooked black beans, drained and rinsed
4 thinly sliced green onions (optional)
1/2 cup pumpkin seeds, toasted (optional)
sour cream or shredded Cheddar cheese (optional)
1/2 cup chopped cilantro (optional)
1 lime, cut in eighths (optional)

Directions: In a 3 or 4-quart saucepan, cook sausage and onion over medium-high heat, stirring frequently until meat is thoroughly cooked and no longer pink. Add rice, corn, cumin, chili powder, tomatoes & green chiles, water or stock and salt; stir once to mix. Bring to a boil, cover, reduce heat to low and simmer 25 minutes without stirring. Gently stir in black beans; add green onions if desired. Garnish with any or all optional ingredients.


Rice and enchiladas getting started!


Enchiladas in the oven and finished Mexican Sausage Rice.


Enjoy!


Share Share this post with friends!

Baking to Freeze: Introduction!

New babies are such a joyous occasion, but the stress of getting used to a new, totally dependent little person in your life is sure to be a bit overwhelming. I’m so excited for my friend, A., who is expecting her new little one any day now (I’m sure it’s a girl, though we don’t actually know yet). She’s already so organized and has been nesting for months, but I wanted to do something to help her through the first busy days. What better than to do something I love (baking!) to support her as she adds to her family? I decided to make and freeze some dinners (and dessert, of course) for her to pop in the oven after Baby comes.

I’ve always loved the idea of giving friends gifts of food. Beyond merely supplying a need, personal, handmade gifts of food also supply warmth and affection. Sitting down to a hot meal is always satisfying and pleasant, and even moreso when it also represents the bond of friendship. It’s an intimate way to share a tiny piece of the load your friends are carrying. It’s lovely to be able to do something to help, and I hope the food turned out lovely for her.

The first step of creating A.’s meals was scouring the internet for which dishes would freeze well, thawing and baking instructions, and packaging tips. After all that searching around, I thought it might be nice to create a “one-stop” post on Willow Bird Baking about creating frozen meals. Hopefully this will be helpful for those of you with expectant friends, new neighbors, or even friends going through times of grief. Using this post, you ought to be able to bake one (or both) of two freezer-friendly casseroles and a batch of frozen cookie dough, print labels/thawing instructions, and get tips on preparing products for the freezer.

Now, onto the food! I chose two lasagnas for my freezing escapade. One is a Mexican Lasagna, which folks joke is neither Mexican, nor a lasagna! It’s very easy to throw together. The other is a Classic Italian Lasagna, which is Italian and is lasagna, and is much more time consuming. It’s a labor of love. Which casserole you choose really depends on your goal: if you want a quick and easy recipe, choose the former, but if you enjoy making more complex recipes, choose the latter (or both). I personally hadn’t made a “real lasagna” before, so I wanted to give it a shot! Finally, I chose to make some cookie dough for a dessert, since it freezes very well. Martha Stewart’s Chunky Peanut, Chocolate, and Cinnamon Cookies sounded hearty and delicious. Because of the large quantities of food, I decided to keep half and give half. That way the baking does double duty, and A.’s freezer doesn’t get overbooked!


LOTS of food!

Click on the recipe below that you’re interested in baking (or baking to freeze!) to find the recipe, printable labels, and thawing instructions:

Recipe #1: Mexican Lasagna

Recipe #2: Classic Italian Lasagna

Recipe #3: Chunky Peanut Chocolate Cinnamon Cookies

Finally, here are some great tips for freezing casseroles, to which I would add the following:

  • Consider packaging: disposable baking dishes are a kindness, since they won’t need to be returned. Make sure all of the dishes you’re preparing will fit in the freezer when packaged and wrapped!
  • Label your meals: In addition to the name of the dish, include instructions on thawing/baking, a “date packaged” and “good until” date, and the recipes (this will allow friends to calculate nutrition information, peruse ingredients, and even make the dish again, if they wish). I’ve included PDF labels for each of the dishes below, so feel free to download and print them. The labels can be cut out and glued on 4×6 index cards to make them sturdier.
  • Wrap food better than you think you need to. Double layers of plastic wrap, pack things in ziplock bags, etc.

1 8 9 10 11