chocolate

Sweet Orange Florentines

“Don’t worry! It’s not scary. Here, I’ll go first.”

Her curly blonde ponytail bobbed as she picked her way through the freezing mountain river towards the sluice. She waved me over and I waded, fully clothed and reluctant, over to her side. The water was rushing past us, slamming into the rocks downstream in a mess of white spray. I must have looked nervous, because she reiterated: “It’s not scary. Watch me.”

She sat down in the freezing, frothing water of the sluice and was whisked away, laughing and splashing, to a pool downstream. Our 7th grade students, who had hiked to this stream with us as part of their overnight field trip and were now watching from the shore, cheered. It seemed easy enough.

You need to know a few things about me to guess how I was feeling at that moment:

1. I have older siblings, which made for some traumatic pool experiences as a child.

2. In college, my roommate frantically demonstrated (on the floor of our dorm room) how to swim minutes before our freshman year swim test, where I was positive I was going to be the first student in Davidson College history to drown.

3. It was a year later before I really learned to swim semi-confidently. I still opted out of taking a SCUBA class when I spent my semester doing marine biology because I was afraid I’d panic underwater and drown.

4. I did panic in about 15 feet of water at one point in the Gulf of Mexico, at which point I promptly requested that my friend drag me to the nearby boat. I think the undercurrent of hysteria in my voice got her attention. “Undercurrent” might be the worst word choice ever given the subject matter. Ugh.

Basically, I love water, but I am not fond of drowning.


sweet flowers for this post provided by one of my lovely vacation bible school students!

Ashley had just run the sluice right in front of me, though, and was safe and sound. If my mom were there, she would’ve begun, “If all your friends were jumping off a bridge…,” but thankfully she wasn’t there at that particular moment. I sat down in the froth of water, which was much colder than it had seemed when it was only up to my knees.

Gasping from the cold, I felt the water begin to propel me down the stream. I picked up speed and bounced through bubbles and foam before being deposited, laughing and flailing, into the pool of calmer water. Our students cheered. Ashley and I promptly posed for a soaked photo taken by one of them.

That wasn’t the first time Ashley had supported or encouraged me. As coworkers, we talked all the time about how to model certain behaviors for our 6th and 7th graders, but she probably didn’t realize how often she modeled fun, joy, and above all, bravery for me. I left every conversation with her feeling calmer, more joyful, and inspired — whether by her fantastic hand-crafted earrings, her creative outfits, her sweet relationship with her family, her bright outlook. How many people can you say that about?

Just recently, Ashley modeled bravery for me one more time. After teaching middle school Spanish for years, she made the decision to move her entire life to Spain, where she’ll be teaching middle school English! She told me that the decision — leaving family and friends and country indefinitely! — was one of the hardest she’s ever made, but after crying for a bit and taking a nap (we both agreed that naps are great for decision making), she knew it was the right choice.

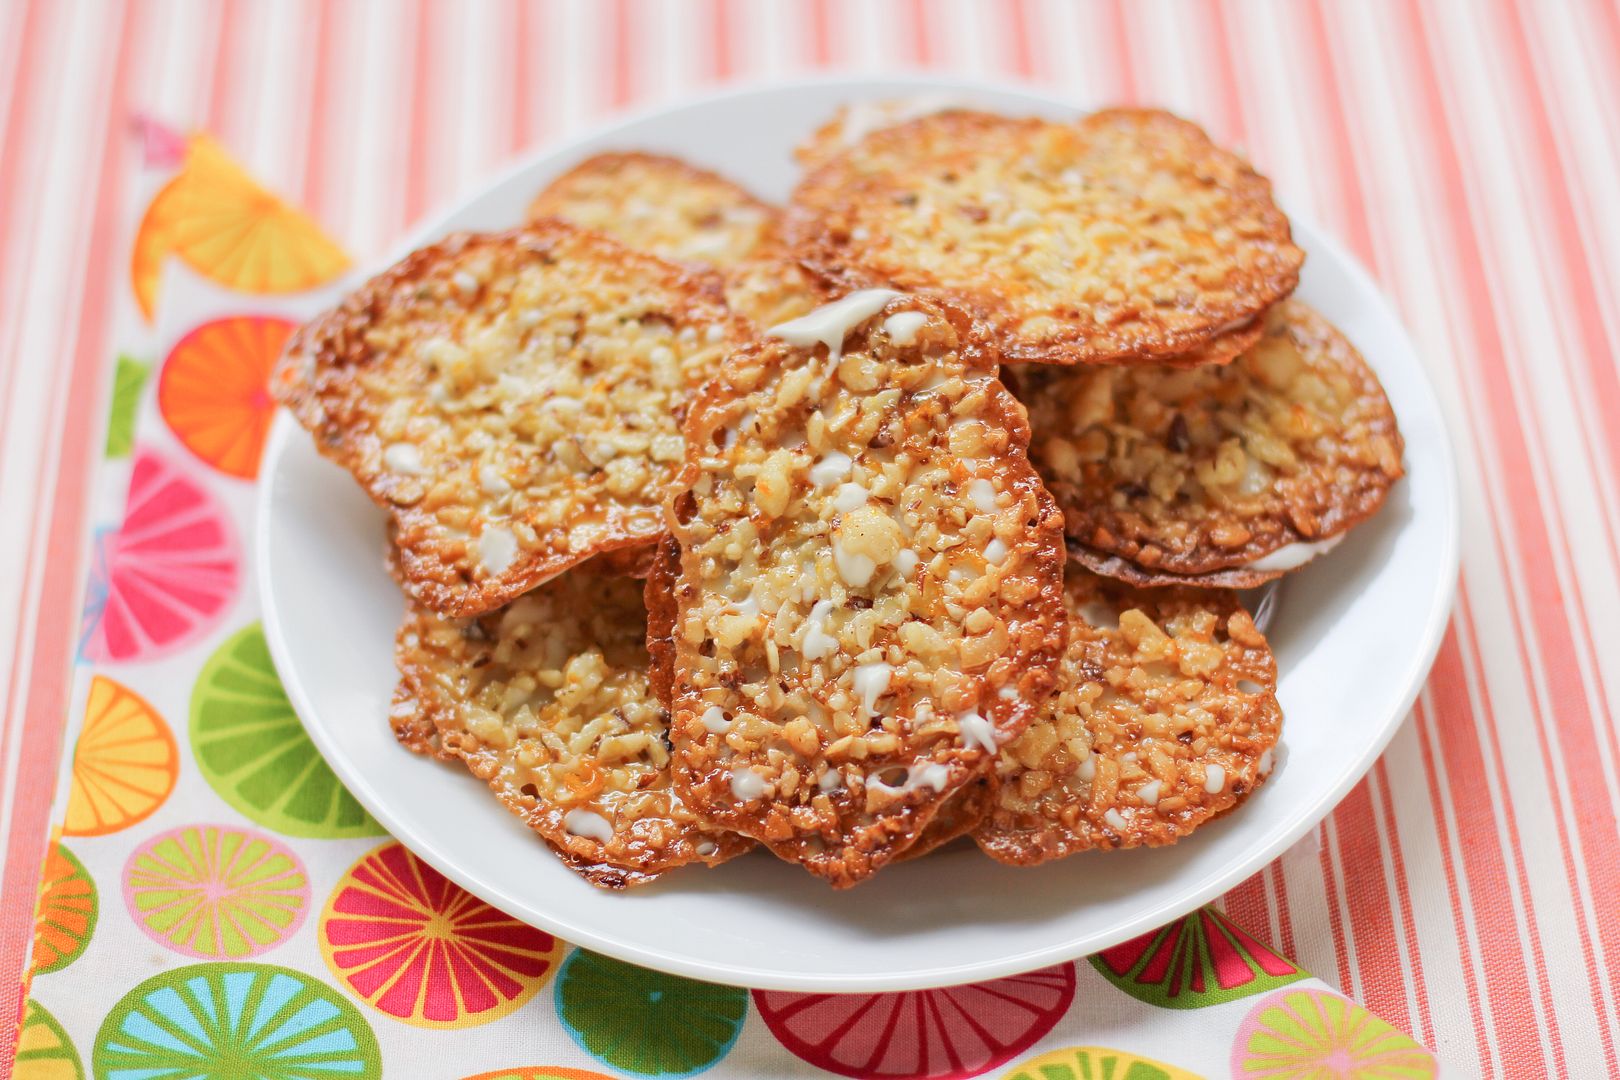
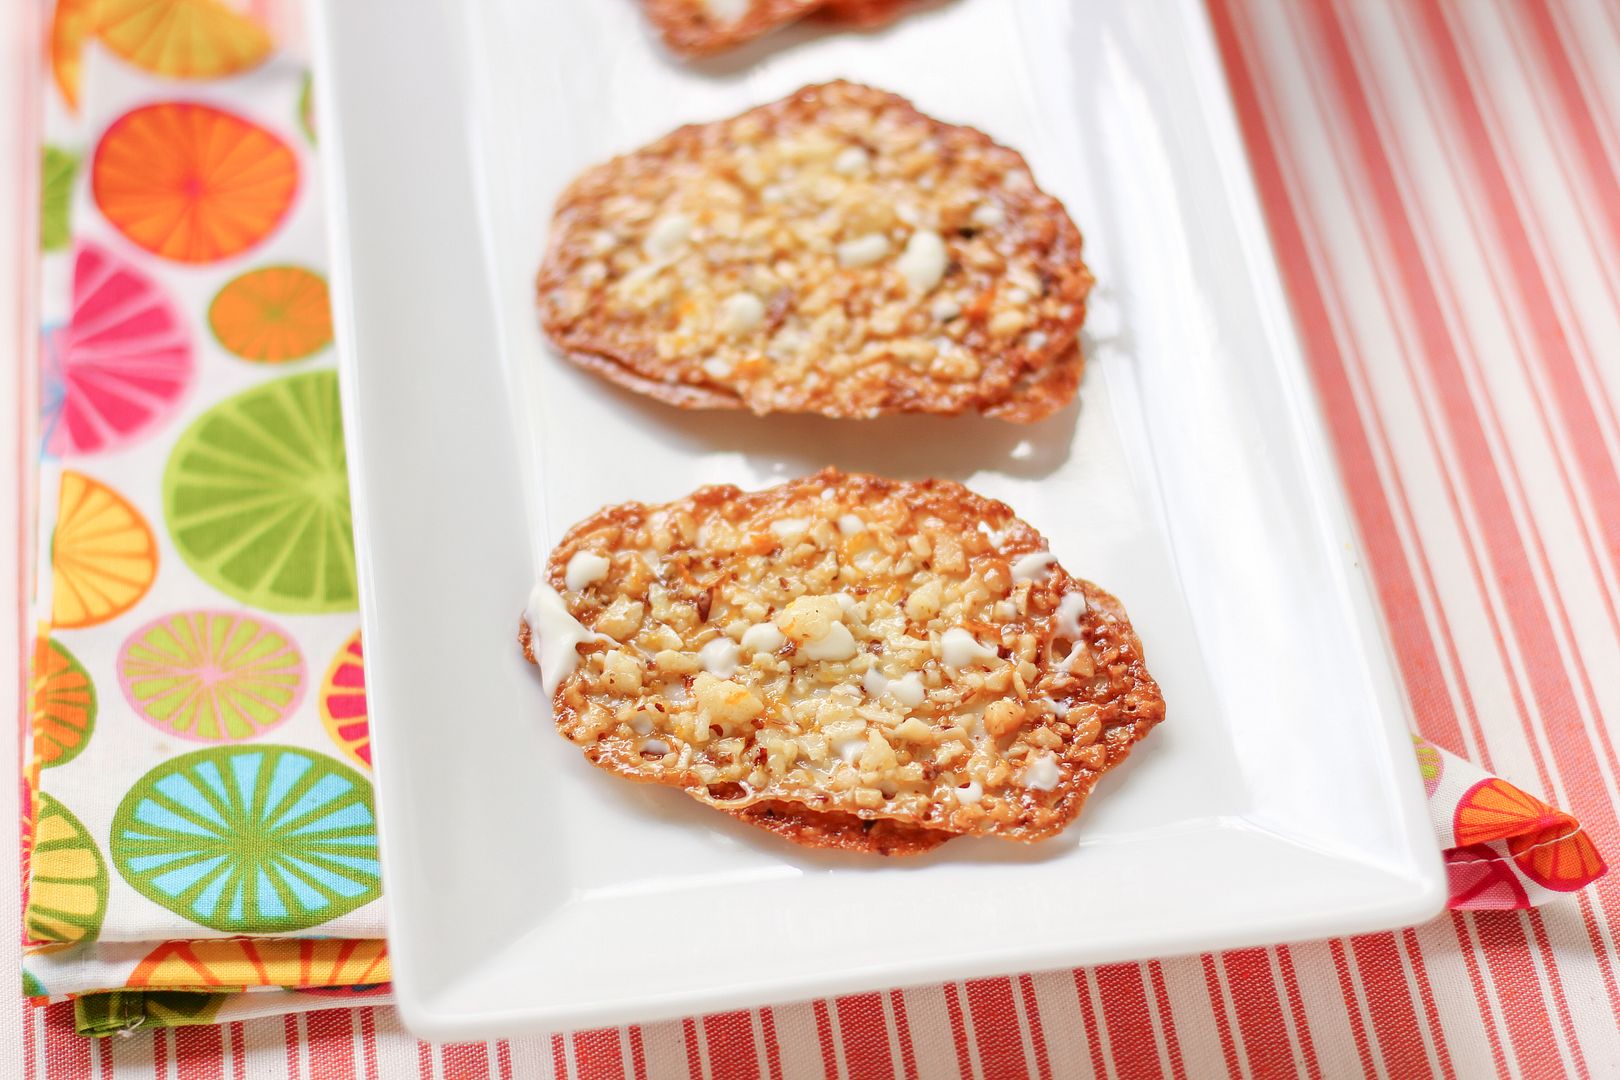
Since she’s famous for packing light, I didn’t want to get her a physical going away present, but I did want to give her something she could “take with her” to know how special she is to me. She’s a cookie baking superstar, so I cobbled together this recipe for her. These florentines are based on some cookies her mom bought once that we all loved. They happen to be the best cookies I’ve ever had, so I hope she can bake them sometime in Spain and enjoy a “taste of home.”

Love you, Ashley!

One year ago: Itsy Bitsy Berry Cream Pies
Two years ago: Pulled Pork BBQ Sandwiches with Creamy Coleslaw and Summer Bean Salad

Sweet Orange Florentines


Recipe by: Willow Bird Baking
Yield: about 15 sandwich cookies

These are the best cookies I’ve ever tasted, seriously! Don’t be afraid of the anise extract — I hate licorice flavor, but the anise extract here is just enough to give an amazing depth to the orange flavor, not enough to make the cookies licoricey. These cookies are so different than drop cookies — make sure you only use a teaspoon of mixture for each cookie even if it looks tiny, because they spread out into the beautiful lace you see above. They’re easy and a lot of fun to bake!

Ingredients:
1/2 cup sliced almonds
3/8 cup macadamia nuts, chopped
1 1/2 tablespoon all-purpose flour
About 1 tablespoon finely grated orange zest (from about 1/2 orange)
1/8 teaspoon salt
3/8 cup sugar
1 tablespoon heavy cream
1 tablespoon honey
2 1/2 tablespoons unsalted butter
1/4 teaspoon pure vanilla extract
1/4 teaspoon anise extract
1/2 cup white chocolate chips

Directions:
Preheat the oven to 350 degrees F with a rack in the center. Line a baking sheet with parchment paper or a silicone baking mat. In the bowl of a food processor, pulse the almonds and macadamia nuts together until finely chopped without letting them form a paste. In a large bowl, whisk together the flour, orange zest, salt, and finely chopped nuts.

In a small saucepan, bring the sugar, cream, honey, and butter to a boil over medium heat, stirring occasionally. Once the sugar is dissolved, continue cooking the mixture for about a minute before removing it from the heat and adding the vanilla extract and anise extract. Stir this mixture into the flour mixture until it’s combined and let it sit for about 30 minutes.

Once the mixture is cool enough to touch, use a teaspoon measure to scoop up 1 teaspoon of batter at a time and roll them into balls. Place these balls on your prepared baking sheets at least 4 inches apart — don’t skimp on this distance, because the cookies will spread a lot as they form their “lace.” Flatten the balls into discs. Bake one pan of cookies at a time, rotating once halfway through the baking time, until they are thin, lacy, and golden brown, about 6-7 minutes (this is one of those cookies where you inevitably burn the first pan and then get the hang of it, so don’t fret. Just keep a close eye on them). Let them cool on the baking sheet for 5 minutes before removing them with a thin spatula to a cooling rack. Repeat until all cookies are baked.

In the meantime, melt the white chocolate chips in the microwave according to package instructions (usually half-power, in small increments, stirring often.) Carefully spread a very thin layer of white chocolate (just a whisp or they’ll be too sweet) on the bottom of one cooled cookie and top it with another to form a thin sandwich. Place these on wax or parchment paper to dry (you can stick them in the refrigerator to speed up the drying process). Serve immediately or store for up to 3 days in an air-tight container with layers separated by wax paper.

If you liked this post, please:
Subscribe to Willow Bird Baking
Follow Willow Bird Baking on Twitter
Follow Willow Bird Baking on Facebook

Gooey Chocolate Skillet Cake Ice Cream Sundae

Gooey Chocolate Skillet Cake Ice Cream Sundae

Gooey Chocolate Skillet Cake Ice Cream Sundae

The only time I’ve lived away from my hometown was during my sophomore year in college when I moved to Beaufort, a small town on the coast of North Carolina. I lived there for a few months before traveling for a month down the Eastern seaboard to study marine zoogeography. That semester changed my life, and I’ve continued to process the memories over the years. Periodically I’ll share stories here on Willow Bird Baking from that time.

In a week’s time we would be sitting in the hot black night, lit by a strand of round bulbs on a bustling restaurant patio in Key West. Having not glanced in a mirror even once for days, I would be unaware of my white blonde hair, my dark sienna face. I would be blissfully aware, though, of the cool soda bathing my tongue in the heat. My first taste of sweet potato fries. The rolling beat of the reggae pouring from a club somewhere down the street.

That was in a week’s time. Right now, though, all I could see was the long 8 miles we were about to paddle to Camp Lulu Key in the Everglades.

Gooey Chocolate Skillet Cake Ice Cream Sundae

I climbed in the canoe quickly, trying to look like I had an ounce of a clue. Blair, not fooled for a moment, showed me how to move my oar and tugged at my lifejacket buckles to test their security. The rest of the group lumbered into our 8-seat canoe and we were off.

My eyes constantly skimmed the surface of the water, waiting to catch sight of the crocodile I felt sure must be following our canoe Tick-Tock style. The occasional tour boat would throw up a wake and I’d brace for the impact of the waves, frantically hoping not to end up in the mouth of said crocodile.

Gooey Chocolate Skillet Cake Ice Cream Sundae

Finally we arrived on the island — not that it was much of a relief. This was our Thanksgiving Break, but turkey was nowhere in sight. Instead, we were spending four days on this obscure island in the Everglades with no electricity, no running water, and some very skinny, solicitous raccoons. The boys were ecstatic. I was less enthused.

There wasn’t a comfortable spot on the entire island. The sun was oppressive, so we tried to retreat to the woods only to find ourselves covered in noseeums, or biting gnats. We tried to hide in our tents only to find they’d turned into ovens in the sunlight. Finally, we settled into the only tolerable routine we could find: spending a half hour or so in the Gulf until we were pruny, followed by a half hour or so in the sun until we were baked. We repeated this cycle incessantly for four days until we’d been bleached out like cow skulls in a Clint Eastwood movie.

Gooey Chocolate Skillet Cake Ice Cream Sundae

There were also the raccoons. The pitiful little things were hungry and thirsty, but we weren’t allowed to disrupt the ecosystem of the island by feeding them. We’d wake up each morning to the whispers of little raccoon tongues across the outside of our tents: they were licking the condensation up as fast as they could. More than once I considered “dropping” a quesadilla or two into the bushes, ecosystem be darned.

Then there were the bathrooms, or lack thereof. I’m not generally shy, but when it comes to announcing to a group of my peers that I have to pee, so would they please avoid this certain shrubbery, thanks very much . . . well, it was a bit much for me.

Gooey Chocolate Skillet Cake Ice Cream Sundae Gooey Chocolate Skillet Cake Ice Cream Sundae
Step 1: Eat some cake.

Every mealtime we battled the insects for our meal. Dinner was eaten in darkness, so there’s no telling how many gnats were ingested with our food. I just tried to shovel in each bite without thinking about the added “protein.” Even the dishes disgusted me, though, since we washed them ourselves with few supplies. Every bowl and fork I ate from felt gritty and germy to my overanxious imagination.

Finally, there was no naturally occurring fresh water and there certainly weren’t any faucets. We brushed our teeth with water bottles, washed dishes with water bottles, drank water from our water bottles. My OCD was on overdrive as I tried to ensure no sand or bugs got into my precious water. One night, consumed with frustration after trying to brush my teeth, I threw my water bottle down into the swash of waves on the shore. I was feeling very sorry for myself and cried a little under the cover of complete darkness. Darkness so complete, actually, that once I managed to look up, I realized that I’d never seen so many stars.

Gooey Chocolate Skillet Cake Ice Cream Sundae
Step 2: Stick some ice cream in that cake.

I called out and my friends joined me. Craning our necks, we saw what the sky was like with no light pollution whatsoever. It was awesome. Not like the pie you ate last night was awesome or like your new skirt is awesome. It was truly AWE-some.

A satellite sliced through the air hundreds of miles above us. After a night of joking, complaining, and storytelling, we were all suddenly silent.

Gooey Chocolate Skillet Cake Ice Cream Sundae
Step 3: Put some caramel on that cake.

Now I think back on Camp Lulu Key as one of my favorite memories. The stars are part of it, certainly (I still stand and stare up at them every night when I take Byrd out, hoping to catch a glimpse of the quieter ones in the breaches).

But maybe even more than that, the memory of discomfort is something I treasure. The inconveniences were small, but they were significant obstacles for me then. They forced me to grow, to settle, and to flex; they started building patience in me that God is still working on today.

Gooey Chocolate Skillet Cake Ice Cream Sundae
Step 4: Eat more cake.

When I compare my current self to my Camp Lulu Key self, I’m pleased to say that I’ve grown and mellowed since then. I can deal with a little dirt and grit. And as for keeping my dishes pristine, well, sometimes it’s nicer to forgo dishes altogether.

After my lovely experience eating Pumpkin Skillet Cake with Mike straight out of my cast iron skillet, I wanted a repeat performance. My birthday this past weekend was the perfect chance to indulge in a warm, gooey skillet cake sundae — chocolate this time, and with heaps of vanilla bean ice cream and a drizzle of hot caramel sauce.

I received many thoughtful birthday gifts (including a hand-baked cake from two of my students — how sweet is that?), but one of my favorite gifts was scooping forkfuls of cake out of a skillet with Mike, pausing only to take pictures of our escapades or for a giant gulp of milk.

Gooey Chocolate Skillet Cake Ice Cream Sundae
Step 5: Make a gratuitous animated gif to illustrate deliciousness of cake.

Have you had an experience that changed you for the better?

One Year Ago: Banana Coconut Cream Cupcakes
Two Years Ago: Coffee Cookie Dough Fudge Cheesecake

5 from 1 reviews
Gooey Chocolate Skillet Cake Ice Cream Sundae
 
Prep time
Cook time
Total time
 
This Gooey Chocolate Skillet Cake Ice Cream Sundae was my birthday cake and I cannot tell you how much I enjoyed it! It’s chocolatey and indulgent without being too rich. Eating the hot frosted cake with vanilla bean ice cream and caramel sauce straight out of the skillet has to be one of the most rewarding sensory experiences in the world. And it’s so easy! It’s really a must-make.
Author:
Serves: 6-8
Ingredients
Cake Ingredients:
  • 1 cup flour
  • 1/2 teaspoon baking soda
  • 1 cup sugar
  • dash salt
  • 1/4 cup (1/2 stick) butter
  • 1/4 cup vegetable oil
  • 2 tablespoons cocoa powder
  • 1/2 cup water
  • 1/4 cup buttermilk
  • 1 egg
  • 1/2 teaspoon vanilla
Frosting Ingredients:
  • 1/4 cup (1/2 stick) butter
  • 2 tablespoons cocoa
  • 3-4 tablespoons milk (as needed for consistency)
  • 1/2 cup pecans, chopped
  • 2 cups powdered sugar
  • 1/2 teaspoon vanilla
  • ice cream (for serving)
  • caramel sauce (for serving; this one is delicious!)
  • whipped cream (for serving)
Instructions
  1. Preheat the oven to 350 degrees F. In a large bowl, whisk flour, baking soda, sugar, and salt together and set aside.
  2. In a 10-inch cast iron skillet, bring the butter, vegetable oil, cocoa powder, and water to a boil. Remove it from the heat and whisk in the dry ingredients well. Mix in the buttermilk, egg, and vanilla. Bake the skillet cake at 350 degrees F for about 15-20 minutes or until a toothpick comes out with just a few moist crumbs.
  3. While the cake starts to cool, make the frosting. In a medium saucepan, bring the butter, cocoa, and milk to a boil. Remove them from heat and add the icing sugar, nuts, and vanilla. Stir to combine. Pour over the warm cake, spread with a spatula, and serve with vanilla bean ice cream, caramel sauce, and whipped cream.


Brownie-Bottom Coconut Chocolate Cream Cake

I was floored to see that Willow Bird Baking is a finalist for SAVEUR Magazine’s Best Baking & Desserts Blog. Thank you so much for making this happen. If you’d like to vote for Willow Bird Baking (there are only 3 days left), you can do so here. You all are truly wonderful.

I watched the side of the VHS tape disappear into the gaping maw of the VCR, waiting for the whirring confirmation that it was well-received before skipping back to the kitchen. I knew there was plenty of time during the previews to complete my next task, so my haste was more due to my excitement than any real need to hurry.

It was time to prepare a culinary masterpiece. I began opening cupboards and surveying their contents with gusto.

This was my absolute favorite time of day. Or, really, night. Everyone in the house was asleep except the lone insomniac (that would be me, and I didn’t mind a bit). I had probably spent “bedtime” reading delicious horror stories or maybe one of my favorite Lucy Maud Montgomery books. Now, wide awake, I was ready for midnight movies and munchies.

My 10-year-old version of mise en place began collecting on the counter: a jar of salsa, some cheddar cheese, and, for lack of tortilla chips, some sliced bread. I deftly stirred the salsa and cheese together like a chef, microwaving it for a few seconds at a time until I had a passable bowl of queso. After pouring a huge glass of Coke (full sugar! the memory makes me want to brush my teeth!), I set up a chair as my personal table, sat down on the floor, and tuned in to the movie.

(I should mention, since my mother is reading, that I was not sitting in the living room. I’d have been an absolute fool to step foot on that pristine beige carpet with a morsel of food. It was my mom’s anniversary gift from my dad and she kept that rug spotless for over a decade until they put in hard floors throughout the house. So, just so we’re clear, I was watching the living room television from the kitchen doorway.)

I picked the movies I watched based on how many food scenes they included. The Little Princess was a great choice because of the Indian feast scene in the attic. The Secret Garden had some nice garden picnic scenes. My favorite midnight movie, though, was Bedknobs & Broomsticks, which included a scene with a cat eating gorgeous sausages. He smacked and gnawed on each plump link with such satisfaction — I loved to eat along with that one!

No matter how much I’d eaten, whenever a food scene came on, I had to make sure I had something to munch on. I sometimes paused the movie to make another bowl of faux queso or to scavenge through the pantry for a sweet dessert.

I’ve grown up in a lot of ways, but I still love to eat a meal while watching food scenes from a movie or cooking show. I’m also still an incurable night owl, though I have to be more conscientious with my midnight snacks nowadays. And of course, I still love to concoct absurd things in the kitchen. This Brownie-Bottom Coconut Chocolate Cream Cake was my crazy creation for Mike’s birthday party last weekend.

This cake would make Dr. Frankenstein proud. It’s a layer of good stuff on top of a layer of better stuff on top of a layer of insane stuff on top of brownies. Basically. Or, to be more specific: there’s some heavenly chocolate mousse and some decadent coconut cream involved. The best part is that even though it looks intense, my 10-year-old self could’ve whipped this thing up with ease. You can even use a brownie mix for the base if you’re short on time.

But actually, the real best part is the taste. As if the ingredient list didn’t clue you in, this thing is delicious.

How about you? Are you the early bird or the night owl?

5 from 1 reviews
Brownie-Bottom Coconut Chocolate Cream Cake
 
Prep time
Cook time
Total time
 
This “cake” actually doesn’t include a single bit of cake. It does include brownies, coconut cream, chocolate mousse, whipped cream, chocolate bits, and toasted coconut. It’s one of the many desserts on Willow Bird Baking born out of the “more is more!” mentality. This cake sounds complicated, but is remarkably easy! If you can bake a pan of brownies and push some buttons on your microwave, you can make this baby. It’s even easy to divide up the work, since many of the steps can be done on separate days. You can make the brownie and coconut layer one day, make the chocolate mousse layer on day two, and top and serve the cake on day three. Enjoy!
Author:
Serves: 10-12
Ingredients
Brownie Layer Ingredients:
  • 1 recipe of your favorite brownies (baked in a 9-inch springform pan)
Coconut Cream Filling Ingredients:
  • 1 1/2 cup half-and-half
  • 1 1/2 cup coconut milk
  • 2 eggs
  • 3/4 cup white sugar
  • 1/4 cup plus 4 teaspoons cornstarch
  • 1/4 teaspoon salt
  • 3/4 cup flaked coconut
  • 1/4 teaspoon coconut extract
  • 1/4 teaspoon vanilla extract
  • 2 tablespoons bittersweet chocolate chips (I use Ghirardelli 60% cacao)
Chocolate Mousse Layer Ingredients:
  • 2 ounces semisweet chocolate chips
  • 2 ounces bittersweet chocolate chips (I use Ghirardelli 60% cacao)
  • 1/3 teaspoon vanilla extract
  • 1 cup chilled whipping cream
  • 2 tablespoons powdered sugar
  • 1/2 teaspoon gelatin
  • 1 1/2 teaspoon cold water
Whipped Cream Topping Ingredients:
  • 3/4 cup chilled heavy whipping cream
  • 2 tablespoons powdered sugar
  • 3/8 teaspoon gelatin
  • 1 1/8 teaspoon cold water
  • toasted coconut
Instructions
  1. Make coconut cream filling: Combine the half-and-half, coconut milk, eggs, sugar, cornstarch, and salt in a medium microwave-safe bowl. Microwave it for 4-6 minutes, whisking well after each minute, until it’s thickened (I tried this microwave trick for the first time in this recipe, and it does work well if you’re short on time, though I think you might end up with a slightly better creamy texture if you whisk the mixture constantly in a saucepan over medium-low heat; not sure how long it’ll take on the stove with this volume, but just whisk until thickened.) Once the mixture is thickened, add coconut and vanilla extracts and the untoasted coconut and stir. Pour half of this filling over your brownie layer, sprinkle on the 2 tablespoons of bittersweet chips, and then pour the rest of the filling. Stick the whole thing in the fridge to chill until firm, about 2 to 4 hours.
  2. Make the chocolate mousse: Place the bittersweet and semisweet chips in a medium bowl. Bring 1/3 cup cream to boil in heavy small saucepan or in a microwave-safe dish in the microwave. Pour it over the chocolate and let it sit for 2 minutes before gently whisking it to a smooth ganache. Cool to room temperature, stirring occasionally.
  3. Place cold water in a small dish and sprinkle gelatin over it to soften for 10 minutes. Heat it for 30 seconds in the microwave and whisk it with a fork to dissolve the gelatin. In a chilled mixing bowl, beat 2/3 cups cold whipping cream and powdered sugar in to stiff peaks, adding gelatin mixture and vanilla extract halfway through. Fold the cream into the chocolate mixture and pour the mousse onto set coconut filling. Chill until set, about 6 hours or overnight.
  4. Make whipped cream topping: Place cold water in a small dish and sprinkle gelatin over it to soften for 10 minutes. Heat it for 30 seconds in the microwave and whisk it with a fork to dissolve the gelatin. In a chilled mixing bowl, whip the cream and powdered sugar to stiff peaks, adding gelatin mixture halfway through. Top the cake with the whipped cream and sprinkle with toasted coconut.


Chocolatey Red Velvet Pull-Apart Bread with Cream Cheese Glaze

“I changed my mind.”

My mom shifted the car into park and turned off the ignition before looking over at me. “What do you mean? You can’t change your mind now; we’re already here.”

I looked out the window at the hair salon and then turned back to my mom. “Can’t I just get a trim, though? I really don’t want short hair. Please.” My 5-year-old voice teetered on the border between whining and shouting.

My mom shook her head. “We already made the appointment and told her what we wanted done. We aren’t spending all this money for just a trim. It’s just hair; it’ll grow back. Come on.”

Before I knew it, I was seated in a pleathery chair in front of a giant mirror, looking at my long blonde locks. Jessica, our hair stylist, sensed my unease. “Let’s just get it over with all at once, okay?” she asked as she tugged it into a ponytail. I could barely nod. A few snips later, my ponytail dropped to the floor with a whisp of finality, and the newly free remnants of my hair fell around my face. They barely reached my ears.

Silent tears began rolling down my cheeks as I calculated how long I’d have to wait to have long hair again.

My hair was really only one facet of my style troubles. In addition to bowl cuts, my mom had a penchant for “hammer pants.” She made many of my outfits by hand, including a hammer-panted onesie (I couldn’t make this up) with candy-pink stripes and gigantic, ceramic ice cream cone buttons. I think it might’ve also had a big lace collar. I posed in it with my bowl cut and a reluctant smile for many a photograph.

Then there was the red-and-denim hammer-panted contraption with the ceramic cow buttons. God bless my mother for sewing clothes for me, seriously, but I considered running away.

At least I was loved? Indeed, my childhood style woes remind me of this quote from food writer Angie Mosier about red velvet cake: “It’s the Dolly Parton of cakes: a little bit tacky, but you love her.”

Incidentally, I think I would’ve rather dressed like Dolly Parton than M.C. Hammer, but that’s neither here nor there.

This red velvet pull-apart bread has all the fun, tacky redness of red velvet with some extra chocolatey goodness thrown in. It began life as a chocolate yeast bread recipe that I modified into a pull-apart loaf. It’s sweet, melty, gooey, and with a cream cheese glaze drizzled over the top, reminiscent of your favorite red velvet desserts. As a plus, there are no hammer pants or bowl cuts in sight.

Tell me about your tackiest fashion choices (or the tackiest fashion “choices” imposed upon you by parents).

Chocolatey Red Velvet Pull-Apart Bread with Cream Cheese Glaze


Recipe by: Willow Bird Baking, adapted from Chocolate Bread by Paula Oland of the Balthazar Bakery
Yield: 2 loaves

Pull-apart loaves are downright addictive. Each layer is crisp on the outside and soft on the inside. This loaf is made from yeast dough with a sweet chocolate flavor, hunks of melty chocolate throughout, and a bright red hue! The cream cheese glaze kicks it right over the top. Schedule out the recipe in advance to allow for the rising/resting times and enjoy!

Bread Starter Ingredients:
1/4 teaspoon active dry yeast
1 cup lukewarm water (100-110 degrees F)
1 cup all-purpose flour, plus 3 tablespoons all-purpose flour

Red Velvet Yeast Bread Ingredients:
2 1/2 cups bread flour
1/4 cup cocoa powder
2 tablespoons (1 ounce) red food coloring plus 1 tablespoon water
1/3 cup sugar
2 teaspoons active dry yeast
1 cup minus 3 tablespoons lukewarm water (100-110 degrees F)
1 1/4 teaspoons table salt
2 tablespoons unsalted butter, room temperature
vegetable oil for lightly oiling bowl

Filling Ingredients:
3/8 – 1/2 cup granulated sugar (depending on how sweet you like things)
2 tablespoons semisweet chocolate chips
2 tablespoons bittersweet chocolate chips (I use Ghirardelli’s 60% cacao)
2 tablespoons unsalted butter, melted

Cream Cheese Glaze Ingredients:
2 ounces cream cheese, room temperature
1/2 cup powdered sugar
2 tablespoons unsalted butter, room temperature
1/4 teaspoon vanilla extract
about 3 tablespoons milk as
mini chocolate chips for sprinkling

Directions:
Note: In recipes that call for hunks of rising/resting time like this one, I like to draw out my schedule with different size boxes representing “hands on” and “hands off” prep time to get a visual feel for how long it will take. If you’re a visual person like me, drawing out your schedule is a great technique to try! Otherwise, a good old fashion list of what you’re doing at what time would also be beneficial.

Make bread starter: Dissolve the yeast in the 100-110 degree water for about 10 minutes. Completely mix in the flour. Cover the bowl loosely and leave it at room temperature to proof for around 6 hours.

Make red velvet yeast bread: Mix the cocoa powder, red food coloring, and 1 tablespoon water into a paste in a small bowl. In a medium bowl, mix together the paste, flour, 1/3 cup sugar, yeast, water, and 1/4 cup of your bread starter (save the rest to use for other recipes). Let this mixture rest for 15 minutes.

Knead in the salt and butter and then knead for about 10 minutes by hand or about 4 minutes on a mixer fitted with a dough hook, or until smooth and elastic. Scoop dough out into a lightly oiled bowl and cover it with a dish cloth. Let it rise until doubled in size, about 1 1/2 hours. Leave the dough in the bowl at this point but fold it in thirds like you’d fold a letter. Recover it and let it rest for 30 more minutes.

Shape and bake pull-apart bread: Prepare two 7″x 3″ x2″ loaf pans by greasing them (I use Wilton’s Cake Release, but you could also butter and flour them). Flour a large work surface. Use a dough scraper or sharp knife to help you cut your dough into halves. Turn out half of the dough onto your floured surface, keeping the other half covered.

Roll your dough out to a 15 inch long and 12 inch wide rectangle, lifting corners periodically to make sure it’s not sticking. If it seems to be snapping back, cover it with your damp towel and let it rest for 5 minutes before continuing.

Spread the melted butter over the surface of the dough with a pastry brush and then sprinkle the sugar and chocolate chips over the top, patting them down to ensure they mostly stick. Some will inevitably fall out as you do the following steps — just stuff ’em back in and don’t worry too much about perfection.

With the long edge of the rectangle toward you, cut it into 6 strips (do this by cutting the rectangle in half, then cutting each half into equal thirds. I used a pizza cutter). Stack these strips on top of one another and cut the resulting stack into 6 even portions (again, cut it in half, and then cut the halves into equal thirds). Place these portions one at a time into your greased loaf pan, pressing them up against each other to fit them all in. Cover the pan with your damp cloth and place it in a warm place for 45 minutes to an hour to double in size. Repeat the rolling and cutting process with the second half of dough.

While the dough rises, preheat oven to 350 degrees F (or 325 if you have a glass loaf dish instead of a metal pan). When it’s risen, place the loaf in the center of the oven and bake for 30-35 minutes until dark on top (if you take it out at light brown, it’s liable to be raw in the middle, so let it get good and dark). Cool until just warm on a cooling rack in the loaf pan while you make the glaze.

Make the cream cheese glaze: Beat the cream cheese until fluffy, and then add sugar and vanilla. Add the milk to thin it to drizzling consistency. Drizzle some of the glaze over the slightly warm bread (save the rest for drizzling over individual slices) and sprinkle it with mini chocolate chips. Serve immediately.

If you liked this post, please:
Subscribe to Willow Bird Baking
Follow Willow Bird Baking on Twitter
Follow Willow Bird Baking on Facebook
Give this post a thumbs up on StumbleUpon
Pin It


Shareother ways to share this post with friends

Chocolate & Coconut Cream Pie Bars

Several months ago, I attended the Foodbuzz Blogger Festival in San Francisco, California, 2,700 miles away from my home. Traveling alone is always a meaningful, reflective experience for me. To process my trip, I periodically share vignettes that I hope are meaningful to you, as well.

. . .

Normally, I would have said no.

On-the-spot requests for money make me nervous, and I made a rule years ago to always say no. I give food or supplies freely, as I’m able, to anyone who asks me for them. But I only give money if I have a space to sit, read about the organization, and make a thoughtful choice. That’s my rule, anyway.

But I wasn’t standing at a check-out counter being asked to donate a dollar to a charity, or walking down the street being asked for change. I was sitting on the BART, the Bay Area’s system of trains, and the little boy in front of me was adorably nervous. I waited politely as he took a deep breath and began a clearly well-rehearsed speech. It came out as one halting sentence.

“Hi-I-am-part-of-the-Boys-&-Girls-Club-and-we-are-raising-money-to-go-to-our-basketball-tournament-in-Reno-I-have-already-collected-all-but-$55-can-you-help-by-donating-today?” He took another big breath, obviously relieved to have finished his spiel.

I saw his friend delivering a similar pitch across the car and briefly considered that this might be an elaborate scheme to get more video game or snack money. My innate cynicism comes from personal experience, since I may or may not have canvassed my neighborhood when I was a tiny entrepreneur telling folks that I was an orphan soliciting donations for cancer treatments. Not one of my prouder moments. Thankfully, I don’t think anyone was fooled. A few people tried to tame their amusement as they slipped me some change, which, in hindsight, was unnecessarily generous.

Regardless of my own childhood scheming, I instinctively felt the child in front of me on the train was being honest, and what’s more, I decided I didn’t care. He had mustered up plenty of pluck to come ask me for a few dollars, and I was going to give them to him. I opened up my envelope of cash (such a tourist) and pulled out a few bills for him. His relief turned into joy. “Thank you!” he cried as he walked across the car.

I heard him deliver his pitch to another woman with a satisfied emphasis on his new balance: “…and all I need is $48 now!” She grinned at me as she handed him a couple of bills as well.

A few minutes later, I saw another passenger on the train say no. The boy, clearly coached to deal with this politely, veiled his disappointment as best he could and gave a resigned little nod. I glanced over at the woman and noticed she’d been watching the exchange as well. When she looked over at me, her face had the same sympathetic smile I was sure my own face was wearing. I didn’t blame the other passenger — after all, any other day and any other mood and I might have decided to follow my own rule — but I did resolve to pray for all the boys to get to go to their basketball tournament.

(And you know what? If he’s playing video games or eating some cheesy poofs with my money at this very moment, by golly, I hope he’s enjoying them.)

. . .

It’s funny how sometimes things — like a brief exchange on a train — build a little nook in your heart. Some moments are like that. Some people are like that.

I made these Chocolate & Coconut Cream Pie Bars for a special person who occupies her own shelf in my heart. Martha is Mike’s great-aunt, for all intents and purposes, and she’s truly a crackerjack of a woman. She deserves all sorts of sweet things — video games and cheesy poofs, even! — but I decided on these bars for her birthday because I know she enjoys coconut. The chocolate layer was a whim, but what a great one — the bittersweet ganache is just enough to add a rich background flavor while still allowing the coconut cream to shine.

These bars take a little time and a little arm muscle, but they’re easy to assemble and more than worth the time spent by the stove. If you love a good coconut cream pie, you’ll love them.

Tell me about a moment when you broke one of your own rules.

Chocolate & Coconut Cream Pie Bars


Recipe by: Willow Bird Baking with filling adapted from All Recipes
Yield: 12-16 bars, depending on size

Okay, 30 minutes of stirring sounds like a lot. But now that I know how incredible these bars are, I would stir for an hour if I had to — maybe even two! They combine all the goodness of an old-fashioned coconut cream pie with the perfect amount of rich ganache. In short, these things are amazing. I used stabilized whipped cream on top of my bars, but if you’re serving them immediately and don’t anticipate keeping them long, feel free to just use plain whipped cream.

Crust Ingredients:
1 cup (2 sticks) butter
2 cups all-purpose flour
1/2 cup icing sugar

Ganache Ingredients:
3/8 cups heavy cream
about 3 ounces bittersweet chocolate chips (I love Ghirardelli’s 60% cacao chips)
about 3 ounces semisweet chocolate chips

Coconut Cream Filling Ingredients:
3 cups half-and-half
3 cups coconut milk
4 eggs
1 1/2 cups white sugar
2/3 cup cornstarch
1/2 teaspoon salt
1 1/2 cup flaked coconut
1/2 teaspoon coconut extract
1/2 teaspoon vanilla extract

Whipped Cream Topping Ingredients:
2 cups heavy whipping cream
1 tablespoon cold water (for stabilizing)
1 teaspoon gelatin (for stabilizing)
3-4 tablespoons icing sugar
1/2 cup coconut, toasted

Directions:
Make shortbread crust: Preheat your oven to 350°F. Prepare a 9 x 13 in. baking dish with a parchment paper sling (I use one long sheet across the length of my dish, and two overlapping short sheets across the width of my dish — just arrange it so that it has some overlap and overhang to help you pull the bars out after they’re finished). Cut the butter into the flour and icing sugar and press into the baking dish (I used a food processor to cut the fat into the flour — about 6 pulses — and then the bottom of a glass to press the mixture into the pan). Bake 18-20 minutes or until light brown. Set on a wire rack. Keep oven preheated for coconut toasting.

Make ganache: While the shortbread is baking, place the chocolate in a medium bowl. Bring the cream to a simmer in a medium saucepan (or microwave it for a couple of minutes). Once the cream reaches a simmer, pour the cream over the chocolate and let stand 1-2 minutes. Whisk in small circles until a smooth ganache has formed. Set it aside until your crust is finished and has cooled for a few minutes, and then pour it over the crust (it’s okay if it’s not cooled all the way). Place the chocolate covered crust in the fridge to chill until the ganache is set into a firm layer.

Toast coconut for the topping: Spread about 1/2 cup of the coconut flakes out on a baking sheet and toast for a few minutes, stirring every minute or so, until the coconut is golden brown. Spread it out on a plate to cool completely.

Make coconut cream filling: Combine the half-and-half, coconut milk, eggs, sugar, cornstarch, and salt in a large saucepan and bring it to a boil over medium-low heat, whisking constantly (this can take anywhere from 30-38 minutes. Some folks on All Recipes said you could zap it in the microwave for a minute at a time, stirring after every minute, until it was thickened. It was only supposed to take around 5-10 minutes, but I was too chicken to try. Let me know if you do.) Add coconut and vanilla extracts and the 1 1/2 cups of untoasted coconut and stir. Pour this filling over your chilled ganache and stick the whole thing in the fridge to chill until firm, about 2 to 4 hours.

Make whipped cream topping: Put 1 tablespoon cold water in a small bowl and sprinkle the gelatin evenly over the top. Let it soften for 2 minutes before microwaving it for 30 seconds and whisking to dissolve the gelatin. Using a chilled bowl and beater, whisk the 2 cups of heavy cream and icing sugar together until the cream forms stiff peaks, stopping to add gelatin mixture about halfway through. Dollop the cream over your bars and gently spread it around. Sprinkle on toasted coconut. Chill until ready to serve to let the whipped cream set up. Use the sling to pull the bars out of the dish, slice with a sharp knife, and enjoy!

If you liked this post, please:
Subscribe to Willow Bird Baking
Follow Willow Bird Baking on Twitter
Follow Willow Bird Baking on Facebook
Give this post a thumbs up on StumbleUpon
Pin It


Shareother ways to share this post with friends

1 8 9 10 11 12 22