chocolate

Bittersweet Marbled Chocolate Cheesecake Brownies

Sometimes it’s easier to skip the hard stuff. Maybe you know what I mean. Maybe you never read Marley and Me because you saw your friends (or in my case, students) feeling weepy towards the end. Maybe you switch off the sad songs, avoid the poignant movies. Maybe you make a joke in the difficult moments to defend yourself from the truth of your emotions, but also keep a secret stash of tissues in your purse for when it doesn’t work.

Some things you can’t skip, though. Some trials are ordained for you. God has known them — and you — since before the foundation of the world, and when He says you’re going through and not around, it’s the right path. Go.

One of the things I can’t skip is the fact that Mike is no longer a Charlottean. Wonderfully and sadly, he moved to Raleigh at the beginning of August to start his graduate program in math.

Mike and I have been together for 11 and a half years now. He saw me complete my first year of high school, get my license, graduate, enroll at Davidson College. He sat with me the morning before my Teach for America interview, picked up the pieces with me as I quit my first real job and moved on to my second real job, and shared my joy when I found Woodlawn, where I teach now. He saw the demise of my first website, the beginning of my blogs, the constant ebb and flow of my poetry. He’s been there.

During my difficult high school years, I’d sometimes drive straight to his apartment after school and play housewife, making Hamburger Helper and eating it on the couch with him while watching Star Trek. On a trip to Charleston in 2003, he bought me flowers that I still have dried in my closet. I saw him eat his first funnel cake in Gatlinburg. During our relationship, I’ve been the girlfriend of a cable guy, a dental technician, a programmer, a mathematician, a college student, a college grad, and now a graduate student. I can’t explain how his transition has inspired me.

What with all that “being there” we’ve done for over a decade, it was particularly difficult to see him pack up his things and move at the beginning of August. While I haven’t been able to ignore the fact that he now lives three hours away and can’t pop over as needed, I have been able to skip talking about it much, so instead I’ve been talking about popsicle molds and Piers Morgan. I know you understand.

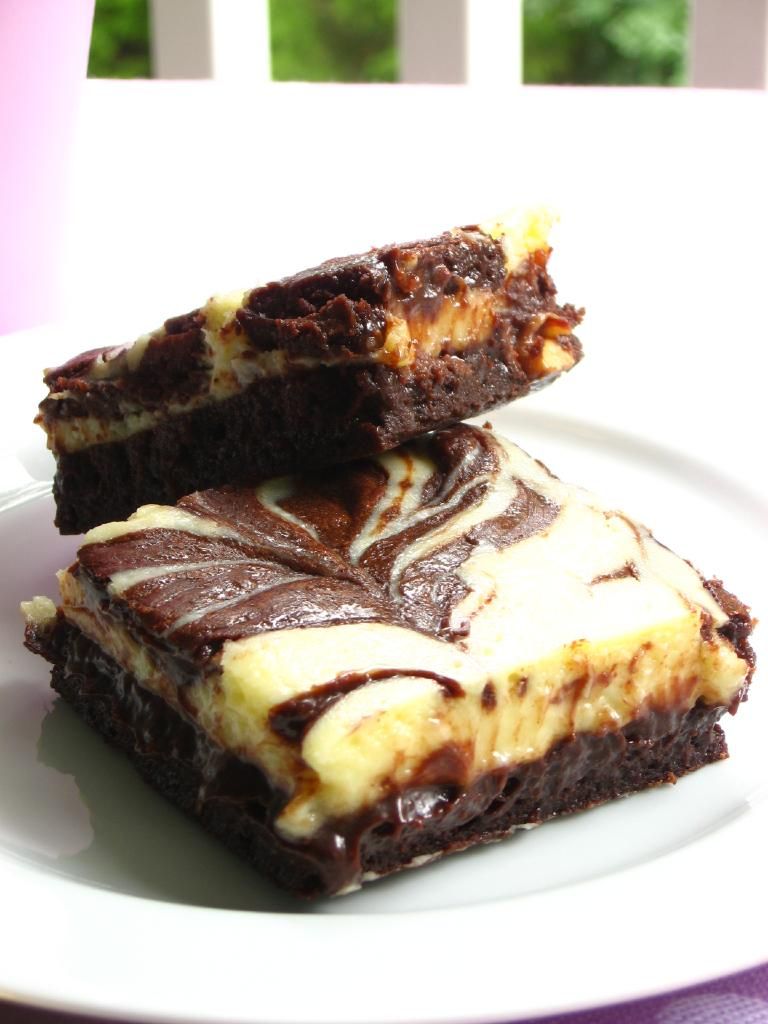
The week before he moved, Mike came over and we made going-away brownies. He loves brownies, but I’d never made him any — something I felt I had to remedy before he moved. We mixed and baked together, another thing I’d always meant to do with him, and the final product was sweeter for it.

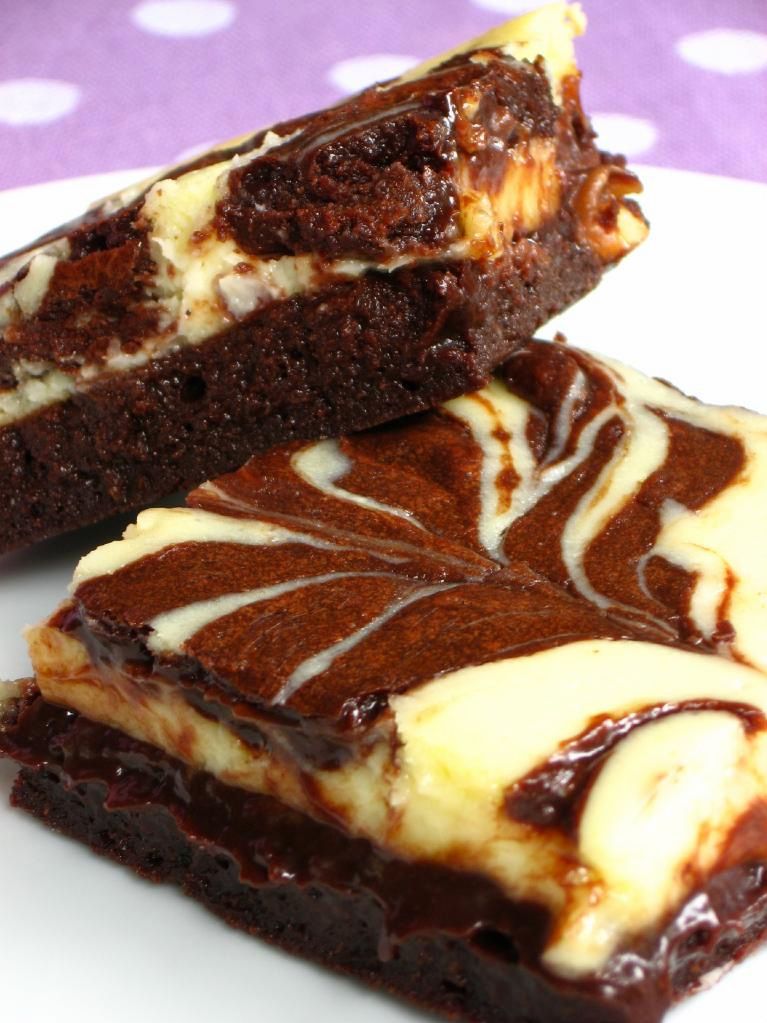
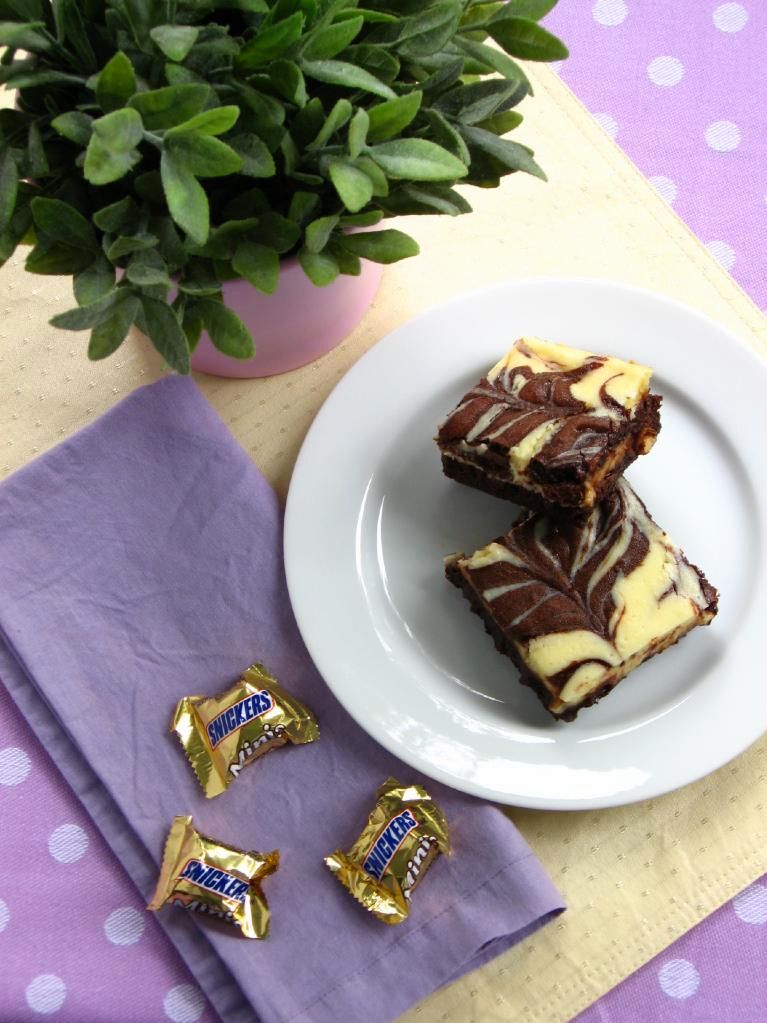
These brownies were a great choice — they’re indulgent and fudgy, with the gorgeous tang of cream cheese that I love. The marbling on top looks fancy, but is extremely easy to accomplish. In half the pan, we embedded funsize Snickers in the batter, which added a superb nutty, caramelly crunch to the brownie base. Naturally, knowing he was moving in a week made each bite a bittersweet experience, but the brownies themselves were the perfect treat for us to enjoy together.

Marbled Chocolate Cheesecake Brownies


Recipe by: adapted from Joy of Cooking
Yield: 9 large or 16 smaller brownies

Brownie Layer Ingredients:
1/2 cup (113 grams) unsalted butter, cut into pieces
4 ounces (115 grams) unsweetened chocolate, coarsely chopped
1 1/4 cups (250 grams) granulated white sugar
1 teaspoon pure vanilla extract
2 large eggs
1/2 cup (65 grams) all purpose flour
1/4 teaspoon salt
funsize Snickers (optional)

Cream Cheese Layer Ingredients:
8 ounces (227 grams) cream cheese, at room temperature
1/3 cup (65 grams) granulated white sugar
1 teaspoon pure vanilla extract
1 large egg

Directions: Preheat oven to 325 degrees F (160 degrees C) and place the rack in the center of the oven. Prepare a 9-inch square baking pan: Spray pan with nonstick cooking spray. Create a foil sling for the pan by cutting two 16-inch lengths of foil and fold them to widths of 5 inches each. Fit foil pieces into baking dish, one overlapping the other, pushing them into corners and up sides of pan; allow excess to overhang pan edges. This creates a sling that will help you remove the brownies after baking and cooling. Spray foil lightly with nonstick cooking spray.

Place a heat-proof stainless steel bowl over a saucepan of simmering water to create a double-boiler. Place the butter and chocolate in the bowl to melt. Remove from the heat and stir in the sugar and vanilla extract. Add the eggs one at a time and beat well with a wooden spoon after adding each. Add the flour and salt and continue stirring with the wooden spoon until the batter is glossy, smooth, and pulls away from the side of the bowl (about one minute). Reserve 1/2 cup of brownie batter for topping. Pour the rest of the batter carefully into prepared pan (here, you can stud the batter with rows of funsize Snickers if desired.

In a separate bowl, use a hand mixer to blend the cream cheese until smooth. Add the sugar, vanilla extract, and egg and blend just until smooth. Spread this mixture carefully over the brownie layer, and then place dollops of the 1/2 cup reserved brownie batter at even intervals over the top. Use a table knife or wooden skewer to carefully marble the dollops through the cream cheese, careful not to mix the batters.

Bake for about 25 minutes or until the brownies just begin to pull away from the sides of the pan and are just starting to brown. Remove from the oven and cool on a wire rack until almost cool. Then, chill the brownies in the refrigerator for about two hours, until they’re firm enough to cut into squares. Once chilled, remove the brownies from the pan by lifting the ends of the foil sling carefully. Transfer to a cutting board and cut into 9 or 16 squares as desired, cleaning the knife with a warm, damp cloth between cuts. You can store leftovers in airtight container in the refrigerator for several days.

P.S. – Some people are experiencing even greater trials right now. Erika of Ivory Hut just lost her house and all her possessions in a horrific house fire. Would you consider donating to help her through this difficult time?

P.S. 2 – In the midst of a trial, there is great blessing. We received news recently that my dad is still cancer-free!

If you liked this post, please:
Subscribe to Willow Bird Baking
Follow Willow Bird Baking on Twitter
Follow Willow Bird Baking on Facebook
Give this post a thumbs up on StumbleUpon


ShareOther ways to share this post with friends!

Wacky Candy Cupcakes: Ferrero Rocher and Reese’s Cup

When my sister called and asked me to make a dessert for her office party, I jumped at the chance to recreate an old favorite. Way back toward the beginning of Willow Bird Baking, I made some fun Ferrero Rocher Cupcakes in which I stuck a whole frozen candy into each cupcake prior to baking. I enjoyed those (despite the candy losing a bit of crunch), but always wanted to find the time to tweak the concept a bit.

This was my chance! I wanted to take a moist chocolate cupcake, fill it with a giant dollop of the hazelnut-chocolate spread Nutella, ice it with rich chocolate frosting, and crown the whole thing with a Ferrero Rocher. The entire cupcake was designed to imitate the flavors in the candies themselves.

And why stop there? How easy would it be to fill some of the cupcakes with peanut butter instead, topping them with a huge Reese’s Cup? Hurray for candy cupcakes!

I could have gotten even more carried away (cupcakes filled with coconut pastry cream and topped with Mounds? Cupcakes filled with caramel and topped with Snickers?), but I reeled it in. That doesn’t mean we have to turn our imaginations off, though. What Candy Cupcake would you make?

Now, I am Wacky McWackerson. I’m as silly as they come. But that’s not why these cupcakes are called Wacky Candy Cupcakes instead of just regular ol’ Candy Cupcakes. Raise your hand if you’ve heard of Wacky Cake! Anyone?

Wacky Cake is NOT what you call the 2nd batch of cupcakes you make after ruining the previous batch and just barely convincing yourself not to throw your muffin pan across the apartment, spewing chocolate lava on your roommate’s couch (hey Barb!), but good guess. I did make these Wacky Cakes after a first batch of chocolate cupcakes flopped, but that’s not why they’re wacky.

Wacky Cake is actually just a vegan chocolate cake — no eggs, no milk — and is probably called “Wacky” ’cause vegans are just a little nutty sometimes . . . just kidding, just kidding! I love you, vegans! The truth is, no one really knows why it’s called wacky. Some say it’s because it’s a little wacky to make a cake with no eggs, which is just as good a reason as any, I guess. Regardless, Wacky Cake happens to be the perfect recipe to resort to after a flop that uses most of your eggs. Just call me MacGyver.

Turns out, Wacky Cake is also yummy and rich — the perfect cupcake base for my creation. I went and added un-vegan ingredients to complete the recipe, but if you’re a vegan looking for a great chocolate cupcake, the base recipe here is perfect for you. It’s also just plain easy to make.

The frosting, on the other hand, was a bit of a hassle. It doesn’t whip up very firm, so I had to refrigerate it for a bit and re-whip before frosting the cupcakes and sticking them in the fridge in a hurry. After sitting in the fridge overnight, though, the frosting is firm — and very chocolatey and delicious. I’d use it again for the taste, but I’d make sure to have refrigerator space cleared out ahead of time to chill the cakes immediately.

Speaking of refrigerating these cupcakes, the Nutella jar expressly says not to refrigerate Nutella. Don’t worry — it’s not because the product turns toxic or anything, but actually because it firms up into almost a nougat texture, which for our purposes, is awesome. The center of the Ferrero Rocher Cupcakes was a hunk of hazelnut-chocolate love.

Overall, these cupcakes were tremendous! I greedily devoured the few I kept to sample, and Sarah says her coworkers were enthusiastic about them as well! Both varieties are the perfect imitations of their respective candies, incredibly indulgent, and simple to make. If you’re used to making a plain cupcake-n-frosting combo, why not get a little feisty, add a sweet filling and a candy topping, and pump up your cupcakes? It’s a quick and easy way to turn a dull dessert into something special.

Now it’s your turn: Think up a cupcake-version of your own favorite candy. Tell me about how you’d make it in the comments section — and bonus points for ACTUALLY DOING IT! Send me photos of your candy cupcake creations to post on Willow Bird Baking!

Ferrero Rocher and Reese’s Cup Cupcakes


Recipe by: Adapted Wacky Cake recipe from Being Wife and frosting from Hershey’s
Yields: about 30 cupcakes

Wacky Cake Ingredients:
3 cups flour
2 cups sugar
6 tablespoons cocoa
1/2 teaspoons salt
2 teaspoons baking soda
2 teaspoons vanilla extract
2 tablespoons vinegar
12 tablespoons of mazola or vegetable oil
2 cups water

“Perfectly Chocolate” Chocolate Frosting Ingredients:
1 cup (2 stick) butter
1 1/3 cup cocoa powder
6 cups powdered sugar
2/3 cup milk
2 teaspoon vanilla extract

Candy supplies needed:
Creamy peanut butter (I don’t use the natural sort for this because I kind of want a processed, sweet flavor)
Nutella
15 Ferrero Rocher candies
15 Reese’s Peanut Butter Cups (I use the big sort!)

Directions:
NOTE: You may want to make these cupcakes the night before you intend to serve them, since the frosting needs time to set in the refrigerator.

Preheat oven to 350 degrees. Line 30 cupcake wells with cupcake liners. In a large bowl, whisk together flour, sugar, cocoa, salt, and baking soda.

Add vanilla, vinegar and oil, stirring until smooth. It’s normal for the mixture to seem thick and pasty right now. Add the water and mix (carefully to avoid splattering) until there are no lumps in the batter.

Pour mixture into prepared cupcake pans. Bake 12-15 minutes, or until toothpick comes out clean. Allow to cool completely.

Carefully hollow out each cupcake using a table knife, and reserving the scraps for another use (maybe cake balls?). Using a piping bag or a ziplock with the corner cut off, fill half the cupcakes with peanut butter and the other half with nutella.

Make frosting: Melt the butter and stir in the cocoa. Alternate adding powdered sugar and milk, and beat to spreading consistency. Stir in vanilla. I refrigerated my frosting after beating to give it a thicker consistency, since it wasn’t as firm as I’d like. Unwrap all your candies while it refrigerates, because you’ll have to work quickly.

Have a platter ready in the fridge to receive finished cupcakes (the frosting is not very secure until it’s been refrigerated for at least a few hours). Pipe a big rosette onto each cupcake, covering your filling, and plop the appropriate candy onto the middle. Place finished cupcakes directly in the fridge to sit for a few hours, and take out immediately before serving.

Other fun candy cupcakes around the internet: 100 Grand Cupcakes, Snickers Cupcakes, another version of Ferrero Rocher Cupcakes.

If you liked this post, please:
Subscribe to Willow Bird Baking
Follow Willow Bird Baking on Twitter
Follow Willow Bird Baking on Facebook
Give this post a thumbs up on StumbleUpon


ShareOther ways to share this post with friends!

Black and White Croquembouche

One of the key components to elegance is often simplicity. An elegant science experiment is one that arrives at a significant conclusion using a simple, clever process. An elegant math proof is one that uses straightforward logical turns to simplify what seems to be a complicated concept. An elegant dress is classic, easy, timeless. An elegant dessert is . . . the cream puff. Dressed in chic black and white for our elegant occasion, of course.

Cream puffs are the sort of thing people buy in tubs from the freezer section. I actually love those icy little things, but they pale (and shiver) in comparison to these homemade, creamy little clouds. The distinct taste difference isn’t the only reason you should make some cream puffs, though.

You should make them because they’re easy. They look fancy, they’re classy enough for company, they’re impressive — but they’re easy! Not just the cream puffs, either, but the actual mounted cream puff tower (the croquembouche) is easy, too! If you can put some cookie-like dollops of batter in the oven, if you can pipe some cream, if you can dip something in chocolate . . . you can make this recipe.

Imagine the look on your husband’s (or wife’s, or sister’s, or dog’s) face when you carry this beauty to the table, calmly announcing, “Dessert’s ready!”

Cream puffs are made with a simple cooked dough called pâte à choux. It’s quick as a whip to make, and then it’s simply piped onto parchment paper, the little peaks are dabbed down with a wet finger, and the dough is egg washed. After a bit in the oven, the puffs are ready for action. I always make my puffs the day before and freeze them, baking them for a few minutes out of the freezer the next day and cooling them before filling (and serving immediately). It may seem odd to freeze the puffs for just one day’s storage, but they’ll get soggy otherwise, so it really is best.

This here lovely tower of creamy puffiness is suffering from a delicious identity crisis. I opted for two flavors of puffs: puffs filled with vanilla cream and dipped in chocolate, and puffs filled with strawberry cream and dipped in white chocolate. They were both delicious and cute, but the consensus was that the vanilla cream puff was best. Feel free to make just one flavor, both flavors, ten different flavors — maybe even a rainbow croquembouche? You go for it!

For my last croquembouche, I used caramel as the building glue. It stuck a lot quicker and was easier to work with in that way, but cooled off too quickly and became too viscous. This time I used melted chocolate, and had the opposite experience. It didn’t harden quickly and was a little shakier during the build, but stayed melty throughout the entire process.

I think the best of both worlds is using chocolate but refrigerating the structure periodically to harden, so that’s what I’ve written into the recipe below.

If you love cream puffs but are used to defrosting them first, it’s time to step out on a limb, get into your kitchen, and construct something beautiful! Tell me: what’s the most elegant dessert you’ve ever made?

Black and White Croquembouche


Recipe by: Willow Bird Baking, with help from: Mike’s Table (strawberry pastry cream), Chef Lou Jones (vanilla pastry cream), Peter Kump and Nick Malgieri (cream puffs)
Yields: 45-50 puffs

Pâte à Choux Ingredients:
1 1/8 cups water
9 tablespoons unsalted butter
3/8 teaspoons salt
1.5 tablespoons sugar
1.5 cups all-purpose flour
6 large eggs
Egg wash (1 egg yolk and 1/2 cup heavy cream, lightly beaten)
chocolate for dipping (I used white chocolate bark for the white puffs and a combo of bitter- and semisweet chocolate for the brown puffs — the bark hardened faster, but you can use whatever you like)

Vanilla Pastry Cream Ingredients:
2 1/4 cups whole milk
6 large egg yolks
2/3 cup sugar
1/3 cup cornstarch
1 vanilla bean, split lengthwise (or 2-3 teaspoons vanilla extract)
2 cups heavy cream

Strawberry Pastry Cream Ingredients:
1/2 recipe of vanilla pastry cream (above)
scant 1 cup strawberries, hulled and chopped
1/16 cup sugar (half of a 1/8 cup measure)

Directions:
I love to watch this video from Martha Stewart anytime I begin a croquembouche, to visualize the process of making pâte à choux, filling puffs, and constructing the tower — take a look at it before you begin.

Make vanilla pastry cream: In medium bowl, whisk together milk, egg yolks, sugar, and cornstarch.

Put remaining 1 3/4 cups milk in a heavy, medium saucepan. Scrape in seeds from vanilla bean; add pod (or add vanilla extract here). Sprinkle remaining 1/3 cup sugar over the milk, letting sugar sink undisturbed to bottom. Set pan over moderate heat and bring it to simmer without stirring.

Temper the egg yolk mixture by adding 1/4 cup of the hot milk mixture to it while whisking. Then, while whisking, gradually whisk egg yolk mixture into the hot milk. Cook over moderate heat, whisking constantly, until pastry cream simmers and thickens, about 1 minute. Remove from heat, discard vanilla pod (if used), and whisk cream until smooth. Transfer to bowl, removing half to another bowl for the strawberry pastry cream, and press plastic wrap directly onto surface (I let it cool a moment first).

Make strawberry pastry cream: toss sugar with strawberries and set aside for 15 minutes. Then simmer them over medium heat for 10-15 minutes, until they begin to thicken a bit. Let cool. Add into 1/2 recipe of pastry cream set aside above and stir to combine well. Press plastic wrap directly onto surface of both bowls of pastry cream, chilling until cold, about 4 hours.

After chilling, whip heavy cream into soft peaks. Add about 1/2 cup of whipped cream into each pastry cream to lighten. Now carefully fold the rest of the whipped cream into the pastry creams (about half into each). NOTE: Pastry cream can be made in advance and refrigerated, wrapped well with plastic wrap on surface, for up to 3 days.

Make the pâte à choux: Combine water, butter, salt and sugar in a saucepan over medium heat. Bring to a boil and stir occasionally. At boil, remove from heat and sift in the flour, stirring to combine completely.

Return to heat and cook, stirring constantly until the batter dries slightly and begins to pull away from the sides of the pan. Transfer to a bowl and stir with a wooden spoon 1 minute to cool slightly.

Add 1 egg. The batter will appear loose and shiny. As you stir, the batter will become dry-looking like lightly buttered mashed potatoes. It is at this point that you will add in the next egg. Repeat until you have incorporated all the eggs.

Pipe the batter using a pastry bag and a plain tip. Pipe choux about 1 inch-part in the baking sheets. Choux should be about 1 inch high about 1 inch wide. Using a clean finger dipped in hot water, gently press down on any tips that have formed on the top of choux when piping. You want them to retain their ball shape, but be smoothly curved on top. Brush tops with egg wash while trying not to drip the wash down the puffs onto the pan (which could somewhat inhibit rise).

Bake the choux at 425 degrees F until well-puffed and turning lightly golden in color, about 10 minutes. Lower the temperature to 350 degrees F and continue baking until well-colored and dry, about 20 minutes more. Remove to a rack and cool (tip from a pro: poke each puff with a toothpick while cooling to release the steam inside. It shouldn’t cause your cream to leak, but will help the puffs stay crisp). Can be stored in a airtight box overnight, but I recommend, if you aren’t using them right away to create your croquembouche, that you freeze them. When you’re ready to use them, bake them at 350 degrees F for 5-6 minutes to refresh and recrisp them.

Fill your puffs: When puffs are cool, use a thin, plain tip to fill them generously with plain or strawberry cream (the strawberry cream will have chunks, so use a wider tip).

Assemble your croquembouche: Melt chocolates in the microwave per packaging instructions (chips are usually melted on half power in increments of 30 seconds, stirring after each). I run a bit of hot water into a large bowl and set my bowl of chocolate down into the larger bowl to keep it melty, but be careful not to get water in the chocolate, which would cause it to seize.

Dip each puff’s head into the chocolate (white or brown as desired), setting them right-side up on wax paper to dry. After you’ve dipped all of the puff tops, begin with the largest puffs, dipping the bottoms and/or corners as needed to build the base of your croquembouche on a plate. After building each level, stick the croquembouche into the refrigerator to harden the chocolate a bit before moving on. Sudden temperature changes aren’t ideal for chocolate and may change the color a little (though it didn’t for me), but I find this preferable to my tower collapsing!

Once the tower is built, serve immediately. I refrigerated mine for a few hours and was fine with the texture, but it’s better served as quickly as possible so the puffs don’t get soggy. Enjoy!


Need to start simpler? Try one of these shortcuts:
-Filling puffs with just one flavor of pastry cream instead of two.
-Filling cooled puffs with simple whipped cream instead of pastry cream.
-Serving puffs on a platter instead of mounted.
-Only using one kind of dipping chocolate.


If you liked this post, please:
Subscribe to Willow Bird Baking
Follow Willow Bird Baking on Twitter
Follow Willow Bird Baking on Facebook
Give this post a thumbs up on StumbleUpon


ShareOther ways to share this post with friends!

Chocolate Mousse Pie

It was a warm Friday in May, and I left school in a hurry after teaching my last class. I swung through the drive-through of Arby’s, ordering a sandwich as large as my head and then wondering why I’d just ordered a sandwich as large as my head. No time to worry about that!

I barreled down the interstate with a quick stop at the UPS processing center to grab the package that should have been delivered to my apartment (sigh) but wasn’t. No time to wait for them to correct the problem — I would need the contents of this package in a matter of hours. I ripped it open to unveil the apron I’d just had printed:

To my great relief, there were no spelling errors, egregious or otherwise. Can you imagine handing an apron to Ree Drummond that said, “WILLOW BIRD BAKING <3 PINEER WOMUN." Actually, now that I think about it, she might've liked that.

That’s right, I was on my way to meet P-Dub herself at her Charlotte booksigning. Now, I’m not really fanatic about celebrities. I was in love with Isaac Hanson for about 2 weeks in middle school before realizing he was never even going to know I existed. So I snapped out of it, went about my business, and didn’t bother with this “fan” silliness anymore.

That being said, I love Ree Drummond. She’s warm, hilarious, genuine, and probably more deserving of her fame than any of the Hollywood crowd. And last time I mentioned her in a post, I got hate mail! From real, live, professional trolls! You know someone’s really “made it” when they have their own little official hate squad following mentions of them around the internet. Cool.

She was as lovely as I expected when I met her in person, but for me, it was one of those Christmas Story experiences. You know the Christmas Story movie, right? The one with the leg lamp? In the movie, little Ralphie stands in line for hours to meet Santa with one goal echoing incessantly in his brain: to ask for a Red Rider BB Gun. That gun is all he wants, and all he’s been able to think about for weeks. He rehearses his lines to perfection. Finally, he reaches the front of the line and stares up into the face of a jaded department store Santa. It’s time to ask for his dream! He musters the strength to speak and . . . he panics. He chokes. He stares. He asks for a football.

Thankfully, I didn’t ask Ree for a football. What I did do is shuffle about, hand her the apron shyly, sort of mention Willow Bird Baking, and then give a dazed grin to the camera. Suddenly we were walking out of the building and I thought about turning around to scream, “No! I wanted a Red Rider BB Gun!” Somehow I don’t think that would have helped.

Anyway, despite my stagefright, Ree was charming and interested in each and every one of the hundreds of people who came to see her. I hope she’s enjoying her apron, and I dedicate this big ol’ heaping Chocolate Mousse Pie to her.

Well, okay, I sort of messed that up too. But not too badly.

The pie was tasty: a buttery, flaky pie crust embracing a thick mess of pillowy, indulgent chocolate mousse and topped with slightly sweetened, loosely whipped cream and chocolate curls. There aren’t many things that taste better than that crust + chocolate combination, in my opinion. It reminded me of the French Silk pies I used to love at Perkins — anybody out there still have a Perkins in their town? Eat a slice of that French Silk for me, please.

But there was an issue; namely, my mousse was grainy. Two or three other commenters on P-Dub’s site had the same problem, but most obtained smooth mousse. I think it comes down to creaming your butter and sugar. Make sure your butter is room temperature, thoroughly softened, and that you cream the sugar in until it’s really dissolved and fluffy.

Regardless of the slight sugar crunch, the pie was a rich, luxurious treat. My Sunday school class got ahold of it and left an empty pie plate in its place — and if that’s not a good sign, I don’t know what is!

Chocolate Mousse Pie


Recipe by: Adapted from Pioneer Woman, crust by Willow Bird Baking
Yields: one 9-inch pie, serves about 8-9

Chocolate Mousse Ingredients:
4 ounces unsweetened baking chocolate
1 cup salted butter, softened
1-½ cup sugar
1 teaspoon vanilla extract
4 whole eggs (since they will be raw, you may want to use pasteurized eggs, and/or avoid serving this recipe to older or pregnant guests)

Pie Crust Ingredients: (you can use a prepared pie shell if desired)
2 cups flour
1 teaspoons salt
1/4 cup cold lard (non-hydrogenated if available)*
1/2 cup cold butter, chopped
3-4 tablespoons ice cold water
1 egg and 1 teaspoon heavy cream for egg wash
*you can substitute vegetable shortening here if you wish, but I highly recommend the lard!

Whipped Cream Ingredients:
2 cups heavy whipping cream
4 tablespoons confectioners’ sugar
1 teaspoon gelatin
3 tablespoons cold water
1 tablespoon hot water

chocolate curls, if desired, for garnish

Directions:
To make the crust, pulse flour and salt together to combine. Add scoops of lard and pulse into the mixture has the texture of coarse sand, about 10 seconds. Add in chunks of butter and pulse until butter pieces are no larger than small peas, about 10 pulses. Add minimum amount of water and pulse on low. If dough remains crumbly and doesn’t come together, add another tablespoon of water. Add as little as is required to enable the dough to be rolled into a ball. Form the dough into a disk, wrap in plastic, and refrigerate for 20-30.

Preheat oven to 450 degrees F. Roll disk of dough out to around 2 inches larger than your pie plate and transfer it, situating it in the plate. Fold the excess dough around the edges and crimp, trimming where necessary. Cover the dough with parchment paper and fill with pie weights or dried beans, pressing to the edges. Bake for around 20 minutes. Remove weights and paper, egg wash crust, and bake 5-10 minutes more, until golden brown (you won’t be baking it again, so make sure it has good color — shielding edges with foil if they begin getting too dark). Let crust cool completely.

In small microwave safe bowl melt 4 ounces of unsweetened baking chocolate until stirrable (about 45 seconds on high). Set aside to cool.

To make the mousse, in a large bowl with an electric mixer beat 1 cup (2 sticks) of butter (I used unsalted and added a dash of salt) and 1 ½ cups of white sugar until fluffy (about 2 to 4 minutes). NOTE: make sure butter is very soft and at room temperature, and beat until sugar is entirely dissolved, or the chocolate mousse will be grainy. When melted chocolate is cooled, drizzle it over the butter/sugar mixture. Add 1 teaspoon of vanilla extract. Beat the mixture thoroughly until combined (on a Kitchen Aid mixer, you will be using the whisk attachment).

Turn your mixer to a medium speed and over a period of 15 to 20 minutes add in the four eggs, one at a time, leaving about 5 minutes between each egg addition. Once the pie filling is well mixed, pour it into the baked pie shell, scraping every last speck of it out of the bowl. Smooth out the pie filling and place pie in the refrigerator to chill for at least two hours (preferably longer).

To make whipped cream, soften gelatin on 3 tablespoons cold water for about 2 minutes. Add 1 tablespoon hot water and stir to dissolve gelatin. Let cool while you mix other ingredients in a bowl to soft peaks. Add gelatin mixture to whipped cream and fold in gently. Pile whipped cream onto top of pie and refrigerate. Garnish with chocolate curls if desired.

If you liked this post, please:
Subscribe to Willow Bird Baking
Follow Willow Bird Baking on Twitter
Follow Willow Bird Baking on Facebook
Give this post a thumbs up on StumbleUpon


ShareOther ways to share this post with friends!

Chocolate Pavlovas with Chocolate Mascarpone Mousse

Don’t laugh.

You’re going to laugh, aren’t you? You’re already laughing, AREN’T YOU?! Okay, clearly I’m a little sensitive about this, but . . . I’ve been going to Jazzercise classes. I know, I know . . . cue the comments about leg warmers, sideways ponytails, and off-shoulder Mickey Mouse t-shirts. Perhaps you’ve conjured up a picture of me in gigantic, neon hoop earrings with poofy bangs dancing around a la Flashdance. It’s okay. I can take it.

Because I love Jazzercise. I LOVE IT. It’s a dance exercise class that includes cardio, small weights, and stretching. I’ve been to two classes, and the pattern seems to be rocking out for 30 minutes (i.e. until I feel like I’m about to die), making the small weights and stretching exercises that last for about 15 minutes a total relief.

Before this, I was a sedentary lump (albeit a lump that did eat healthily throughout the week), so it’s no surprise that I’m the least coordinated person on the planet. Like, less coordinated than your Great Aunt Ida who uses a walker to get around and can’t really see anymore. Like, she would laugh me off the dance floor. So I’m typically the one flailing around in the back of the Jazzercise class two steps behind everyone else and sashaying in the wrong direction. I only wish I were joking!

The good news is, I still love it. I laugh at myself the whole time, sweat a lot, and wonder with slight discomfort if I’m jiggling in an unattractive way. As one of the instructors told me after my first class, “We’re all moving the wrong way at some point!” I just keep jabbing and kicking and pliéing and sashaying and wriggling and whatever else I’m supposed to do until the class is over and I feel like a champ. Albeit a champ with poofy bangs.

Another reason to love my new foray into the exercise world is being able to reflect upon my healthy movement while eating things like rich Chocolate Pavlovas with Chocolate Mascarpone Mousse and Mascarpone Cream. I can now make comments to myself like, “Oh yeah, I totally Jazzercised this off. No problem,” or, “I’m sure we’ll be sashaying these calories off tomorrow.”

With so much Secret Gardening going on, you may have assumed the Daring Bakers challenge fell by the wayside this month. Fortunately, that was not the case! The June 2010 Daring Bakers’ challenge was hosted by Dawn of Doable and Delicious. Dawn challenged the Daring Bakers’ to make Chocolate Pavlovas and Chocolate Mascarpone Mousse. The challenge recipe is based on a recipe from the book Chocolate Epiphany by Francois Payard.

These pavlovas are not the sort with the marshmallowy interior, but are more crisp throughout, like meringue cookies. They’re topped with a decadent, fluffy chocolate mascarpone mousse and a drizzle of mascarpone cream made with heavenly Crème Anglaise. I opted to leave out orange flavorings suggested by the original recipe, because I typically don’t like citrus meddling with my chocolate. The result was perfect. Make your pavlovas small, because these components all together make for an extremely rich, luscious dessert. You’re going to need a glass of milk. And a nap. And some Jazzercise.

But it’s worth it! Mike and I loved this dessert. The combination of crisp and smooth textures was fantastic. It was messy to eat, but simple to make, and a joy to taste! As Daring Bakers challenges go, this challenge had very few, “Uh-oh, this recipe’s about to fail!” moments — a huge plus for me in this busy month. I made my chocolate pavlovas look like little Soda Shop ice cream sundaes for added fun. Scrounge up your best chocolate and enjoy the cool mousse and crisp pavlova on a hot summer evening.

In the meantime, tell me, what’s your favorite exercise routine? Jazzercise? Zumba? Treadmill? Channel surfing?


Gorgeous flowers from a student’s parents’ garden.

Chocolate Pavlovas with Chocolate Mascarpone Mousse


Recipe by: Adapted from Chocolate Epiphany by Francois Payard
Yields: About 8-10 servings depending on the size of your pavlovas

Chocolate Pavlova Ingredients:
3 large egg whites
½ cup plus 1 tbsp (110 grams) white granulated sugar
¼ cup (30 grams) confectioner’s (icing) sugar
1/3 cup (30 grams) cocoa powder

Chocolate Mascarpone Mousse Ingredients:
1 ½ cups (355 mls) heavy cream
9 ounces (255 grams) good chocolate, chopped (I used bittersweet Ghiradeli chocolate chips)
1 2/3 cups (390 mls) mascarpone
pinch of nutmeg

Mascarpone Cream Ingredients:
1 recipe crème anglaise (see below)
1/6 cup (120 mls) mascarpone
1/6 cup (120 mls) heavy cream

Crème Anglaise Ingredients:
1/3 cup whole milk
1/3 cup heavy cream
1/3 vanilla bean, split or 1 teaspoon pure vanilla extract
2 large egg yolks
2 tablespoons sugar

Directions:
Make chocolate pavlovas: Place a rack in the center of the oven and preheat to 200º F (95º C) degrees. Line two baking sheets with silpat or parchment and set aside.

Put the egg whites in a bowl and whip until soft peaks form. Increase speed to high and gradually add granulated sugar about 1 tbsp at a time until stiff peaks form (the whites should be firm but moist.) Sift the confectioner’s sugar and cocoa powder over the egg whites and fold the dry ingredients into the white (this looks like it will not happen. Fold gently and it will eventually come together.)

Fill a pastry bag with the meringue. Pipe the meringue into whatever shapes you desire. Alternatively, you could just free form your shapes and level them a bit with the back of a spoon. Bake for 2-3 hours until the meringues become dry and crisp. Cool completely. You can make these ahead of time and store in an airtight container for up to 3 days.

Make the Crème Anglaise: While the pavlovas are baking (unless you made them ahead of time), whisk together the egg yolks and sugar until the mixture turns pale yellow.

Combine the milk, cream and vanilla in a saucepan over medium high heat, bringing the mixture to a boil. Take off the heat. Pour about ½ cup of the hot liquid into the yolk mixture, whisking constantly to keep from making scrambled eggs. Pour the yolk mixture into the pan with the remaining cream mixture and put the heat back on medium. Stir constantly with a wooden spoon until the mixture thickens enough to lightly coat the back of a wooden spoon. Do not overcook.

Remove the mixture from the heat and strain it through a fine mesh sieve into a bowl. Cover and refrigerate until the mixture is thoroughly chilled, about 2 hours or overnight.

Make the chocolate mascarpone mousse: While the pavlovas are baking or cooling, put ½ cup (120 mls) of the heavy cream in a saucepan over medium high heat. Once warm, add the chocolate and whisk until melted and smooth. Transfer the mixture to a bowl and let sit at room temperature until cool.

Place the mascarpone, the remaining cup of cream and nutmeg in a bowl. Whip on low for a minute until the mascarpone is loose. Do not overbeat, as the mascarpone will break. Mix about ¼ of the mascarpone mixture into the chocolate to lighten. Fold in the remaining mascarpone until well incorporated. Refrigerate until you’re ready to assemble your pavlovas.

Make the mascarpone cream: Slowly whisk the mascarpone into the Crème Anglaise. Put the cream in a bowl and beat with electric mixer until very soft peaks are formed. Fold the cream into the mascarpone mixture.

Assemble your pavlovas: Pipe the mousse onto the pavlovas and drizzle with the mascarpone cream over the top. Dust with confectioner’s sugar and add fresh fruit if desired.

P.S. – Now that I’ve posted my Daring Bakers challenge, check back soon for Secret Garden recipes!

P.S. 2 – Make sure to stop by and see other Daring Bakers’ creations!

If you liked this post, please:
Subscribe to Willow Bird Baking
Follow Willow Bird Baking on Twitter
Follow Willow Bird Baking on Facebook
Give this post a thumbs up on StumbleUpon


ShareOther ways to share this post with friends!

1 15 16 17 18 19 22