bread

Chocolatey Red Velvet Pull-Apart Bread with Cream Cheese Glaze

“I changed my mind.”

My mom shifted the car into park and turned off the ignition before looking over at me. “What do you mean? You can’t change your mind now; we’re already here.”

I looked out the window at the hair salon and then turned back to my mom. “Can’t I just get a trim, though? I really don’t want short hair. Please.” My 5-year-old voice teetered on the border between whining and shouting.

My mom shook her head. “We already made the appointment and told her what we wanted done. We aren’t spending all this money for just a trim. It’s just hair; it’ll grow back. Come on.”

Before I knew it, I was seated in a pleathery chair in front of a giant mirror, looking at my long blonde locks. Jessica, our hair stylist, sensed my unease. “Let’s just get it over with all at once, okay?” she asked as she tugged it into a ponytail. I could barely nod. A few snips later, my ponytail dropped to the floor with a whisp of finality, and the newly free remnants of my hair fell around my face. They barely reached my ears.

Silent tears began rolling down my cheeks as I calculated how long I’d have to wait to have long hair again.

My hair was really only one facet of my style troubles. In addition to bowl cuts, my mom had a penchant for “hammer pants.” She made many of my outfits by hand, including a hammer-panted onesie (I couldn’t make this up) with candy-pink stripes and gigantic, ceramic ice cream cone buttons. I think it might’ve also had a big lace collar. I posed in it with my bowl cut and a reluctant smile for many a photograph.

Then there was the red-and-denim hammer-panted contraption with the ceramic cow buttons. God bless my mother for sewing clothes for me, seriously, but I considered running away.

At least I was loved? Indeed, my childhood style woes remind me of this quote from food writer Angie Mosier about red velvet cake: “It’s the Dolly Parton of cakes: a little bit tacky, but you love her.”

Incidentally, I think I would’ve rather dressed like Dolly Parton than M.C. Hammer, but that’s neither here nor there.

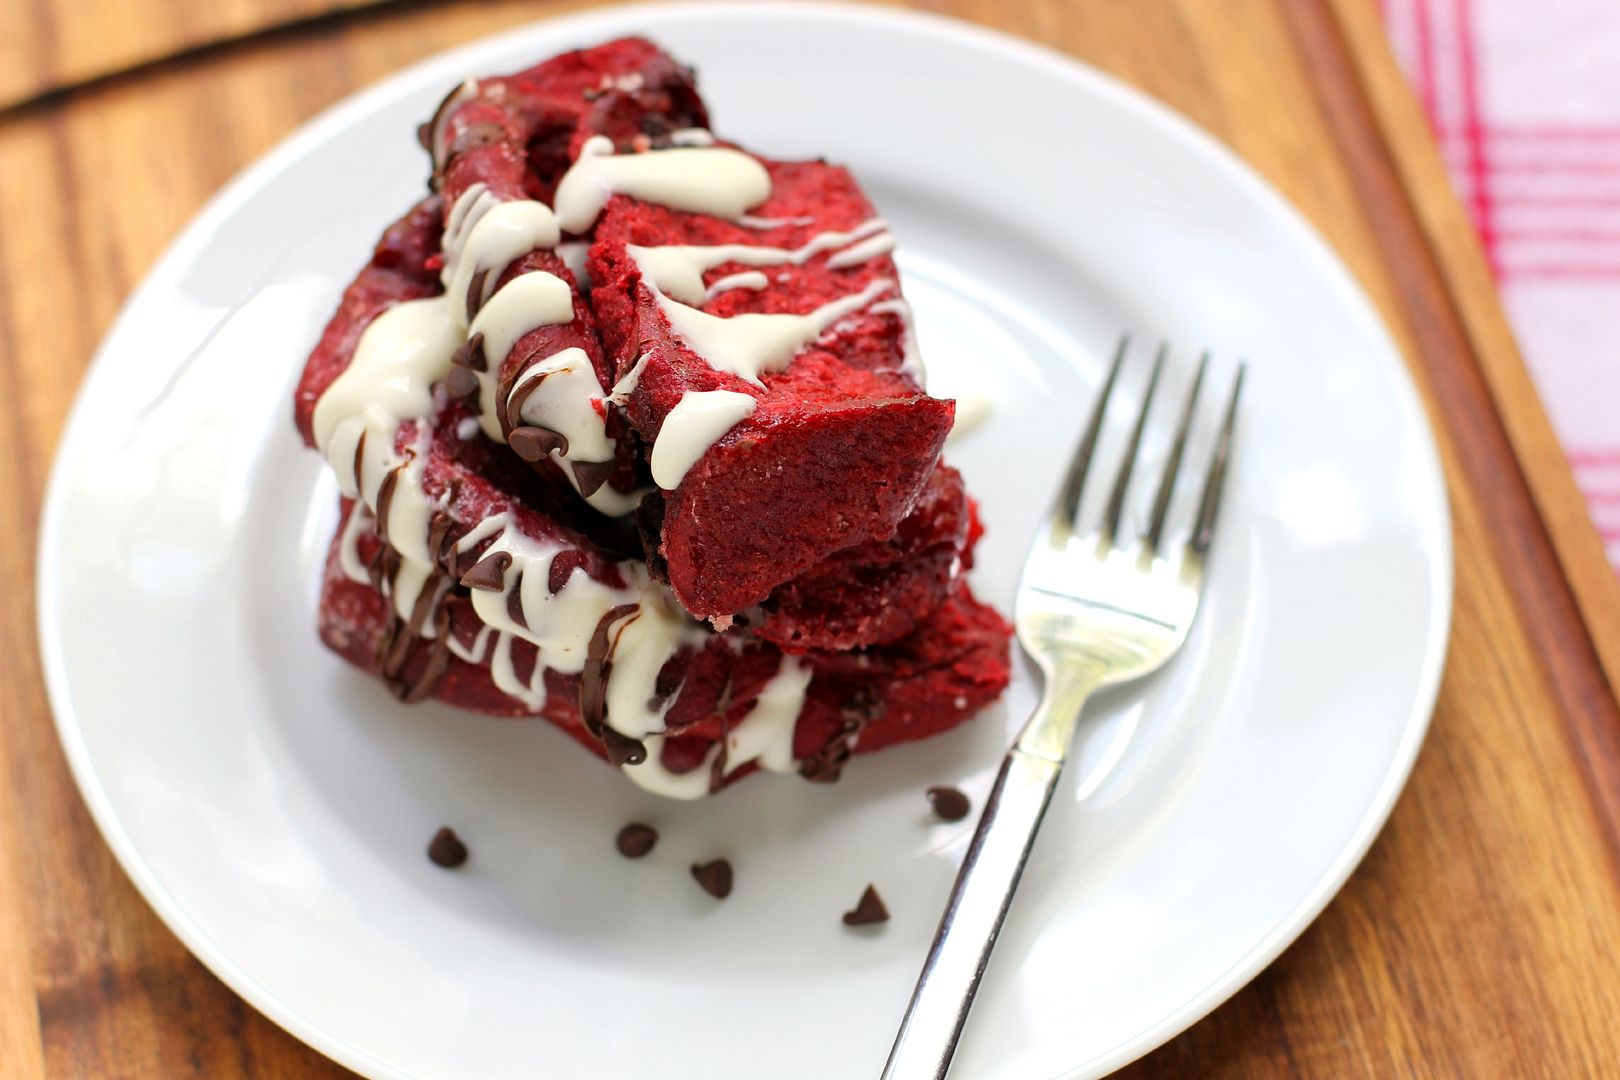
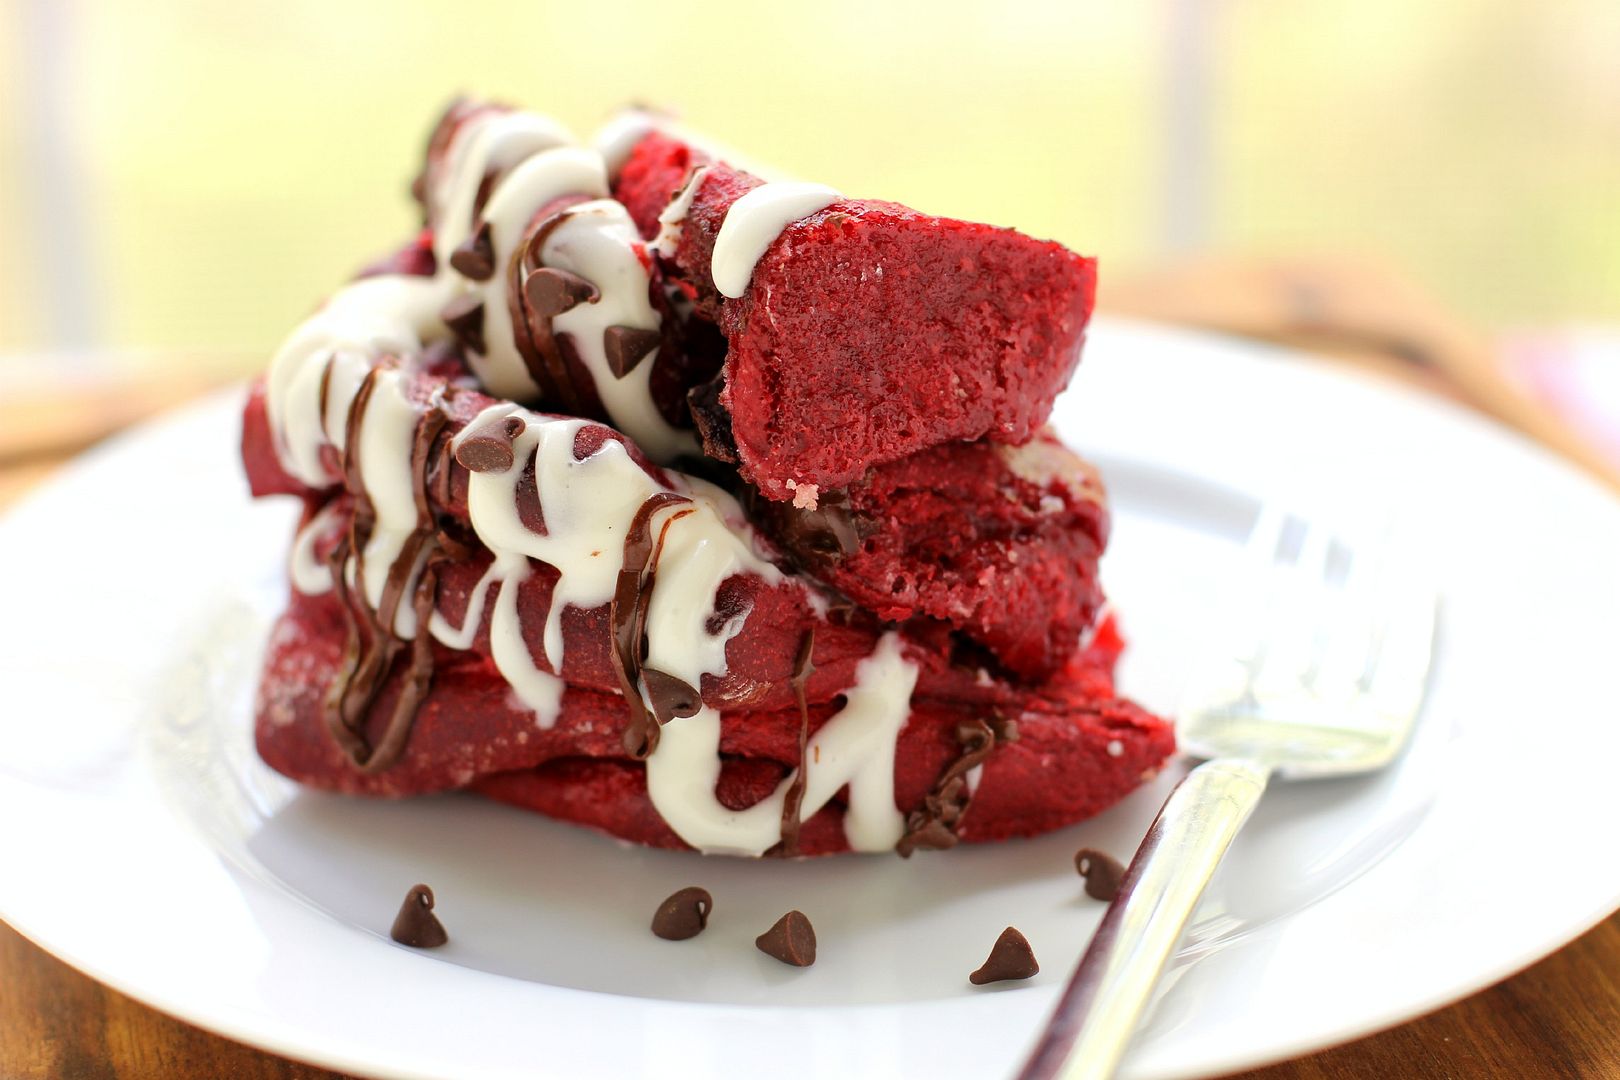
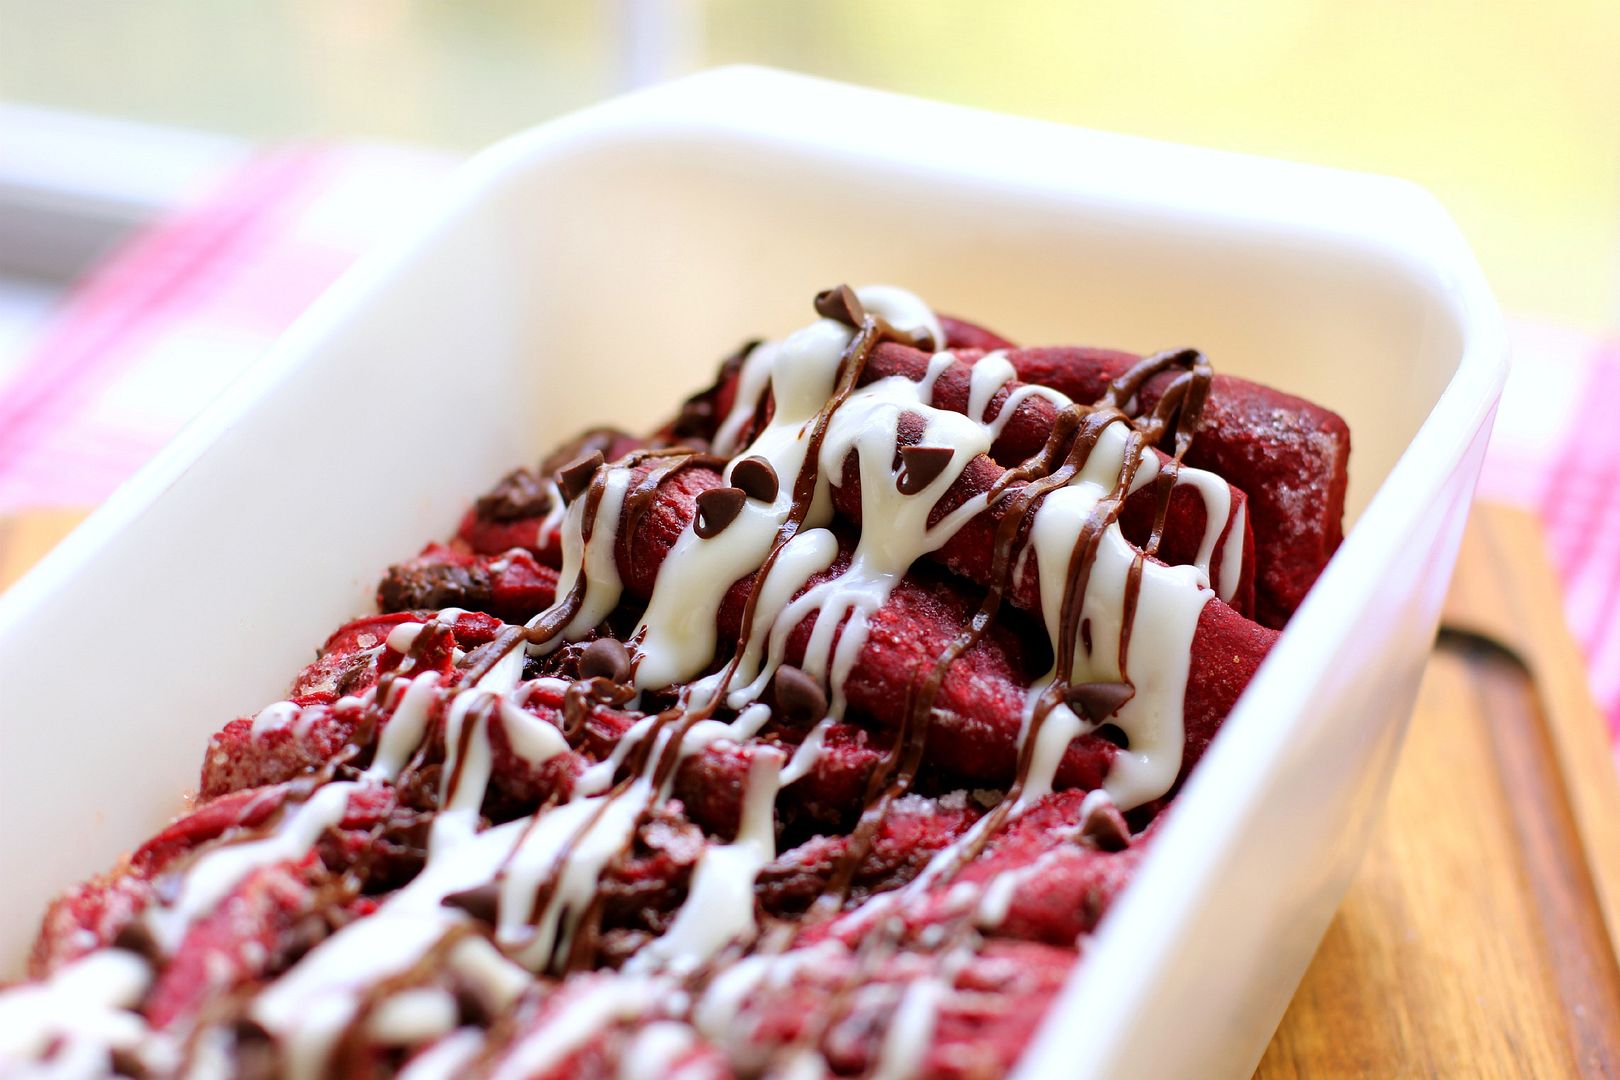
This red velvet pull-apart bread has all the fun, tacky redness of red velvet with some extra chocolatey goodness thrown in. It began life as a chocolate yeast bread recipe that I modified into a pull-apart loaf. It’s sweet, melty, gooey, and with a cream cheese glaze drizzled over the top, reminiscent of your favorite red velvet desserts. As a plus, there are no hammer pants or bowl cuts in sight.

Tell me about your tackiest fashion choices (or the tackiest fashion “choices” imposed upon you by parents).

Chocolatey Red Velvet Pull-Apart Bread with Cream Cheese Glaze


Recipe by: Willow Bird Baking, adapted from Chocolate Bread by Paula Oland of the Balthazar Bakery
Yield: 2 loaves

Pull-apart loaves are downright addictive. Each layer is crisp on the outside and soft on the inside. This loaf is made from yeast dough with a sweet chocolate flavor, hunks of melty chocolate throughout, and a bright red hue! The cream cheese glaze kicks it right over the top. Schedule out the recipe in advance to allow for the rising/resting times and enjoy!

Bread Starter Ingredients:
1/4 teaspoon active dry yeast
1 cup lukewarm water (100-110 degrees F)
1 cup all-purpose flour, plus 3 tablespoons all-purpose flour

Red Velvet Yeast Bread Ingredients:
2 1/2 cups bread flour
1/4 cup cocoa powder
2 tablespoons (1 ounce) red food coloring plus 1 tablespoon water
1/3 cup sugar
2 teaspoons active dry yeast
1 cup minus 3 tablespoons lukewarm water (100-110 degrees F)
1 1/4 teaspoons table salt
2 tablespoons unsalted butter, room temperature
vegetable oil for lightly oiling bowl

Filling Ingredients:
3/8 – 1/2 cup granulated sugar (depending on how sweet you like things)
2 tablespoons semisweet chocolate chips
2 tablespoons bittersweet chocolate chips (I use Ghirardelli’s 60% cacao)
2 tablespoons unsalted butter, melted

Cream Cheese Glaze Ingredients:
2 ounces cream cheese, room temperature
1/2 cup powdered sugar
2 tablespoons unsalted butter, room temperature
1/4 teaspoon vanilla extract
about 3 tablespoons milk as
mini chocolate chips for sprinkling

Directions:
Note: In recipes that call for hunks of rising/resting time like this one, I like to draw out my schedule with different size boxes representing “hands on” and “hands off” prep time to get a visual feel for how long it will take. If you’re a visual person like me, drawing out your schedule is a great technique to try! Otherwise, a good old fashion list of what you’re doing at what time would also be beneficial.

Make bread starter: Dissolve the yeast in the 100-110 degree water for about 10 minutes. Completely mix in the flour. Cover the bowl loosely and leave it at room temperature to proof for around 6 hours.

Make red velvet yeast bread: Mix the cocoa powder, red food coloring, and 1 tablespoon water into a paste in a small bowl. In a medium bowl, mix together the paste, flour, 1/3 cup sugar, yeast, water, and 1/4 cup of your bread starter (save the rest to use for other recipes). Let this mixture rest for 15 minutes.

Knead in the salt and butter and then knead for about 10 minutes by hand or about 4 minutes on a mixer fitted with a dough hook, or until smooth and elastic. Scoop dough out into a lightly oiled bowl and cover it with a dish cloth. Let it rise until doubled in size, about 1 1/2 hours. Leave the dough in the bowl at this point but fold it in thirds like you’d fold a letter. Recover it and let it rest for 30 more minutes.

Shape and bake pull-apart bread: Prepare two 7″x 3″ x2″ loaf pans by greasing them (I use Wilton’s Cake Release, but you could also butter and flour them). Flour a large work surface. Use a dough scraper or sharp knife to help you cut your dough into halves. Turn out half of the dough onto your floured surface, keeping the other half covered.

Roll your dough out to a 15 inch long and 12 inch wide rectangle, lifting corners periodically to make sure it’s not sticking. If it seems to be snapping back, cover it with your damp towel and let it rest for 5 minutes before continuing.

Spread the melted butter over the surface of the dough with a pastry brush and then sprinkle the sugar and chocolate chips over the top, patting them down to ensure they mostly stick. Some will inevitably fall out as you do the following steps — just stuff ’em back in and don’t worry too much about perfection.

With the long edge of the rectangle toward you, cut it into 6 strips (do this by cutting the rectangle in half, then cutting each half into equal thirds. I used a pizza cutter). Stack these strips on top of one another and cut the resulting stack into 6 even portions (again, cut it in half, and then cut the halves into equal thirds). Place these portions one at a time into your greased loaf pan, pressing them up against each other to fit them all in. Cover the pan with your damp cloth and place it in a warm place for 45 minutes to an hour to double in size. Repeat the rolling and cutting process with the second half of dough.

While the dough rises, preheat oven to 350 degrees F (or 325 if you have a glass loaf dish instead of a metal pan). When it’s risen, place the loaf in the center of the oven and bake for 30-35 minutes until dark on top (if you take it out at light brown, it’s liable to be raw in the middle, so let it get good and dark). Cool until just warm on a cooling rack in the loaf pan while you make the glaze.

Make the cream cheese glaze: Beat the cream cheese until fluffy, and then add sugar and vanilla. Add the milk to thin it to drizzling consistency. Drizzle some of the glaze over the slightly warm bread (save the rest for drizzling over individual slices) and sprinkle it with mini chocolate chips. Serve immediately.

If you liked this post, please:
Subscribe to Willow Bird Baking
Follow Willow Bird Baking on Twitter
Follow Willow Bird Baking on Facebook
Give this post a thumbs up on StumbleUpon
Pin It


Shareother ways to share this post with friends

Pork Bulgogi Bāozi (Steamed Korean BBQ Buns)

Hands down, my favorite food experience in the universe (so far — who knows, maybe something really awesome is goin’ down on Mars) is going to yum cha, or eating at a dim sum restaurant. Dim sum is a Chinese tea-like meal where a variety of amazing dishes are served as small plates. At a typical dim sum restaurant, carts full of steamed dumplings, fried eggplant, roasted pork buns, custard cakes, Chinese broccoli, sesame balls, and other treats traverse the dining room, replenishing each table.

It sounds pretty heavenly, right? If you haven’t tried it, you really should. That being said, my first dim sum experience was, um, terrifying.

I think the restaurant atmosphere contributed more than a little bit to my anxiety. The interior walls were all painted stark black, and the blinds were mostly drawn. Where sunlight did find a breach, it sliced into the space as bright and sharp as a flashing knife. Grotesque white statues towered in the center of the restaurant and carts crawled down narrow aisles, preventing any retreat. The restaurant owners were apparently going for “horror movie chic.”

My real trepidation, though, came from having no idea how dim sum worked. I saw the carts full of food, but were you supposed to flag them over? Would they just come to you? Were you supposed to write your order on your tab or did the servers write it for you? Was it annoying to ask what each dish was? As the cart rolled towards our table, so did a wave of panic. I didn’t know what I was doing! I turned a frantic face to Mike and literally started plotting an escape: “We’ve already ordered our drinks, but can’t we just pay for them and run out?!”

Mike, thankfully, was calm. He talked me down, helping me to temper my fear by focusing on the food. And oh, the food! I stuffed myself silly with every manner of new and delicious Chinese food, but my favorite dish by far was the char siu bao, or steamed pork buns.

These buns aren’t your average heavy, dense bread. They’re light, cakelike, and inexplicably fluffy. They’re clouds! They’re sheep! They’re cotton! They’re every other fluffy metaphor you’ve ever heard. The sweet pork filling inside the mildly sweet steamed buns was worth every bit of dim sum panic I’d felt. I vowed to make them in my own kitchen someday.

Y’all, that day has come — except, inspired by the McCormick 2012 Flavor Forecast, a report that highlights up-and-coming flavor trends around the world, I decided to mix it up. Two trends the Flavor Forecast describes are Honoring Roots and No Boundaries. These trends — one that showcases regional flavors around the world and another that encourages the blurring of the boundary lines between them — seemed to complement one another in a delicate balance. They were yin and yang, if you will. I chose to encapsulate both by creating a traditional recipe — Chinese steamed pork buns — with an unexpected ingredient. Instead of filling the buns with char siu, the typical Chinese barbecued pork, I opted to fill them with salty, sweet, spicy Korean barbecue, or bulgogi.

Bulgogi combines the spice of Korean Pepper Paste with sultry sesame, fruity Korean pear, and garlic. It’s delicious over rice, but it really shone when it was coated in this delicious sauce and stuffed into these gorgeous buns (ha ha ha, gorgeous buns!) It took me three tries to make the perfect bāozi, but this version really is the tops. I can honestly say that pulling my Fluffy McFluffypants buns out of my new bamboo steamer was one of my proudest kitchen moments to date. Even better, these buns were one of my most delicious kitchen moments to date!

It may require an initial investment to begin cooking and enjoying Asian food if you aren’t used to doing so (I had to buy soy sauce, rice wine, rice vinegar, Korean pepper paste, sesame oil, sesame seeds, and potato starch to stock my pantry). But these ingredients can be used over and over again, and meals like this are so worth the investment!

In fact, I was so excited about this recipe that I made you a video tutorial on how to shape the bāozi. Sophomoric jokes are included at no extra charge:

Have you ever eaten at a dim sum restaurant or cooked a new-to-you cuisine at home?

Pork Bulgogi Bāozi (Steamed Korean BBQ Buns)


Recipe by: Willow Bird Baking with bun recipe adapted from Rasa Malaysia and bulgogi recipe adapted from Food.com
Yield: 12 pork bulgogi buns

Korean BBQ, or bulgogi, is a delicious combination of salty, sweet, and spicy. It’s amazing served over rice, but even better stuffed inside these slightly sweet, light-as-a-feather steamed buns. I did all the legwork for you in this one, trying multiple bun recipes and tweaking quantities until they were just right. So trust me: invest in the ingredients (you’ll use them over and over again) and make these buns! If you don’t have a steamer, here’s an easy way to make one.

Bun Ingredients:
8 grams active dry yeast
160 milliliters lukewarm water (100-110 degrees F; I use a candy thermometer to do a quick check)
½ teaspoon white vinegar
280 grams low-protein flour (Hong Kong Flour or Cake Flour)
100 grams wheat or potato starch (I used potato)
100 grams icing sugar
30 grams shortening
10 grams baking powder
10 milliliters cold water

Pork Bulgogi Ingredients:
1 pound pork loin (cut into thin, wide slices)
5 tablespoons soy sauce
2 cloves garlic, minced
2 sprigs green onions, chopped
1/2 yellow onion, sliced
2 tablespoons McCormick toasted sesame seeds
black pepper
1 tablespoon and 1 1/2 teaspoons honey
2 1/2 – 4 tablespoons Korean red pepper paste (gochujang)
1 tablespoon McCormick red pepper flakes
1 1/2 teaspoons sesame oil
1 teaspoon vegetable oil for cooking
1/2 cup chopped Korean pear

Sauce Ingredients:
1 tablespoon + 1/4 teaspoon soy sauce
1 1/2 teaspoons honey
1 1/2 teaspoons sweet soy sauce
1 1/4 teaspoons sesame oil
1 teaspoon Korean red pepper paste (gochujang)
3/4 teaspoon rice vinegar
1/4 teaspoon packed brown sugar
1/4 teaspoon McCormick toasted sesame seeds
chopped green onions

Directions:
NOTES: I measured the bun ingredients by weight for accuracy. You can convert them to imperial measures using an online calculator, but I’d use weights if you can.

Some of the ingredients for this recipe (Korean red pepper paste, rice wine, sweet soy) are easiest to find at an Asian supermarket. I bought my steamer there as well, for around $13 — a great investment considering how many times I’ve already used it! Finally, you can usually find pork ready-sliced for bulgogi at an Asian supermarket; if not, freeze the loin for a bit before slicing with a serrated knife, which will make it easier to cut through.


Make pork bulgogi: Whisk together marinade ingredients (soy sauce, garlic, green onions, onion, sesame seeds, sesame oil, pepper, honey, pepper paste, and pepper flakes) and toss pork in marinade. Cover and let the pork marinate overnight in the refrigerator (for at least 8 hours).

Heat a skillet over medium heat and add vegetable oil. When oil is shimmery, add some of the pork mixture (don’t crowd the pan — I cooked about 4 slices at a time) and cook, turning occasionally, for about 5 minutes or until brown and done. Remove this pork to a cutting board. Cut all pork into small bite-sized pieces and place it in a bowl. Toss in chopped Korean pear.

Make sauce: Whisk all sauce ingredients together except green onions. Pour about half of the sauce over your pork bulgogi (you want it lightly coated, not swimming in the sauce) and reserve the other half (with green onions sprinkled in) for dipping.

Make bāozi: Sift together the flour, wheat or potato starch, and powdered sugar into a mixing bowl. Make a well in the center and gently combine the yeast, vinegar, and warm water in the well. Let this sit and proof for around 10 minutes before slowly mixing in the surrounding flour mixture bit by bit, forming a dough. Add in the shortening and then knead (on a KitchenAid mixer at about speed 4-6, knead for about 4 minutes; by hand, knead for about 10 minutes) until the dough is smooth and elastic. It shouldn’t be sticky to the touch.

Transfer the dough to a bowl lightly coated with vegetable oil. Cover it with a damp cloth and place it somewhere warm to rise (I always put mine into an oven that has been warmed for a few minutes and then left open to drop to just above room temperature) for 30 minutes. I never noticed too much rise, so don’t worry if it doesn’t seem like a huge difference.

After 30 minutes, dissolve the baking powder completely in the water and sprinkle this mixture over the bao dough. Knead it in to fully combine it (I used the dough to mop up any of the mixture that was still on the bowl and kneaded it in well — an uneven distribution of baking powder can cause discoloration of your buns). Recover the dough and let it rest for 10 more minutes.

Fill and shape your buns: Turn the dough out onto wax paper and pat it into an even width. Use a dough cutter or sharp knife to divide it into 12 roughly equal sections. Take one section and gently roll it out to about 1/4 inch thick with a rolling pin (I keep the sections I’m not working with covered with a damp cloth so they don’t dry out.) Holding the dough in your non-dominant hand, place the pork bulgogi filling in the center and carefully pleat the edges of the dough together at the top, turning the bun as you work, until it is fully closed (see the video below for a demonstration of to shape the buns — and jokes about the word ‘buns,’ of course). Place each bun on a square of wax or parchment paper.

Steam your buns: Preheat your steamer by boiling water and a teaspoon of vinegar over medium-high heat in a saucepan with your steamer on top (here’s a photo of how your steamer setup should look). Preheating the steamer ensures your buns will fully rise. Once it’s steaming, place buns in each tier (being careful not to crowd them), spray them with a bit of water (this help ensure a smooth surface), and close the steamer. Cook for 12 minutes without opening the lid. Remove the buns to a cooling rack to let them cool. Serve warm with reserved dipping sauce.

You don’t see many product reviews on Willow Bird Baking, because I’m choosy with how I share this space. My choosiness reflects my own ideals for Willow Bird in addition to my respect for the community we have here. When I get the opportunity to work with a company I genuinely love and use in my own kitchen, though, I’m always thrilled to share. McCormick is just such a company, and I’m excited to share their forecast of upcoming flavor trends.

Disclosure: McCormick sent me a Flavor Forecast Immersion Kit of ingredients, and compensated me for other ingredients and for my time and creative energy. I value my readers such that all opinions expressed on Willow Bird are always my own.

If you liked this post, please:
Subscribe to Willow Bird Baking
Follow Willow Bird Baking on Twitter
Follow Willow Bird Baking on Facebook
Give this post a thumbs up on StumbleUpon
Pin It


Shareother ways to share this post with friends

Healthy Roasted Tomato and Onion Bread Soup

The realization that I am a delicate Southern flower who requires thick, humid warmth to survive was not a gradual one for me. I remember vividly the exact moment that confirmed it.

It was my junior year of high school and I was sitting in my first period French class. Our class was held in a portable classroom (read: drafty old trailer) and the door was still open to welcome arriving students. And oh my ever-loving goodness, il faisait froid.*

*It was cold, y’all.

I was sitting in my desk, hunched over and hugging myself in an attempt to protect my vital organs from the piercing morning cold. Despite my efforts and the fact that I was wearing a winter coat (which, as you’ll learn, is basically miraculous for me), I was pretty sure I was dying of hypothermia.

As discomfort gave way to alarm, I wondered how much longer I should wait before raising my hand and asking to be carried into the main building, preferably by burly seniors in puffy coats. I looked around to see if anyone else was on the verge of death. A few people were chatting. A girl was shuffling around in her backpack. Ms. Moran was looking over some papers. Hm.

I began to calculate the distance I would have to walk upright — with vital organs relatively unprotected! — to pull the door shut in one last effort to save myself.

It was during this hellacious class (actually, I wouldn’t have minded a little fire just then — hold the brimstone, though) that I knew I would die if I were ever forced to move to any northern state. I remember realizing that at that very moment, people were walking around and going to work and surviving in, like, Vermont. I was aghast.

Since then, I’ve realized a few things. For instance, I’ve realized that I almost die each winter because I don’t wear enough clothing. I’m not running around in culottes or anything (you guys remember culottes?), but I have an aversion to layering my outfits. I end up pulling and tugging at things all day to get comfortable. Give me a short, lightweight sundress to slip on any old day.

As a result of my layering troubles, I’m often exposed to the elements. I’ll pat myself on the back for wearing a sweater, but then neglect to wear a coat over it. Or I’ll grab my coat on the way out the door, but decide not to worry about scarves or mittens. Or, like, real shoes.

I may or may not have been that person in college wearing rubber ducky flip-flops in the snow.

Anyway, I’m generally bad at cold weather, but I’m not totally hopeless. I may be dressing wholly inappropriately for the temperature, but at least I’ll be eating appropriately. When it’s cold, I start to crave oatmeal, warm drinks, chilis, stews, and soups.

This Roasted Tomato and Onion Bread Soup has been on a regular rotation at my house this winter. Something about serving piping hot soup over a toasty, buttered slice of bread feels rustic and satisfying to me. Best of all, each 1 cup serving of soup is full of veggies and has a little over 200 calories, making this recipe ideal for all the resolutioners out there! When I know I’m having a bowl of this with my dinner, I look forward to it all day long. So grab your snuggies, bundle up, and enjoy!

What are the temperatures like where you live? How do you brave the cold?

Healthy Roasted Tomato and Onion Bread Soup


Recipe by: Adapted from Eating Well
Yield: 6 1-cup servings

This bright soup is served piping hot over a slice of buttered bread. The result is splushy, hearty, and warms you to the soul. I sometimes make a batch of this soup and eat it for several days. When I’m ready to eat a serving, I toast a slice of bread while reheating the soup and then assemble as usual.

Ingredients:
4 cups thinly sliced onions
3 tablespoons extra-virgin olive oil
salt to taste
freshly ground pepper to taste
4 cups cherry tomatoes, halved (I halved most but left some whole)
1/2 cup thinly sliced garlic, plus 1 whole clove, peeled and halved
3 cups reduced-sodium chicken broth or vegetable broth
6 slices hearty bread of your choice
2/3 cup chopped fresh basil
6 tablespoons finely shredded Parmesan cheese
butter for bread
dash of red wine vinegar (optional)

Directions:
Preheat the oven to 450 degrees F. In a large skillet over medium-high heat, heat 1 tablespoon of olive oil. Add thinly sliced onions and top with another tablespoon of olive oil. Add salt and pepper. Toss the onions to coat. Caramelize the onions my cooking them, stirring occasionally (but not constantly, so they can caramelize on the heat) for about 30 minutes or until they’re rich and brown.

In the meantime, I usually chop my tomatoes and garlic. Spray a 9-by-13-inch pan with cooking spray and add the tomatoes, garlic (except the halved clove), the last tablespoon of oil, and salt and pepper to taste. Gently toss tomatoes to coat. Roast these in the oven until the tomatoes are starting to fall apart and brown in spots, about 20 minutes.

When your onions are caramelized, move them to a big stockpot. Deglaze the skillet by pouring the chicken stock into it and bringing it to a simmer. Use a wooden spoon to scrape up the brown bits from the bottom of the pan. Pour the stock into the stockpot with the onions. Add tomato and garlic mixture to the pot as well, mixing gently to combine. Bring this to a simmer. Remove it from the heat, salt and pepper to taste (sometimes I add a dash of red wine vinegar at the end for a little zing), and cover it to keep it warm.

Meanwhile, line your bread up on a foil-lined baking sheet and bake it for about 10 minutes until it’s toasted (full disclosure: I just toast mine in the toaster). Rub a little butter over it and rub the halved garlic cloves on it while it’s still warm (full disclosure: I use jarred minced garlic here instead for more intense flavor). To serve the soup, place a slice of toast into each bowl and ladle a serving of soup on top. Top with 2 tablespoons of shredded cheese and a sprinkle of fresh basil. Serve immediately.

If you liked this post, please:
Subscribe to Willow Bird Baking
Follow Willow Bird Baking on Twitter
Follow Willow Bird Baking on Facebook
Give this post a thumbs up on StumbleUpon
Pin It


Shareother ways to share this post with friends

Winter Breakfast Chili Over Eggs in Sourdough Bowls


winter breakfast chili: spicy chili served over fluffy scrambled eggs in sourdough bowls

My 6th graders’ faces lit up deviously. It was a cold, gray morning hardly worthy of delight, but they seemed delighted nonetheless.

I was standing at the front of the room sipping the day’s second diet Sunkist while I issued instructions for the assignment they were about to begin. They double-checked: “So we don’t put our name on it anywhere? Can we disguise our handwriting? Can we give you a letter grade?”

The assignment was something I affectionately call Ms. Ruble’s Progress Report.

It was only fair, I had explained to them, for students to give me a grade since I got to give them one. And since I wanted them to feel comfortable honestly evaluating my performance, they could complete the entire progress report anonymously.

The ardor with which they began furiously scribbling comments — some writing in careful cursive or big block caps to hide their identity — made me a tad bit nervous. One after another finished with a flourish and shuffled their paper into the growing stack at the front of the room.

You may think I’m a little nuts. And every trimester when I give a gaggle of 12- and 13-year-olds the power to anonymously evaluate me, I kind of wonder if I’m a little nuts as well. But even though I may get one or two angsty comments, I learn something about how my students are feeling from every insight they offer. And beyond that, every single time I’ve completed this exercise with them, I’ve been overwhelmed not by how snarky they are, but by how kind.

For instance, from my most recent evaluations:

“I like your singing and your happiness.”

“I like having individual chats about my essays or projects.”

“I know you care about me because you always take the time to make class fun and equal for every student.”

“I really liked making haiku and working outside.”

“Ms. Ruble only gets mad when necessary.” (Ha!)

“I like how organized everything is and how we read a lot.” (Lots of them asked for even more reading time!)

“I love the creative projects we do because they really entertain me.”

“Ms. Ruble is always helping me with things I don’t understand.”

“You can tell she has put thought into each lesson and really wants you to enjoy it.”

“I really enjoyed making the paper cranes and doing the anime project. I have learned a lot so far this year about China and Japan.”

“I like that language arts challenges you, makes you want to put forth all of your potential and effort. Awesome teacher.”

“Ms. Ruble is fair because she gives proper instruction for everything we do and constantly includes our opinions about activities.”

“I like that Ms. Ruble is funny and that makes the class fun. I also like that she adds her own touch to the lesson.”

“Class is strict to keep it running smoothly and that’s what I like the most.”

“There is never a day that is boring from just note taking off the board.”

“I know that Ms. Ruble cares about me because she gives us lots of tips and is always trying to make us better at everything.”

“I think Ms. Ruble sees so much potential in every one of us. She thinks we all can succeed.”

. . . Wow, right? I’m getting a little teary compiling these just like I did while reading them.

Honestly, these comments say a lot more about my students than they say about me. I’m no different from any other teacher who works hard and tries to give her class a valuable experience. But my students, given complete freedom, anonymity, and voice — a soapbox to gripe about homework! to call me a witch! to rip apart my policies! to complain about having to write essays! — are the ones who chose words full of kindness.

If you’re surprised that when given the opportunity to say anything, these tweens chose to be sweet, I understand. We hear about the cyberbullying and the “mean girls,” very real issues, but we don’t often hear about kids’ kind hearts. The day after I read these evaluations, I stood in front of class and tried not to get choked up as I thanked them for their suggestions, critiques, and most of all, for their thoughtfulness.

Sometimes folks are skeptical about this claim, but I’ll say it again: middle schoolers are great little people.

. . .


Speaking of things that have warmed my soul lately, this Winter Breakfast Chili was another pleasant surprise. I’d never toasted and ground chiles to make my own chile paste before, but believe me, I’ll never go back. First, it was easy — I found cheap, big bags of the dried chiles I needed right in my local grocery store (in the small Hispanic foods section). Second, this chili is flippin’ awesome — it’s the best I’ve ever tasted hands down.

You may be curious about the concept of a breakfast chili. The idea was borne from my desire to create a winter breakfast that was warm and filling, full of protein and just a bit of heat. This chili includes bacon and chorizo and is served over fluffy scrambled eggs in sourdough bread bowls from my local bakery. It turned out to be a phenomenal breakfast reminiscent of spicy, comforting huevos rancheros. And since the chili can be prepared in advance and refrigerated, it’s also the perfect special breakfast for a busy holiday morning.

What’s warmed your soul lately?

Winter Breakfast Chili Over Eggs in Sourdough Bowls


Recipe by: Recipe adapted from Cooks’ Illustrated, as found on Brown Eyed Baker
Yield: 4 servings

The layers of flavor in this chili come from the toasted dried chiles used to make the chile paste, the savory chorizo and bacon, and the addition of some yeasty beer. It’s a rich, deep, slightly spicy dish that shines on a breakfast or dinner table. For breakfast, serve it over fluffy scrambled eggs in a sourdough bowl with broiled cheese on top. Since the chili can be prepared in advance, it makes the perfect dish for a busy holiday morning.

Chili Paste Ingredients:
3 dried ancho chiles (about 7/8 ounces), stems and seeds removed, and flesh torn into 1-inch pieces
1-2 dried árbol chiles, stems removed, pods split, seeds removed
1 tablespoon plus 1 1/2 teaspoons cornmeal
1 teaspoon dried oregano
1 teaspoon ground cumin
1 teaspoos cocoa powder
1 1/4 cups chicken broth, divided

Chili Ingredients:
1/4 pound dried pinto beans (about 1/2 cup), rinsed and picked over
Table salt
1 medium onions, cut into ¾-inch pieces (about 1 cup)
1 1/2 jalapeño peppers, stems and seeds removed, cut into ½-inch pieces
1 tablespoon plus 1 1/2 teaspoons vegetable oil, divided
2 garlic cloves, minced
1/2 (14.5-ounce) can diced tomatoes
1 teaspoon light molasses
3 ounces chorizo, with casings removed
a few strips of bacon
1/2 (12-ounce) bottle milk lager (I don’t know anything about beer, so I just used Red Stripe and it came out perfectly)*
4 eggs for scrambling
1 tablespoon butter
4 sourdough boules (about 4 inches in diameter)
1 cup sharp cheddar cheese, shredded
sour cream and cilantro for serving
*If you don’t cook drink alcohol (I don’t, either), you should know that according to this chart, only about 5-10% of alcohol will remain in the entire dish by the time you’re done. The beer is very important to the flavor and I don’t recommend skipping it.

Directions:
Note on scheduling: This chili can be fully prepared in advance and stored in the fridge for a few days. You can hollow out fresh bread boules the day before serving and wrap them tightly to keep them soft. When ready to eat, reheat the chili in the microwave for a few minutes, stirring periodically. Scramble your eggs, assemble the dish, broil the cheese on top, and serve.

Other notes: Make sure to wear gloves when working with chiles and avoid touching your eyeballs (or other people’s eyeballs. But why would you be doing that? Weirdo.) You can substitute 1/4 cup chili powder and 1/8 to 1/4 teaspoon cayenne pepper if you don’t want to use the dried chiles, but I highly, highly recommend you give it a try. It’s so easy, and very gratifying.


Soak the beans: In a large stock pot or Dutch oven, bring 8 cups of water, beans, and 1 1/2 teaspoons salt to a boil over high heat. Once boiling, remove the pot from the heat and cover it. Let it stand for 1 hour before draining and rinsing the beans and rinsing out the pot.

Prepare chile paste: Preheat the oven to 300 degrees F. Toast ancho chiles in a skillet over medium-high heat, stirring frequently, until they’re fragrant (4 to 6 minutes). Reduce the heat if they start to smoke. Place the chiles into the bowl of a food processor and let them cool. Leave the skillet unwashed for future use.

Add the árbol chiles, cornmeal, oregano, cumin, cocoa, and 1/4 teaspoon salt to the food processor with the ancho chiles and pulverize for about 2 minutes, or until finely ground. Then, with the food processor still running, slowly add 1/4 cup of chicken broth until a smooth paste forms (about 45 seconds). Use a spatula to scrape the sides of the bowl as needed. Transfer the paste to a bowl and set aside.

Make the chili: Put the onions in the food processor and pulse them until they’re chopped (about 4 pulses). Add the jalapeños and pulse until the mixture reaches the consistency of a chunky salsa, about 4 more pulses, scraping the bowl if needed.

In your stock pot or Dutch oven, heat 1 1/2 teaspoons of vegetable oil over medium-high heat. Add the onion mixture and cook, stirring occasionally, until the veggies are softened and the moisture has cooked off, about 7 to 9 minutes. Then add the garlic and saute until it’s fragrant, just about 1 minute. Add the chili paste, tomatoes, and molasses and stir to combine thoroughly. Add the remaining 1 cup of chicken broth and the drained beans and bring the whole mixture to a boil before reducing the heat to simmer.

Meanwhile, cook the bacon over medium-high heat in your skillet to your desired crispiness. Remove it to drain on a paper towel lined plate. In the same skillet, cook the chorizo until browned through (add 1 1/2 teaspoons of vegetable oil if needed to supplement the bacon grease). Use a slotted spoon to transfer the chorizo to the Dutch oven. Discard any liquid in the skillet (but don’t rub off the stuck-on bits!) and return to the heat. Add 1/2 of the bottle of lager to the skillet, scraping the bottom of the pan with a wooden spoon to loosen any browned bits, and bring it to a simmer. Pour the lager into the Dutch oven. Stir to combine and return the mixture to a simmer.

Cover the pot and transfer it to the oven. Cook until the meat and beans are fully tender, 1½ to 2 hours (I kept test-tasting the beans, since they took the longest — mine actually took longer than 2 hours). While the chili cooks, hollow out 4 sourdough bread boules for serving. If you’re not serving the chili today, wrap these tightly to preserve their freshness for the next day. Otherwise, set them aside.

When the chili is finished, let it stand, uncovered, for about 10 minutes. Stir the chili well and season to taste with salt. (Afterwards, you can store it in a tupperware in the refrigerator if you’re not eating it right away.)

Assemble the dish: When you’re ready to serve your chili, heat 1 tablespoon butter in a skillet over medium heat. Scramble 4 eggs and distribute them evenly between the bread boules. Ladle chili over the eggs in each boule. Top with shredded cheddar and place on a baking sheet covered in foil. Broil on high for a couple of minutes, watching closely, until cheese is melted and bubbly. Serve immediately with cilantro, avocado, chopped onions, and sour cream.

If you liked this post, please:
Subscribe to Willow Bird Baking
Follow Willow Bird Baking on Twitter
Follow Willow Bird Baking on Facebook
Give this post a thumbs up on StumbleUpon
Pin It


Shareother ways to share this post with friends

Apple Cinnamon Monkey Bread Sundaes (using leftover yeast dough!)

While we’re on the subject of getting used to failure and letting yourself take shortcuts, I have a confession to make. Growing up as a perfectionist sometimes meant I was a very, very poor sport.

In 6th grade, I was determined to accumulate every possible accolade available to me. I tore through novels at a frantic pace to be the top Electronic Bookshelf reader. I drew up posters to campaign for a student council position. I left class each day to run the controls for the entire school’s closed circuit news station. I assisted the computer teacher setting up technology for special events. I wrote columns for the 6th grade newsletter, The Leopard’s Roar. I slaved over every assignment as part of my neverending quest for perfect grades. I practiced endlessly to execute the perfect flip over the monkey bars on the playground. Life was juuuust about perfect.

One cool spring morning, though, things changed. I’d been eagerly awaiting an announcement from my teacher, Mrs. McRae. She was looking for a few trustworthy students with integrity and strong academic performance to appoint to the coveted position of safety patrol. Being on the safety patrol would add another shiny pip to my starched, pristine collar, and I was absolutely rabid over it.

The morning was packed with independent work. I was absorbed in completing my math worksheet while folks milled about the room attending to their own tasks. At one point, I realized Mrs. McRae was calling out the answers to the worksheet, but since I wasn’t finished, I tuned her out and continued working without much thought. I didn’t think twice about doing so until one of my classmates piped up with a whine, “Mrs. McRae, Julie’s cheating! She’s writing down answers while we’re checking it!” I looked up, shocked.

Just to bandage my wounded pride a little (15 years later, because you know, that’s normal), I was not cheating. I was calculating the answer to every problem and hadn’t heard or recorded a single answer that was called out. I was just trying to finish my worksheet, y’all! Nevertheless, Mrs. McRae called me out of the classroom.

I explained my situation to her in a panic. Surely she couldn’t possibly think that what that little twerp said about me was true?! Her bespectacled face stared down at me with doubt. You could see the wheels turning in her head: Well, Julie does care an awful lot about grades. Maybe…

Confronted with what felt like the greatest injustice I’d ever suffered, I began to have a full-on anxious meltdown. As I restated my case and pleaded with her to believe me, I started crying tears of frustration. Finally, I stormed into the bathroom beside our mobile classroom to flip out in private. A few minutes later, Mrs. McRae followed me. She told me that she didn’t know if I’d cheated or not, but considering the situation, she did not feel it was appropriate to appoint me to safety patrol.

Oh my goodness, y’all. Oh my goodness.

My little 6th grade life flashed before my eyes. I cried some more in the bathroom. I cried at home that night. I glared daggers at the safety patrol students when I passed them in the hallways in the following weeks. I’d love to say, “And then I got over it!” but here I am writing an entire blog post about it as an adult, so uh. That’s probably kind of unhealthy, right? Whatev. It scarred me, people!

But ultimately, even though it was hard to swallow, I can honestly say I appreciate the lesson in dealing with unfairness and disappointment. Getting used to the fact that things don’t always go your way (and sometimes, aren’t even fair!) is part of being a healthy human being.

Talking about disappointments is an apt opening to a monkey bread post on Willow Bird Baking. Don’t worry; these Apple Cinnamon Monkey Bread Sundaes aren’t disappointing! They’re gorgeous, rich fall treats. Monkey bread in general, though, has always been a total fail for me. It typically falls apart, overflows its pan, or ends up doughy in the middle. Even when I tried straight up convenience monkey bread with canned biscuit dough I managed to use too many cans and create quite the underbaked mess (stop laughing!) I can’t explain this phenomenon — monkey bread should be so darn easy. What’s the matter with me?!

Anyhow, instead of throwing a fit in the bathroom, I’ve kept trying new monkey bread recipes. I love the stuff, so even the “failures” get devoured in short order. And these Apple Cinnamon Monkey Bread Sundaes were quite the little success. With one batch of yeast dough, you can make some Taco Pockets and a quick dessert — two dishes for the effort of one! The “recipe” that follows outlines this simple method for dressing up your leftovers. Next time you’re making some yeast rolls or dinner pockets, save some dough for monkey bread!

What’s an injustice you remember experiencing?

Apple Cinnamon Monkey Bread Sundaes (using leftover yeast dough!)


Recipe by: Bits and pieces adapted from What’s Cookin’, Chicago?, All Recipes
Yield: depends on your leftover dough

This recipe is actually just a method of dolling up leftover dough to make monkey bread sundaes. Using this little technique, you can save some dough from any dinner recipe and create a dessert to enjoy at the end of the meal with no extra fuss. Even if you only have a small amount of leftover dough, you can bake your monkey bread in the wells of a cupcake pan and serve the warm, gooey pieces over vanilla bean ice cream!

To make Apple Cinnamon Monkey Bread with leftover dough, grab:

Leftover yeast dough* that has already completed one rise. Maybe you used the first half for some Taco Pockets? You sly devil, you.
Sauce: You can use 1/2 cup (1 stick) melted butter mixed with 1 cup brown sugar to form a caramelly sauce. For more apple flavor, you could also try mixing 1/2 cup butter and 1/2 cup brown sugar over the stove, removing it from heat, and adding 1/2 cup apple butter.
Cinnamon and sugar mixture: 1/2 cup sugar whisked together with 1 1/2 teaspoons cinnamon.
Melted butter: about 1/2 cup.
Apples: 1 peeled, cored, and chopped apple (or more if you have lots of leftover dough)
Nuts: about 1 cup of chopped nuts like pecans or walnuts. I chose pecans because I love them.

Then do this:
Set up each of your items in a row to form an assembly line: an apple station, a melted butter station, a cinnamon/sugar station, and then a greased bundt pan (or greased cupcake pan if you only have a bit of leftover dough). Set your sauce and nuts to the side for now.

With floured fingers, take a ping-pong-ball-sized pinch of leftover yeast dough (you can change this to smaller pinches if you’re baking in a cupcake pan). First, place some apples in the middle of the ball of dough and pinch the dough closed around them. Then drop the dough ball in melted butter, tossing gently to coat with a fork. Next, drop it in the cinnamon and sugar mixture and toss gently to coat (use a separate fork in this bowl). Drop your coated dough ball in the greased pan.

Once you have a single layer covering the bottom of the pan you’re using, spoon a layer of sauce over the dough balls and sprinkle on a layer of nuts. Continue pinching, filling, and coating dough balls to form another layer, and then spoon sauce and sprinkle nuts over this, too. Keep going until you’ve used all your dough.

When you’ve used all of your dough, distribute a last bit of sauce and nuts over the top. Cover the pan with plastic wrap and let the dough rise for about an hour in a draft-free place. In the meantime, preheat the oven to 350 degrees F. When risen, bake the bread for 20-35 minutes (this can vary depending on the size of your dough balls and the size pan you used, but look for a dark golden brown color on top. If you take it out when it’s just golden brown, it’ll likely still be raw inside, so let it get dark.) Let cool in the pan for 5 minutes and then invert onto a plate (or pick out the monkey bread pieces with a fork like I did, to serve over vanilla bean ice cream!)

*Note: You can use this technique with canned biscuit dough, too — just cut out the rise time.

If you liked this post, please:
Subscribe to Willow Bird Baking
Follow Willow Bird Baking on Twitter
Follow Willow Bird Baking on Facebook
Give this post a thumbs up on StumbleUpon


ShareOther ways to share this post with friends!

1 6 7 8 9 10 12