other

Gulab Jamun with Caramelized Bananas — and an Indian Buffet Love Story

I have heavy scent memories of an Indian restaurant Mike and I used to frequent called Jaipur. They must have burned incense every night for years. Maybe the scent is something the owner remembered but couldn’t place — something from when his synapses weren’t yet refined enough for memory. His mother burning it in the kitchen in a now-faraway home on the subcontinent, and he, just a baby then, lying swaddled in a room down the hall, his blankets collecting particles of sandalwood in each fold.

It’s sweet to imagine what the little restaurant means to him. It means something sweet to me, too. The orange and pink and gold, the weight of the incense, the guttural cry of otherworldly Indian music accompanied by sitar tones — all of it connected to a pseudo-memory for me. A memory of dust, colors, street food, and lights — an India I’ve never visited except in East Asian art classes, narrow Indian restaurants, the marigold-filled scenes of Monsoon Wedding, and the memories and photographs of friends.

Jaipur was also special to me and Mike because it was “our restaurant.” I remember weekend after weekend of trekking across town in my now-long-gone Altima, arriving at the buffet after dark. I remember rationing each plate so that I could have seconds of some of my favorites — palak paneer and red lentils — and sopping up every drop with warm naan.

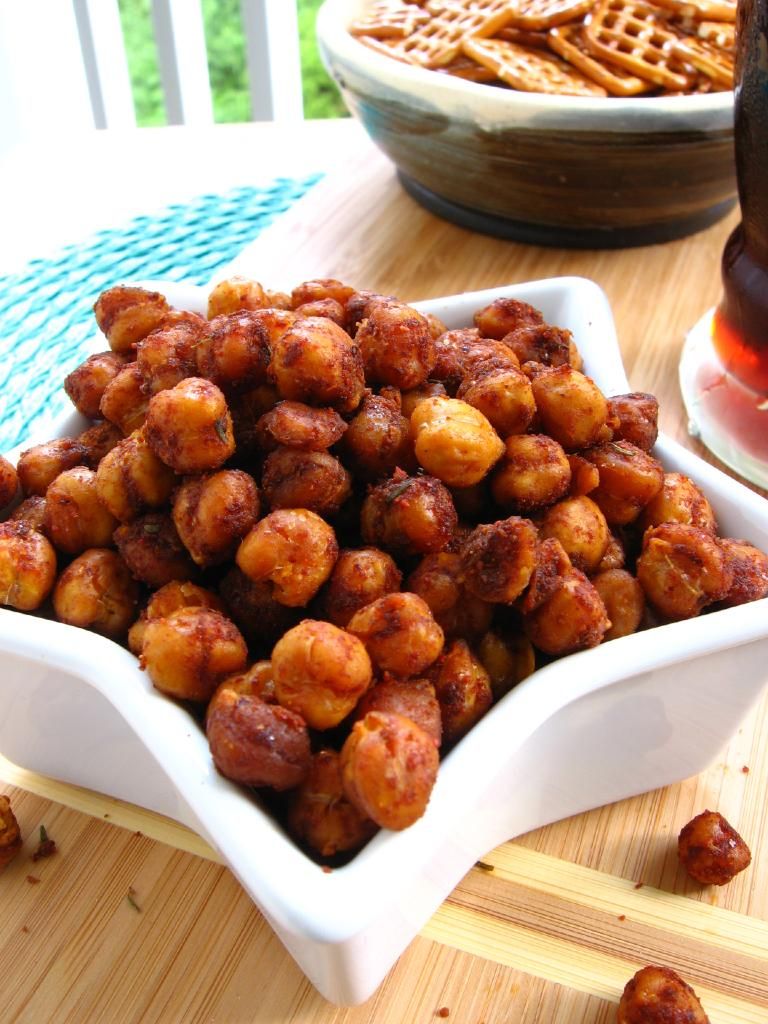
I remember the shy waiter who knew our order before we sat down, and the chef who stopped us before we could serve ourselves from the buffet if he had a fresher, newer batch of bread. I remember smooth, sweet mango lassis, holding hands across the table . . . and spooning up warm, fragrant Gulab Jamun into tiny bowls alongside fruit-studded rice pudding.

It’s literally been years since I’ve been back to Jaipur now, and these neon and curry memories are even more poignant with Mike living across the state from me. When I saw that Project Food Blog Challenge #2 was to make a classic dish from another culture that’s out of your comfort zone, I knew I had to do some justice to Jaipur and our times there.

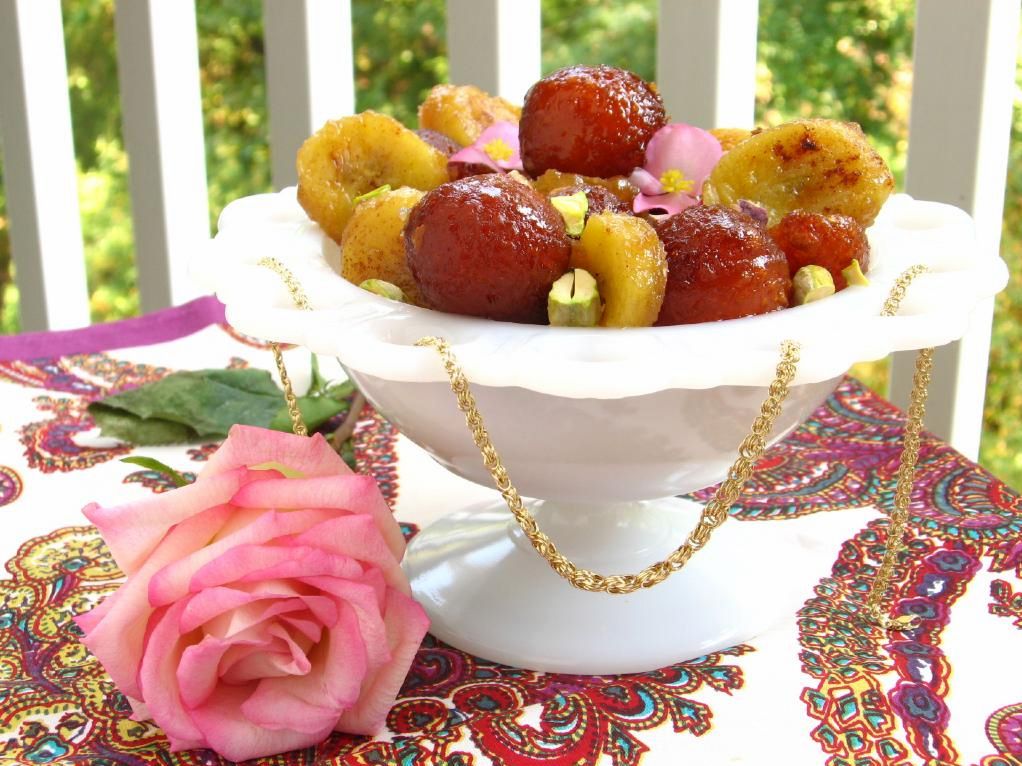
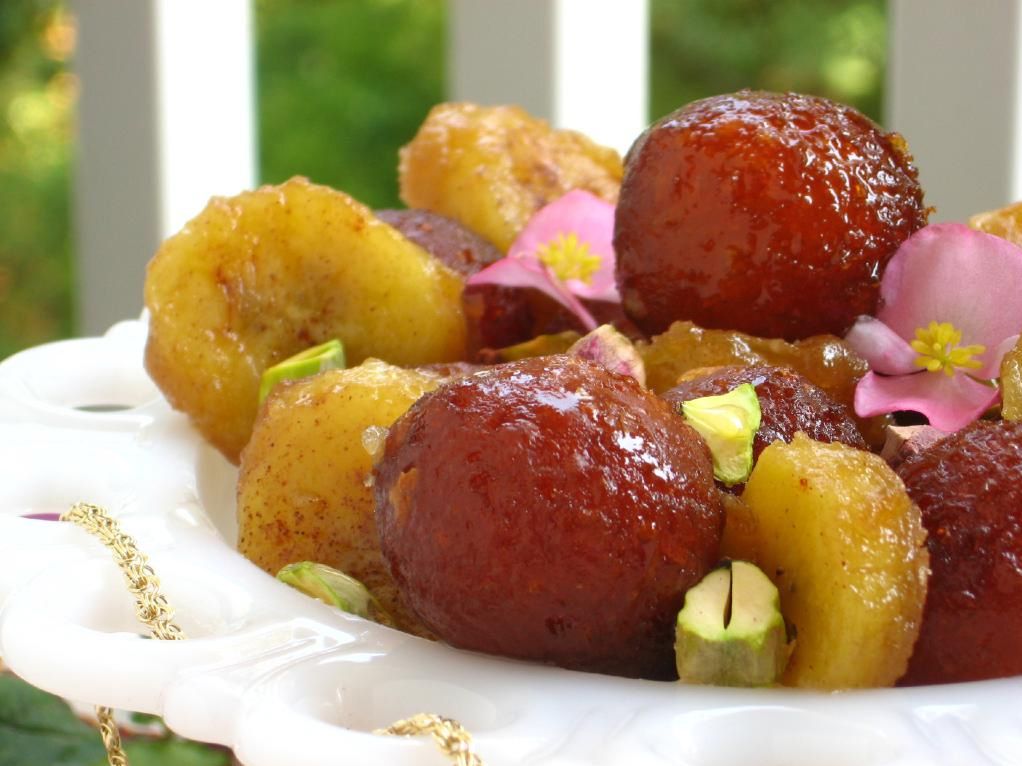
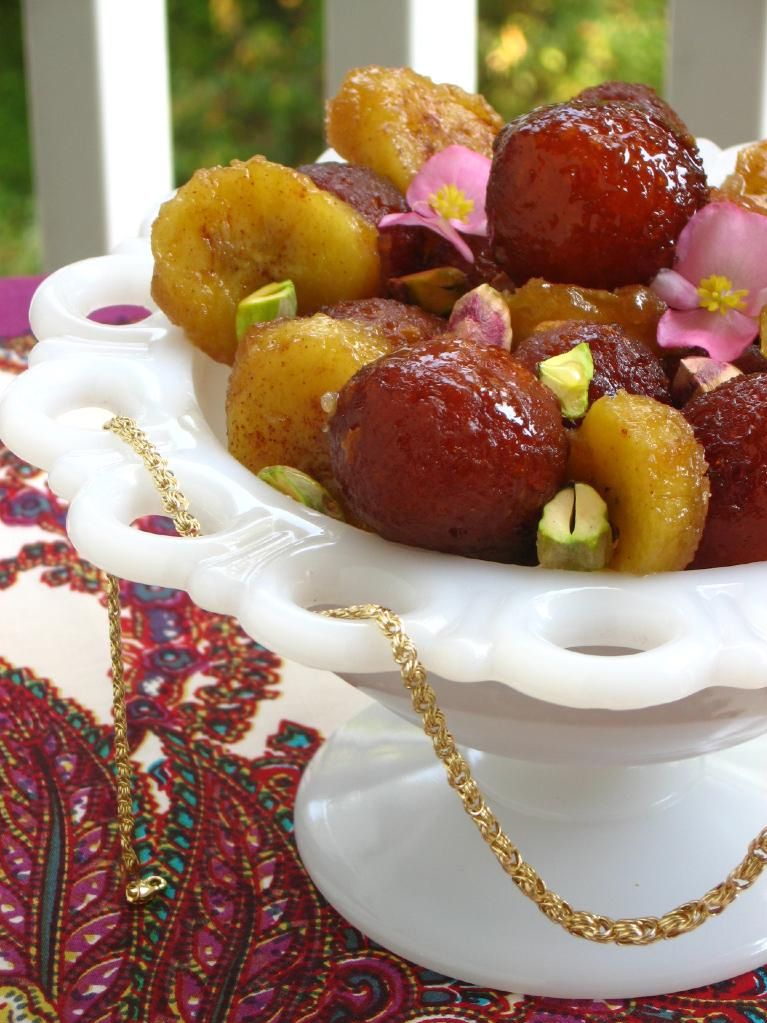
Gulab jamun, named for their rose flavoring and a fruit they resemble, are cake-like, juicy dumplings loaded with a sweet rose, cardamom, and saffron syrup. They’re common at Indian weddings and were often the highlight of our dinner at Jaipur. I savored mine in two bites, while Mike devoured each dumpling in one gulp.

While these rosy, sticky dumplings are a joyful memory for me, making them wasn’t something I considered before reading Project Food Blog’s Challenge #2. They’re fried — and frying things is not something I love. My fry-phobia not about the health considerations (have you seen my blog lately?), but rather, the difficulty of maintaining an appropriate oil temperature, the mess, and the inevitable burnt/undercooked disasters. Remember the Tumbleweed Burger post, where my attempt to fry onions produced a sum total of one halfway acceptable onion (okay, even that one was pretty pitiful) that I used in pictures and then threw away?

I’m fighting for something I love, though, and I hope my steps away from my comfort zone are steps towards becoming the next food blog star.

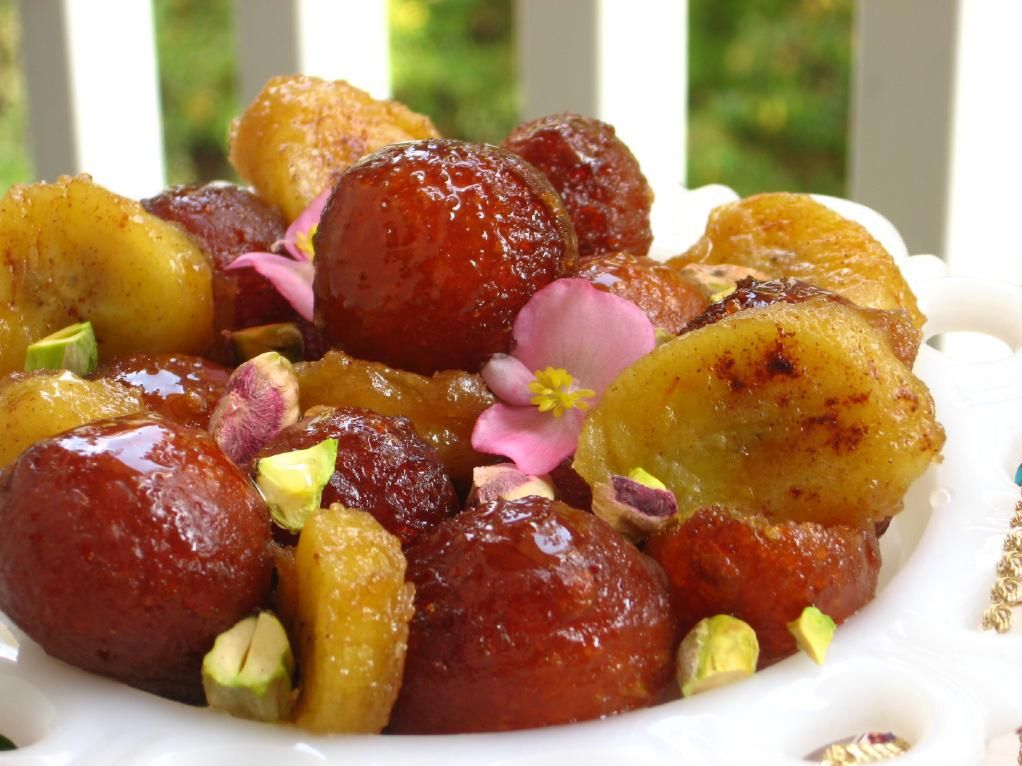
It wasn’t enough to recreate my favorite, sultry Indian dessert — I wanted to bring something of my taste to the table. I paired the gulab jamun with caramelized bananas and pistachios, hoping to create a rich, floral, indulgent product that would be incredible served warm over vanilla bean ice cream.

My first version was a little too sweet, though (sugar syrup AND caramelized bananas). I reduced the sugar in the bananas and the gulab jamun syrup in the recipe below in hopes that it balances out. I’ll try it this way next time — no loss if it doesn’t work, because the bananas and dumplings are both delicious on their own as well!

What about you? What food stirs up important memories for you? Is it a type of cuisine, a certain dish?

Gulab Jamun with Caramelized Bananas


Recipe by: Gulab jamun by Show Me the Curry, and caramelized bananas adapted by Willow Bird Baking
Yield: 10-15 gulab jamun, depending on the size

Syrup Ingredients:
1.5 cups sugar
2 cups water
a few drops rose essence (or about 4x the amount of rosewater)
1/2 teaspoon (or to taste) ground cardamom
a few strands saffron (optional)

Ball Ingredients:
1/2 cup instant dry milk powder
2 tablespoons all-purpose flour
2 tablespoons yogurt
1 tablespoon ghee, clarified butter, or vegetable oil
1/4 teaspoon baking soda
oil for frying (at least 1.5 inches deep)
pistachios for garnish

Caramelized Banana Ingredients:
1 banana, slightly green, not quite ripe, sliced crosswise into 1/4″ slices
1 tablespoon light brown sugar
1.5 tablespoons unsalted butter
dash of cinnamon

Directions:
First, make the syrup. Combine all syrup ingredients in a sauce pan and bring to a boil. Once it boils, reduce the heat and allow it to simmer while you prepare the rest of the recipe.

Begin heating the oil for deep-frying on low-medium heat. You want it to reach 230 degrees according to some websites, but I had more luck frying from 250-270. You want a slow, patient fry on these.

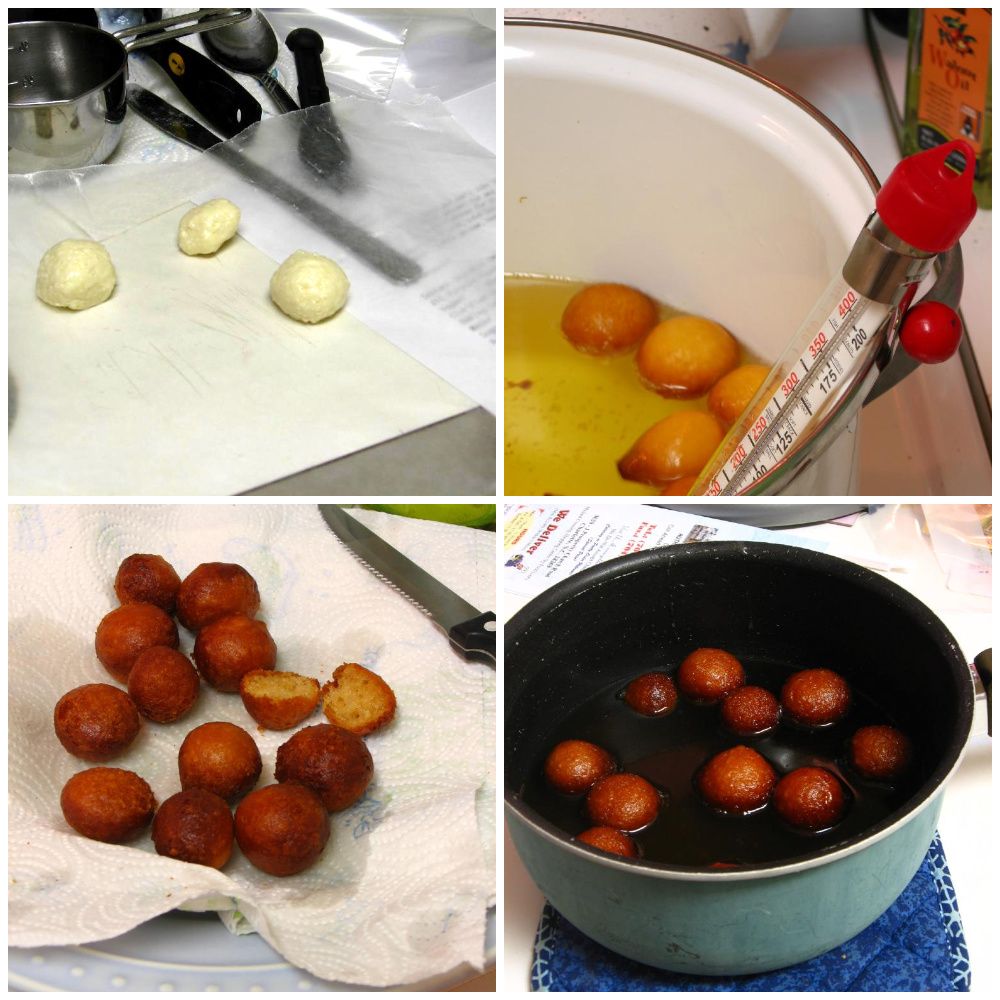
While oil heats, mix dry ingredients: milk powder, all-purpose flour, and baking soda. Add clarified butter (or ghee or vegetable oil) and then, slowly, the yogurt, mixing well to make a dough. Allow it to rest for 5-10 minutes (don’t worry if it looks wet at first — after resting it will be right). With oiled hands, form into 10-15 small balls (they will nearly double in size throughout the cooking and soaking process, so do make them smaller than you think you should).

Test the oil: drop in a small piece of dough. If it sits at the bottom of the pan for a moment before coming to the surface, the oil is ready. Drop in 3-4 balls at a time and, after they float up, rotate them continuously for an even color. Be patient — when the balls are a dark golden brown, remove them with a slotted spoon and let them drain on paper towels.

When all balls are draining, bring the syrup up to a boil again. Drop in the balls, turn off the heat, and cover the syrup. Allow balls to soak at least 45 minutes to overnight.

When about ready to serve, caramelize bananas. Heat a large, non-stick skillet over medium-high heat. When hot, add half of the butter and let it sizzle for a few seconds before adding bananas. These should brown for about 30 seconds without being disturbed. Then turn them over and add brown sugar, cinnamon, and last half of butter. Shake the pan to keep the bananas moving and cook about a minute more, until sugar is melted and bananas are caramelized, but still solid. Remove from heat. Serve gulab jamun with caramelized bananas and pistachios to garnish. You can also serve warm gulab jamun and caramelized bananas over vanilla ice cream.

Willow Bird Baking is a contestant in Project Food Blog, a contest comprised of a series of challenges to find the next food blog star. To see my contestant profile, please click here. Voting for Challenge #2 begins on September 27 — will you consider voting for me? I’ll post a reminder and instructions on how to do so on that date. I am so grateful for your support!


If you liked this post, please:
Subscribe to Willow Bird Baking
Follow Willow Bird Baking on Twitter
Follow Willow Bird Baking on Facebook
Give this post a thumbs up on StumbleUpon


ShareOther ways to share this post with friends!

Assorted Donut Muffins and Project Food Blog: Vote Now!

Willow Bird Baking is a contestant in Project Food Blog, a contest comprised of a series of challenges to find the next food blog star. If you missed it, my first challenge post explains why I blog, and what makes WBB special. Voting for Challenge #1 is now open! To vote, register for a Foodbuzz account. Once you’re registered, sign in and go here. To vote, click the heart next to the words “Vote for this Entry.” I am so grateful for your support!


At this point, just about all of us have either made Donut Muffins, eaten Donut Muffins from a generous friend, bookmarked a recipe for Donut Muffins, drooled over photos of Donut Muffins, or cursed the day Donut Muffins were invented as we kicked our scales across the bathroom.

I was in the “bookmarked the recipe” category for way too long. Every time I’d see another Donut Muffin post pop up in my Google Reader, I’d admonish myself for not having made them yet. They’re billed as warm, pluffy cake-donut-like muffins that have soaked up butter before being coated in cinnamon and sugar. It’s basically criminal that I hadn’t made them until this past weekend. But don’t worry — I made up for lost time.

What’s the fun of donuts? The taste, definitely — but also the puff of powdered sugar, the jam centers, the colorful sprinkles, the melty chocolate, the sticky glaze. A major component of what makes donuts so fun is the assortment. Even though I have a favorite donut, I always buy a few kinds so that I can pick through the box excitedly, tasting different combinations and flavors. So why make just one sort of Donut Muffin? Especially when it’s so easy to make a few kinds?

In my Donut Muffin assortment: Caramel Apple Donut Muffins, Jam-Filled Powdered Sugar Donut Muffins, and of course, Chocolate Sprinkle Donut Muffins.

You start out by making the batter like normal, but then separate a third of it to add diced apples to. After baking all the muffins up, the apple donut muffins get coated in cinnamon, sugar, and a caramel glaze. Another 1/3 of the batch gets coated with powdered sugar and filled with raspberry jam. The final 1/3 gets a bath in melted chocolate and some sprinkles. I bought a box of bakery cookies just to have a cute little “donut box” to put them in (no clue what I’m going to do with those cookies)!

The Chocolate Sprinkle Donut Muffins were good — but next time I’ll fill them with whipped cream or pastry cream for more donuttiness (that is a Merriam-Webster-certified real word, y’all. Okay, it’s not. Not even close). The Jam-Filled Powdered Sugar Donut Muffins were delicious little jammy bites. But the Caramel Apple Donut Muffins . . . they were OUT OF THIS WORLD. Like, OUT OF THIS GALAXY. Like, OH MY GOODNESS. My roommate had to sit down when she took her first bite, and she insists they’re the best thing I’ve ever made. Are you dicing apples yet? Good.

When they’re warmed up slightly, full of apply, buttery, cinnamon-sugary goodness, and coated with the buttery caramel glaze, these fluffy Caramel Apple Donut Muffins are analogous to the donuts you’d drive across town for. Sure, you want the assortment — and I ate plenty of the other two tasty flavors — but these are the ones you’d keep coming back for.

By the way, are you afraid of caramel? That’s probably because you’ve been using recipes with directions that say things like “look for an amber color,” or, even better, a “dark amber color.” I don’t know about you, but I think “amber” is pretty subjective. What gives? We stopped using terms like “low oven” and “slow oven” in recipes long ago in favor of fancy little things called oven temperatures. It’s time we switched over our sugar recipes to include temperatures as well. Caramel is nowhere near as frightening with a candy thermometer, y’all. You’ll be glad to see I’ve provided temperatures for your caramel sauce below, since I’m not feeling prehistoric.

What’s your favorite kind of donut? I think mine changed with my first bite o’ Donut Muffins! The recipe below shows you how to make all 3 kinds at once, but feel free to make just one sort if you’re feeling decisive.

Assorted Donut Muffins


Recipe by: Willow Bird Baking, adapted from the base recipe by Buns In My Oven. Caramel sauce by Martha Stewart.
Yield: 36 mini-muffins or 18 regular muffins

Batter Ingredients:
3/4 cup sugar
1 large egg
1 1/2 cups all purpose flour
2 tsp baking power
1/4 tsp salt
1/4 tsp ground nutmeg
1/4 cup vegetable oil
3/4 cup milk (low fat is fine)
1 tsp vanilla extract

Extras for Chocolate Sprinkle Donut Muffins:
melted chocolate
sprinkles
whipped cream (if desired, for filling)

Extras for Caramel Apple Donut Muffins:
2 tablespoons melted butter, for dipping
1/4 cup sugar mixed with 1 1/2 teaspoons cinnamon
1/4 apple, peeled and diced (I used a Gala apple)
caramel sauce (recipe below)

Extras for Jam-Filled Powdered Sugar Donut Muffins:
raspberry jam (or flavor of your choice)
about 3/4 cup powdered sugar, sifted
melted butter leftover from Caramel Apple Donut Muffins

Directions:
Prepare two mini-muffin pans by spraying with cooking spray. Preheat the oven to 350 degrees F. Beat sugar and egg together in a large bowl until fluffy. In a smaller bowl, whisk together flour, baking powder, salt, and nutmeg. Pour dry ingredients into wet ingredients and stir until combined. Add vegetable oil, milk, and vanilla extract and mix. Separate 1/3 of mixture into separate bowl and fold in diced apples (these will be the Caramel Apple Donut Muffins). Pour all batter into prepared muffin tins, filling each about 3/4 full. Bake for 13-15 minutes until tester comes out clean.

Let cool in the pan for a few minutes before removing onto a cooling rack (if muffins are extremely delicate and difficult to remove, you may need to bake them a minute longer — mine weren’t quite done enough. On the cooling rack, separate the donut muffins into 3 batches: the apple muffins, 1/2 of the plain muffins, and the other half of the plain muffins. These will be your three types of donuts.

For the Caramel Apple Donut Muffins: Melt the butter in the microwave and mix the cinnamon and sugar in a separate bowl. When the muffins are cool enough to handle, dunk the tops into the melted butter and then into the cinnamon-sugar mixture. Let dry/cool on cooling rack as you prepare caramel sauce (as directed in recipe below). Store caramel in fridge and drizzle on heated Apple Muffins right before serving.

For the Chocolate Donut muffins: When the muffins are cool enough to handle, dunk the tops into the melted chocolate. Add colorful sprinkles. You could fill these with pastry cream or whipped cream using a narrow pastry tip inserted into the bottom of the muffin if you wanted a cream-filled donut muffin.

For the Jam-Filled Powdered Sugar Donut Muffins: When the muffins are cool enough to handle, dunk the tops into the leftover melted butter and then into sifted powdered sugar. When donuts are cool, fill them with raspberry jam using a small pastry tip jabbed into the bottom of the muffin. Be careful not to overfill and burst your muffin (that should definitely be a more popular idiom than ‘burst your bubble,’ don’t you agree?) You may have to re-powder tops before serving if you keep these overnight, since some of the powdered sugar dissolves.

NOTE: Store all your muffins in an airtight container in the fridge.

Caramel Sauce Ingredients:
3/4 cups sugar
1/8 cup water
1/2 cup heavy cream
1/8 cup creme fraiche or sour cream
1/4 teaspoon pure vanilla extract
Pinch of coarse salt

Directions:
NOTE: This makes more caramel than you need, but I don’t reduce the recipe because it would make it difficult to use a candy thermometer, a tool that I believe is absolutely crucial in preparing caramel. I know you can find something else to spoon caramel sauce over — and this is truly delectable caramel.

Prepare a bowl set in an ice-water bath. Place sugar and water in a saucepan and heat over medium-high heat until it boils and the sugar is dissolved. Throughout this process, use a wet pastry brush to wash down the sides of your saucepan often to prevent crystal formation. Reduce the heat to medium and cook until the mixture reaches 345 degrees on a candy thermometer (begin swirling gently when you see hints of amber, so the sugar cooks evenly), about 5-7 minutes. Immediately remove from the heat and add cream carefully (the mixture will bubble up) while whisking constantly. Return mixture to medium heat until it boils and sugar melts.

Remove from heat, and pour into the bowl set in your ice-water bath. Let the caramel cool, whisking often, for 10 minutes before whisking in creme fraiche, vanilla, and salt. Cover and refrigerate at least 2 hours before serving over Caramel Apple Donut Muffins. Can store in the refrigerator for up to 5 days.

If you liked this post, please:
Subscribe to Willow Bird Baking
Follow Willow Bird Baking on Twitter
Follow Willow Bird Baking on Facebook
Give this post a thumbs up on StumbleUpon


ShareOther ways to share this post with friends!

Croissant Masters Round 3

Know what makes me happy? Croissants. Know what makes me happier? Homemade croissants. Know what makes me happiest?! HOMEMADE CROISSANTS YOU MADE!

These amazing home cooks have battled the butter, lassoed the lamination, dominated the dough, wrestled the rolling pin, and flung the flour. They committed to croissant in the Willow Bird Baking Croissant Challenge — and arose victorious (pun intended)!

Seriously, all puns aside (how long can this possibly last?), I am flooded with pride and joy every time I open my email to a new batch of readers’ freshly made croissants. If you don’t think you can make these golden pastries, think again. Below are four home cooks just like you, and they’ve all conquered the process. Will you commit to croissant? Go get the recipe for yourself! You can also see the first or second round of Croissant Masters.

Time to show off the latest Croissant Rockstars!


Clair: “They turned out really great. Buttery and flaky, a bit crisp on the outside but still soft on the inside . . . All in all, a good amount of work, something you really have to commit your day (or morning) to, but totally worth the effort.”


[see more of Clair’s croissants here.]


Amanda R.: “I never liked croissants until I tried homemade ones from your recipe, and I LOVED them. My mom kept saying that they tasted like rolls my great grandmother used to make, so it was especially meaningful to have her share that memory, all thanks to your encouragement and amazingly clear instructions for croissant making.”


Joanna: “I made some croissants today (it’s my first try) and they are delicious! Plus the video you provided was very helpful . . . my family loved them.”


Abbey C.: “I went into making these not considering that it involved two of the things I am worst at — using a rolling pin and cutting straight lines. But they were truly delicious, and I was even getting a bit better at shaping them by the end. Thanks so much for this challenge . . . I probably would never have considered making them otherwise.”


If you liked this post, please:
Subscribe to Willow Bird Baking
Follow Willow Bird Baking on Twitter
Follow Willow Bird Baking on Facebook
Give this post a thumbs up on StumbleUpon


ShareOther ways to share this post with friends!

Bittersweet Marbled Chocolate Cheesecake Brownies

Sometimes it’s easier to skip the hard stuff. Maybe you know what I mean. Maybe you never read Marley and Me because you saw your friends (or in my case, students) feeling weepy towards the end. Maybe you switch off the sad songs, avoid the poignant movies. Maybe you make a joke in the difficult moments to defend yourself from the truth of your emotions, but also keep a secret stash of tissues in your purse for when it doesn’t work.

Some things you can’t skip, though. Some trials are ordained for you. God has known them — and you — since before the foundation of the world, and when He says you’re going through and not around, it’s the right path. Go.

One of the things I can’t skip is the fact that Mike is no longer a Charlottean. Wonderfully and sadly, he moved to Raleigh at the beginning of August to start his graduate program in math.

Mike and I have been together for 11 and a half years now. He saw me complete my first year of high school, get my license, graduate, enroll at Davidson College. He sat with me the morning before my Teach for America interview, picked up the pieces with me as I quit my first real job and moved on to my second real job, and shared my joy when I found Woodlawn, where I teach now. He saw the demise of my first website, the beginning of my blogs, the constant ebb and flow of my poetry. He’s been there.

During my difficult high school years, I’d sometimes drive straight to his apartment after school and play housewife, making Hamburger Helper and eating it on the couch with him while watching Star Trek. On a trip to Charleston in 2003, he bought me flowers that I still have dried in my closet. I saw him eat his first funnel cake in Gatlinburg. During our relationship, I’ve been the girlfriend of a cable guy, a dental technician, a programmer, a mathematician, a college student, a college grad, and now a graduate student. I can’t explain how his transition has inspired me.

What with all that “being there” we’ve done for over a decade, it was particularly difficult to see him pack up his things and move at the beginning of August. While I haven’t been able to ignore the fact that he now lives three hours away and can’t pop over as needed, I have been able to skip talking about it much, so instead I’ve been talking about popsicle molds and Piers Morgan. I know you understand.

The week before he moved, Mike came over and we made going-away brownies. He loves brownies, but I’d never made him any — something I felt I had to remedy before he moved. We mixed and baked together, another thing I’d always meant to do with him, and the final product was sweeter for it.

These brownies were a great choice — they’re indulgent and fudgy, with the gorgeous tang of cream cheese that I love. The marbling on top looks fancy, but is extremely easy to accomplish. In half the pan, we embedded funsize Snickers in the batter, which added a superb nutty, caramelly crunch to the brownie base. Naturally, knowing he was moving in a week made each bite a bittersweet experience, but the brownies themselves were the perfect treat for us to enjoy together.

Marbled Chocolate Cheesecake Brownies


Recipe by: adapted from Joy of Cooking
Yield: 9 large or 16 smaller brownies

Brownie Layer Ingredients:
1/2 cup (113 grams) unsalted butter, cut into pieces
4 ounces (115 grams) unsweetened chocolate, coarsely chopped
1 1/4 cups (250 grams) granulated white sugar
1 teaspoon pure vanilla extract
2 large eggs
1/2 cup (65 grams) all purpose flour
1/4 teaspoon salt
funsize Snickers (optional)

Cream Cheese Layer Ingredients:
8 ounces (227 grams) cream cheese, at room temperature
1/3 cup (65 grams) granulated white sugar
1 teaspoon pure vanilla extract
1 large egg

Directions: Preheat oven to 325 degrees F (160 degrees C) and place the rack in the center of the oven. Prepare a 9-inch square baking pan: Spray pan with nonstick cooking spray. Create a foil sling for the pan by cutting two 16-inch lengths of foil and fold them to widths of 5 inches each. Fit foil pieces into baking dish, one overlapping the other, pushing them into corners and up sides of pan; allow excess to overhang pan edges. This creates a sling that will help you remove the brownies after baking and cooling. Spray foil lightly with nonstick cooking spray.

Place a heat-proof stainless steel bowl over a saucepan of simmering water to create a double-boiler. Place the butter and chocolate in the bowl to melt. Remove from the heat and stir in the sugar and vanilla extract. Add the eggs one at a time and beat well with a wooden spoon after adding each. Add the flour and salt and continue stirring with the wooden spoon until the batter is glossy, smooth, and pulls away from the side of the bowl (about one minute). Reserve 1/2 cup of brownie batter for topping. Pour the rest of the batter carefully into prepared pan (here, you can stud the batter with rows of funsize Snickers if desired.

In a separate bowl, use a hand mixer to blend the cream cheese until smooth. Add the sugar, vanilla extract, and egg and blend just until smooth. Spread this mixture carefully over the brownie layer, and then place dollops of the 1/2 cup reserved brownie batter at even intervals over the top. Use a table knife or wooden skewer to carefully marble the dollops through the cream cheese, careful not to mix the batters.

Bake for about 25 minutes or until the brownies just begin to pull away from the sides of the pan and are just starting to brown. Remove from the oven and cool on a wire rack until almost cool. Then, chill the brownies in the refrigerator for about two hours, until they’re firm enough to cut into squares. Once chilled, remove the brownies from the pan by lifting the ends of the foil sling carefully. Transfer to a cutting board and cut into 9 or 16 squares as desired, cleaning the knife with a warm, damp cloth between cuts. You can store leftovers in airtight container in the refrigerator for several days.

P.S. – Some people are experiencing even greater trials right now. Erika of Ivory Hut just lost her house and all her possessions in a horrific house fire. Would you consider donating to help her through this difficult time?

P.S. 2 – In the midst of a trial, there is great blessing. We received news recently that my dad is still cancer-free!

If you liked this post, please:
Subscribe to Willow Bird Baking
Follow Willow Bird Baking on Twitter
Follow Willow Bird Baking on Facebook
Give this post a thumbs up on StumbleUpon


ShareOther ways to share this post with friends!

Snack Attack #2: Chili-Lime Roasted Chickpeas

You’ve had sweet (with a little tart thrown in for good measure). Now it’s time for the other side of the snacking coin: salty. Salty, spicy, tangy, bright, crunchy, provocative. Wait, can food be provocative?

I think so. Especially if the words chili-lime are involved.

I’ve seen roasted chickpeas cropping up all over the interwebs and have been all in a tizzy wanting to try them. They just look so scrumptious and snackable. I headed over to The Kitchn where there are about a billion (okay, fifteen) seasoning suggestions for roasted chickpeas. I needed some inspiration.

And oh, did I find inspiration! The Kitchn lists Garlic, Pepper, Rosemary chickpeas; Soy Sauce, Sesame Oil, Chili Powder chickpeas; and Brown Sugar, Rosemary, Cayenne Pepper chickpeas, just to name a few.

Chili powder, cumin, and lime all seemed like popular seasoning components, though I couldn’t seem to find a recipe that put them all together. They’re a match made in tex-mexy heaven, though, so I threw them all in my chickpea seasoning mix. Sure enough, the finished product tasted exactly like I’d imagined — spicy and addictive. I crunched down chickpea after chickpea while watching the first few episodes of America’s Got Talent on Hulu (no spoilers, please — except one. Feel free to tell me if anyone knocks Piers Morgan’s block off after a particularly snotty critique).

Are you in a snacky mood? These are so simple to make and they taste better than those greasy potato chips. The spice flavoring would also be wonderful on popcorn. What’s your go-to salty snack?

Chili-Lime Roasted Chickpeas


Recipe by: Adapted from chowmama
Yields: about 1.5 cups roasted chickpeas

Ingredients:
2 15-ounce cans chickpeas (also called garbanzo beans), drained, rinsed, and blotted dry
3-4 teaspoons chili powder*
2 tablespoons olive oil
1 tablespoon + 1 teaspoon lime juice
3/4 teaspoon sea salt
1-2 teaspoons cumin*
Pinch of dried herbs of your choice (I used a little rosemary and thyme) OR chopped fresh cilantro

*Note: start with the lowest amount of spice, then add more to taste.

Directions:
Preheat oven to 400 degrees F. Line a baking sheet with aluminum foil and spray it with cooking spray. Spread chickpeas out in a single layer over the foil. Once oven is preheated, bake chickpeas for 45-50 minutes, stirring and flipping every 15 minutes or so. Chowmama includes a note saying that the cooking times can very; the way she looked for (and thus the way I looked for) doneness is taking a few chickpeas out, letting them cool for a minute, and then biting into them. Take them out when they’re really crunchy.

Near the end of the chickpeas’ cooking time, combine oil, chili powder, lime juice, sea salt, and cumin in a medium bowl. Whisk to mix. When chickpeas are done, let them cool for just a minute before pouring them into the oil mixture. Stir to coat all the chickpeas well. Eat immediately, or store in an airtight container (after cooling completely) to eat later.

If you liked this post, please:
Subscribe to Willow Bird Baking
Follow Willow Bird Baking on Twitter
Follow Willow Bird Baking on Facebook
Give this post a thumbs up on StumbleUpon


ShareOther ways to share this post with friends!

1 56 57 58 59 60 69