Month: November 2010

Browned Butter Pumpkin Croquemcake with White Chocolate Chai Mousse (Project Food Blog Round 8!)

Because of YOU, Willow Bird Baking is one of only 24 blogs in Project Food Blog Round 8! I am so beyond grateful for your support and love throughout this process. Challenge #8 was to create a baked good using pumpkin. VOTING IS NOW OPEN! (Thank you for voting! Voting is now closed.) I’d love it if you’d pop over to cast a vote for me by clicking “Vote for this Entry” here. Thank you all!!

I am basically an architect. I know some folks who worked through countless hours of pesky schoolwork to call themselves architects and may disagree with me. But I think I have enough experience to go ahead and claim the title.

See, in 6th grade, my classmates and I were divided into teams and charged with a task of monumental proportions. We were to engineer a bridge out of toothpicks, string, and glue. Each of these “resources” was assigned a cost, and we were given a budget of imaginary money with which to purchase supplies. The team whose bridge could hold the most weight at the end of the competition would win epic bragging rights.

Moist, amazing Browned Butter Pumpkin Cake!

We must have been hyped up on marshmallowy breakfast cereal or something, because as soon as the teachers said GO, it was on.

We were ruthless. We pasted, chopped, measured, quarreled, budgeted, collaborated, and in a move that I’m still not sure was entirely legal, pilfered cast-off supplies from the trash can. Hey, we were just being green, right? Nowadays we’d obtain a high L.E.E.D. certification and get a pat on the back. I’m sure my teachers would’ve seen it that way . . .
I remember waxing intellectual about the structural integrity of domes, lecturing a classmate on how strong the ends of an egg were for this reason. Another peer gave an impromptu diatribe on the virtues of suspension bridges. We ended up with some sort of Frankesteinian hybrid, a bridge held up by suspension and bulky domes underneath. We were still furiously glopping on excess glue in hopes of bolstering the bridge’s integrity when the teachers called time.
We watched breathlessly as the teacher judging the competition picked up a thin book and placed it on our bridge. It held. Another volume was snapped up into her fingers and laid gingerly on our opponents’ bridge. It held.

One by one, she stacked books on top of our lopsided, aesthetically wreck-tastic but apparently strong-as-an-ox toothpick bridge. Every book our bridge held was matched by one on our opponent’s bridge — until the teacher picked up two textbooks. Ours held under the weight. Our opponents’ bridge collapsed — and so did we: we collapsed into cheers and giggles, inebriated with victory. We had done it! We were brilliant engineers! We had won!
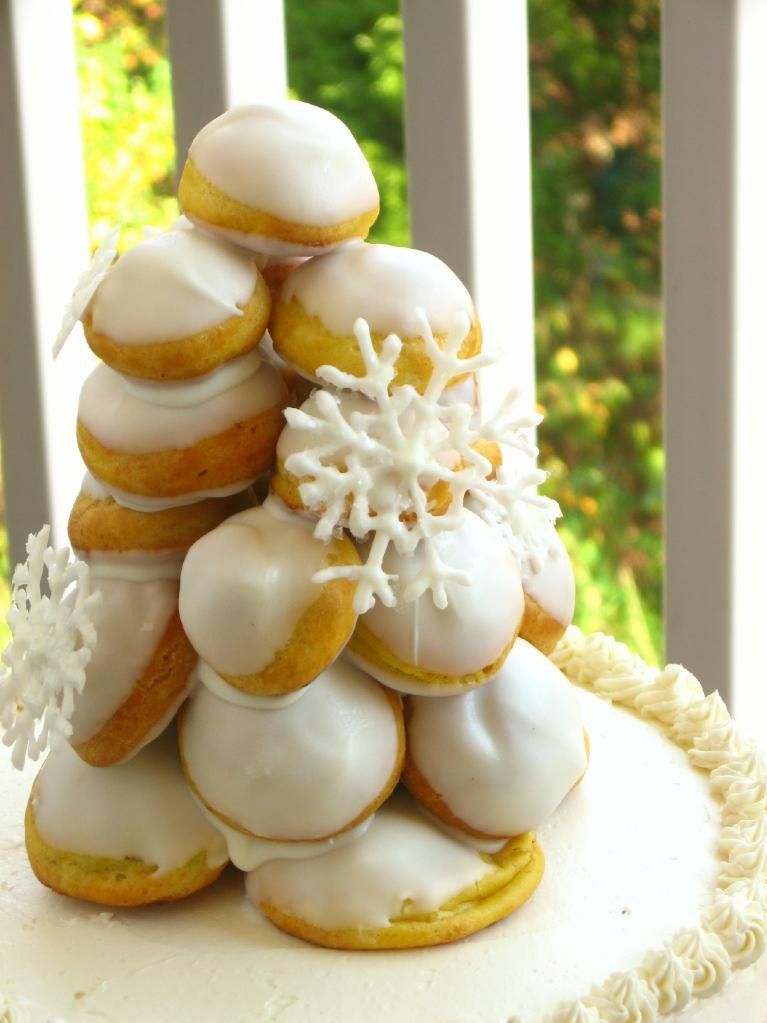

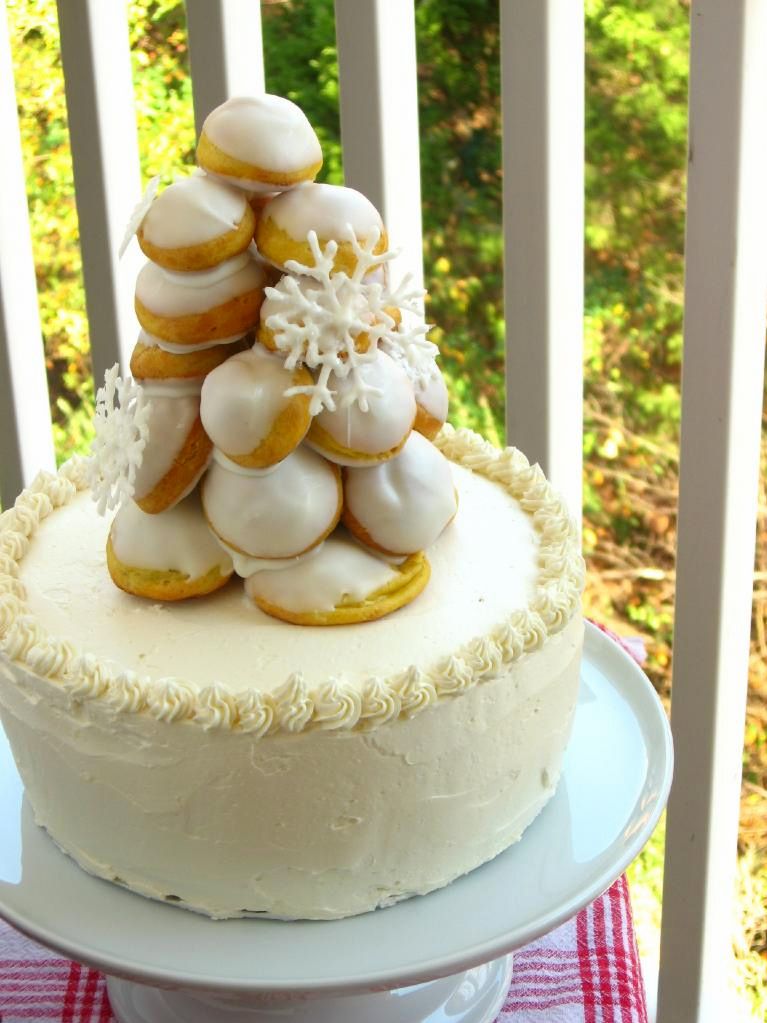
Pumpkin profiteroles — with pumpkin in the choux dough itself — were filled alternately with White Chocolate Chai Mousse and ganache.

As the crowd thinned, we stood around and stared in wonder at our messy little Golden Gate. My friend Ashley was not yet satisfied. Sure, our bridge was stronger than the other team’s, but just how strong? With her hands on teammates’ shoulders for balance, Ashley stepped — first one foot, and then the other — onto the bridge.

It held.

I’ll never forget that moment standing in front of my elementary school, seeing Ashley’s huge grin, relishing the easy pulse of victory through our already-marshmallow-filled veins. So, yeah, I’m basically an architect. Right?
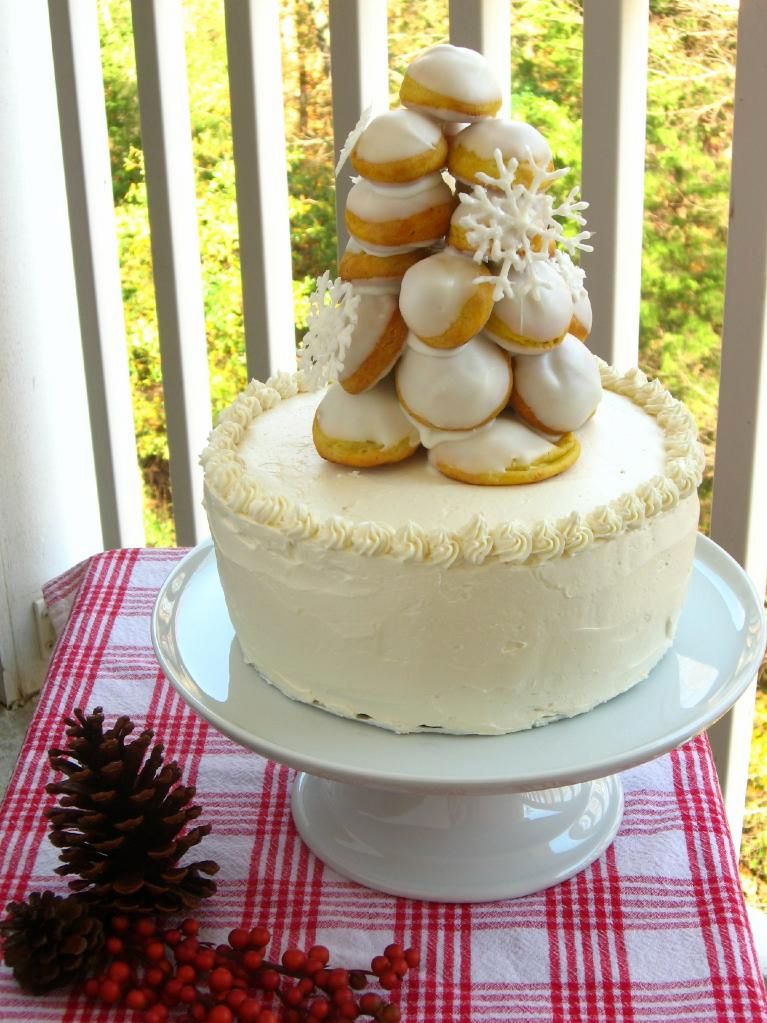
At least, it was this (misguided?) confidence that led me to believe that I could construct what I’ve officially dubbed the croquemcake.

I wanted to pull out all the stops for Project Food Blog Round 8 (do I say that every round? It’s definitely true every round!) The challenge was to create a baked good using pumpkin, and I was torn between building pumpkin profiteroles (made from pâte à choux) into a lovely croquembouche (mounted cream puff tower) or baking a pumpkin chai cake. Suddenly, it hit me. When in doubt, do both.

I may or may not have tweeted my desire to bathe in luxurious Swiss buttercream.

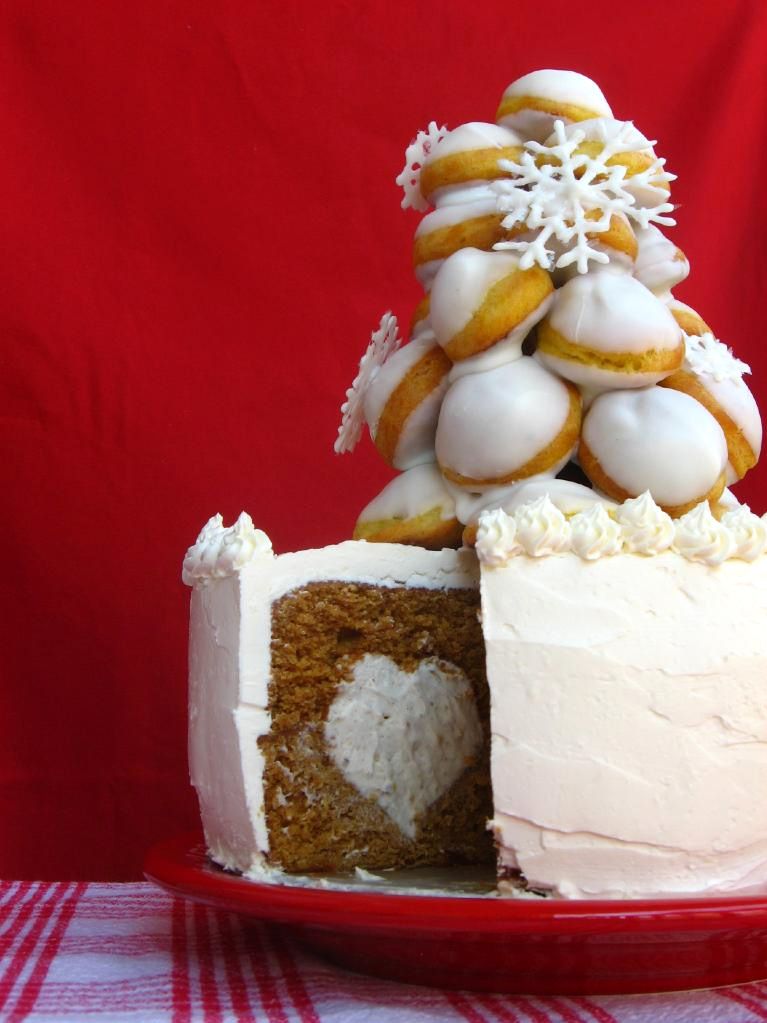
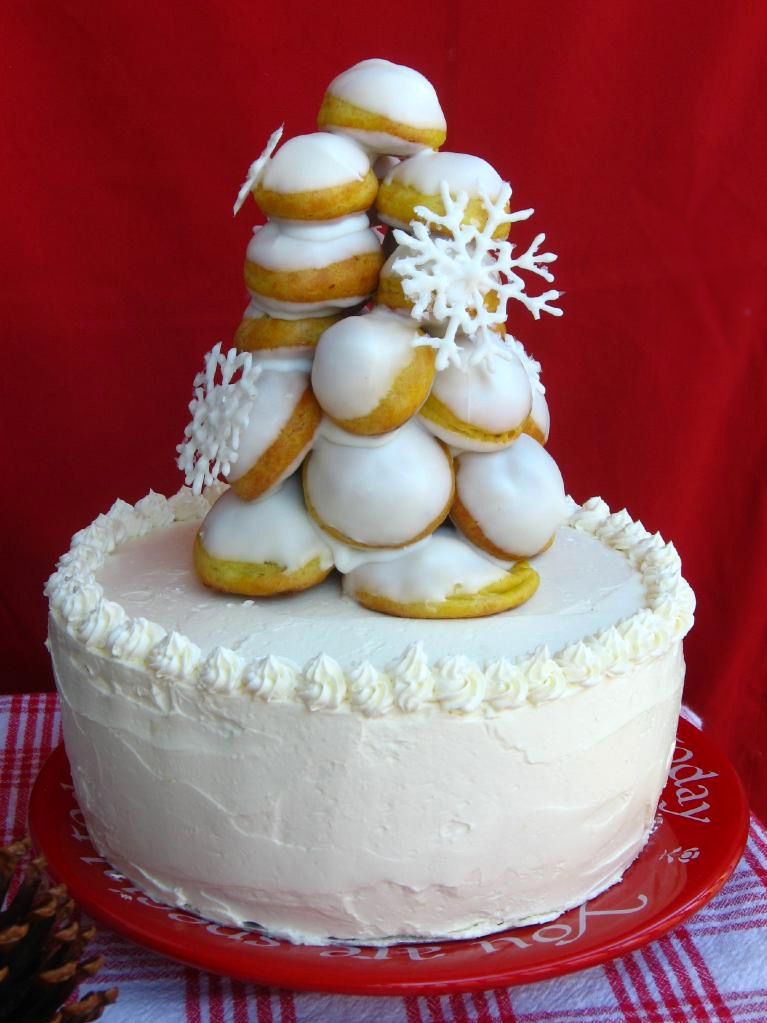
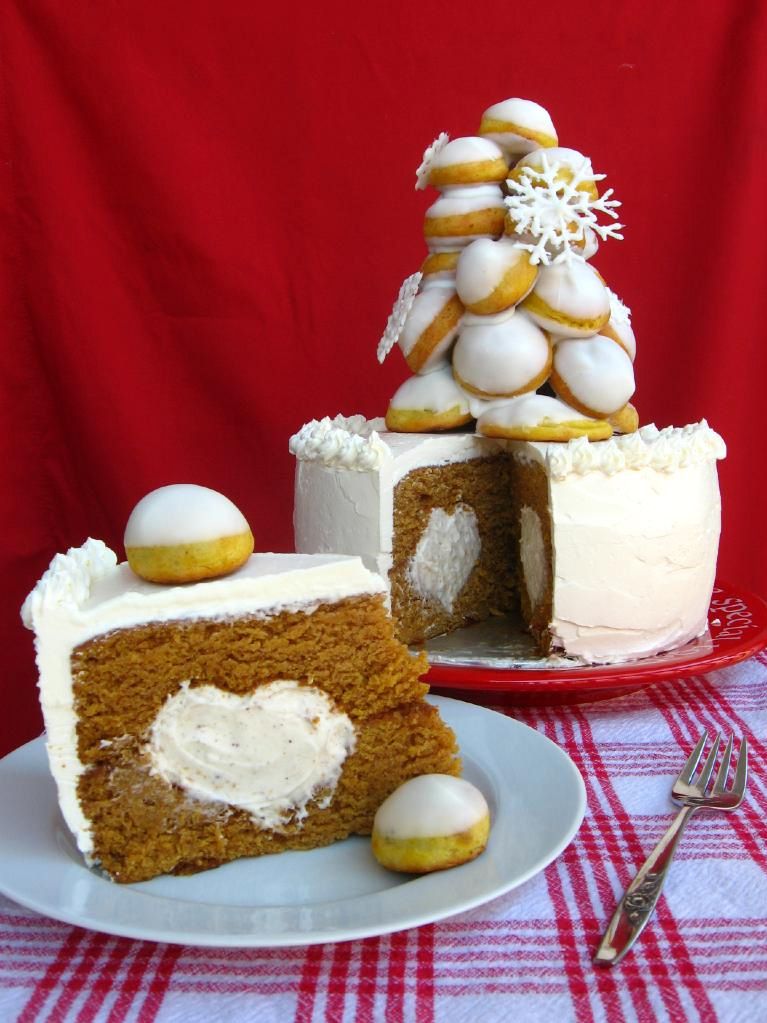
Thus, the croquemcake was born: a browned butter pumpkin cake filled with a comforting white chocolate chai mousse heart, frosted with velveteen Swiss buttercream frosting, and topped with a croquembouche of pumpkin profiteroles filled with chai mousse and ganache. The cake is served in slices accompanied by a few plucked cream puffs, and is essentially the embodiment of all things autumn.

At first I was panicky about trying to stack a tall, leany thing on top of a tall, frosted thing, but it turned out to be super easy, and it produced a ravishing effect.


The White Chocolate Chai Mousse is incredamazing, y’all. Even if you put off making the whole shebang until Christmas, you should make some bowls o’ mousse ASAP!

. . . oh, and it just might be my new favorite dessert ever. Every bite had an insanely satisfying combination of textures and flavors. This beautiful croquemcake would be the rockstar of any holiday table.

Don’t be scared of the length of the recipe. True to Willow Bird Baking’s mission, this dessert is also surprisingly easy to make. Let me qualify that: it takes three days and has tons of steps, but the steps themselves are simple and manageable. Use my note below on timing to space out the recipe steps into manageable chunks. It is so worth the effort.

What’s your favorite childhood memory?

Browned Butter Pumpkin CroquemCAKE with White Chocolate Chai Mousse


Recipe by: Willow Bird Baking, compiled and adapted from sources including Fine Cooking, Annie’s Eats, America’s Test Kitchen, Cookin’ Canuck, Martha Stewart, Gina DePalma, Alone and Unobserved
Yields: 15-20 servings, depending on your size o’ cake slices. You’ll have the topping croquembouche plus about 30 other cream puffs to serve alongside.

Pumpkin Puree Ingredients: (or use canned pumpkin puree)
about 7 pounds worth of sugar pumpkins (or pie pumpkins)
2-3 cups water

Browned Butter Pumpkin Cake Ingredients:
1 1/2 cups of your pumpkin puree
3/4 cup unsalted butter; more for the pans
2 cups unbleached all-purpose flour; more for the pans
1 1/2 teaspoon baking soda
1 1/2 teaspoon ground cinnamon
1 teaspoon ground ginger
3/4 teaspoon table salt
1/4 teaspoon ground cloves
1 1/2 cups granulated sugar
2/3 cup firmly packed light brown sugar
2 large eggs
1/3 cup buttermilk

White Chocolate Chai Mousse Ingredients: (I had a lot of leftover mousse; you could probably get by with 2/3 of this recipe)
2 1/4 teaspoons powdered gelatin
3 tablespoons water
18 ounces white chocolate chips (see note)
4 1/2 cups cold heavy cream
heaping 1/2 teaspoon ground cinnamon
heaping 1/2 teaspoon ground cardamom
1/4 teaspoon ground nutmeg
1/4 teaspoon ground ginger
1/4 teaspoon ground allspice
1/4 teaspoon ground pepper (white or black)
dash cayenne powder

Swiss Buttercream Frosting Ingredients:
1 cup sugar
4 large egg whites , at room temperature
24 tablespoons (3 sticks) unsalted butter, at room temperature
2 teaspoon vanilla extract

Profiterole (Cream Puff) Ingredients:
1 1/8 cups water
9 tablespoons unsalted butter
3/8 teaspoons salt
1.5 tablespoons sugar
1.5 cups all-purpose flour
6 large eggs
3/4 cup pumpkin puree
Egg wash (1 egg yolk and 1/2 cup heavy cream, lightly beaten)

Ganache Ingredients:
10 ounces bittersweet and semisweet chocolate chips
3/4 cup heavy whipping cream


Directions:
Note on timing: This dessert is easy to create, but involves many steps. For this reason, I divided the work over three days. On day 1, I roasted and pureed my pumpkins (you can nix this day if you use canned pumpkin). On day 2, I baked my cake and froze it, baked my profiteroles and froze them, and made my chai mousse. I also piped out white chocolate snowflake decorations to dry overnight. On day 3, I made my frosting, assembled and frosted my cake, made ganache, filled my profiteroles, and constructed my croquembouche.

To make pumpkin puree: Preheat oven to 350 degrees F. Cut the tops off of above 7 pounds worth of sugar pumpkins (also called pie pumpkins). Cut the pumpkins in half and scrape out the seeds and innards. Place the pumpkin halves peel-up, cut-side-down in a baking dish and fill the dish 1/4 inch deep with water (about 2-3 cups). Roast pumpkins for 60-90 minutes, or until flesh is fork tender. Allow them to cool for a bit before scooping all flesh out of the peel and placing it in a food processor. Puree for 2-3 minutes until completely pureed, then drain in a paper towel-lined colander for about an hour. Store your pumpkin puree in the fridge for up to 5 days or freeze it in 1-cup increments for later use. Alternatively, you can use canned pumpkin puree for this recipe.

To make browned butter pumpkin cake: I baked my cake in a pan that allows you to fill your cake with a heart-shaped tunnel of mousse (please comment if you’d like the details). If you don’t have one of these pans, you can still create the tunnel effect! You can use this technique by the fabulous Amanda, or this tunnel technique featured previously on my blog.

Preheat oven to 350 degrees F. Butter and flour two cake pans (either the heart-tunnel pan or regular 9-inch cake pans) very thoroughly. Melt the butter in a saucepan over medium heat and cook it, swirling occasionally, until it’s golden brown with a nutty aroma, around 4 minutes. Remove it from heat and pour it into a bowl to cool for about 15 minutes.
Whisk or sift together flour, baking soda, cinnamon, ginger, salt, and cloves in a small bowl. In a separate, large bowl, whisk together 1 1/2 cups of pumpkin puree, granulated sugar, brown sugar, eggs, and buttermilk until well combined. Use a spatula to stir in the dry ingredients until just combined, and then whisk in the browned butter. Pour batter evenly into prepared cake pans.

Bake the cakes until a toothpick inserted in the center comes out with just a few moist crumbs, around 28 minutes. Let cakes cool in their pans until mostly cool before turning them out onto wax paper to wrap and freeze. Freeze at least 30 minutes or until firm.

To make white chocolate chai mousse: Mix spices (cinnamon, cardamom, nutmeg, allspice, ginger, pepper, cayenne) together in a small bowl. Set aside.
Place 3 tablespoons of water in a small bowl and sprinkle the gelatin over top to dissolve and soften for at least 5 minutes. Place white chocolate in a medium bowl. Combine 1 1/2 cups of cream and spice mixture in a saucepan over medium heat and cook until simmering. Remove from heat, add gelatin, and stir to dissolve. Pour gelatin mixture over white chocolate and whisk in small circles until smooth. Cool completely to room temperature, stirring occasionally, around 5 to 8 minutes.

In a separate bowl, beat remaining cream to soft peaks. Use a whisk to fold about 1/3 of the whipped cream into white chocolate mixture to lighten. Then fold the rest of the whipped cream in until no streaks remain. Refrigerate your mousse until set, then stir slightly to break up before using.

To make profiteroles: Combine water, butter, salt and sugar in a saucepan over medium heat. Bring to a boil and stir occasionally. At boil, remove from heat and sift in the flour, stirring to combine completely.

Return to heat and cook, stirring constantly until the batter dries slightly and begins to pull away from the sides of the pan. Transfer to a bowl and stir with a wooden spoon 1 minute to cool slightly.

Add 1 egg. The batter will appear loose and shiny. As you stir, the batter will become dry-looking like lightly buttered mashed potatoes. It is at this point that you will add in the next egg. Repeat until you have incorporated all the eggs. Stir in pumpkin puree.

Pipe the batter using a pastry bag and a plain tip. Pipe choux about 1 inch-part in the baking sheets. Choux should be about 1 inch high about 1 inch wide. Using a clean finger dipped in hot water, gently press down on any tips that have formed on the top of choux when piping. You want them to retain their ball shape, but be smoothly curved on top. Brush tops with egg wash while trying not to drip the wash down the puffs onto the pan (which could somewhat inhibit rise).

Bake the choux at 425 degrees F until well-puffed and turning lightly golden in color, about 10 minutes. Lower the temperature to 350 degrees F and continue baking until well-colored and dry, about 20 minutes more. Remove to a rack and cool (tip from a pro: poke each puff with a toothpick while cooling to release the steam inside. It shouldn’t cause your cream to leak, but will help the puffs stay crisp). Can be stored in a airtight box overnight, but I recommend, if you aren’t using them right away to create your croquembouche, that you freeze them. When you’re ready to use them, bake them at 350 degrees F for 5-6 minutes to refresh and recrisp them.

To make ganache: Bring the cream to a simmer in a medium saucepan (or just stick it in the microwave for 2 minutes in a microwave-safe bowl). Place the chocolate in a medium bowl. Once the cream reaches a simmer, pour the cream over the chocolate and let stand 1-2 minutes. Whisk in small circles until a smooth ganache has formed. Let ganache stand at room temperature until fully cooled, then whip to frosting-like consistency for piping into cooled profiteroles.

To make Swiss buttercream frosting: Combine sugar and 1/2 cup water in a small saucepan and bring to a boil over medium-high heat, stirring to dissolve sugar. Boil without stirring until syrup reaches 240° on a digital thermometer, about 5 minutes.

Meanwhile, in a stand mixer with whisk attachment, beat egg whites on medium-high speed until soft peaks form. With mixer on medium speed, gradually pour in hot syrup in a thin stream; avoid pouring syrup on whisk. Increase speed to medium-high and beat until stiff peaks form and mixture is cool, about 8 minutes. Reduce speed to medium and add butter 1 tablespoon at a time, beating after each addition. (If at any time buttercream appears curdled, beat on high until smooth, then reduce speed to medium and continue beating in butter.) Once all butter is added, beat on high speed until buttercream is smooth and fluffy, about 1 minute. Beat in vanilla extract.

To assemble your cake: Line up cake layers and trim sides as needed with a long serrated knife. No need to thaw before you do this — it’s actually easier with frozen layers. Spoon white chocolate chai mousse into heart-shaped wells in your cake layers (if applicable — or spoon it into whatever shaped cavity you’re using). Carefully position the top layer on the bottom. Apply a thin coating of frosting all over as a “crumb coat” and refrigerate the cake for a half hour or so. Then frost the cake generously with the remaining frosting.

To assemble your croquembouche: Fill cooled profiteroles with leftover chai mousse and ganache as desired. Melt white chocolate bark and dip tops of each profiterole into the chocolate, lining up on wax paper to dry. Cover a plate with wax paper — this is where you’ll build your croquembouche. Start with bigger, broader profiteroles and use the white chocolate as “glue” to piece together a sturdy base. I refrigerate my croquembouche after the construction of each new layer, to harden the chocolate and avoid any toppling incidents! Continue building a cone, fitting the profiteroles together according to their shape. Use white chocolate to pipe snowflakes on wax paper, and to “glue” them onto your croquembouche once they’re dry. Refrigerate your croquembouche until you’re ready to assemble your final product.

To assemble your final croquemCAKE: Carefully ensure that your croquembouche isn’t sticking to your wax paper. Gently lift it onto the center of your cake. Surround your cake with leftover cream puffs for serving. Enjoy!


Roasting pumpkins! While there’s not a huge taste difference from using this process versus the canned stuff, it’s a fun, satisfying thing to try!

If you liked this post, please:
Subscribe to Willow Bird Baking
Follow Willow Bird Baking on Twitter
Follow Willow Bird Baking on Facebook
Give this post a thumbs up on StumbleUpon


ShareOther ways to share this post with friends!

Easy Apple Puff Pastry Tarts with Almond Whipped Cream (Voting Now Open in Project Food Blog!)

Willow Bird Baking is a contestant in Project Food Blog, a contest comprised of a series of 10 challenges to find the next food blog star. Voting for Challenge #7 is now open! I would be SO grateful if you’d consider voting for me in this round! Just sign in to your Foodbuzz account (or register if you don’t already have one). Then go to my cheesecake video entry here and vote by clicking the heart next to the words “Vote for this Entry.” I appreciate your support so much!

I just arrived in Orlando after 9 hours in a car (thankfully, I was accompanied by a fun coworker, Kyle). I’m in town to give a presentation at the National Council of Teachers of English convention, but after that road trip, I’m not even sure I can still speak English, much less teach others how to teach it.

I kind of expect the next few days to be a blur. Wayyy too much Coke Zero, wayyy too much work done this week, and wayyy too much bustling around this morning means that I’m currently feeling crumpled and headachy.

Kyle and I spent the last 45 minutes of the trip searching for food in a starvation-induced trance. We’d already ruled out Steak ‘n Shake, but every exit had one (and almost nothing else), as if taunting us. Lots of hotels, lots of outlet malls, lots of big-neon-lit-Orlandoy places — but no normal, honest-to-goodness FOOD. Lulled by hunger delirium and the soporific British accent of Kyle’s GPS, I had almost lost touch with reality when we finally spotted a Chick-fil-a. We definitely needed one of those easy buttons you see on TV. Easy dinner for people with currently confuzzled brains, please!

Well, an easy dinner didn’t happen, but here’s an “easy button” for dessert, at least. These apple puff pastry tarts are truly painless in addition to being warm and comforting. I served these treats at my parents’ anniversary dinner. Before beginning dinner prep, I made sure my puff pastry was thawed, cut into squares, and ready to go. After dinner, the family retired to the living room to relax while I mixed my apples and spices and baked up the tarts. Just before serving, we topped each tart with almond whipped cream, which turned out to be my favorite component.

The entire dessert was fancy-looking enough for company, but easy enough for any busy weeknight (easier, obviously, than my food quest with Kyle).

Okay, enough bleary-eyed blogging. Before I say anything too silly, I’m signing off and heading to bed (in the condo bedroom that’s decorated entirely in Disney characters — no confusion about what city I’m in!)

Make some tarts, y’all!

Easy Apple Puff Pastry Tarts with Almond Whipped Cream


Recipe by: Pioneer Woman
Yields: about 6 individual tarts

Tart Ingredients:
homemade or store-bought puff pastry sheets, thawed and cut into rectangles
4 apples, cored and sliced but not peeled
1 cup brown sugar
1/4 teaspoon salt
optional spices to taste: cinnamon, nutmeg, etc.

Almond Whipped Cream Ingredients:
2 cups heavy whipping cream
5-6 tablespoons confectioners’ sugar (to taste)
1 teaspoon almond extract

Directions:
Preheat your oven to 415 degrees. Put the puff pastry rectangles on a greased baking pan (with edges, so the juices don’t run down and caramelize on your oven, or on your mom’s freshly cleaned oven . . . not that I’m speaking from experience, or anything. Combine apple slices, sugar, salt, and any spices you’re using in a bowl and allow them to sit for a few minutes. Then arrange the apple slices on the puff pastry in a straight line, overlapping.

Bake 18 – 20 minutes, or until pastry is puffy and golden brown. While pastry is baking, whip together cream, sugar, and almond extract in a medium bowl to soft peaks. Place this in the fridge until you’re ready to use it.

Remove pastries from the oven and immediately serve with a dollop of cold almond whipped cream (allow diners to place this on their own tarts to ensure it doesn’t melt before it gets to them!)

If you liked this post, please:
Subscribe to Willow Bird Baking
Follow Willow Bird Baking on Twitter
Follow Willow Bird Baking on Facebook
Give this post a thumbs up on StumbleUpon


ShareOther ways to share this post with friends!

Deconstructing a Pizza and a Place

Deconstruction in the culinary world is about division: a familiar dish is broken down into its discrete flavor components, which are served in an unexpected way. It’s about assembly: the separated components meld in each bite, surprising in their newfound unity. It’s about departure: the eater is asked to readjust what they know and what they think they know. It’s about coming home. It’s about the moment when all the flavors suddenly make sense as a recognizable whole — maybe as a dish you’ve had a taste memory of since childhood, but didn’t expect to meet in this new form.

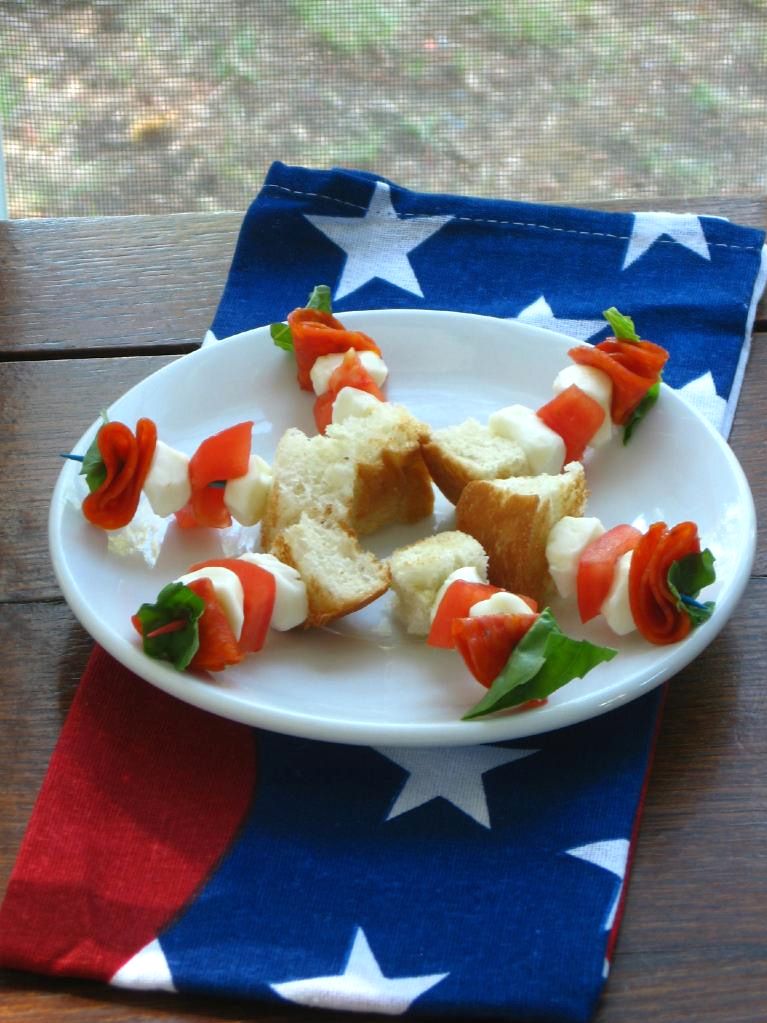
During my parents’ anniversary dinner, I took the classic dishes they’d grown up with and reinterpreted them. Diner pizza became these deconstructed pizza bites, cold and salty, bold and mellow — and surprising in their transformation from discrete bits of flavor to a unified, familiar experience.


View of the Bay Bridge from Alcatraz

San Francisco was also deconstructed for me this past weekend. I attended the Foodbuzz Food Blogger Festival and after a weekend of crowds, taxis, food, lights, friends, laughter, food, cameras, trolleys, hills, and food, I’m sitting alone in Charlotte trying to process the experience.

It’s quiet here — just the sound of airplanes in the sky above my apartment, the road noise beyond the woods, the determined hum of my recently reemployed heater. When I look to the west from this vantage point, pretending my vision reaches the 3,000 miles and 96 hours back in time to my trip, I see fragmented moments: a deconstructed city, a deconstructed experience.

Maybe if I offer these bits of memory to you together — no toothpick to assemble them on, so a blog post will have to do — you’ll taste the flavor of the weekend.


A gull looks toward San Francisco

FLAVOR

Bursting, juicy pork sandwiches with crispy pork skin. Cupcakes like coconut clouds. Adorable quail eggs. Agave-sweetened gazpacho. The burning rush of juice from a garlicky escargot pop. Sultry corn tortillas around shredded beef. A tongueful of flaming mushroom soup. Tart cranberries nestled in goat cheese. Lamb resting peacefully on a bed of butternut. Gruyère tucked inside a fat croissant.


Mini-doughnuts by the bay

ADRENALINE

I presented my Blueberry Stuffed French Toast Bowl recipe to a room filled with sweet, hungry people. Before the demonstration, my shaking hands were trying desperately to set each kitchen utensil and bowl in its rightful place, taking aimless photos, and failing to fasten my apron properly. During the demonstration, I might have been a little silly. Maybe. And after the demonstration — pure joy. What fun! What supportive friends!


Doing my Nature’s Pride demonstration at the Foodbuzz Tasting Pavilion

LAUGHTER

On Saturday night, Foodbuzz hosted a scavenger hunt around the city. I joined a group of relative strangers to romp around San Francisco being silly. I was so exhausted before we began that I wasn’t sure if I’d made the right decision — but being a part of Team Tony & the Gold Dust Gals (as we dubbed ourselves) was a highlight of my trip. Here are the tasks we had to complete (photos in this section are by the super-sweet Laura Flowers except the business card photo by my lovely roomie Diana):

[youtube=http://www.youtube.com/watch?v=ZByOPa-X-l0&fs=1&hl=en_US&color1=0x402061&color2=0x9461ca]1. Dance with a stranger (I totally stepped on his foot).


2. Late night exercise: 10 synchronized jumping jacks.


3. Exchange business cards with 10 people.


4. Photo with the hippest person you can find (the dude in the bowtie, OBVIOUSLY!)

5. Late night toast at the Gold Dust Lounge (I don’t drink, but water works!)


6. Late night snack (of brightly colored, flagrantly artificial drugstore sweets!)

It was beyond absurd scavenging around San Francisco with these wonderful, crazy people. I started out so tired I could barely move, but once we finished our tasks, I didn’t want the night to end.

CRISIS

Even as we were running around San Francisco through bouts of laughter and chatter, something was very wrong. In fact, something had been wrong throughout my trip. On my first night in the city, I walked out to the drugstore to purchase a few supplies. A homeless man stood outside and asked if I would buy him a tuna sandwich and some orange juice – something I happily did. As the weekend stretched on, though, I saw a different man or woman on every corner. Every few feet. In every other doorway.

During the scavenger hunt, we passed a man with no shoes and only a thin sweatshirt sitting in an alcove. He was unable to make eye contact, and seemingly unable to modulate his voice. In a quiet monotone, he was repeating, “Help me — somebody help me.”


San Francisco sunset through the dirty hotel window

I don’t know what to say except that I’m haunted. We have homeless in Charlotte, but I encounter them at a rate that I feel I can manage, and offer them a warm lunch or dinner. In San Francisco, I was overwhelmed. What can I do for this person? And this one? And this one? Each individual deserves a meal, deserves clothing, deserves love, deserves a kindness. But I don’t have the money to provide for them. I prayed as I passed, but was confronted with a scripture from James: “If one of you says to them, ‘Go in peace; keep warm and well fed,’ but does nothing about their physical needs, what good is it?”

I’m reading through the article series, Shame of the City from 2003 and still wondering, wondering, wondering: what can I do?


View of the Golden Gate Bridge from Alcatraz

COMFORT

Despite traumatic moments, Sunday was a balm on my nerves and heart. My beloved college roommate, Martha, drove an hour and a half to spend the day with me. We walked through the sometimes-rain and sometimes-mist in Chinatown, then took a trolley out to the water. We devoured croissants and muffins at Boudin Bakery, home of “mother sponge,” the starter of San Francisco’s famous sourdough.

The sea lions of Fisherman’s Wharf had us in stitches — especially the particularly bulbous ones. I made Martha pose like a tourist in front of random ferries and Ghirardelli square. We rounded off the night with In N Out fries and a crazy drive across the Golden Gate Bridge. Staring out at the lights of Sausalito and San Francisco with someone I truly love to pieces was one of my favorite parts of the trip.


Me and Martha

From random bites to random dances, from boisterous sea lions to giant bay bridges, San Francisco was full of magic. I’ll continue to process the experience and break it down into bright bite-size pieces. In the meantime, have a Deconstructed Pizza Bite.

Do you have suggestions for how to get involved in the plight of the homeless? Have you found a way of serving underprivileged citizens? Let me know.

Deconstructed Margherita Pizza Bites


Recipe by: Willow Bird Baking
Yield: about 12 pizza bites

Ingredients:
2 1-inch thick slices of crusty Italian bread, toasted
12 pieces of pepperoni
1 tomato, chopped into cubes
24 mozzarella pearls (or small hunks of mozzarella)
about 4-5 large basil leaves, torn into 3 pieces each

Directions:
On a toothpick, assemble the following: one hunk of bread as your base, a pearl of mozzarella, a hunk of tomato, another pearl of mozzarella, a piece of pepperoni folded into quarters, and finally, a piece of basil leaf. Refrigerate until ready to serve, and serve cold for a fresh, bright flavor.


Sea lions at Fisherman’s Wharf

If you liked this post, please:
Subscribe to Willow Bird Baking
Follow Willow Bird Baking on Twitter
Follow Willow Bird Baking on Facebook
Give this post a thumbs up on StumbleUpon


ShareOther ways to share this post with friends!

How to Make 27+ Cheesecakes and Look Awesome While Doing It

…or at least, feel like you look awesome while doing it?

Thank you so much for voting me into Project Food Blog Round 7 — I’m so grateful for your support! Challenge #7 was to create a video tutorial. I think you guys know by now that I’m a little obsessed with soupedup cheesecakes, so without further ado (okay, with a little more further ado), I’m about to show you how to create flippin’ awesome cheesecakes.

LIGHTS

What went into creating this video? Lots and lots of planning — dozens of pages worth! Lots and lots of time — 35+ hours worth! And lots and lots of fun — probably more than I should’ve had. Ahem. You’ll see.

CAMERA

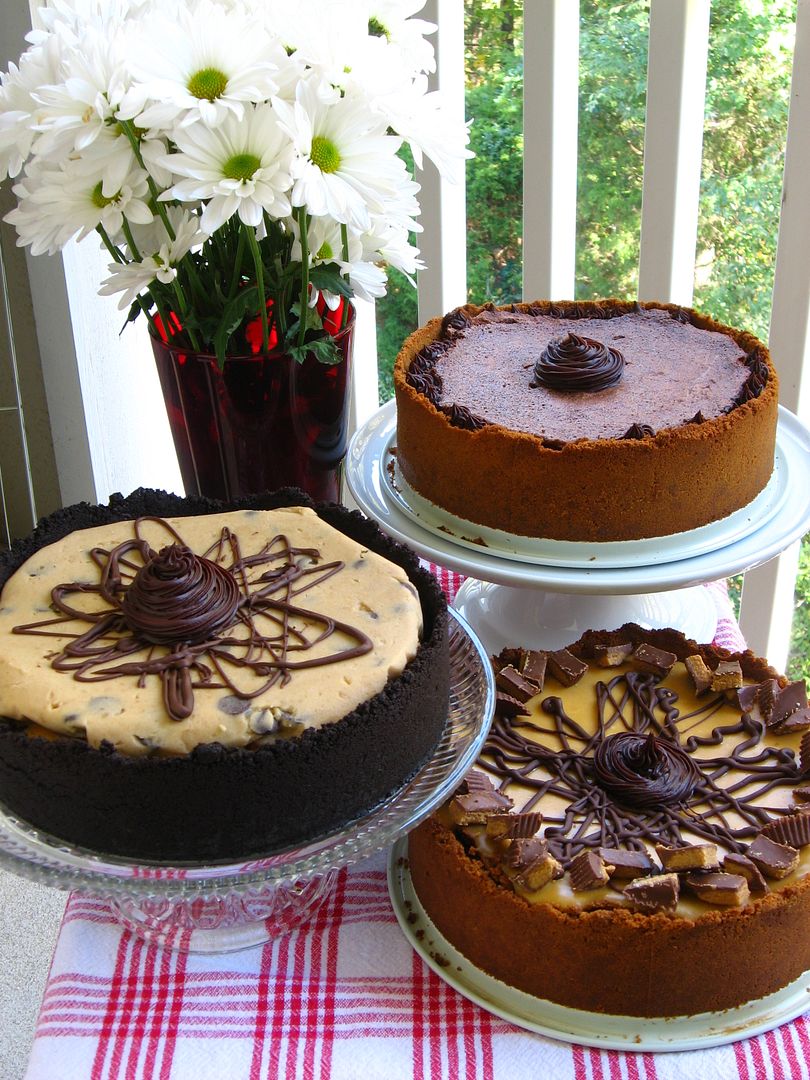
Cheesecakes are incredibly customizable. In the video below, I’ll show you 3 different crusts, 3 different fillings, and 3 different toppings. By mixing and matching these components, you can feasibly create over 27 different cheesecakes! So, um, if you ever need 27 different cheesecakes . . . I got ya covered.

ACTION

Enough of the suspense! What do you get when you combine stop-motion animation, a music video, some ridiculousness, and a whole lotta cheesecake? Watch and see.

http://www.youtube.com/watch?v=7Dj3msQYjOQ&fs=1&hl=en_US&color1=0x402061&color2=0x9461ca

(please click here to see bigger version)

You can print the recipes for these cheesecakes here: Coffee Cookie Dough Fudge Cheesecake, Caramel Fudge Brownie Cheesecake, Chocolate Peanut Butter Bliss Cheesecake.

(Note: Voting is now open! I would so appreciate if you’d take a moment to pop over and vote for me by clicking the heart on this page once you’re signed into your Foodbuzz account. Registering for a Foodbuzz account is quick, easy, and free if you don’t have one already! Thanks, y’all!)

THE BLOOPER REEL

…wherein I prove that I’m basically tone deaf, drop my brownie layer in the floor, yell a lot at my piece-of-crap hand mixer, and eat bacon.

http://www.youtube.com/watch?v=a4D3hOu0DOM&fs=1&hl=en_US&color1=0x402061&color2=0x9461ca

(please click here to see bigger version)

STRIKE THE SET

After the video camera was tucked away, the tripods were folded up, and my smudgy lipstick had faded, there was still one itty bitty order of business to attend to. What the heck does one do with three cheesecakes?! Turns out there was something awesome to do with them!

My friend Carol has a heart the size of Jupiter. She’s worked with children with special needs for several years now, and recently, while browsing Reece’s Rainbow, a website that connects orphans with special needs to adoptive homes, she laid eyes on Quinton. Quinton is a tiny, precious baby boy in Eastern Europe with Downs Syndrome. At first, Carol half-jokingly asked her husband if they could adopt him. As time went on, though, it became clear that neither she nor her husband could stop thinking about Quinton.

They posted his picture on her refrigerator and decided they were going for it. They’re currently beginning the process to bring him home! This miracle is not without a cost — it will take thousands of dollars. I decided my huge, decadent cheesecakes were perfect for a little fundraising. I gave two of them away in return for donations to Quinton’s fund. I can’t tell you what an honor it is to be a tiny part of Carol’s journey — and how humbling it is to see other friends donating their time, goods, services, energy, and love to them! Little Quinton is already changing our lives. Would you like to help as well? You can see Quinton and donate to his adoption fund here.

ROLL THE CREDITS

A big thank you to: ALL Willow Bird Baking readers who have been so supportive, Sarah for the use of her camera, Kim for loaning me a second tripod, Byrd for being willing to hang out with me while I edited video for about a decade, Royalty-Free Music, Carol for already being an amazing mommy even though her little one is still across the world, my 7th grade students for inspiring my stop-motion animation, and everyone who helped me eat cheesecake!

P.S. – Did you have a chance to see my Teaser Video?
P.S. 2 – Dear Coworkers, if you make fun of me about this, no more cheesecake for you!

If you liked this post, please:
Subscribe to Willow Bird Baking
Follow Willow Bird Baking on Twitter
Follow Willow Bird Baking on Facebook
Give this post a thumbs up on StumbleUpon


ShareOther ways to share this post with friends!