Month: July 2010

Chocolate Mousse Pie

It was a warm Friday in May, and I left school in a hurry after teaching my last class. I swung through the drive-through of Arby’s, ordering a sandwich as large as my head and then wondering why I’d just ordered a sandwich as large as my head. No time to worry about that!

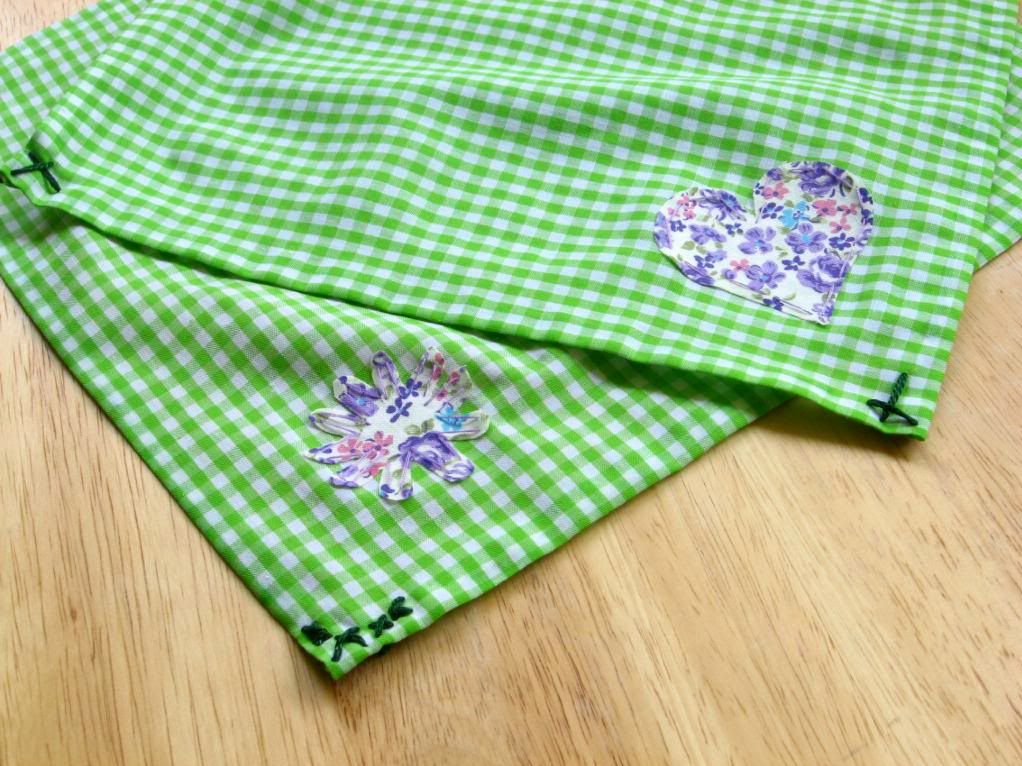
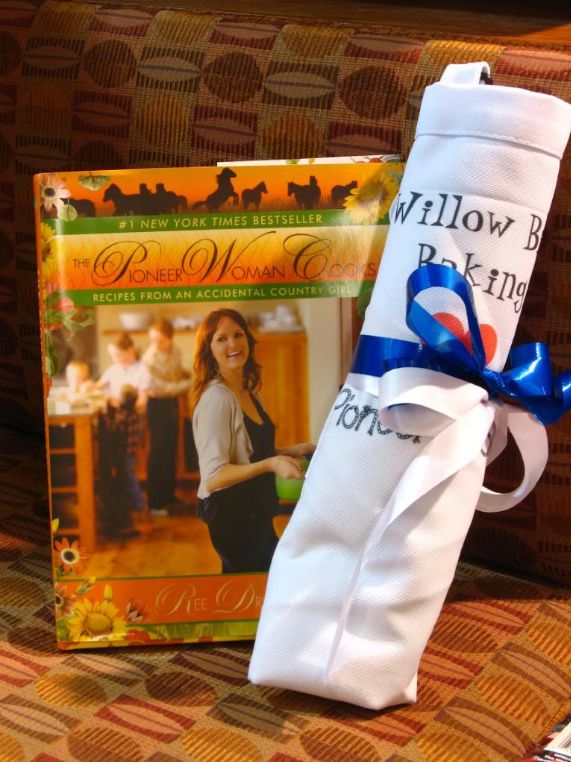
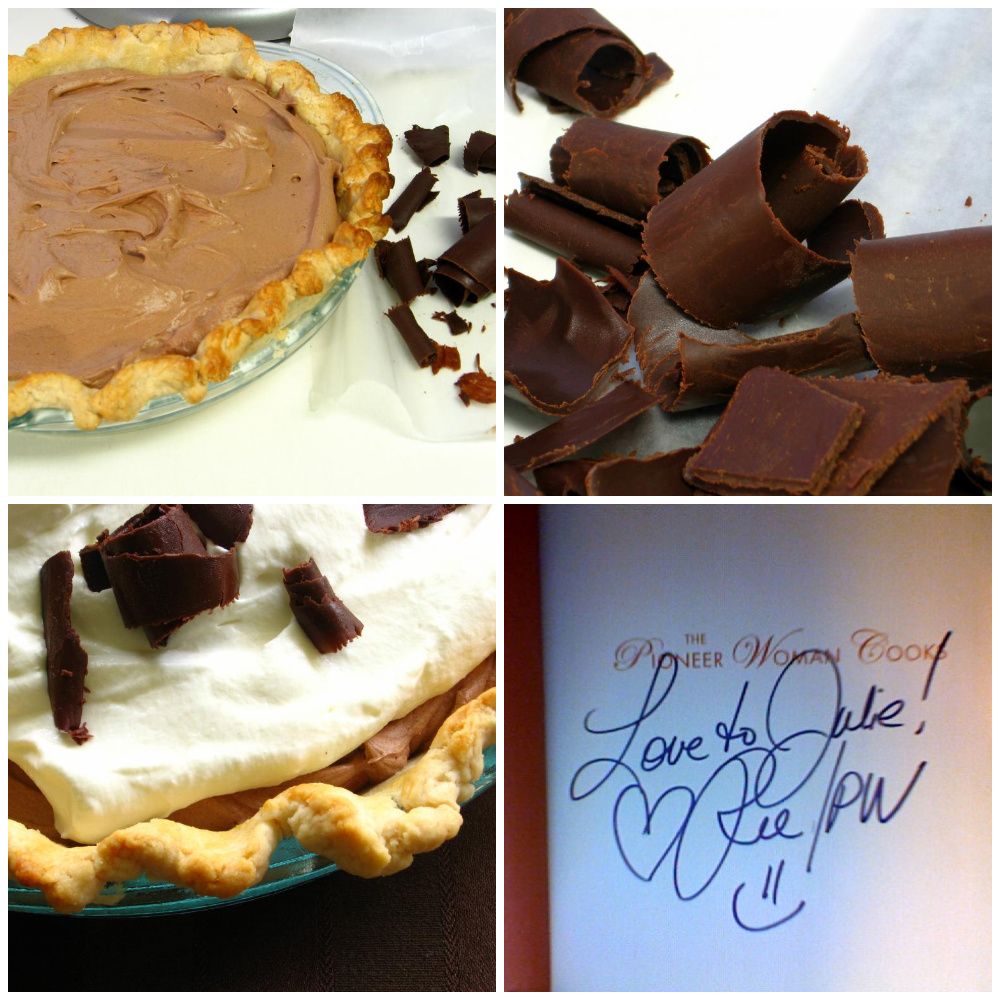
I barreled down the interstate with a quick stop at the UPS processing center to grab the package that should have been delivered to my apartment (sigh) but wasn’t. No time to wait for them to correct the problem — I would need the contents of this package in a matter of hours. I ripped it open to unveil the apron I’d just had printed:

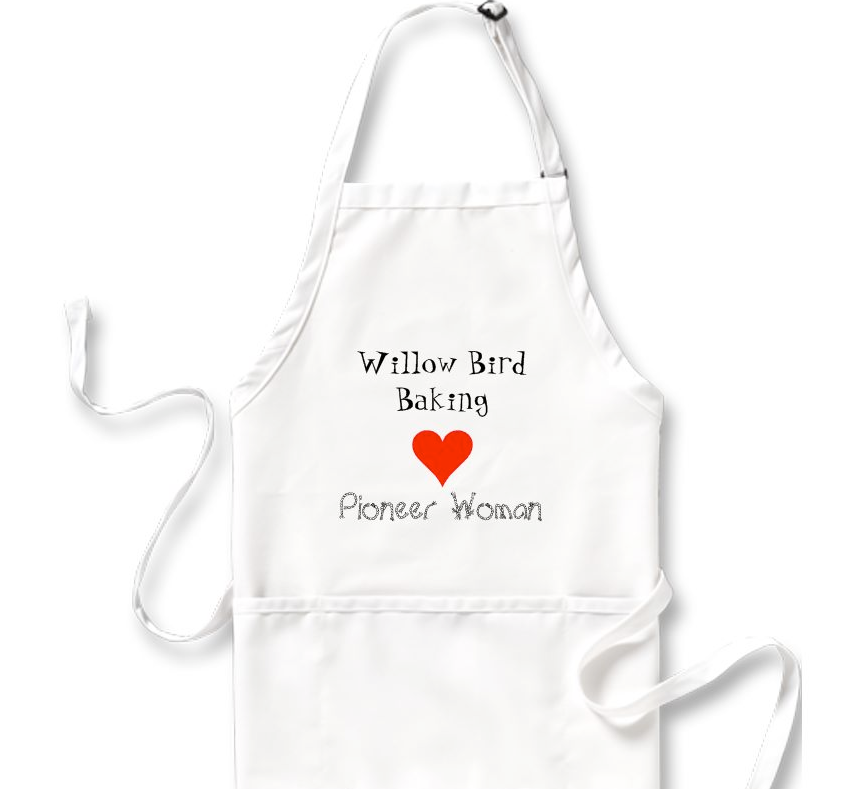
To my great relief, there were no spelling errors, egregious or otherwise. Can you imagine handing an apron to Ree Drummond that said, “WILLOW BIRD BAKING <3 PINEER WOMUN." Actually, now that I think about it, she might've liked that.

That’s right, I was on my way to meet P-Dub herself at her Charlotte booksigning. Now, I’m not really fanatic about celebrities. I was in love with Isaac Hanson for about 2 weeks in middle school before realizing he was never even going to know I existed. So I snapped out of it, went about my business, and didn’t bother with this “fan” silliness anymore.

That being said, I love Ree Drummond. She’s warm, hilarious, genuine, and probably more deserving of her fame than any of the Hollywood crowd. And last time I mentioned her in a post, I got hate mail! From real, live, professional trolls! You know someone’s really “made it” when they have their own little official hate squad following mentions of them around the internet. Cool.

She was as lovely as I expected when I met her in person, but for me, it was one of those Christmas Story experiences. You know the Christmas Story movie, right? The one with the leg lamp? In the movie, little Ralphie stands in line for hours to meet Santa with one goal echoing incessantly in his brain: to ask for a Red Rider BB Gun. That gun is all he wants, and all he’s been able to think about for weeks. He rehearses his lines to perfection. Finally, he reaches the front of the line and stares up into the face of a jaded department store Santa. It’s time to ask for his dream! He musters the strength to speak and . . . he panics. He chokes. He stares. He asks for a football.

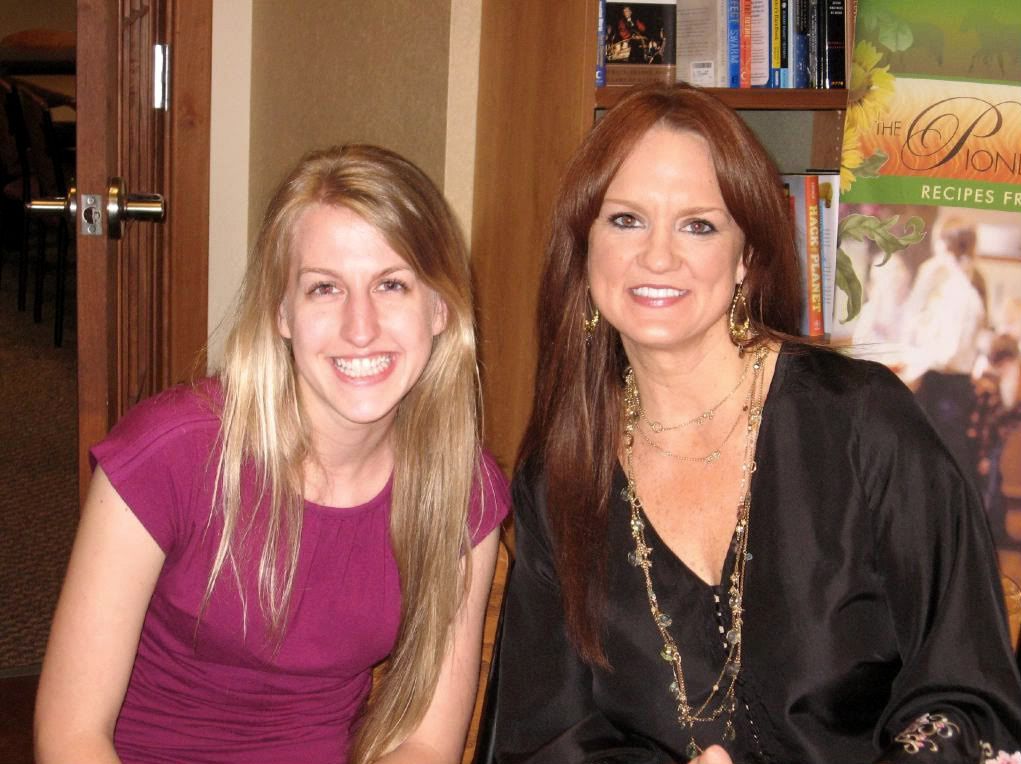
Thankfully, I didn’t ask Ree for a football. What I did do is shuffle about, hand her the apron shyly, sort of mention Willow Bird Baking, and then give a dazed grin to the camera. Suddenly we were walking out of the building and I thought about turning around to scream, “No! I wanted a Red Rider BB Gun!” Somehow I don’t think that would have helped.

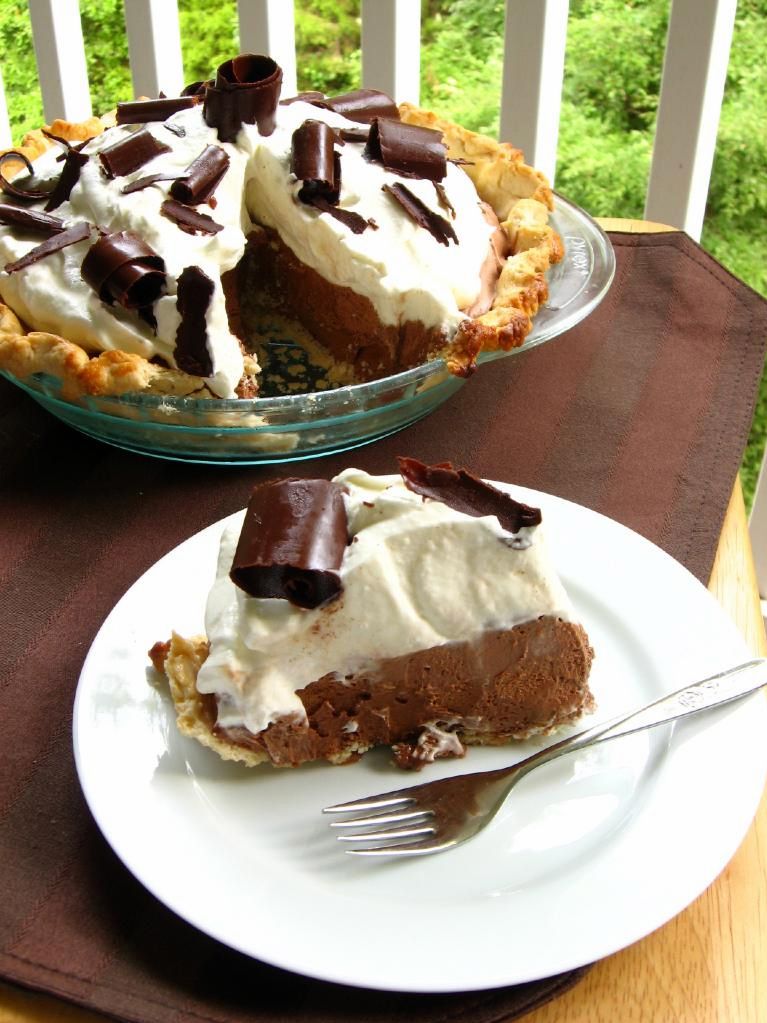
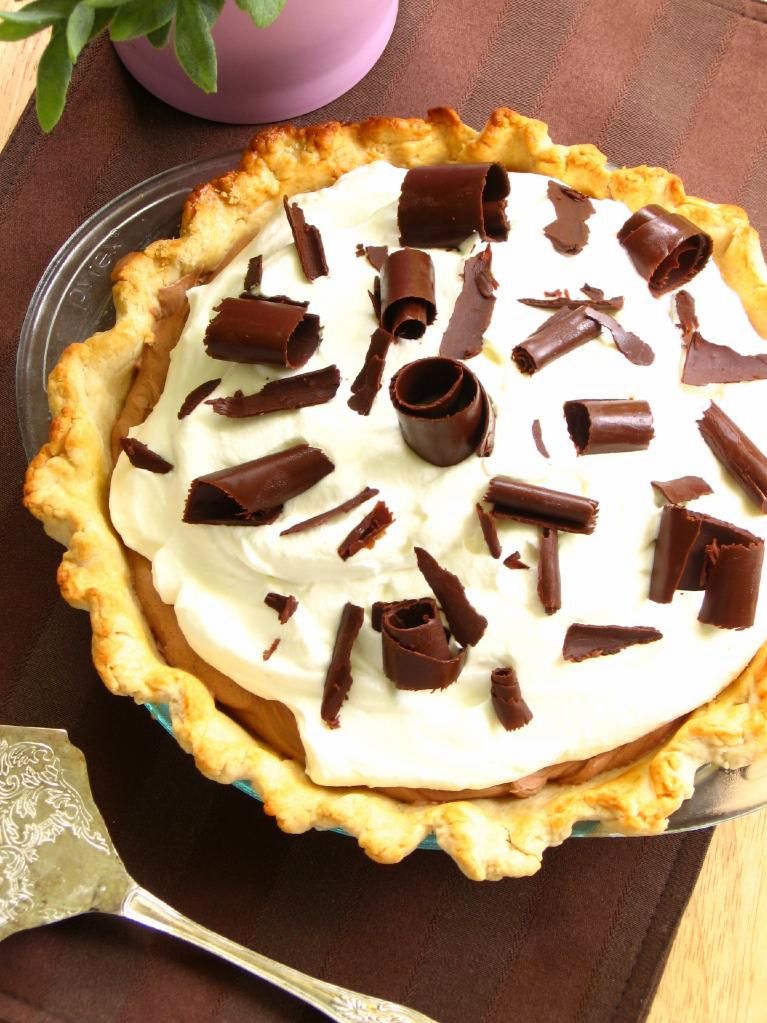
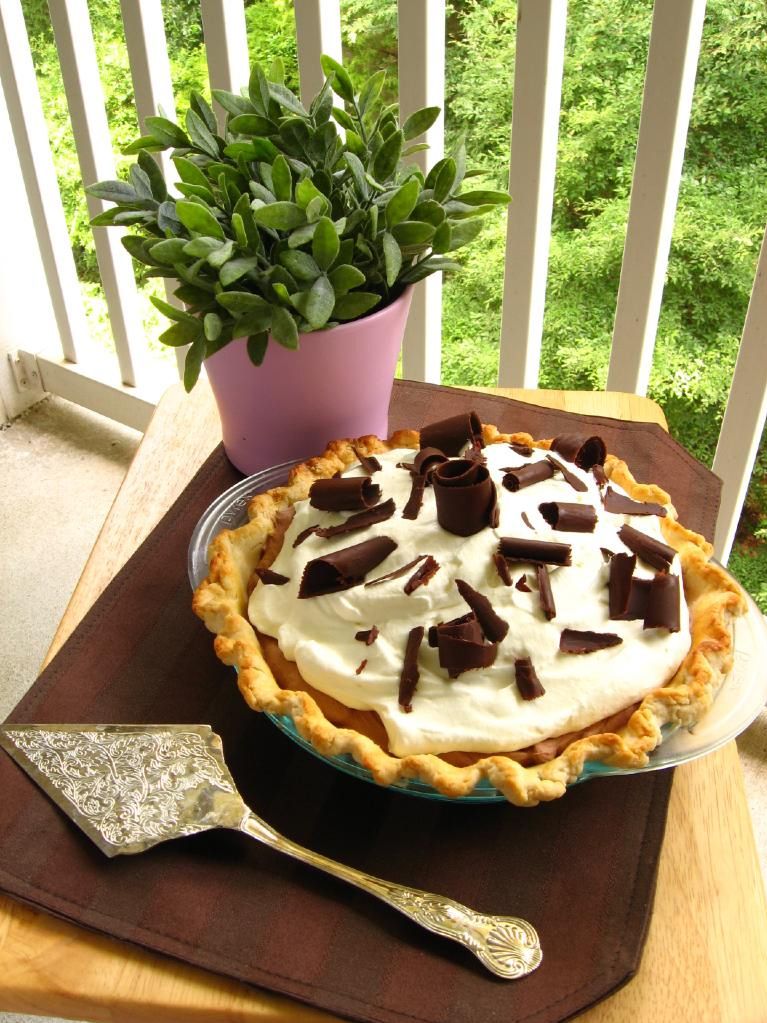
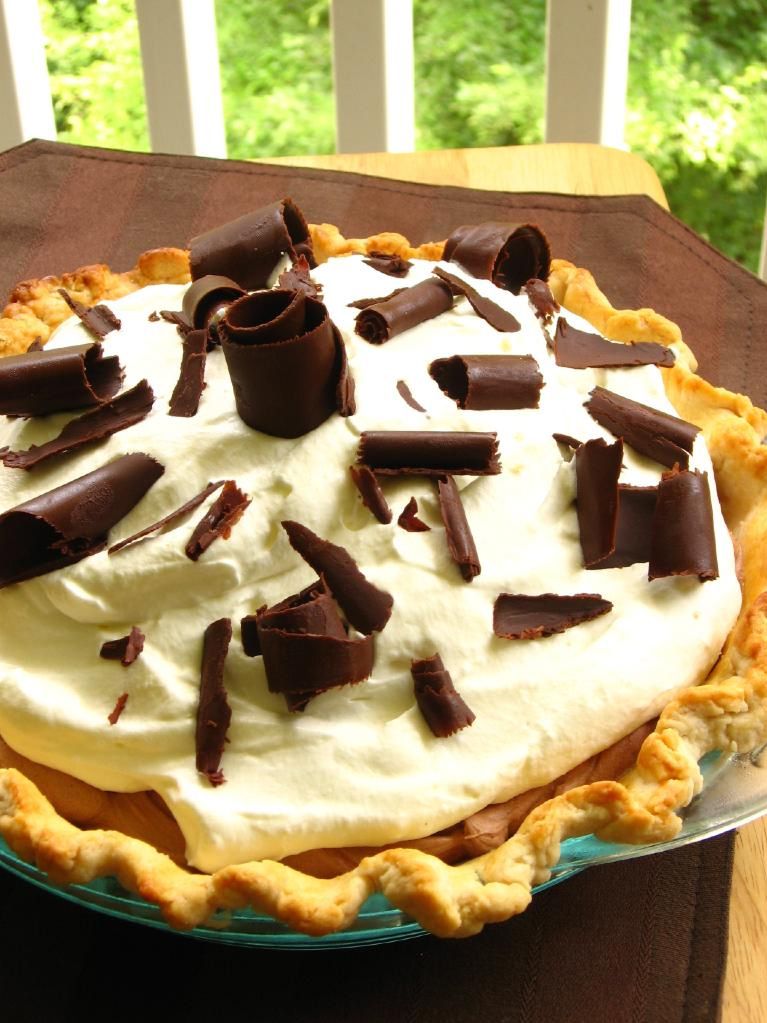
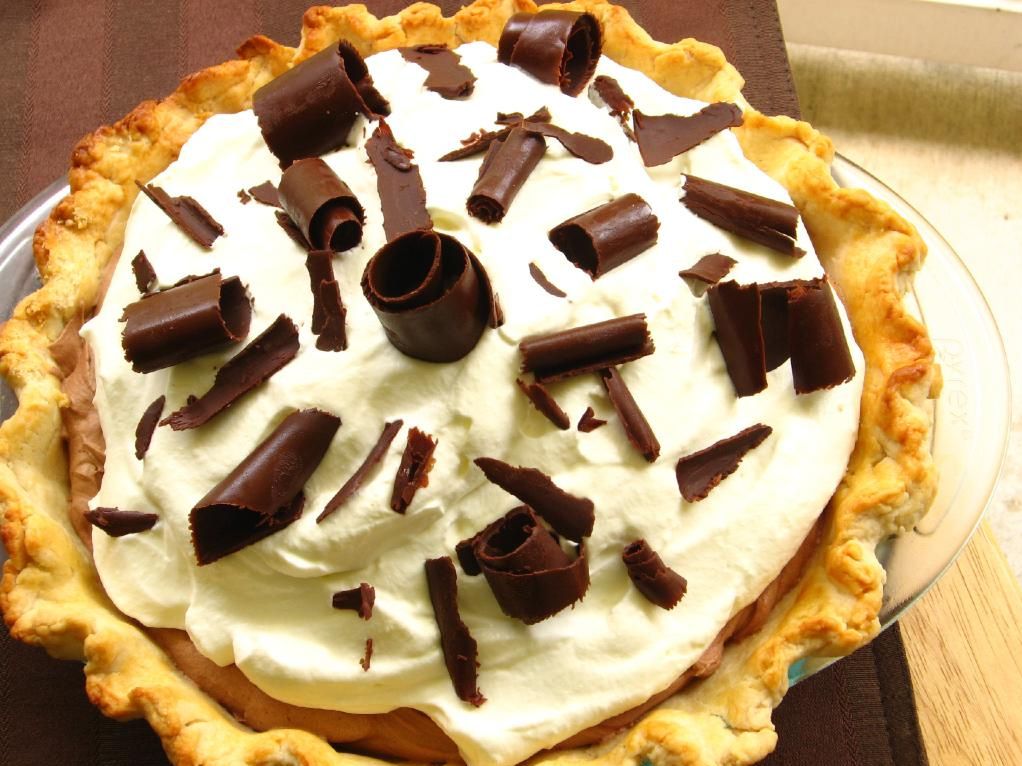
Anyway, despite my stagefright, Ree was charming and interested in each and every one of the hundreds of people who came to see her. I hope she’s enjoying her apron, and I dedicate this big ol’ heaping Chocolate Mousse Pie to her.

Well, okay, I sort of messed that up too. But not too badly.

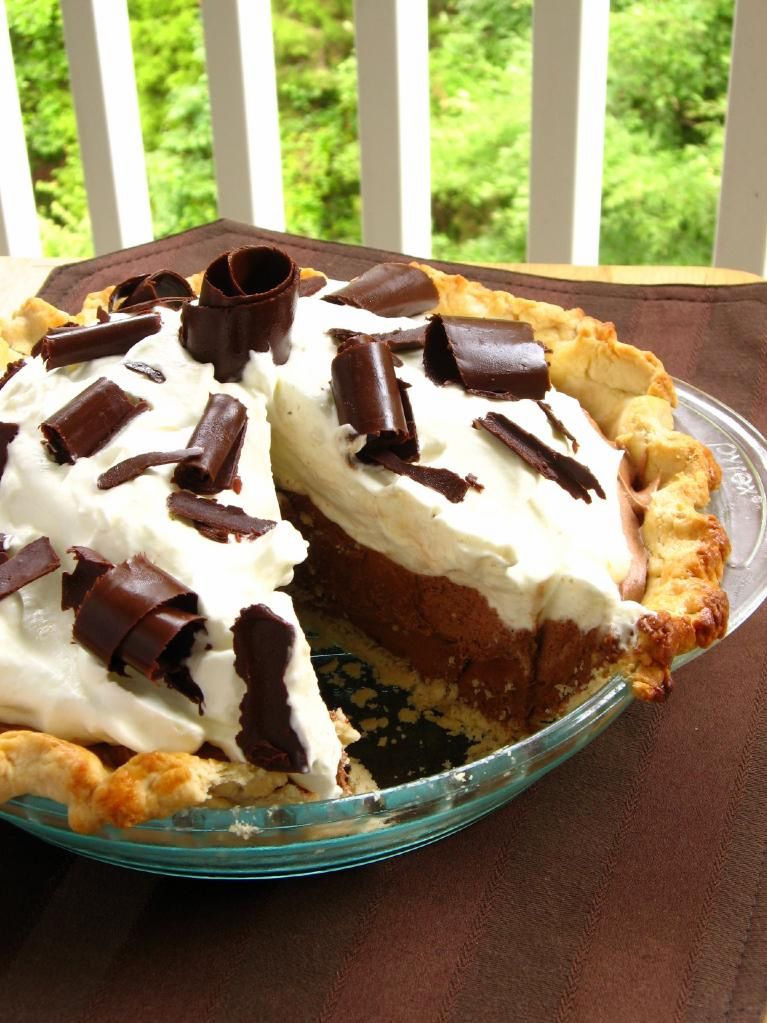
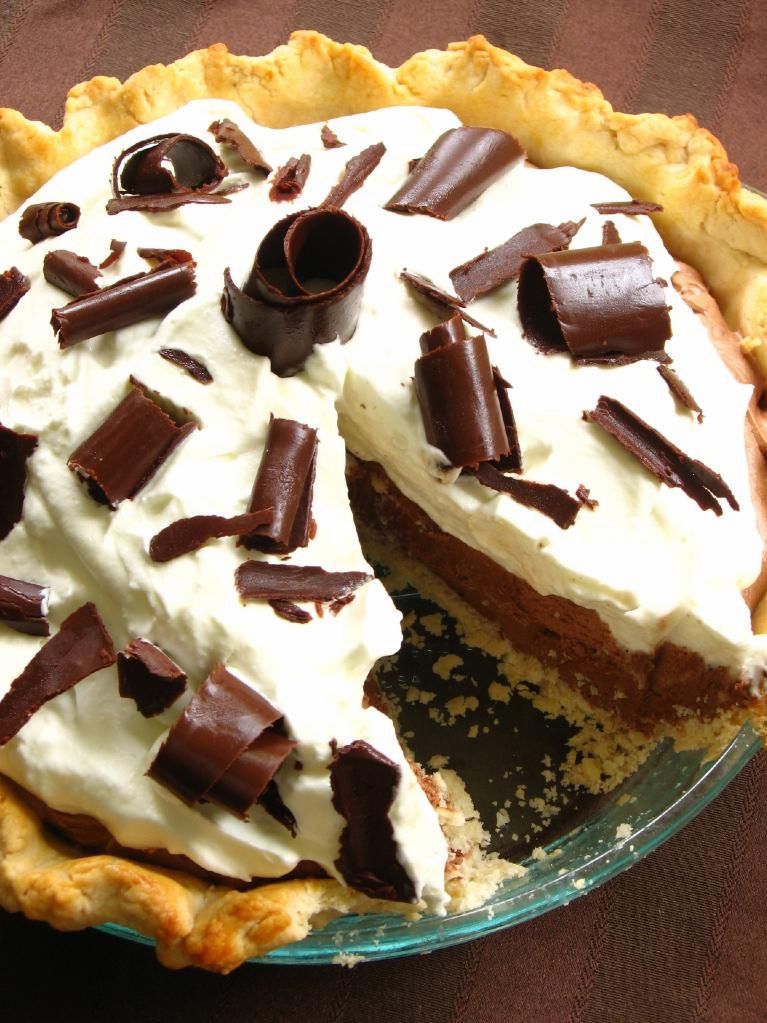
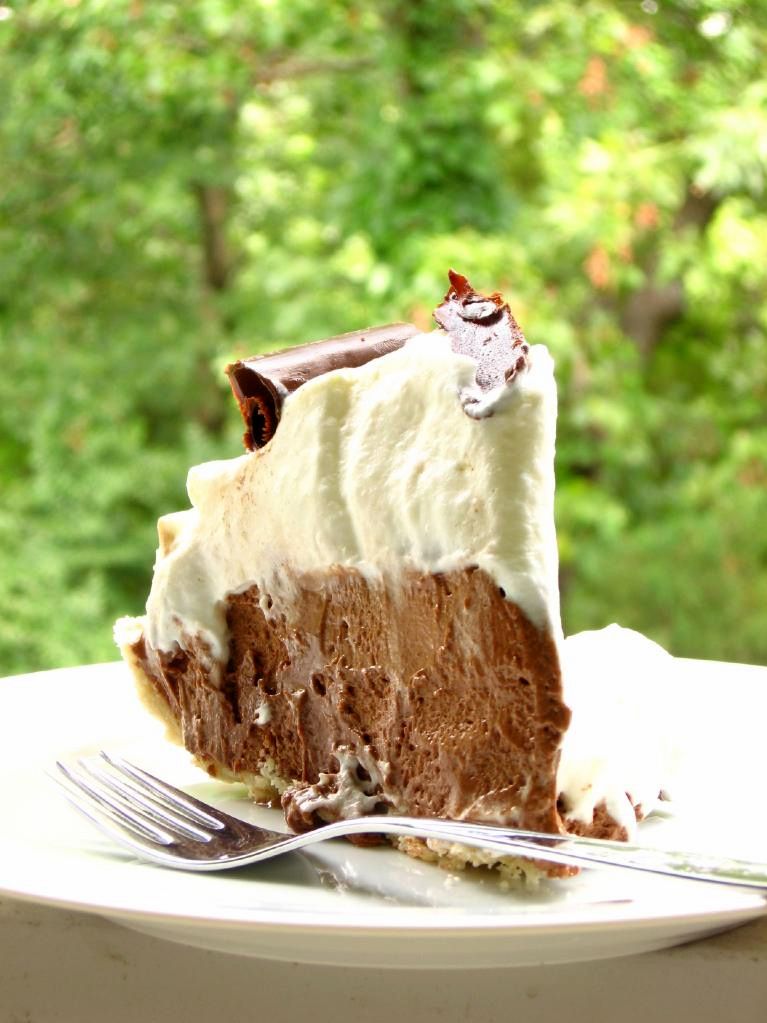
The pie was tasty: a buttery, flaky pie crust embracing a thick mess of pillowy, indulgent chocolate mousse and topped with slightly sweetened, loosely whipped cream and chocolate curls. There aren’t many things that taste better than that crust + chocolate combination, in my opinion. It reminded me of the French Silk pies I used to love at Perkins — anybody out there still have a Perkins in their town? Eat a slice of that French Silk for me, please.

But there was an issue; namely, my mousse was grainy. Two or three other commenters on P-Dub’s site had the same problem, but most obtained smooth mousse. I think it comes down to creaming your butter and sugar. Make sure your butter is room temperature, thoroughly softened, and that you cream the sugar in until it’s really dissolved and fluffy.

Regardless of the slight sugar crunch, the pie was a rich, luxurious treat. My Sunday school class got ahold of it and left an empty pie plate in its place — and if that’s not a good sign, I don’t know what is!

Chocolate Mousse Pie


Recipe by: Adapted from Pioneer Woman, crust by Willow Bird Baking
Yields: one 9-inch pie, serves about 8-9

Chocolate Mousse Ingredients:
4 ounces unsweetened baking chocolate
1 cup salted butter, softened
1-½ cup sugar
1 teaspoon vanilla extract
4 whole eggs (since they will be raw, you may want to use pasteurized eggs, and/or avoid serving this recipe to older or pregnant guests)

Pie Crust Ingredients: (you can use a prepared pie shell if desired)
2 cups flour
1 teaspoons salt
1/4 cup cold lard (non-hydrogenated if available)*
1/2 cup cold butter, chopped
3-4 tablespoons ice cold water
1 egg and 1 teaspoon heavy cream for egg wash
*you can substitute vegetable shortening here if you wish, but I highly recommend the lard!

Whipped Cream Ingredients:
2 cups heavy whipping cream
4 tablespoons confectioners’ sugar
1 teaspoon gelatin
3 tablespoons cold water
1 tablespoon hot water

chocolate curls, if desired, for garnish

Directions:
To make the crust, pulse flour and salt together to combine. Add scoops of lard and pulse into the mixture has the texture of coarse sand, about 10 seconds. Add in chunks of butter and pulse until butter pieces are no larger than small peas, about 10 pulses. Add minimum amount of water and pulse on low. If dough remains crumbly and doesn’t come together, add another tablespoon of water. Add as little as is required to enable the dough to be rolled into a ball. Form the dough into a disk, wrap in plastic, and refrigerate for 20-30.

Preheat oven to 450 degrees F. Roll disk of dough out to around 2 inches larger than your pie plate and transfer it, situating it in the plate. Fold the excess dough around the edges and crimp, trimming where necessary. Cover the dough with parchment paper and fill with pie weights or dried beans, pressing to the edges. Bake for around 20 minutes. Remove weights and paper, egg wash crust, and bake 5-10 minutes more, until golden brown (you won’t be baking it again, so make sure it has good color — shielding edges with foil if they begin getting too dark). Let crust cool completely.

In small microwave safe bowl melt 4 ounces of unsweetened baking chocolate until stirrable (about 45 seconds on high). Set aside to cool.

To make the mousse, in a large bowl with an electric mixer beat 1 cup (2 sticks) of butter (I used unsalted and added a dash of salt) and 1 ½ cups of white sugar until fluffy (about 2 to 4 minutes). NOTE: make sure butter is very soft and at room temperature, and beat until sugar is entirely dissolved, or the chocolate mousse will be grainy. When melted chocolate is cooled, drizzle it over the butter/sugar mixture. Add 1 teaspoon of vanilla extract. Beat the mixture thoroughly until combined (on a Kitchen Aid mixer, you will be using the whisk attachment).

Turn your mixer to a medium speed and over a period of 15 to 20 minutes add in the four eggs, one at a time, leaving about 5 minutes between each egg addition. Once the pie filling is well mixed, pour it into the baked pie shell, scraping every last speck of it out of the bowl. Smooth out the pie filling and place pie in the refrigerator to chill for at least two hours (preferably longer).

To make whipped cream, soften gelatin on 3 tablespoons cold water for about 2 minutes. Add 1 tablespoon hot water and stir to dissolve gelatin. Let cool while you mix other ingredients in a bowl to soft peaks. Add gelatin mixture to whipped cream and fold in gently. Pile whipped cream onto top of pie and refrigerate. Garnish with chocolate curls if desired.

If you liked this post, please:
Subscribe to Willow Bird Baking
Follow Willow Bird Baking on Twitter
Follow Willow Bird Baking on Facebook
Give this post a thumbs up on StumbleUpon


ShareOther ways to share this post with friends!

Croissant Masters!

You may remember my goal to encourage folks to make croissants at home for the first time. What an amazing experience it’s been! As I mentioned before, making croissants was one of my proudest kitchen moments. Well, hearing about others making croissants for the first time because of my post is without a doubt one of my proudest blogging moments.

Seventeen crazy croissanters came, they saw, they baked. And now it’s time to show the first batch of them off. Introducing . . . the first 5 croissant masters!


Hannah: “People demanded that I should try other challenges and I promised to do so if you do another one, since all the tricks etc. you posted helped a lot. I guess otherwise I wouldn’t have thought that I could manage baking them.”


Amy: “I did enough folding to qualify for a management position at the Gap.”


[see more of Amy’s croissants here.]


Kat: “The trick is to use the fridge as a lifeboat. Every time something seems to be heading south, throw it all in the fridge.”


[see more of Kat’s croissants here.]


Emily: “I mean, I made these croissants. From scratch. All by myself. That is an accomplishment…”


[see more of Emily’s croissants here.]


Kirsten: “I’ll definitely be making croissants of some sort again…”


[see more of Kirsten’s croissants here.]


If all of these beautiful croissants produced by bakers just like you — some with experience, some without — make you want to join in the fun, please let me know so I can add you to my list of folks committed to croissant! Stay tuned for the rest of the croissant masters.


If you liked this post, please:
Subscribe to Willow Bird Baking
Follow Willow Bird Baking on Twitter
Follow Willow Bird Baking on Facebook
Give this post a thumbs up on StumbleUpon


ShareOther ways to share this post with friends!

Secret Garden Recipe: Buttermilk Cranberry Scones

This post brought to you courtesy of Mike’s laptop. Who knew blogging while lounging around could be so much fun? My poor little computer chair is singing the “Baby Come Back” song from those Swiffer commercials.

Anyway, onto more important things. There’s been a bit of a turning point in my life recently. I’ve had a revelation regarding scones.

See, before I made these scones for my sister’s surprise garden party, I hadn’t really been interested in scones. From the pictures I’d seen, they just looked like dry, boring biscuits. Sometimes they almost appeared to have a biscotti-like texture — and I’m not a biscotti fan. Why bake all the moisture out of something? Some of you are scone enthusiasts, and you’re feeling smug right now, because you know exactly what I discovered when I took my first bite of a Buttermilk Cranberry Lemon Scone:

SCONES ROCK.

How have I missed out on these for so long?! Blog after blog tried to tell me that scones were actually amazing, but I didn’t believe them! Turns out, scones are not dry — they’re fluffy and soft. Scones are not boring — they’re flaky and heavenly. Scones are not flavorless — they’re bright and buttery! It’s like someone crossed a feather-light biscuit with a freakin’ pie crust, and set it on a plate in front of me with some clotted cream! I know I’m using too many exclamation points! I just can’t! help! it! SCONES!

Let me make this clear. (You’re probably thinking, “The 85th exclamation point clarified enough, thanks,” but humor me.) I had buttery, homemade croissants on my plate next to a Buttermilk Cranberry Scone. Those croissants are one of the best things I’ve ever tasted, but . . . I had a hard time deciding if I preferred them . . . or the scone.

The subtle lemon with that buttery, flaky scone texture made each piping hot biscuit a ball of sunshine. Cranberries provided a slightly tart complement, and a nice variation in texture. I tore into a hot scone, slathered it with mascarpone cheese, and devoured. Eat them with butter, orange marmalade, strawberry jam, or nothing at all. Especially if you’ve been skeptical about scones, you just have to give it a shot!

You can make these scones ahead of time, shape them, and freeze them for quick breakfasts throughout the week. They bake straight from the freezer and are lovely every time. Once I tasted one, I regretted not doubling the recipe, so keep that in mind!

How about you? Are you a smug scone lover that knew all along how amazing they are? Or have you been reluctant to try scones as well?

Buttermilk Cranberry Scones


Recipe by: Adapted slightly from Pinch My Salt
Yields: 8 scones

Ingredients:
2 cups all purpose flour
1/4 cup granulated sugar
1 1/2 teaspoons baking powder
1/4 teaspoon baking soda
1/2 teaspoon salt
1/2 cup cold unsalted butter, cut into small chunks
1/2 cup buttermilk
1 large egg
1/3 cup sweetened dried cranberries
2 teaspoons lemon extract
heavy cream (optional, for brushing tops of scones)

Lemon Glaze Ingredients: (optional)
1/2 cup confectioners’ sugar
2 teaspoons lemon juice

Directions:
1. Preheat oven to 425 degrees.
2. In a medium bowl, whisk or sift together flour, sugar, baking powder, soda and salt. Add butter chunks and toss lightly with flour; place bowl in fridge.
3. In a small bowl, whisk together egg, buttermilk, and lemon extract; place bowl in fridge.
4. Get organized: measure out the cranberries; set aside. Line a baking sheet with parchment or a silpat; set aside. Lightly dust a counter top with flour. Pour a little bit of heavy cream in a bowl and have a pastry brush handy.
5. Remove bowls of flour and buttermilk from fridge. Cut butter into flour with a pastry blender or rub together with your fingertips until it resembles coarse crumbs. Add cranberries and stir to combine.
6. Add buttermilk mixture all at once to flour mixture and stir until the mixture clumps together. Dump mixture out onto floured counter top and, with floured hands, gather into a ball and knead once or twice to combine everything. Pat into a circle about 1/2 inch thick. Cut into 8 slices, like a pie, or cut with biscuit or cookie cutters into whatever shape you prefer. Put scones on lined baking sheet and brush lightly with heavy cream (optional). NOTE: At this point, you can refrigerate the scones for up to a week before baking as directed straight from the fridge. Alternatively, you can freeze the scones on a lined baking sheet until solid and then transfer them to a ziplock bag to store in freezer. Do not thaw, but bake as directed straight from the freezer.
7. Bake in a preheated 425 degree oven for 13-15 minutes until lightly browned. Remove to cooling rack.
8. Once scones are mostly cool, mix ingredients for the glaze. Adjust proportions of sugar and lemon juice for thickness and taste, and then drizzle lightly over each scone.

If you liked this post, please:
Subscribe to Willow Bird Baking
Follow Willow Bird Baking on Twitter
Follow Willow Bird Baking on Facebook
Give this post a thumbs up on StumbleUpon


ShareOther ways to share this post with friends!

Spicy Peach and Cucumber Salsa

Byrd doesn’t know she’s a posh poodle. When her ears are all askew and she’s running through the apartment with a half-decapitated stuffed hedgehog in her mouth, posh is the last thing that comes to mind. She’s a rough and tumble fetchin’ machine, and in case you couldn’t tell, she is finally recovered enough from her knee surgery to play again! We couldn’t be more thrilled.

Though she’s not posh, Byrd does eat posh food of mommy’s choosing. In a roundabout way, I have her to thank for this Spicy Peach and Cucumber Salsa recipe. I was at the local organic grocery store last week picking up a bag of her select kibble when I noticed a bowl of this surprising salsa sitting out to sample. I usually pass up samples, but the unexpected combination of peaches and cucumbers caught my eye, so I took a small nibble.

Suddenly, it was the 4th of July all over again — fireworks in my mouth! Spicy chipotle; refreshing cucumbers; succulent peaches all mingled on a cayenne-pepper laced blue corn chip. There were so many experiences in each bite: tangy, sweet, hot, acidic, cool, juicy. I’d heard of mango salsa, pineapple salsa, but this salsa was a revelation for me. A delicious, tasty, yummy revelation. So much so that I thought about it the whole way home.

The next day after my Jazzercise class (are you still laughing about that?!), I drove back to the organic grocery determined to find the recipe’s creator. And find him I did! Michael works at the grocery and is quite the home chef himself. After spending months in Mexico, he now lives in North Carolina and has his own garden plot replete with tomatoes. He was kind enough to share his recipe, and I scrawled it down on the back of an old grocery list.

My aunt and uncle recently visited from Missouri (hello, Show Me State readers!) and I served them this salsa before a delicious cookout on a balmy day. Mine wasn’t as spectacular as Michael’s, but it was still a success. This is really one of those recipes where you have to add a little, taste a little, add a little more. Fiddle with it until it suits your taste, and then let it sit in the fridge for a half hour or so and meld. I’ll keep practicing until mine is as fantastic as the original!

Also, a note about chips. I tried this salsa on Garden of Eatin’ Red Hot Blues, and I can’t recommend them enough. This is not a sponsored endorsement (though I will accept as many free bags of these chips as they feel like sending me — are you out there, Garden of Eatin’?), just good ol’ fashioned personal opinion. These organic blue corn chips are coated in a fine speckle of cayenne pepper and were the perfect complement to the cool sweetness of the salsa. If you’re not a fan of heat, Garden of Eatin’ also makes a regular blue corn chip that I’m sure is fantastic as well. And everyone likes eating blue chips, right?

I know at first you might have some salsa skepticism — peach and cucumber is definitely an unusual combination — but give this recipe a try. One tiny bite of this salsa inspired a day of obsessive googling and a half-hour drive just to get the recipe. It must be good. And Michael, if you’re reading this, make sure to drop me an email or comment to let me know you saw the post — in true Julie fashion, I’ve lost your email address!

Spicy Peach and Cucumber Salsa


Recipe by: Michael
Yields: 3 cups of salsa

Ingredients:
1-1.5 cups diced, unpeeled cucumber (about 1-2)*
2-2.5 cups diced, peeled, pitted peaches (about 3-4)
1/4-1/2 can of chipotle peppers, diced (depending on your heat tolerance)**
2 tablespoons chopped mint
3 tablespoons lime juice
3 tablespoons peach preserves

Directions:
Mix all ingredients in a bowl. Season salsa to taste with salt. Prepare up to 2 hours ahead, cover, and refrigerate until serving. Stir to blend before serving.

*I recommend doing an even finer dice on your cucumber and peach than I did, for texture’s sake.
**Chipotle chiles come canned in adobo. Make sure to wear gloves while chopping and not to touch your face or eyes.

If you liked this post, please:
Subscribe to Willow Bird Baking
Follow Willow Bird Baking on Twitter
Follow Willow Bird Baking on Facebook
Give this post a thumbs up on StumbleUpon


ShareOther ways to share this post with friends!

Secret Garden Craft: Simple Luncheon Napkins

Part of making a celebration special is the thought behind it. I wanted the Secret Secret Garden Party to be particularly special for my sister, so I decided to incorporate some handmade touches — things that showed thoughtfulness in their detail. There was a problem, though.

I am not crafty.

I love the idea behind crafting and think I could be good at scrapbooking, sewing, quilting, knitting, crocheting, jewelry making — if I had 42 hours in a day instead of 24. But I don’t have any extra time, so I don’t have any experience in the crafting world. My mom regularly encourages me to take up sewing, and I regularly reply that I need another hobby like I need a lobotomy (which, in case you’re wondering, is not at all. Yet.)

So, how do you add a handmade touch to a party without many crafting skills? Presenting simple, low-sew luncheon napkins for the crafting impaired.

While these do take a little bit of time, no sewing machine is required, and you can dress them up or down depending on the effort you want to expend. This quick craft is great for adding a handmade touch to a celebration, creating color-coordinating napkins for your table, or dipping your toes into the cold crafting water. I loved that I could sew on little appliques in contrasting fabric to make a sweet, shabby chic product.

Simple Sweet Luncheon Napkins


Help with this craft: DIY Maven
Yields: 9 luncheon napkins

Supplies needed:
2 yards fabric for napkins
1/4 yard fabric for appliques (optional)
Liquid Stitch or similar product
iron
clear nail polish
ruler
scissors
needle
thread (I used embroidery thread for decorative cross-stitching, and regular thread to stitch around the appliques)

Directions:
1. Cut your napkin fabric into 13″ x 13″ squares.

2. On each square, fold over the right side of the napkin 1/4″ and press well with the iron. Fold the right side over another 1/4″ and press well. Repeat these two folds on the left side.

3. Fold each corner down, forming a small triangle, and press these well.

4. Now fold the top down 1/4″ over the triangle and press well. Fold it over another 1/4″, press well, and then pin. Repeat this with the bottom.


5. Use a simple cross stitch to secure the corners. Sometimes I used just one large X, over times I flanked it with smaller cross-stitching on either side. It’s up to you. You can use embroidery thread or regular thread in a contrasting color for this.


6. Use a cotton swab to evenly apply Liquid Stitch under the top, bottom, left, and right edges, pressing firmly to seal. Now your napkin is complete and ready to embellish, if you wish!

7. Cut out shapes of your choice from contrasting fabric. Use clear nail polish to lightly paint the edges so they won’t fray.

8. Attach your applique with a little liquid stitch to the location of your choice.
9. If desired, use a needle and thread to stitch around the applique to give it a sweet handmade feel.
10. Repeat these steps on all napkins. Let napkins dry overnight. If you liquid stitch the applique well and secure the mitered corners carefully, these will probably be fine being machine washed on gentle. I’m using mine more for decorative purposes.

If you liked this post, please:
Subscribe to Willow Bird Baking
Follow Willow Bird Baking on Twitter
Follow Willow Bird Baking on Facebook
Give this post a thumbs up on StumbleUpon


ShareOther ways to share this post with friends!

1 2