raspberry

Secret Garden Recipe: Sparkling Raspberry Lemonade

Dear Summer,

I know I haven’t always treated you the way you deserve to be treated. There were plenty of days this summer when I slept through the best part of the morning. I only went out for ice cream one time, and that was after nightfall. I didn’t get to the beach or the pool even once. I never accomplished the picnic I’d planned in the mountains.

Listen, Summer, I know that being a teacher makes this even harder to excuse. I, better than anyone else (besides my students, maybe), should know the value of a great summer. I should have played in sprinklers. I should have driven around town with a slushy in one hand (and hopefully the steering wheel in the other). I should have gone on at least a couple of spontaneous road trips. Trust me, I know.

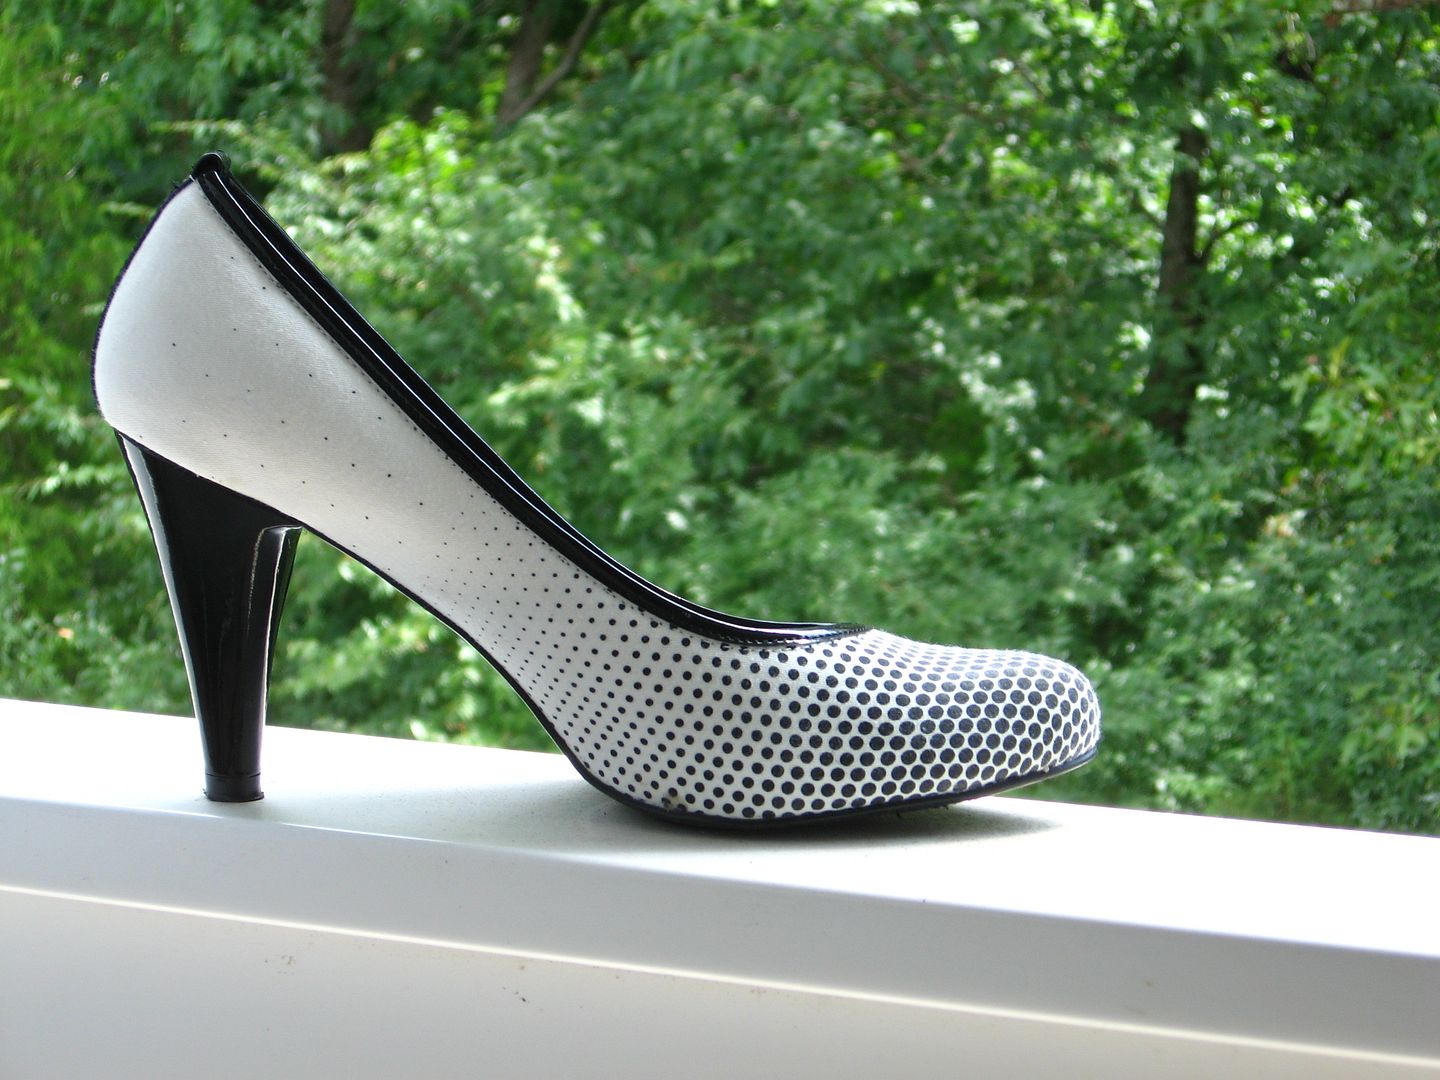
Give me some credit, though, Summer. I did almost exclusively wear a rotation of 3 sundresses all summer long. I stopped wearing clothes with finicky washing/drying directions to facilitate my summer laziness. I stocked up on dollar store flip flops and barely wore a legitimate shoe the entire season — except for that one time I wore my sassy heels. I started watching some of the horrible reality television that I’m embarrassed to talk about. I met my friend Beth for Indian, and just the other day, met my friend Andrea for sushi.

I filled up my hummingbird feeder! Not with raspberry lemonade, true, but I think the hummingbirds were plenty happy with sugar-water.


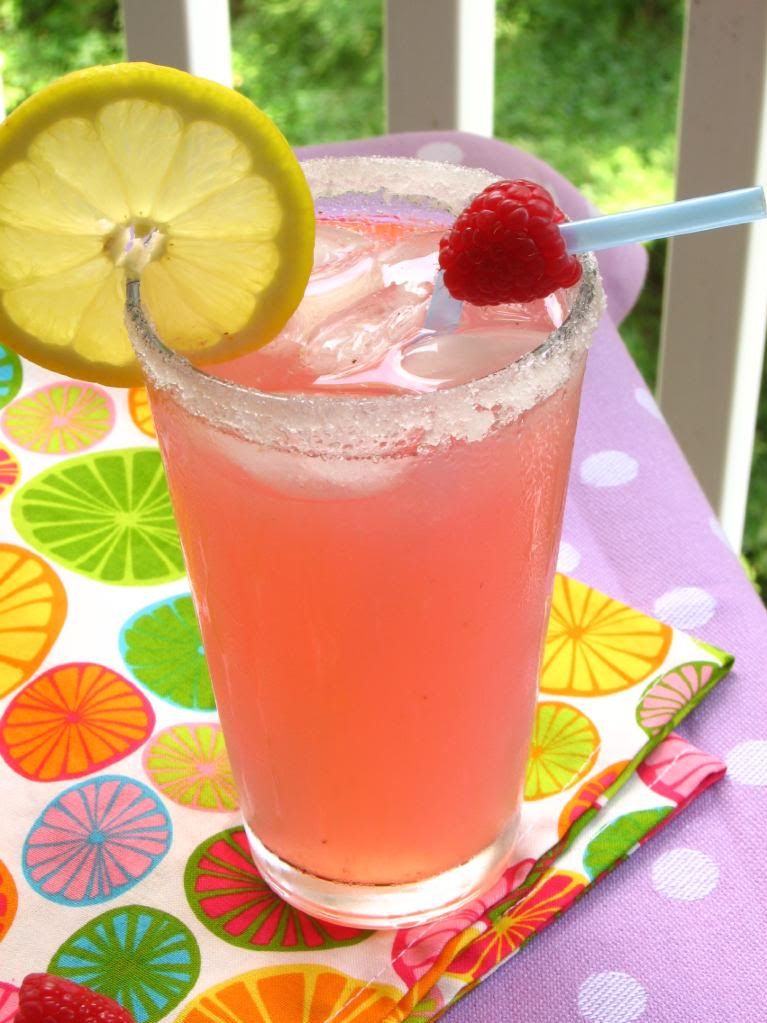
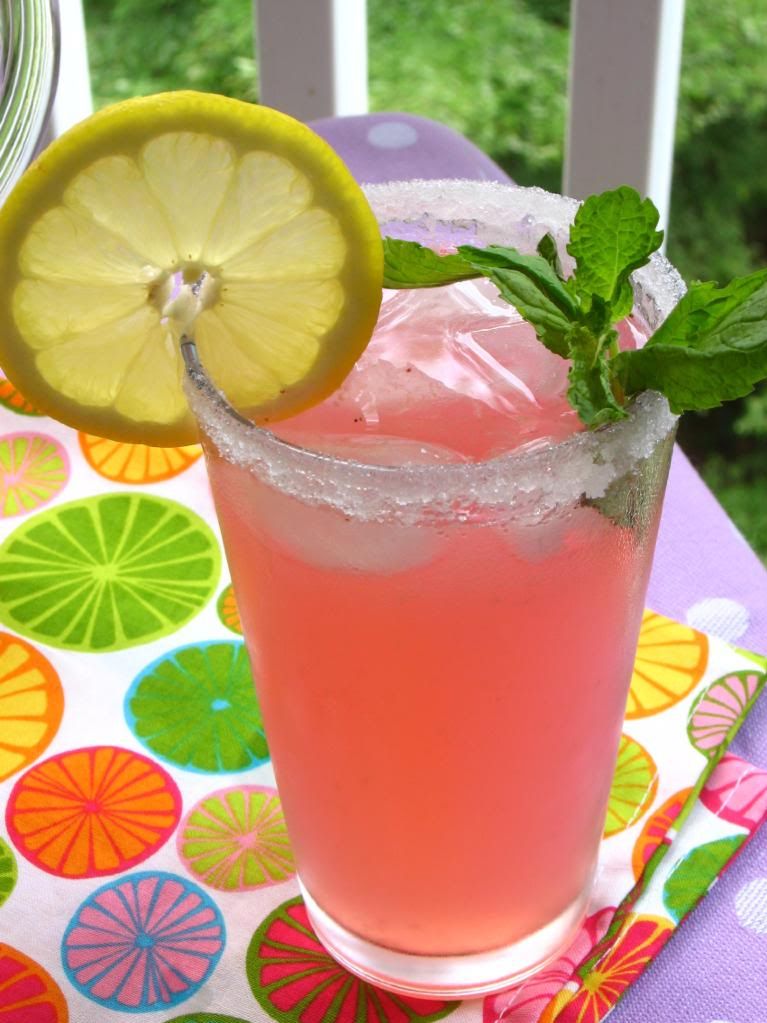
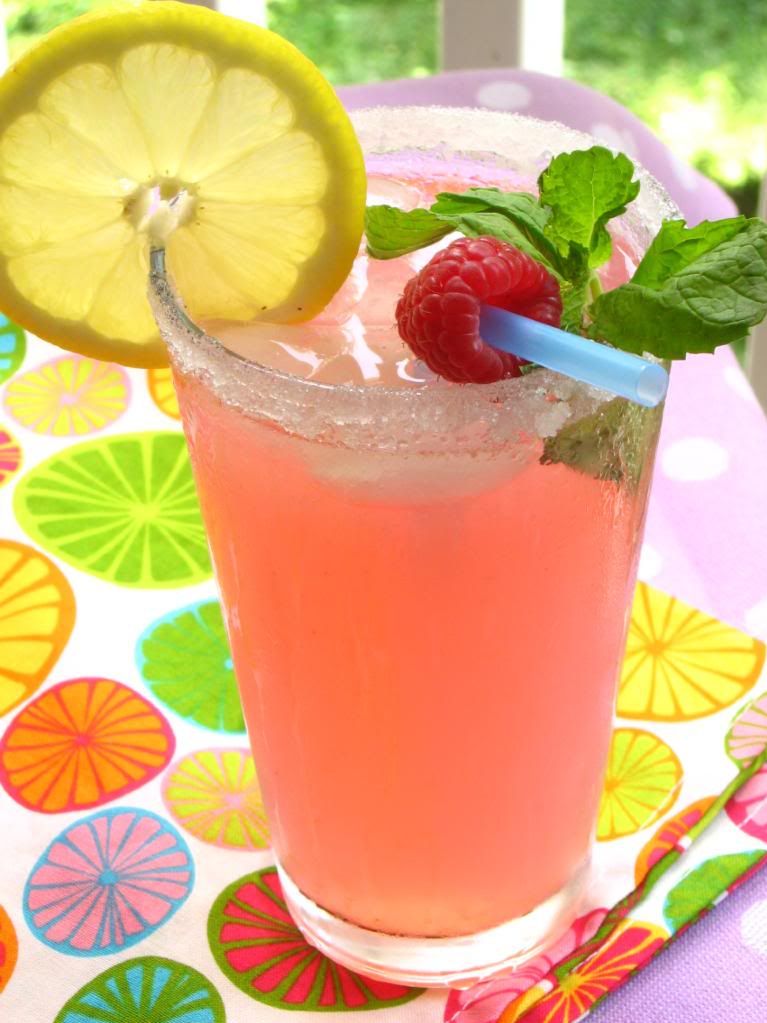
Changing up garnishes!

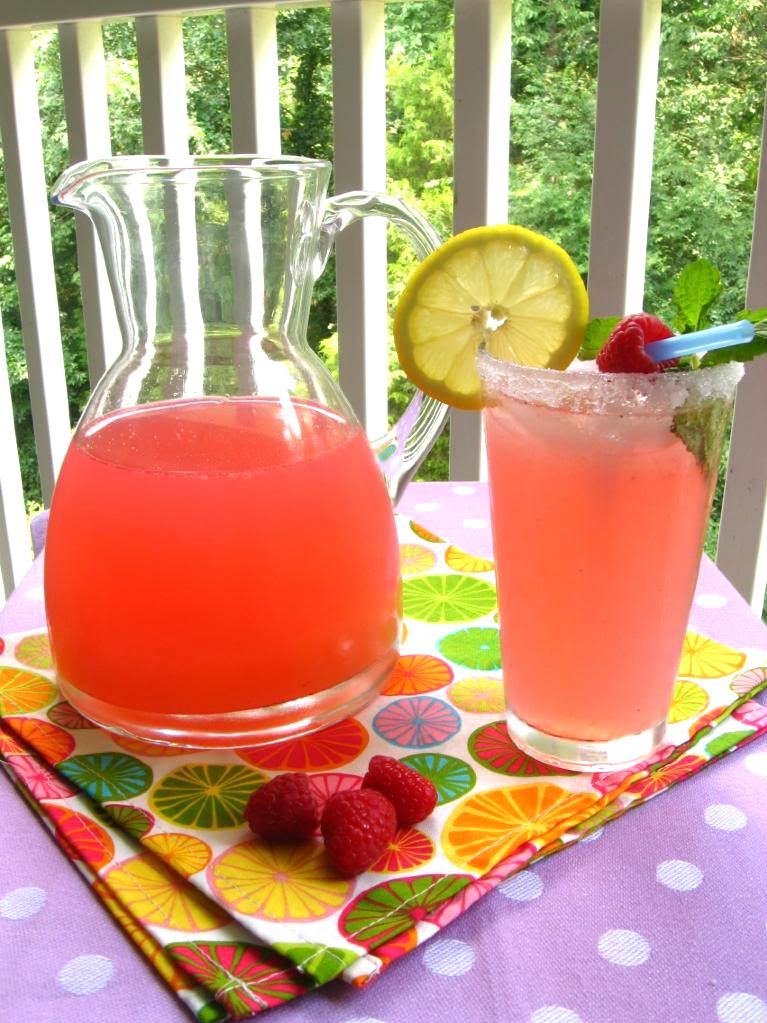
And I didn’t just flit around, either — I also used you, precious Summer, to be productive in ways I love. I planned a Secret Garden surprise party for my sister, for which I made this gorgeous lemonade. I blogged and blogged and blogged. I wrote the syllabus for the new cooking classes I’m teaching this fall. I diligently kept up with Top Chef.

Wait, watching Top Chef counts as productive, right?


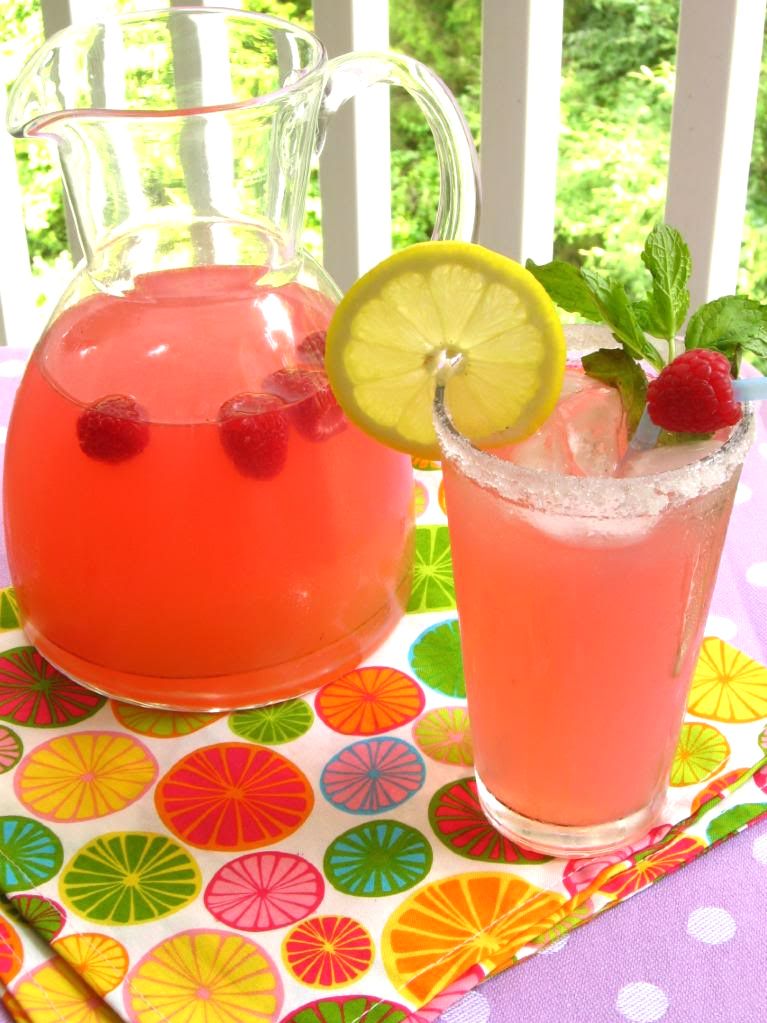
Aw, a few raspberries in the pitcher look so nice. Maybe I should have added a lemon slice or two, too?

Summer, even though I’ve made some mistakes, it’s obvious that I care about you. I’m begging you, pleading with you — stay just a little longer. I’ll make amends; I’ll make sparkling raspberry lemonade. I’ll sit on the balcony with little Byrd, sippin’ this tart, fruity, sweet summertime beverage, just like I’m supposed to. Pretty please?

Love,
Julie

Sparkling Raspberry Lemonade


Recipe by: Adapted from Sunset
Yields: about 5 1/2 cups of lemonade

Ingredients:
1 1/2 cup raspberries, washed and patted dry
2/3 cup sugar
1 cup lemon juice
1 1/2 cup sparkling water
2 1/2 cups water*

Directions:
Mash raspberries with sugar in a small bowl and let stand for 10 minutes. Press this mixture through a fine mesh strainer into a pitcher and discard the seeds. Add lemon juice, sparkling water, and water, stirring to combine. Taste and add more sugar if desired. Dip each serving glass’s rim into lemon juice and then into sugar. Serve lemonade in these glasses with ice, and garnish with raspberries, mint, pretty straws, lemon slices, etc. as desired.

*NOTE: I am so lame. I fiddled with the original amount of liquid in the recipe and of course didn’t write down the changes I made. This is my best guess as to how much water and sparkling water I added, based on memory, but you can always fiddle with the ratio of ingredients after tasting.

And, because I would be frustrated if someone mentioned their sassy heels on a blog without showing me a picture:

If you liked this post, please:
Subscribe to Willow Bird Baking
Follow Willow Bird Baking on Twitter
Follow Willow Bird Baking on Facebook
Give this post a thumbs up on StumbleUpon


ShareOther ways to share this post with friends!

Lemon Raspberry Cake

Willow Bird Baking is the namesake of my darling little noodle (read: poodle), Byrd. As I sit here writing this post (and listening to the cooing of mourning doves outside my window), she is at the veterinary hospital recovering from a double knee surgery. Judging by her exuberance about riding in the car yesterday morning, she wasn’t really expecting it.

Apparently both her little kneecaps were popping out of place, and she couldn’t do some of her favorite things (fetching, jumping) without limping. Poor puppy pumpkin. The vet tech just called and said she is standing, but won’t try to walk, and won’t eat a thing. No wonder, since she’s in a strange place without her mama. We go pick her up at 12:30 today, so keep us in your prayers.


Get it? It’s decorated to look like a lemon.

Because of this unexpected $2,400 surgery, my finances have not been my friends lately. I’ve been cutting back: we haven’t been eating out, I’ve been trimming my grocery budget, and the last time I got my hair cut or colored was last August — I’m about ready to pick up some scissors myself. In addition to limiting my spending, another issue needed to be addressed: waste!

I’ve been a bad steward of my kitchen for too long. Buying a bag of cheese with the best intentions, but letting it mold. Buying a bag of fresh herbs, using them once, and letting them brown in the back of my fridge. Buying expensive ingredients (hello, pancetta, I’m talking to you) with the intention of using every last hunk, only to open my fridge drawer a month later and guiltily remember that broken resolution.

So, I’ve been trying to be better. Leftover creams, frostings, and doughs from one pastry become the basis for the next. I survey the fridge for unused ingredients before deciding what to make for Saturday dinner. It’s not perfect, but it’s better than it was!

This past weekend, leftover raspberry curd, nine egg whites left from making the curds, and some extra lemons provided my inspiration.

After buying only some butter, some fresh raspberries, and some white chocolate bark, I whipped up this cool, bright, summer dessert: Lemon Raspberry Cake. The cake itself is my favorite white cake recipe because it’s moist with the perfect crumb. Each layer is brushed with lemon syrup for moisture and tang before being coated in a luxurious raspberry curd. The frosting is rich and decadent, and even the white chocolate decorations added a nice dimension to the overall flavor of each slice.

My “lemon” decoration broke as I was trying to release it from the wax paper I piped it on, so I pieced it together on top of the cake. It’s a little crooked! I’m sure you can do better. I also completely forgot the poppy seed until I made the third cake layer (I mixed it separately), so you’ll notice that only my middle layer has the seeds. Oh well! Crooked citrus or not, seeds or not, we all loved the refreshing taste of this layer cake! Happy eating!

Lemon Raspberry Cake


Recipe by: compiled from adaptations of The Way the Cookie Crumbles (white cake), Notes from my Food Diary (frosting and raspberry curd), Bon Appétit (lemon syrup)
Yields: 12 servings

Cake Ingredients:
3 3/8 cups cake flour, plus more for dusting the pans
1 1/2 cups + 3 tablespoons whole milk, at room temperature
9 large egg whites, at room temperature
3 teaspoons almond extract
1 1/2 teaspoons vanilla extract
2 1/4 cups + 3 tablespoons granulated sugar
6 teaspoons baking powder
1 1/2 teaspoons table salt
18 tablespoons unsalted butter (2 sticks and 2 tablespoons), softened but still cool
1 1/2 tablespoons poppy seed (optional)

Lemon Syrup Ingredients:
1/2 cup sugar
1/2 cup boiling water
1/4 cup fresh lemon juice

Raspberry Curd Filling Ingredients:
1/2 cup (1 stick) unsalted butter
Two 1/2-pints ripe raspberries or one 12-ounce package frozen raspberries, thawed
5 large egg yolks, lightly beaten
3/4 cup sugar
Pinch of salt
2 to 3 teaspoons fresh lemon juice

Lemon Buttercream Frosting Ingredients:
1 cup (2 sticks) unsalted butter, at room temperature
2 tablespoons finely grated lemon zest (I opted for a teaspoon or two of lemon extract instead)
3 cups sifted confectioners’ sugar
3 tablespoons fresh lemon juice

Directions: Make raspberry curd: Melt the butter in a large saucepan over medium heat. Add the raspberries, egg yolks, sugar, and salt and cook, mashing the berries and stirring frequently at first and them constantly at the end, until thickened, about 10 minutes (this took longer for me — about 15+). Pour this mixture through a coarse strainer, pressing to get out the maximum amount of liquid. Add in lemon juice to taste. Allow this to cool and then cover (with plastic wrap touching surface of curd to prevent skin from forming) and refrigerate until ready to use.

For the Cake: Set oven rack in middle position. (If oven is too small to cook both layers on a single rack, set racks in upper-middle and lower-middle positions.) Heat oven to 350 degrees. Spray three 9-inch round cake pans with nonstick cooking spray; line the bottoms with parchment or waxed paper rounds. Spray the paper rounds, dust the pans with flour, and invert pans and rap sharply to remove excess flour. (I brush my pans with Wilton’s cake release, then add the parchment circle and brush again. Be sure the parchment circles reach to the edges of your pan to ensure easily release).

Pour milk, egg whites, and extracts into 2-cup glass measure, and mix with fork until blended.

Mix cake flour, sugar, baking powder, poppy seed, and salt in bowl of electric mixer at slow speed. Add butter; continue beating at slow speed until mixture resembles moist crumbs, with no powdery streaks remaining.

Add all but ½ cup of milk mixture to crumbs and beat at medium speed (or high speed if using handheld mixer) for 1½ minutes. Add remaining ½ cup of milk mixture and beat 30 seconds more. Stop mixer and scrape sides of bowl. Return mixer to medium (or high) speed and beat 20 seconds longer.

Divide batter evenly between prepared cake pans; using rubber spatula, spread batter to pan walls and smooth tops. Arrange pans at least 3 inches from the oven walls and 3 inches apart. (If oven is small, place pans on separate racks in staggered fashion to allow for air circulation.) Bake until thin skewer or toothpick inserted in the center comes out clean, 23 to 25 minutes.

Let cakes rest in pans for 3 minutes. Loosen from sides of pans with a knife, if necessary, and invert onto wire racks. Reinvert onto additional wire racks. Let cool completely, about 1½ hours.

Make lemon syrup: Place sugar in small metal bowl. Add 1/2 cup boiling water; stir to dissolve sugar. Stir in lemon juice.

Make frosting: Beat the butter and zest with an electric mixer on medium speed in a medium bowl until light and fluffy. Gradually add the sugar and beat until light and fluffy. Add the lemon juice and beat for 1 minute longer.

Assemble the cake: I love Smitten Kitchen’s Layer Cake Tips — especially the one about freezing your layers before working with them. It makes it so much easier.

When cakes are completely cool, level each layer using a long, serrated knife. Use a little frosting to attach your bottom layer to a cake board or serving platter. Brush layer generously with lemon syrup. Spread a scant 1/2 cup raspberry curd on the layer (I may have used a little more). Continue building the layers this way, with syrup and curd, until all three layers are stacked. Frost with lemon buttercream frosting. I used white chocolate to create decorations for the sides and top of my cake. Cut into wedges and serve with fresh raspberries. Store in refrigerator.


Enjoy!


Share Share this post with friends!

Lemon Madeleines with Mango and Raspberry Curd — and a chance to win a mixer!

What does summer taste like?

I know what summer looks like. It looks like trees weighed down with heavy cascades of leaves, thunderheads gathering solemnly in evening heat, steam rising off pavement. Summer sounds like the persistent hum of cicadas, wind rushing through the woods behind my apartment. Summer smells like jasmine, gardenias, and bushels and bushels of honeysuckle. Summer feels like bearing the burden of the sun, carrying its winter secrets on new summer skin . . .

But what does summer taste like? I think it must taste like mango curd, tropical and cool and sweet on your tongue. And of course, it tastes like lemon: fresh and bright. Don’t forget ripe, lush berries, and oh, maybe some freshly whipped cream piled high on top.

The folks at beso.com want to know what you think summer tastes like, and it’s worth a KitchenAid mixer to them! They’re currently holding a Baking Up Summer Sweets contest in which you can tell them about your favorite summer recipe for a chance to win.

Given my own summer tastes, I’m entering beso.com’s contest with a recipe that’s mangoy, lemony, berry-y, creamy . . . full of summer goodness. And since I recently won a mini-madeleine pan from Shortbread NYC, of course it had to involve madeleines! Hence, lemon madeleines with mango and raspberry curd were born.

These lemony bites are the perfect summer treat. I served them with fresh, sliced strawberries. They were light, bright, and so tiny — perfect for sitting on a warm patio in the evening and nibbling one-by-one. Also, I don’t know about you, but I’m a dipper. I love dipping sauces and creams. Dipping each of these golden hunks into various curds and cream was not only delicious, but a fun experience too! Just a note about the texture of the madeleines, though: these were a bit cakey and only had a slight outer shell just after baking, which may displease die-hard madeleine lovers. I’m not sure if it was my silicone pan or the recipe. Nevertheless, I enjoyed the texture.

Speaking of KitchenAid mixers, you will never believe what I got for my birthday. My family all chipped in and bought me the most gorgeous silver professional KitchenAid stand mixer in the world! Bowl-lift, 5 quart bowl, and it came complete with a complimentary KitchenAid timer, four prep bowls, and a free attachment. To say I was shocked would be an understatement. Summer in this house is gonna sound like a whole lotta mixin’ this year! So what would I do with that pretty mixer beso.com is giving away, were I to win? My mama’s mixer is looking a little beat up, so I’m thinking it would be a good belated Mothers’ Day gift. Here’s hoping!

Mix up your own summer treat and enter to win, but don’t forget to mix up some of these madeleines as well! Make mango curd, raspberry curd, or both! You’ll love every summery bite.

Lemon Madeleines with Mango and Raspberry Curd


Recipe by: adapted from Joy of Baking (madeleines), Smitten Kitchen (mango curd), and notes from my food diary(raspberry curd)
Yields: about 80-90 bite-sized mini madeleines, maybe 25 regular size

Madeleine Ingredients:
1/2 cup (113 grams) unsalted butter, melted
1 cup (130 grams) all-purpose flour
1/2 teaspoon baking powder
1/8 teaspoon salt
3 large eggs, at room temperature
2/3 cup (133 grams) granulated white sugar
1/2 teaspoon pure vanilla extract
1/2 teaspoon lemon extract

Mango Curd Ingredients:
1 15-ounce ripe mango, peeled, pitted, cut into 1/2-inch pieces
1/3 – 1/2 cup sugar (depending on your preference for tart vs. sweet)
3 tablespoons fresh lime or lemon juice (lime comes out tangier)
Pinch of salt
4 large egg yolks
1/4 cup (1/2 stick) unsalted butter, cut into small pieces

Raspberry Curd Ingredients:
1/2 cup (1 stick) unsalted butter
Two 1/2-pints ripe raspberries or one 12-ounce package frozen raspberries, thawed
5 large egg yolks, lightly beaten
3/4 cup sugar
Pinch of salt
2 to 3 teaspoons fresh lemon juice

Whipped Cream Ingredients:
2 cups heavy whipping cream
3 tablespoons confectioners’ sugar

Directions:
Make madeleine batter: First, melt the butter and allow it to cool while you make the batter. In a small bowl place the flour, baking powder and salt and whisk until well blended.

In the bowl of your electric mixer, beat the eggs and sugar at medium-high speed until the mixture has tripled in volume and forms a thick ribbon when the beaters are lifted (about 5 minutes).  Add the vanilla and lemon extracts and beat to combine.

Sift a small amount of flour over the egg mixture and, using a large rubber spatula, fold the flour mixture into the beaten eggs to lighten it.  Sift the rest of the flour over the egg mixture and fold in being sure not to overmix or the batter will deflate. 

Whisk a small amount of the egg mixture into the melted butter to lighten it.  Then fold in the cooled melted butter in three additions.  Cover and refrigerate for at least 30 minutes, or several hours, until slightly firm.

While batter is refrigerating, make mango curd: Puree mango, sugar, lime/lemon juice and salt in processor, scraping down sides of work bowl occasionally. Add yolks; puree 15 seconds longer. Strain through sieve set over large metal bowl, pressing on solids with back of spatula to release as much puree as possible. Discard solids in sieve.

Set metal bowl over saucepan of simmering water (do not allow bottom of bowl to touch water); whisk puree until thickened and thermometer registers 170°F., about 10 minutes. Remove from over water. Whisk in butter 1 piece at a time. Cover with plastic wrap (directly on the curd to prevent a skin from forming) and refrigerate for several hours. Note: Freeze excess for up to two months.

Make raspberry curd: Melt the butter in a large saucepan over medium heat. Add the raspberries, egg yolks, sugar, and salt and cook, mashing the berries and stirring frequently at first and them constantly at the end, until thickened, about 10 minutes (this took longer for me — about 15+).

Pour the mixture through a coarse strainer set over a bowl, pressing hard on the solids to extract as much liquid as possible. Cool to room temperature; the curd will continue to thicken as it cools. Stir in lemon juice to taste. Refrigerate. Note: freeze excess for up to 1 month.

To bake madeleines, position a rack in the center of the oven and preheat to 375 degrees F (190 degrees C).  Generously butter two 12-mold madeleine pans.  Dust the molds with flour and tap out the excess.  Alternatively, use Bakers Joy to coat pans. (Make sure the pans are well greased or the madeleines will stick and be hard to remove.)

Drop a generous tablespoonful of the batter into the center of each prepared mold, leaving the batter mounded in the center.  (This will result in the classic “humped” appearance of the madeleines.)

Bake the madeleines for 11 to 13 minutes, until the edges are golden brown and the centers spring back when lightly touched.  Note: If you make miniature madeleines, reduce the baking time to about 7-9 minutes. Do not overbake these cookies or they will be dry.

Remove the pans from the oven and rap each pan sharply against a countertop to release the madeleines.  Transfer the madeleines, smooth sides down, to wire racks to cool.  While they cool, make whipped cream by mixing cream and sugar together until they reach loose whipped cream consistency. Serve madeleines with curds and cream the same day for best taste, or store them in an airtight container at room temperature for 2 to 3 days or frozen, well wrapped, for up to 1 month.


Enjoy!

P.S. – Wondering about that refreshing-looking pitcher of sparkling strawberry lemonade? That summer recipe is coming up soon!

P.S. 2 – My roommate texted me today from her visit to her home state of New York. It snowed there today. Yikes! Buffalo, summer is coming soon, just hang on!


Share Share this post with friends!

Raspberry Almond Braid

20 things I love about SPRING BREAK:

1. Wearing sundresses and new dollar store flip-flops.

2. Playing with a dollar store Frisbee in the parking lot with Mike (and realizing that we are truly terrible at Frisbee).

3. Mike’s family’s Easter egg hunt. I ended up with polleny toes and a scraped up arm — but it was worth it. I found 6 eggs! Who says this stuff is just for kids?

4. Playing fetch with Byrd, who has been following me around with her pink rubber bone in her mouth.

5. Running through soft grass barefoot.

6. Witnessing an all-out wasp vs. bees war on my balcony. The gigantic humble bees are bouncing around the new nest the wasps are building, causing an uproar. All of this goes on overhead while I try to focus on photographing my food!

7. Reading books with wet hair after an evening shower.

8. Watching marathons of Undercover Boss online and bawling the entire time. I can’t help it! I’m a softie. Thanks Heidi and Shannon for recommending the show to me!

9. Reminiscing about April Fool’s Day. My 6th grade students received a fake test that they diligently tried to complete with sad looks on their little faces until I finally revealed my trickery (sample question: “What happened on page 148 of the novel?”). The 7th graders were redirected from room to room via signs before finally arriving and being “chewed out” for being late — I’m a good actor when I need to be! They got me pretty good, too: a fake cup of hot chocolate “spilled” all over my desk.

10. Photographing food outside in WARM, SUNNY weather. Such a difference from shivering on my balcony, fiddling with my tripod with numb fingers!

11. Leaving my hair down and letting it swing around my shoulders. Or tying my hair up in pigtails and feeling only a little silly.

12. Eating delicious Indian food before coming home and devouring cheesecake squares.

13. Getting the BEST parking spot outside my apartment building, because everyone else is at work! Mwahaha!

14. Sitting at my desk with the windows thrown open beside me, birds singing, squirrels nesting in the trees, and the occasional lawnmower revving in the distance.

15. Waking up, eating breakfast . . . and then taking a nap.

16. Planning Mike’s BIRTHDAY DINNER and DESSERT for this upcoming weekend! And actually having the time and energy to make it fancy!

17. The spring part.

18. The break part.

19. Everything . . .

20. . . . including this Raspberry Almond Braid.

This Raspberry Almond Braid is a tender, flaky, almond-flavored pastry enveloping rich raspberry preserves and topped with a sweet glaze. I was hunting for something simple and comforting to take to the ladies in my Bible study and decided a raspberry cream cheese coffee cake would be perfect . . . only I couldn’t settle on any of the recipes I found. Some were too heavy and cakey; some involved yeasted dough, which felt too finicky for me today. So when I found this braid — made with a quick cream cheese dough — I was sold.

The cream cheese dough was lovely to work with in that it didn’t stick to my rolling pin or the sheets of wax paper I rolled it out between. It actually felt a lot like the crescent roll dough you can buy in stores, so I’m sure you could whip this braid up with one of those cans — but this tasted a ton better! It was almondy and had an almost creamy flavor. The entire dessert was subtly sweet, rich, satisfying, and created in less than an hour.

And you know what I love the most about this braid? In addition to being easy, fast, and delicious, it’s so pretty! Don’t you love simple recipes that look fancy? Make this Raspberry Almond Braid for a quick breakfast one morning this spring, or for a light dessert. I’ll definitely be rounding up my favorite flavors of preserves to make this again!

Raspberry Almond Braid


Recipe by: Adapted from Luna Cafe
Yields: 10-12 1-in. slivers of braid, or about 4 servings

Dough and Filling Ingredients:
2 cups all-purpose flour, sifted
1 teaspoon baking powder
1/2 teaspoon salt
1/2 cup unsalted butter
3 ounces best quality cream cheese
1/2 cup milk, minus 1/2 teaspoon
1/2 teaspoon almond extract
1/2 cup raspberry preserves (or your favorite preserves)

Icing Ingrdients:
1/2 cup powdered sugar
1 tablespoon milk
1/8 teaspoon vanilla
1/8 teaspoon almond extract
2 tablespoons toasted sliced almonds (optional)

Directions:
NOTE: To prepare this braid in advance, complete all steps and assemble the braid but do not bake. Cover the braid on its parchment lined baking sheet with plastic wrap and refrigerate overnight. Set out in the morning as you preheat the oven and then bake as usual.

Preheat oven to 425 degrees F. In the bowl of a food processor, mix the flour, baking powder, and salt. Add the cream cheese and butter into the flour mixture and pulse to cut the fat into the flour (about 6 pulses). Add the milk and almond extract and blend into a loose dough.

Turn the dough onto a floured surface and knead VERY LIGHTLY for 4-5 strokes. (NOTE: This is the step at which you can ruin the braid. If you overwork the dough, the pastry will be tough. Just gather the dough together and don’t worry about making it smooth. It will still look a little rough. That’s perfect.)

Between two sheets of waxed paper, roll the dough to an 8- by 12-inch rectangle. Turn dough out onto a lightly greased baking sheet and remove the waxed paper. Measure and mark the dough lengthwise into thirds. Spread preserves down the middle third of the dough, keeping it about ½ inch from the mark on both sides.

Make 2¾-inch slight diagonal cuts at 1-inch intervals on each the long sides. Do not cut into the center jam-filled area. Fold strips, first one from one side and then one from the other side in a rotating fashion, over the filling. It will now resemble a braid. Bake in a 425° oven for 12-15 minutes, until the dough is cooked through and the top is lightly browned.

In a small glass measuring cup with a pouring spout, combine the sugar, milk, vanilla, and almond extract. Drizzle over the top of the braid. If desired, sprinkle on the toasted sliced almonds while the icing is still wet. Serve warm.


Enjoy!


Share Share this post with friends!

3.14159265358979323846…

Happy Pi Day! My math geek boyfriend had never heard of it, so go figure.

Here are my favorite pie recipes (and okay, some tarts for good measure). Whether you’re a math nerd or just want another excuse to eat pie, you have my blessing.


Fresh Blueberry Pie


Red Berry Pie


Mini-Pies! Pumpkin, Sour Cream Apple, Peach Crisp


Raspberry Cream Cheese Tart


Chocolate Tart


Peach Crisp Pie

Apparently there’s also a Pie — er, I mean Pi — Approximation Day in July?! Score!


Share Share this post with friends!

1 4 5 6 7 8