Because of YOU, Willow Bird Baking is one of only 24 blogs in Project Food Blog Round 8! I am so beyond grateful for your support and love throughout this process. Challenge #8 was to create a baked good using pumpkin.
VOTING IS NOW OPEN!(Thank you for voting! Voting is now closed.) I’d love it if you’d pop over to cast a vote for me by clicking “Vote for this Entry” here. Thank you all!!
I am basically an architect. I know some folks who worked through countless hours of pesky schoolwork to call themselves architects and may disagree with me. But I think I have enough experience to go ahead and claim the title.
See, in 6th grade, my classmates and I were divided into teams and charged with a task of monumental proportions. We were to engineer a bridge out of toothpicks, string, and glue. Each of these “resources” was assigned a cost, and we were given a budget of imaginary money with which to purchase supplies. The team whose bridge could hold the most weight at the end of the competition would win epic bragging rights.

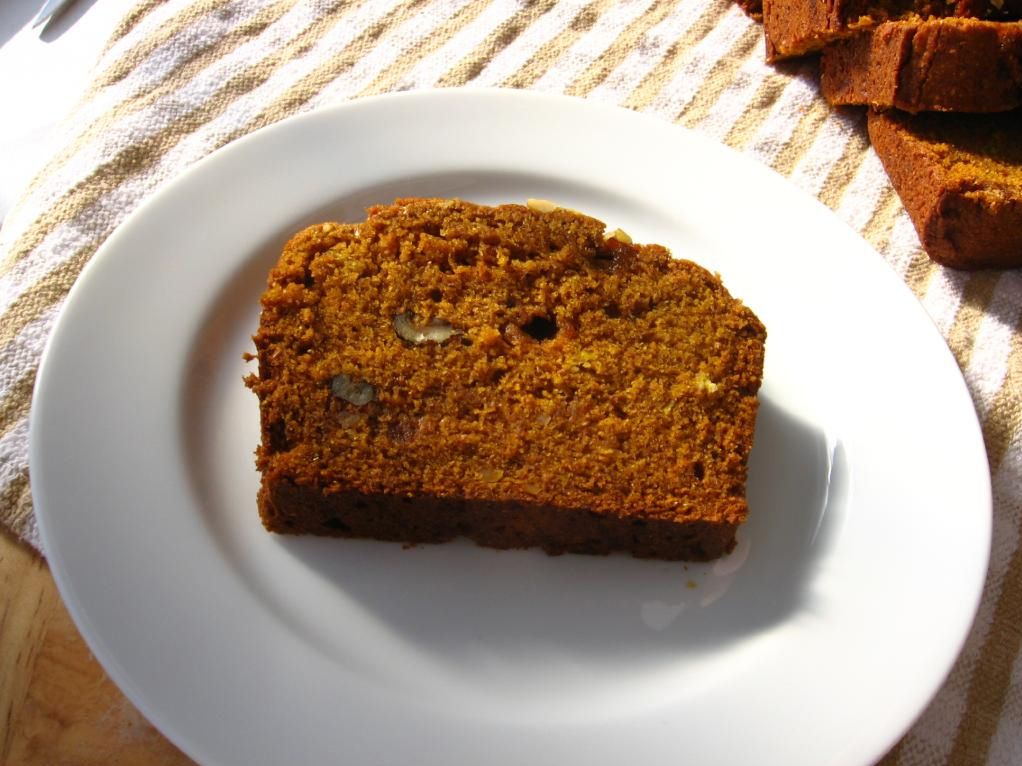
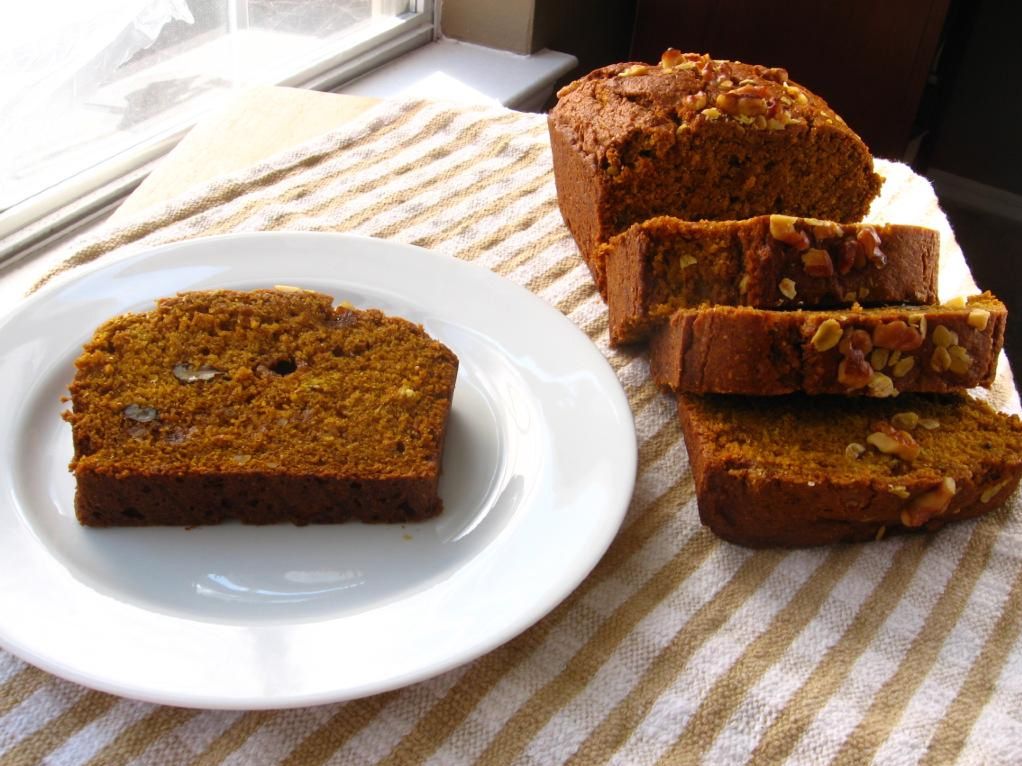
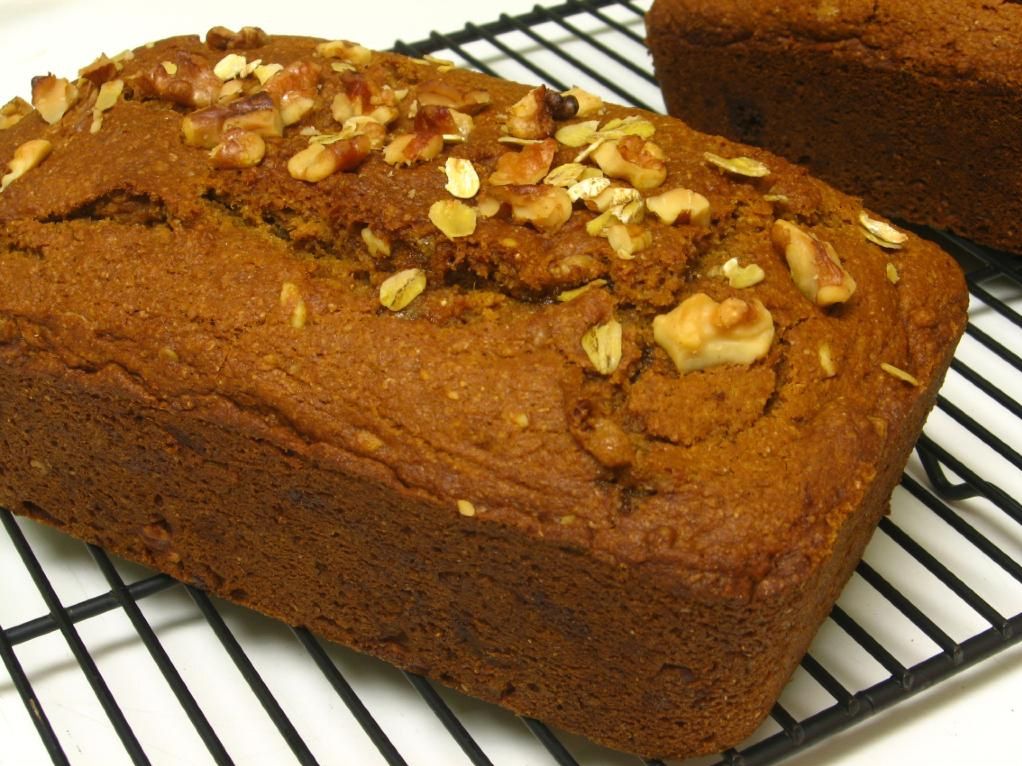
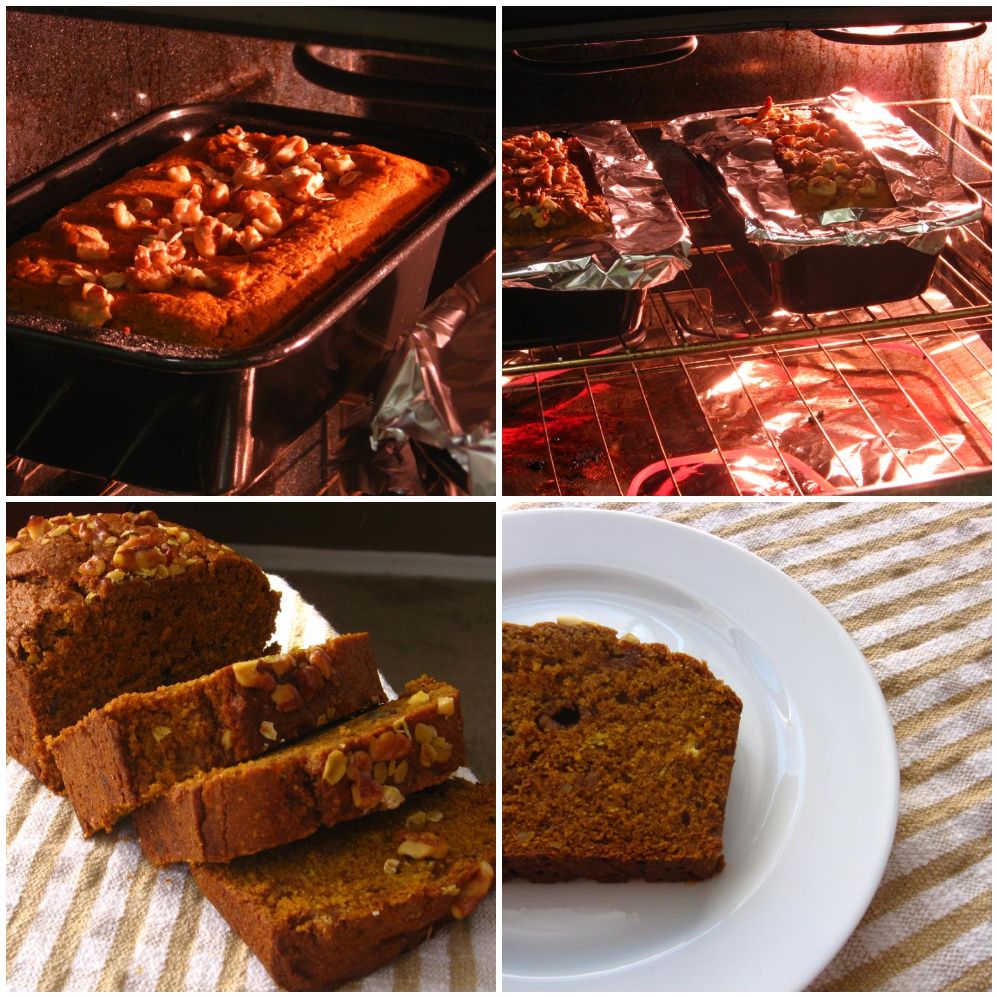
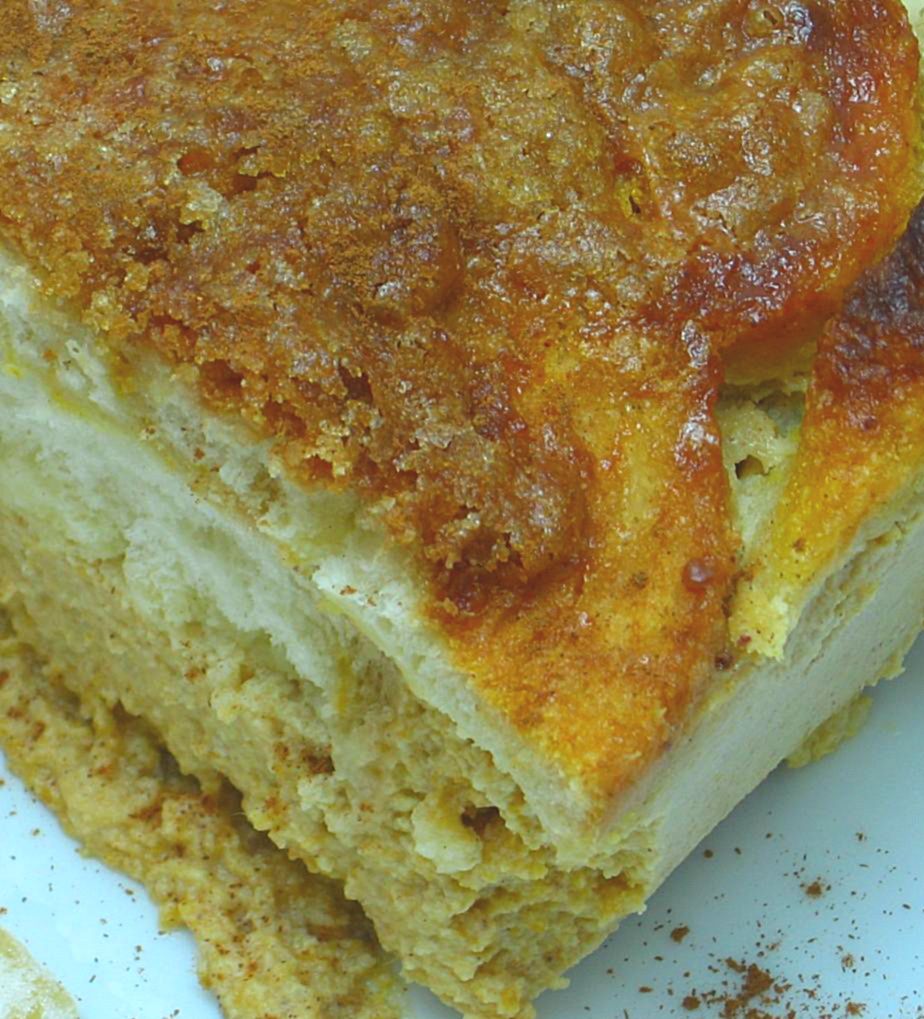
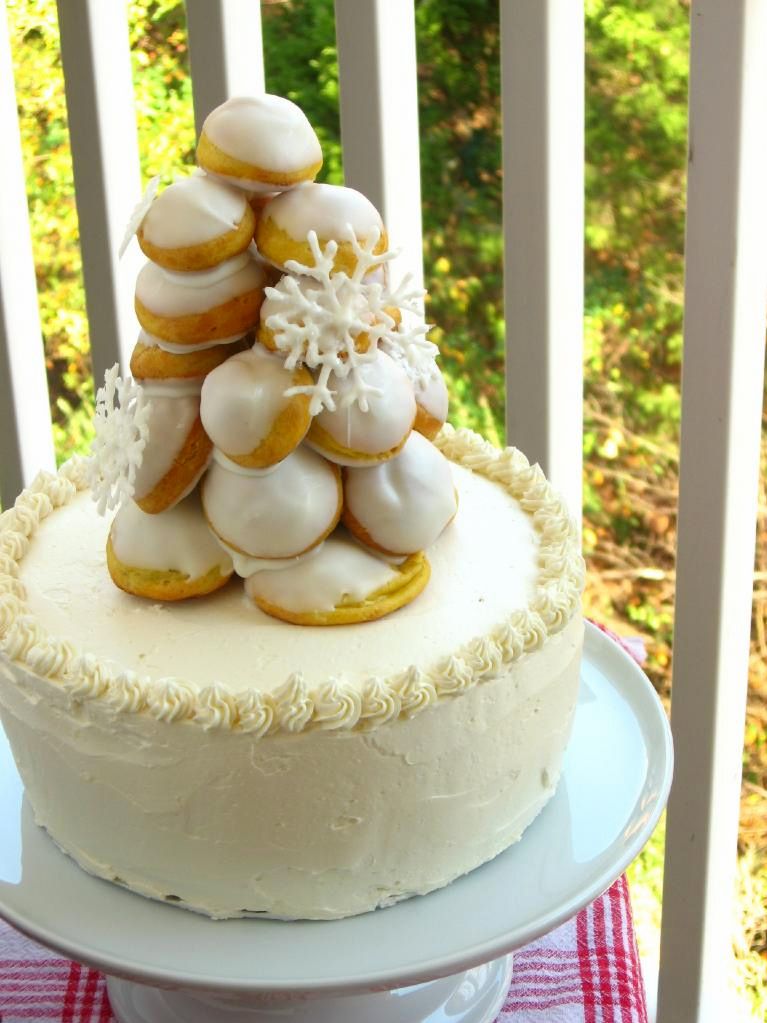
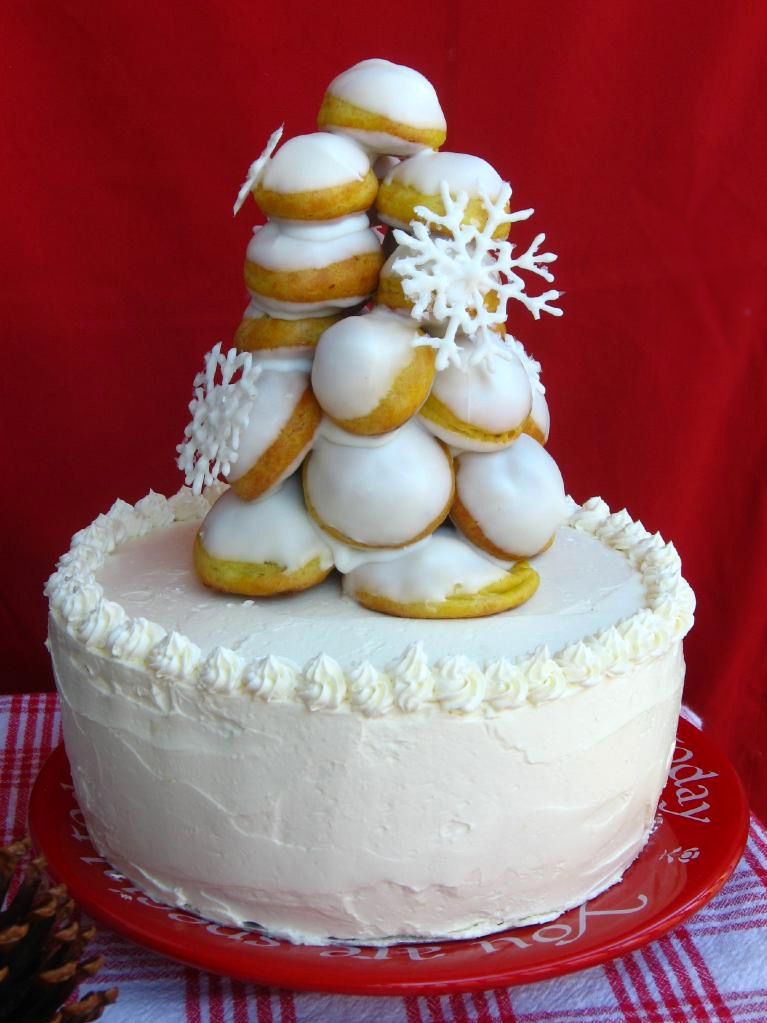
Moist, amazing Browned Butter Pumpkin Cake!
We must have been hyped up on marshmallowy breakfast cereal or something, because as soon as the teachers said GO, it was on.
We were ruthless. We pasted, chopped, measured, quarreled, budgeted, collaborated, and in a move that I’m still not sure was entirely legal, pilfered cast-off supplies from the trash can. Hey, we were just being green, right? Nowadays we’d obtain a high L.E.E.D. certification and get a pat on the back. I’m sure my teachers would’ve seen it that way . . .
I remember waxing intellectual about the structural integrity of domes, lecturing a classmate on how strong the ends of an egg were for this reason. Another peer gave an impromptu diatribe on the virtues of suspension bridges. We ended up with some sort of Frankesteinian hybrid, a bridge held up by suspension and bulky domes underneath. We were still furiously glopping on excess glue in hopes of bolstering the bridge’s integrity when the teachers called time.
We watched breathlessly as the teacher judging the competition picked up a thin book and placed it on our bridge. It held. Another volume was snapped up into her fingers and laid gingerly on our opponents’ bridge. It held.
One by one, she stacked books on top of our lopsided, aesthetically wreck-tastic but apparently strong-as-an-ox toothpick bridge. Every book our bridge held was matched by one on our opponent’s bridge — until the teacher picked up two textbooks. Ours held under the weight. Our opponents’ bridge collapsed — and so did we: we collapsed into cheers and giggles, inebriated with victory. We had done it! We were brilliant engineers! We had won!
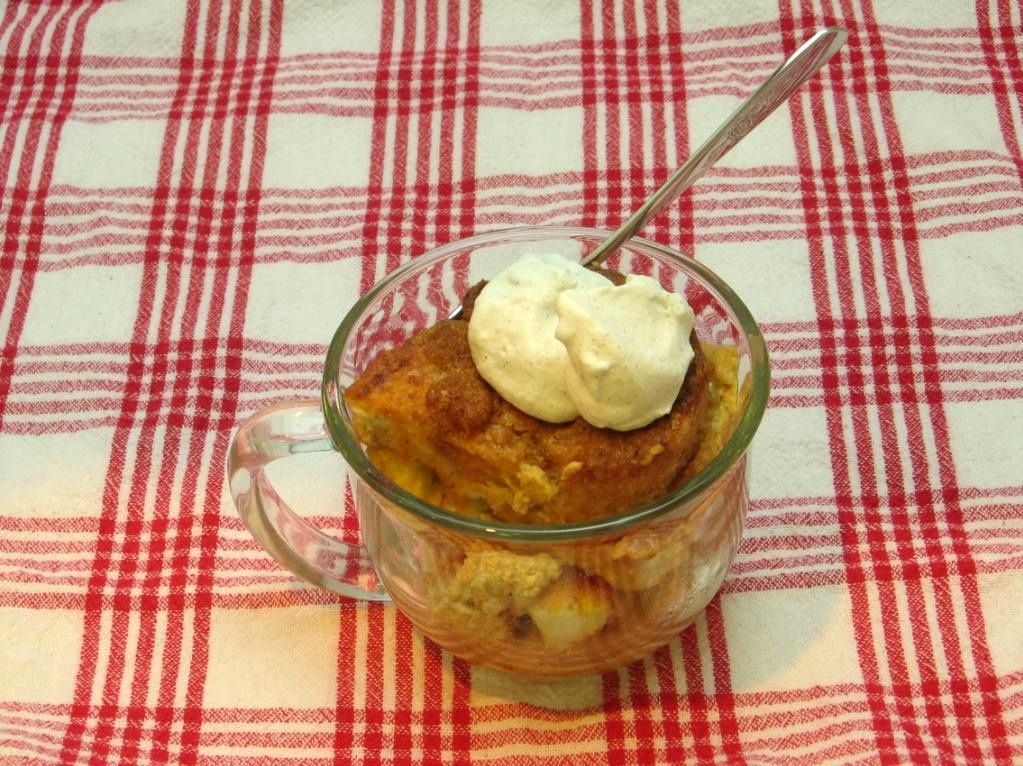
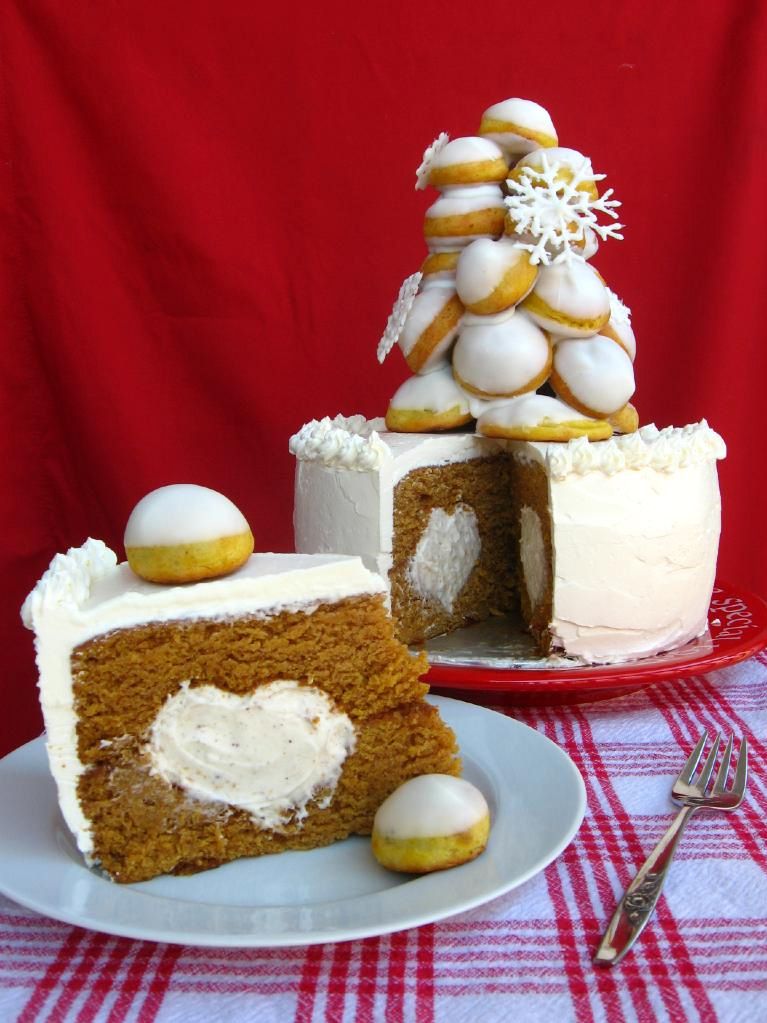
Pumpkin profiteroles — with pumpkin in the choux dough itself — were filled alternately with White Chocolate Chai Mousse and ganache.
As the crowd thinned, we stood around and stared in wonder at our messy little Golden Gate. My friend Ashley was not yet satisfied. Sure, our bridge was stronger than the other team’s, but just how strong? With her hands on teammates’ shoulders for balance, Ashley stepped — first one foot, and then the other — onto the bridge.
It held.
I’ll never forget that moment standing in front of my elementary school, seeing Ashley’s huge grin, relishing the easy pulse of victory through our already-marshmallow-filled veins. So, yeah, I’m basically an architect. Right?
At least, it was this (misguided?) confidence that led me to believe that I could construct what I’ve officially dubbed the croquemcake.
I wanted to pull out all the stops for Project Food Blog Round 8 (do I say that every round? It’s definitely true every round!) The challenge was to create a baked good using pumpkin, and I was torn between building pumpkin profiteroles (made from pâte à choux) into a lovely croquembouche (mounted cream puff tower) or baking a pumpkin chai cake. Suddenly, it hit me. When in doubt, do both.
I may or may not have tweeted my desire to bathe in luxurious Swiss buttercream.
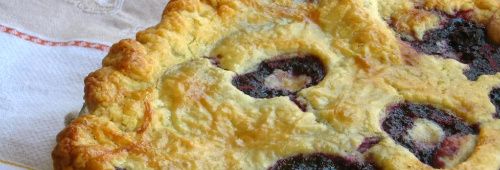
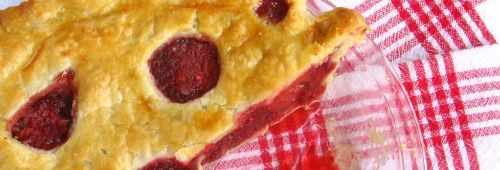
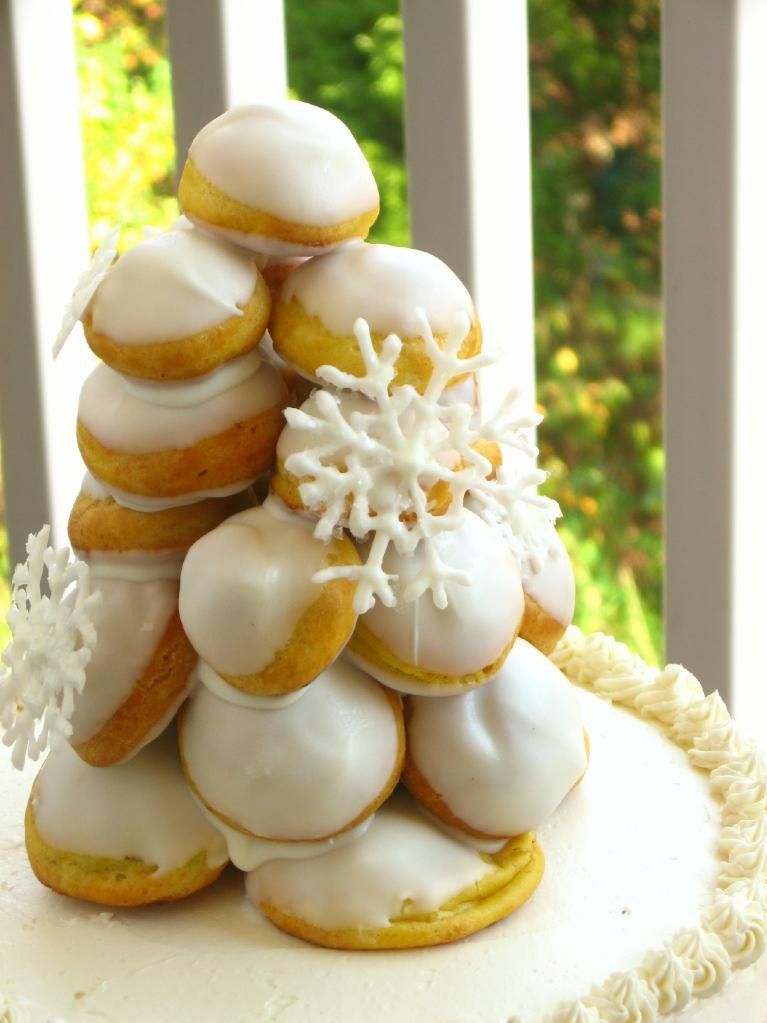
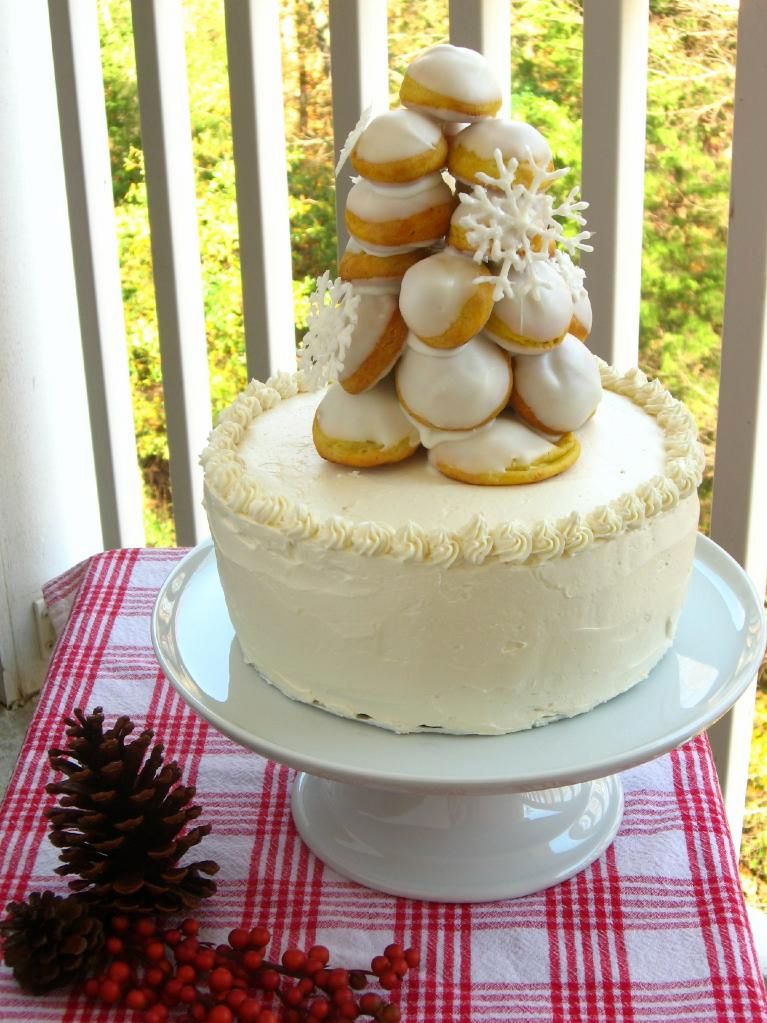
Thus, the croquemcake was born: a browned butter pumpkin cake filled with a comforting white chocolate chai mousse heart, frosted with velveteen Swiss buttercream frosting, and topped with a croquembouche of pumpkin profiteroles filled with chai mousse and ganache. The cake is served in slices accompanied by a few plucked cream puffs, and is essentially the embodiment of all things autumn.
At first I was panicky about trying to stack a tall, leany thing on top of a tall, frosted thing, but it turned out to be super easy, and it produced a ravishing effect.

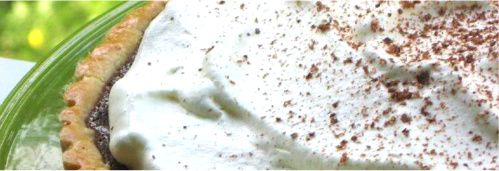
The White Chocolate Chai Mousse is incredamazing, y’all. Even if you put off making the whole shebang until Christmas, you should make some bowls o’ mousse ASAP!
. . . oh, and it just might be my new favorite dessert ever. Every bite had an insanely satisfying combination of textures and flavors. This beautiful croquemcake would be the rockstar of any holiday table.
Don’t be scared of the length of the recipe. True to Willow Bird Baking’s mission, this dessert is also surprisingly easy to make. Let me qualify that: it takes three days and has tons of steps, but the steps themselves are simple and manageable. Use my note below on timing to space out the recipe steps into manageable chunks. It is so worth the effort.
What’s your favorite childhood memory?
Browned Butter Pumpkin CroquemCAKE with White Chocolate Chai Mousse
Recipe by: Willow Bird Baking, compiled and adapted from sources including Fine Cooking, Annie’s Eats, America’s Test Kitchen, Cookin’ Canuck, Martha Stewart, Gina DePalma, Alone and Unobserved
Yields: 15-20 servings, depending on your size o’ cake slices. You’ll have the topping croquembouche plus about 30 other cream puffs to serve alongside.
Pumpkin Puree Ingredients: (or use canned pumpkin puree)
about 7 pounds worth of sugar pumpkins (or pie pumpkins)
2-3 cups water
Browned Butter Pumpkin Cake Ingredients:
1 1/2 cups of your pumpkin puree
3/4 cup unsalted butter; more for the pans
2 cups unbleached all-purpose flour; more for the pans
1 1/2 teaspoon baking soda
1 1/2 teaspoon ground cinnamon
1 teaspoon ground ginger
3/4 teaspoon table salt
1/4 teaspoon ground cloves
1 1/2 cups granulated sugar
2/3 cup firmly packed light brown sugar
2 large eggs
1/3 cup buttermilk
White Chocolate Chai Mousse Ingredients: (I had a lot of leftover mousse; you could probably get by with 2/3 of this recipe)
2 1/4 teaspoons powdered gelatin
3 tablespoons water
18 ounces white chocolate chips (see note)
4 1/2 cups cold heavy cream
heaping 1/2 teaspoon ground cinnamon
heaping 1/2 teaspoon ground cardamom
1/4 teaspoon ground nutmeg
1/4 teaspoon ground ginger
1/4 teaspoon ground allspice
1/4 teaspoon ground pepper (white or black)
dash cayenne powder
Swiss Buttercream Frosting Ingredients:
1 cup sugar
4 large egg whites , at room temperature
24 tablespoons (3 sticks) unsalted butter, at room temperature
2 teaspoon vanilla extract
Profiterole (Cream Puff) Ingredients:
1 1/8 cups water
9 tablespoons unsalted butter
3/8 teaspoons salt
1.5 tablespoons sugar
1.5 cups all-purpose flour
6 large eggs
3/4 cup pumpkin puree
Egg wash (1 egg yolk and 1/2 cup heavy cream, lightly beaten)
Ganache Ingredients:
10 ounces bittersweet and semisweet chocolate chips
3/4 cup heavy whipping cream
Directions:
Note on timing: This dessert is easy to create, but involves many steps. For this reason, I divided the work over three days. On day 1, I roasted and pureed my pumpkins (you can nix this day if you use canned pumpkin). On day 2, I baked my cake and froze it, baked my profiteroles and froze them, and made my chai mousse. I also piped out white chocolate snowflake decorations to dry overnight. On day 3, I made my frosting, assembled and frosted my cake, made ganache, filled my profiteroles, and constructed my croquembouche.
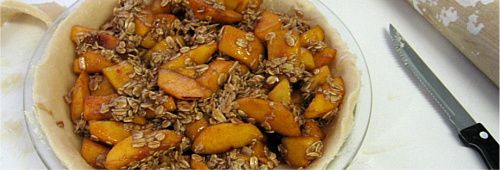
To make pumpkin puree: Preheat oven to 350 degrees F. Cut the tops off of above 7 pounds worth of sugar pumpkins (also called pie pumpkins). Cut the pumpkins in half and scrape out the seeds and innards. Place the pumpkin halves peel-up, cut-side-down in a baking dish and fill the dish 1/4 inch deep with water (about 2-3 cups). Roast pumpkins for 60-90 minutes, or until flesh is fork tender. Allow them to cool for a bit before scooping all flesh out of the peel and placing it in a food processor. Puree for 2-3 minutes until completely pureed, then drain in a paper towel-lined colander for about an hour. Store your pumpkin puree in the fridge for up to 5 days or freeze it in 1-cup increments for later use. Alternatively, you can use canned pumpkin puree for this recipe.
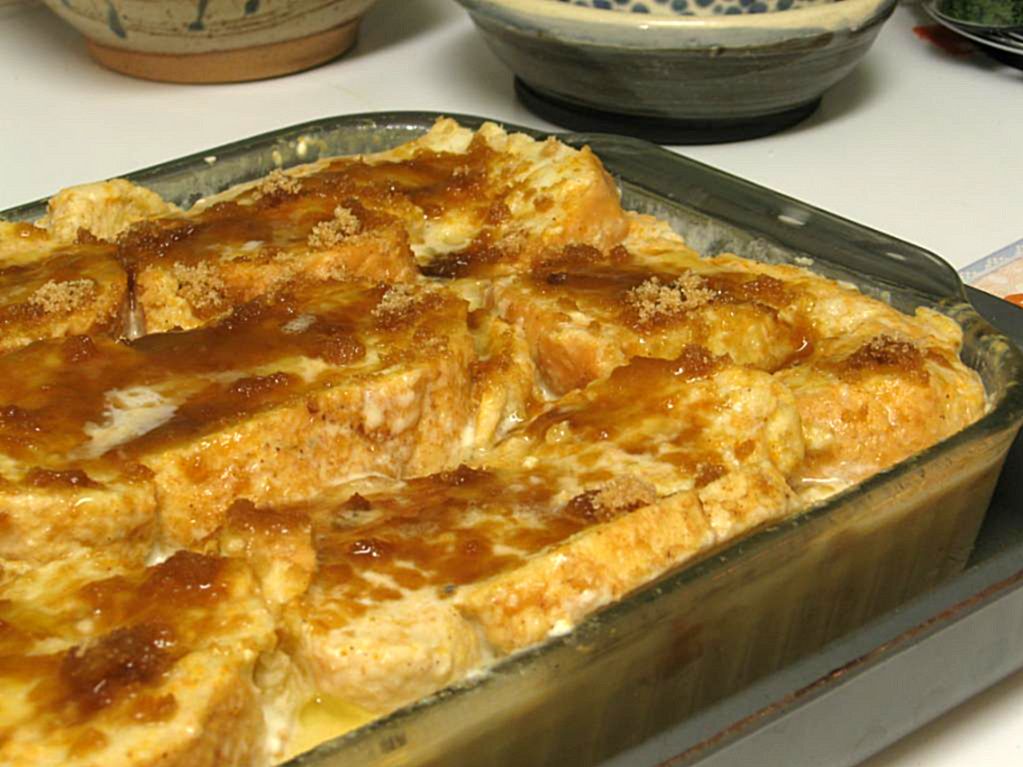
To make browned butter pumpkin cake: I baked my cake in a pan that allows you to fill your cake with a heart-shaped tunnel of mousse (please comment if you’d like the details). If you don’t have one of these pans, you can still create the tunnel effect! You can use this technique by the fabulous Amanda, or this tunnel technique featured previously on my blog.
Preheat oven to 350 degrees F. Butter and flour two cake pans (either the heart-tunnel pan or regular 9-inch cake pans) very thoroughly. Melt the butter in a saucepan over medium heat and cook it, swirling occasionally, until it’s golden brown with a nutty aroma, around 4 minutes. Remove it from heat and pour it into a bowl to cool for about 15 minutes.
Whisk or sift together flour, baking soda, cinnamon, ginger, salt, and cloves in a small bowl. In a separate, large bowl, whisk together 1 1/2 cups of pumpkin puree, granulated sugar, brown sugar, eggs, and buttermilk until well combined. Use a spatula to stir in the dry ingredients until just combined, and then whisk in the browned butter. Pour batter evenly into prepared cake pans.
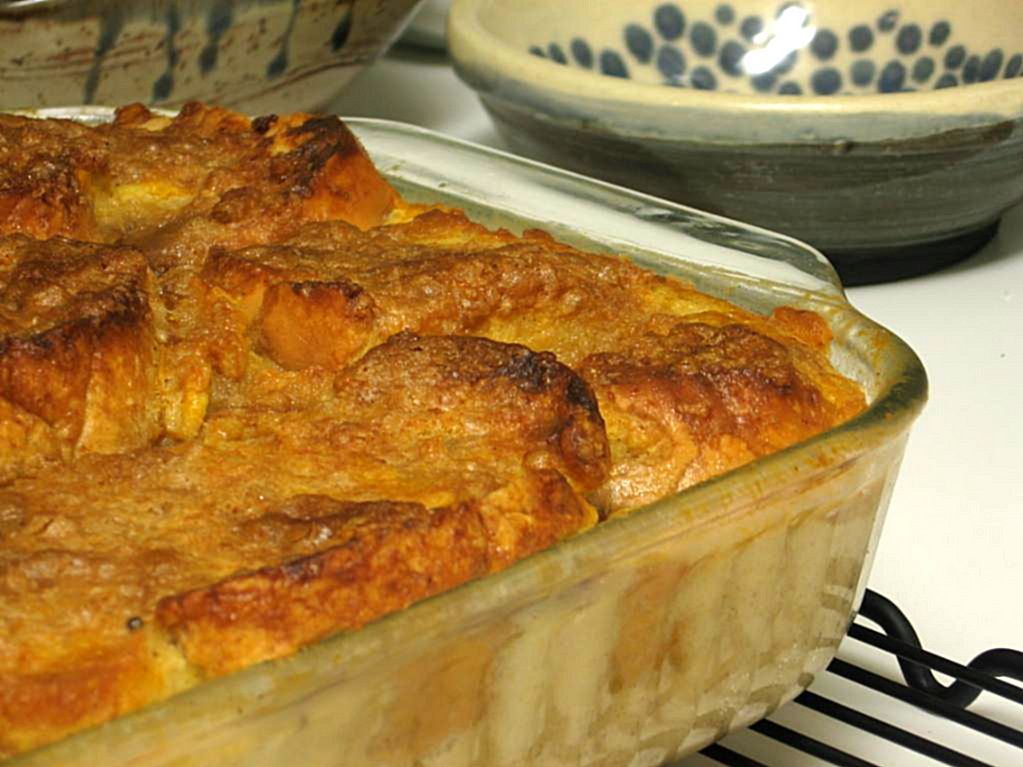
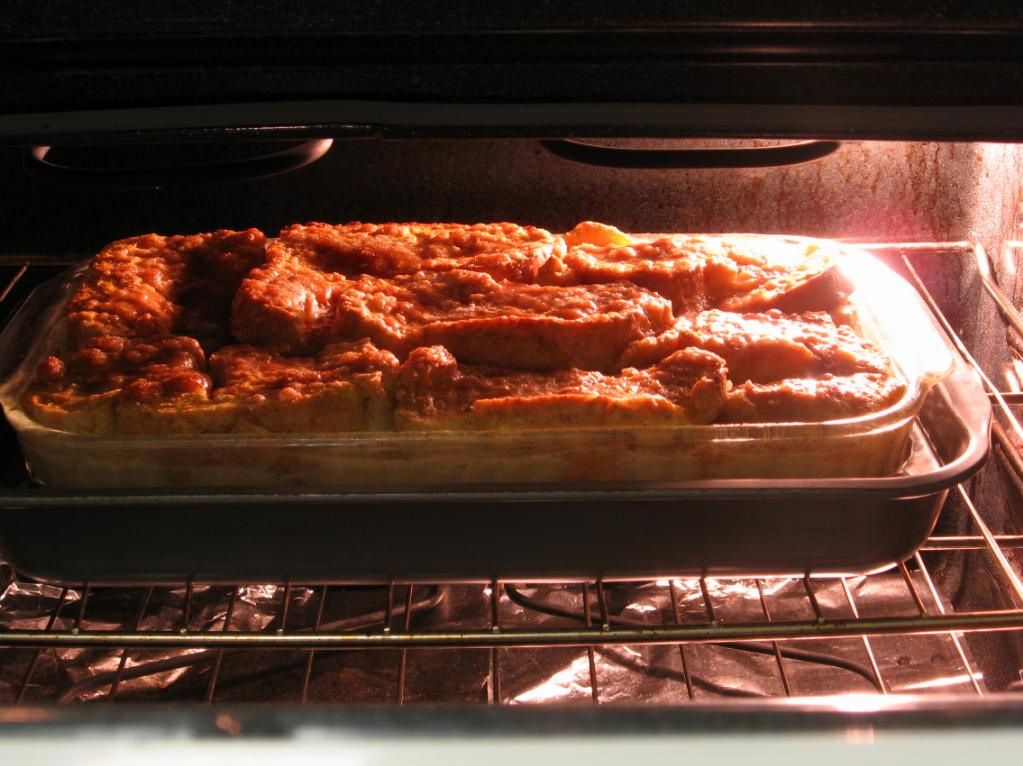
Bake the cakes until a toothpick inserted in the center comes out with just a few moist crumbs, around 28 minutes. Let cakes cool in their pans until mostly cool before turning them out onto wax paper to wrap and freeze. Freeze at least 30 minutes or until firm.
To make white chocolate chai mousse: Mix spices (cinnamon, cardamom, nutmeg, allspice, ginger, pepper, cayenne) together in a small bowl. Set aside.
Place 3 tablespoons of water in a small bowl and sprinkle the gelatin over top to dissolve and soften for at least 5 minutes. Place white chocolate in a medium bowl. Combine 1 1/2 cups of cream and spice mixture in a saucepan over medium heat and cook until simmering. Remove from heat, add gelatin, and stir to dissolve. Pour gelatin mixture over white chocolate and whisk in small circles until smooth. Cool completely to room temperature, stirring occasionally, around 5 to 8 minutes.
In a separate bowl, beat remaining cream to soft peaks. Use a whisk to fold about 1/3 of the whipped cream into white chocolate mixture to lighten. Then fold the rest of the whipped cream in until no streaks remain. Refrigerate your mousse until set, then stir slightly to break up before using.
To make profiteroles: Combine water, butter, salt and sugar in a saucepan over medium heat. Bring to a boil and stir occasionally. At boil, remove from heat and sift in the flour, stirring to combine completely.
Return to heat and cook, stirring constantly until the batter dries slightly and begins to pull away from the sides of the pan. Transfer to a bowl and stir with a wooden spoon 1 minute to cool slightly.
Add 1 egg. The batter will appear loose and shiny. As you stir, the batter will become dry-looking like lightly buttered mashed potatoes. It is at this point that you will add in the next egg. Repeat until you have incorporated all the eggs. Stir in pumpkin puree.
Pipe the batter using a pastry bag and a plain tip. Pipe choux about 1 inch-part in the baking sheets. Choux should be about 1 inch high about 1 inch wide. Using a clean finger dipped in hot water, gently press down on any tips that have formed on the top of choux when piping. You want them to retain their ball shape, but be smoothly curved on top. Brush tops with egg wash while trying not to drip the wash down the puffs onto the pan (which could somewhat inhibit rise).
Bake the choux at 425 degrees F until well-puffed and turning lightly golden in color, about 10 minutes. Lower the temperature to 350 degrees F and continue baking until well-colored and dry, about 20 minutes more. Remove to a rack and cool (tip from a pro: poke each puff with a toothpick while cooling to release the steam inside. It shouldn’t cause your cream to leak, but will help the puffs stay crisp). Can be stored in a airtight box overnight, but I recommend, if you aren’t using them right away to create your croquembouche, that you freeze them. When you’re ready to use them, bake them at 350 degrees F for 5-6 minutes to refresh and recrisp them.
To make ganache: Bring the cream to a simmer in a medium saucepan (or just stick it in the microwave for 2 minutes in a microwave-safe bowl). Place the chocolate in a medium bowl. Once the cream reaches a simmer, pour the cream over the chocolate and let stand 1-2 minutes. Whisk in small circles until a smooth ganache has formed. Let ganache stand at room temperature until fully cooled, then whip to frosting-like consistency for piping into cooled profiteroles.
To make Swiss buttercream frosting: Combine sugar and 1/2 cup water in a small saucepan and bring to a boil over medium-high heat, stirring to dissolve sugar. Boil without stirring until syrup reaches 240° on a digital thermometer, about 5 minutes.
Meanwhile, in a stand mixer with whisk attachment, beat egg whites on medium-high speed until soft peaks form. With mixer on medium speed, gradually pour in hot syrup in a thin stream; avoid pouring syrup on whisk. Increase speed to medium-high and beat until stiff peaks form and mixture is cool, about 8 minutes. Reduce speed to medium and add butter 1 tablespoon at a time, beating after each addition. (If at any time buttercream appears curdled, beat on high until smooth, then reduce speed to medium and continue beating in butter.) Once all butter is added, beat on high speed until buttercream is smooth and fluffy, about 1 minute. Beat in vanilla extract.
To assemble your cake: Line up cake layers and trim sides as needed with a long serrated knife. No need to thaw before you do this — it’s actually easier with frozen layers. Spoon white chocolate chai mousse into heart-shaped wells in your cake layers (if applicable — or spoon it into whatever shaped cavity you’re using). Carefully position the top layer on the bottom. Apply a thin coating of frosting all over as a “crumb coat” and refrigerate the cake for a half hour or so. Then frost the cake generously with the remaining frosting.
To assemble your croquembouche: Fill cooled profiteroles with leftover chai mousse and ganache as desired. Melt white chocolate bark and dip tops of each profiterole into the chocolate, lining up on wax paper to dry. Cover a plate with wax paper — this is where you’ll build your croquembouche. Start with bigger, broader profiteroles and use the white chocolate as “glue” to piece together a sturdy base. I refrigerate my croquembouche after the construction of each new layer, to harden the chocolate and avoid any toppling incidents! Continue building a cone, fitting the profiteroles together according to their shape. Use white chocolate to pipe snowflakes on wax paper, and to “glue” them onto your croquembouche once they’re dry. Refrigerate your croquembouche until you’re ready to assemble your final product.
To assemble your final croquemCAKE: Carefully ensure that your croquembouche isn’t sticking to your wax paper. Gently lift it onto the center of your cake. Surround your cake with leftover cream puffs for serving. Enjoy!

Roasting pumpkins! While there’s not a huge taste difference from using this process versus the canned stuff, it’s a fun, satisfying thing to try!
If you liked this post, please:
–Subscribe to Willow Bird Baking
–Follow Willow Bird Baking on Twitter
–Follow Willow Bird Baking on Facebook
–Give this post a thumbs up on StumbleUpon