Summer Strawberry Sour Cream Pie

I have a love-hate relationship with Twitter. Twitter is related to this big ol’ Strawberry Sour Cream Pie, I promise.

On one hand, I hate Twitter. Twitter moves at the speed of light during prime tweeting hours. My OCD urge to not “miss out” on what’s going on slams head-on into a wall built with millions of 140-character bricks. Suddenly, I realize I’ve been watching my twitter feed for the better part of an hour. My eyes glaze over, my back hurts, and my brain starts translating each thought into its shortest possible expression. At this point, I need to tweet myself:

@julieruble Time 2 get off twitter immediately #beforeyoureyeballsfallout

That hashtag’s gonna catch on, just you wait and see.

But I love Twitter. I’m connected to hundreds of great people — other bloggers, Willow Bird Baking readers, the occasional celebrity chef. I keep in touch with an extended web of lovely folks that I might not have time to call or write a lengthy email to. There’s a level of casual interaction that brooks folks jumping into a conversation that pertains to their interests. You can easily meet fabulous new people, keep up with the dynamic blogosphere, and support fellow writers. Cool.

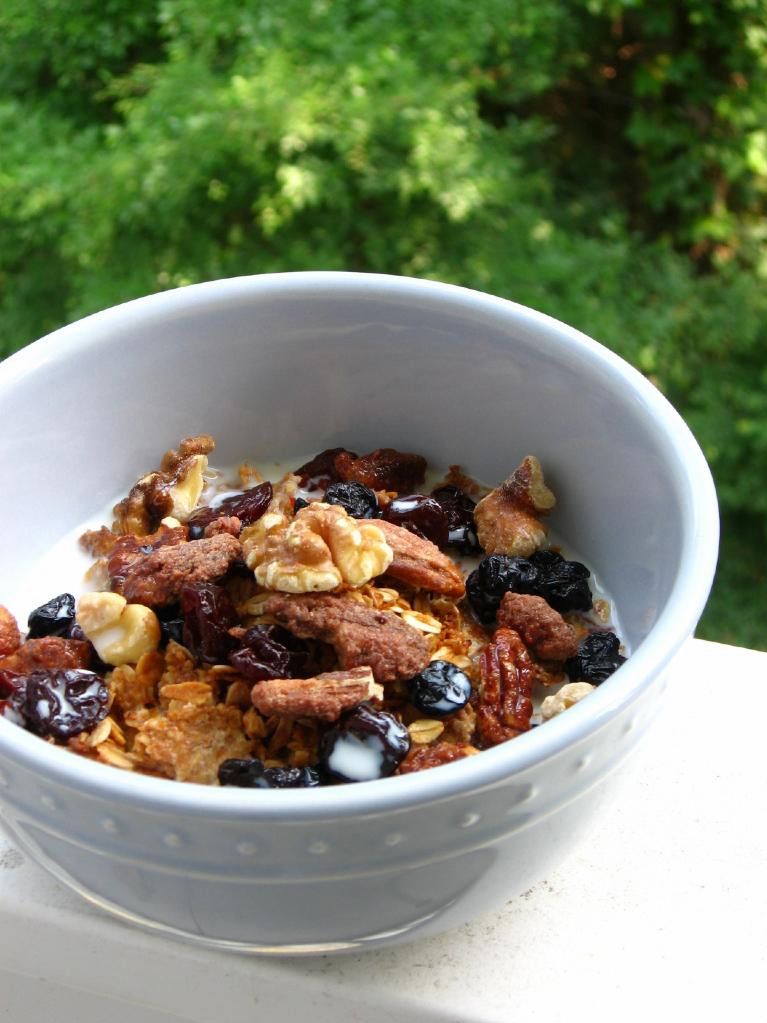
Even more cool? Sometimes twitter magic happens, and someone amazing (cough cough Jaden Hair of wonderful Steamy Kitchen) finds your blog and drools over some S’mores Cereal. Now that’s cool.

Like most things, there’s a twitter balance — for me, it involves checking in a few times a day, and that’s it. Thankfully, during one of my forays into the land of tweets, I found a gem. Lovely Patti at Worth the Whisk posted that one of her pies had been chosen as Pie of the Day by KCRW Radio’s Good Food Blog: Strawberry Sour Cream Pie.

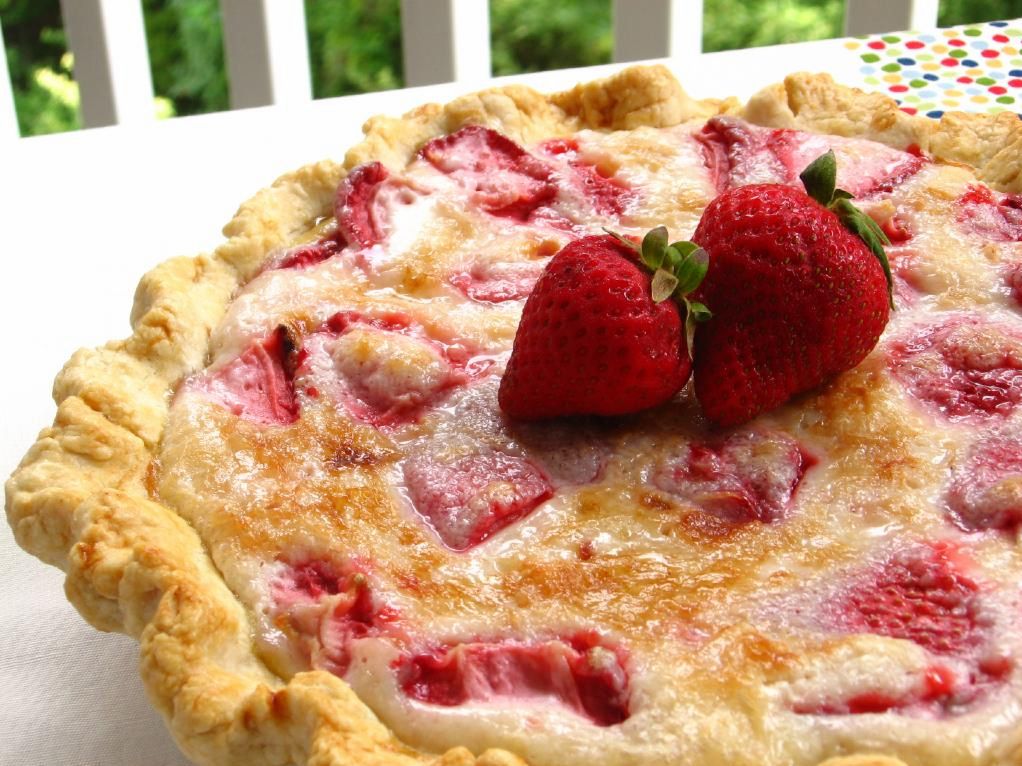
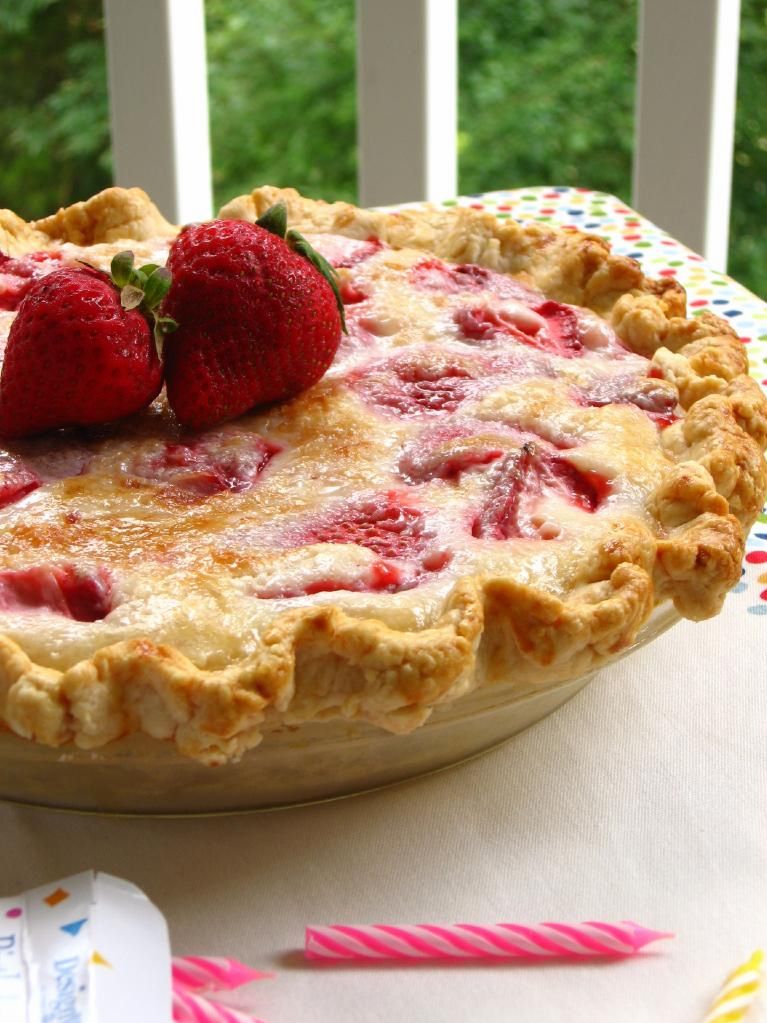
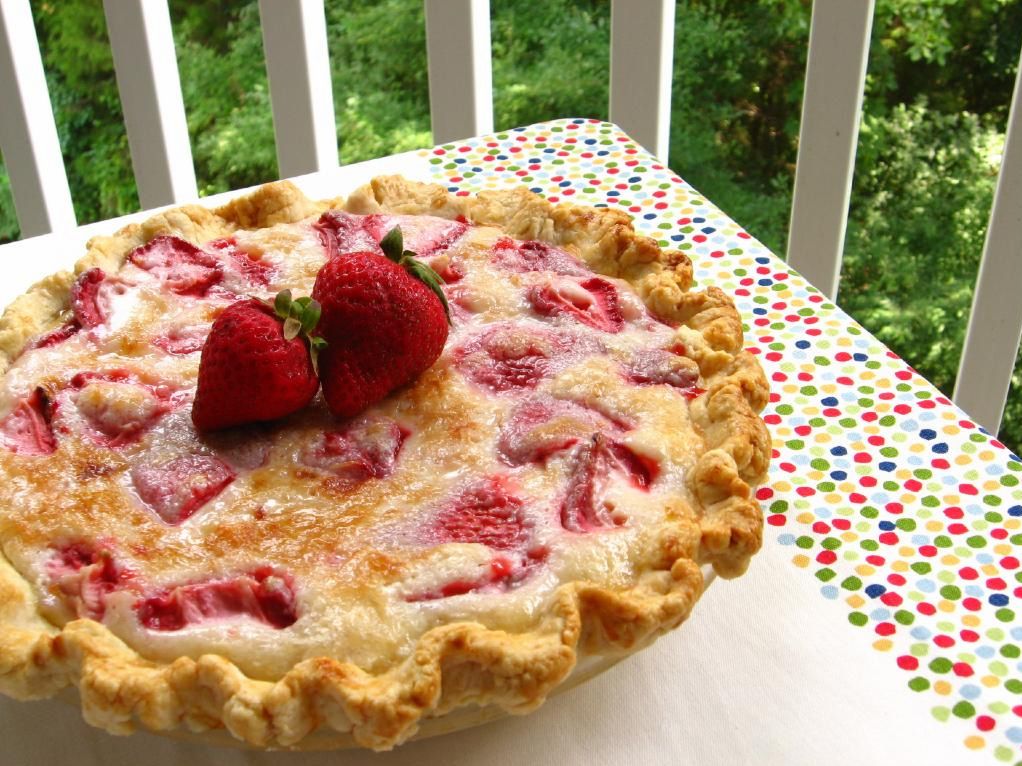
Listen, you don’t scroll past an award-winning Strawberry Sour Cream Pie. You just don’t.

You stop, you ogle, you marvel, you salivate a little (in a classy way, of course), and then you go pick up some sour cream.

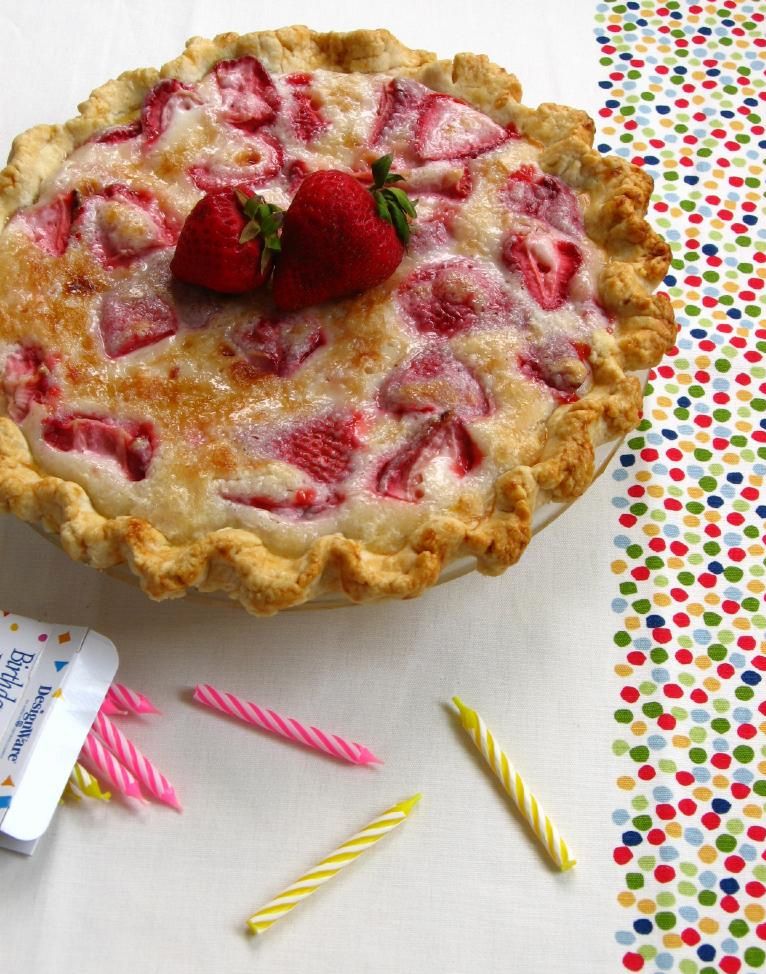
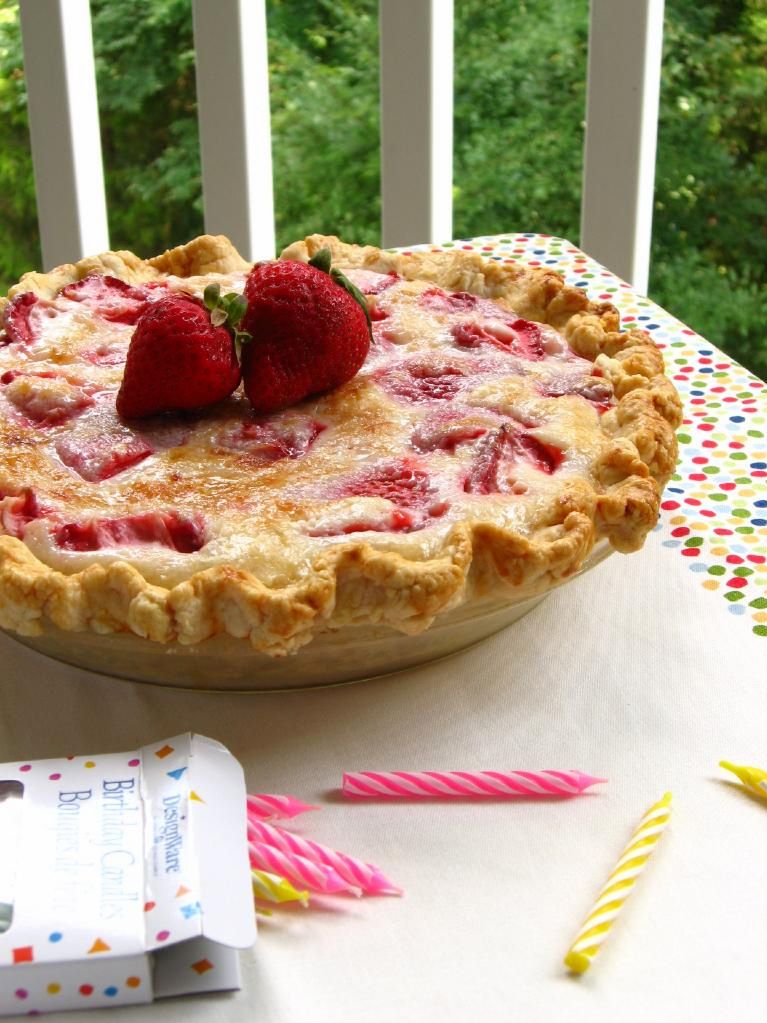
I knew while baking that this pie, along with the heavier Chocolate Mousse Pie, would be the perfect treats to take in for my dear Sunday school leader Joyce’s birthday.

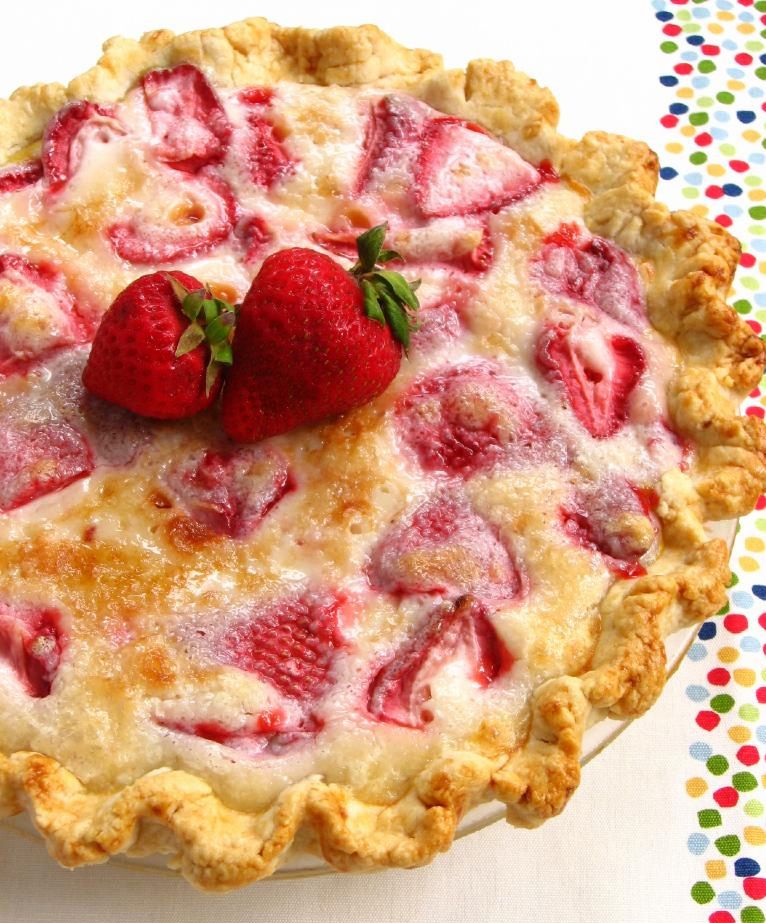
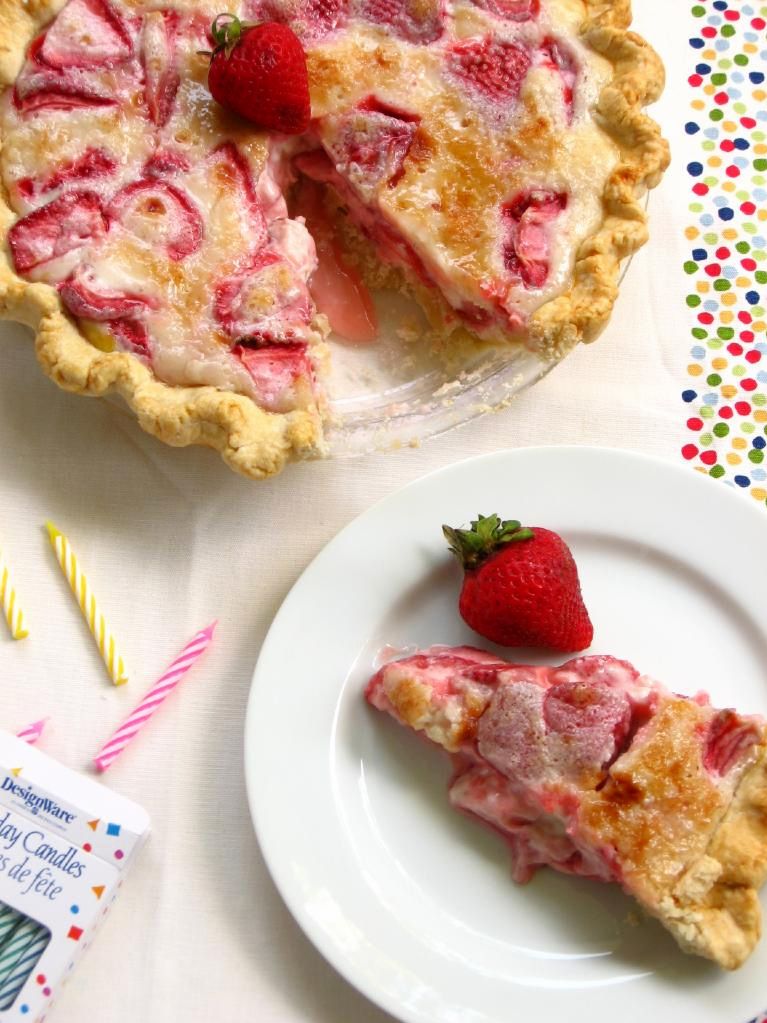
I love the combination of fruit and sour cream, and it really sings in this gorgeous, lazy-day treat. The strawberries stay juicy, and the tangy-sweet fruit is delicious against the buttery crust. And pies like this are the reason people started saying things were “easy as pie.” You don’t need to blind bake the crust, pre-cook the filling, or any other fussy stuff. You roll out your dough, fill it, bake it, cool it, eat it . . . lick the plate.

If you’ve never made a pie before, this is a lovely place to start. It’s a single crust pie and simple as can be. Tell me: what’s your favorite pie to eat during sweltering summertime?

Summer Strawberry Sour Cream Pie


Recipe by: Worth the Whisk
Yields: one 9-inch pie, serves 6-8

Pie Crust Ingredients: (or you can use an unbaked, prepared crust)
2 cups flour
1 teaspoons salt
1/4 cup cold lard (non-hydrogenated if available)*
1/2 cup cold butter, chopped
3-4 tablespoons ice cold water
1 egg and 1 teaspoon heavy cream for egg wash
*you can substitute vegetable shortening here if you wish, but I highly recommend the lard!

Filling Ingredients:
1 quart fresh strawberries
1 cup flour
1 1/4 cup sugar, reserve 1 tablespoon
Dash salt
1 cup sour cream (not fat-free)

Directions:
Preheat oven to 450 degrees F. To make the crust, pulse flour and salt together to combine. Add scoops of lard and pulse into the mixture has the texture of coarse sand, about 10 seconds. Add in chunks of butter and pulse until butter pieces are no larger than small peas, about 10 pulses. Add minimum amount of water and pulse on low. If dough remains crumbly and doesn’t come together, add another tablespoon of water. Add as little as is required to enable the dough to be rolled into a ball. Form the dough into a disk, wrap in plastic, and refrigerate for 20-30.

Roll disk of dough out to around 2 inches larger than your pie plate and transfer it, situating it in the plate. Fold the excess dough around the edges and crimp, trimming where necessary.

Hull and wash the strawberries and slice them in half. Set aside. Sift flour, sugar, and salt into a large mixing bowl. Add sour cream, blending until creamy. Gently fold in the berries without overmixing. Pour fruit into pie shell and spread to edges without packing down — there should be spaces throughout the filling. Sprinkle the top with the last 1 tablespoon sugar.

Bake the pie for 10 minutes, then reduce the heat to 350 degrees F (I leave the oven door open a minute during this period to let the temperature drop a little) and bake an additional 30 minutes or until crust is golden brown.

Broil the pie for 2-3 minutes to brown up the top. Allow to cool completely (4-5 hours in the fridge, I’d say) before cutting, and serve with fresh whipped cream or ice cream.

If you liked this post, please:
Subscribe to Willow Bird Baking
Follow Willow Bird Baking on Twitter
Follow Willow Bird Baking on Facebook
Give this post a thumbs up on StumbleUpon


ShareOther ways to share this post with friends!

48 Homemade Breakfast Cereals

I like variety. Sure, sometimes during the week I can get on a kick and eat the same thing every night for dinner (hellooo, lima beans, I’m lookin’ at you), but I also really appreciate mixing it up every now and then.

That’s why a few months ago when I decided I wanted some breakfast cereal, I went to the store and bought about 8 different boxes of the stuff. Each morning needed to have its own flavor — as long as the nutrition facts were acceptable. What? Don’t look at me like that. Sure, I may be the same girl who posted the Coffee Cookie Dough Fudge Cheesecake, but I do try to eat reasonably during the week!

The store-bought cereal was okay. At least, I thought it was okay at the time. But then something happened — I had one of those thunderous BIG IDEAS.

It all started when I was perusing one of my favorite blogs, Not So Humble Pie, and saw her (you’re not going to believe it) S’mores Candy Bar. I know. Insane.

The premise of her post was that she didn’t understand the excitement over this new company that makes customizable candy bars, since it’s so easy to make them at home. Having been excited about the customizable candy bar company, I felt admonished. And inspired.

Because even more than I had been excited about customizable candy bars, I was excited about customizable cereal. There’s this company on the web (I won’t link to them, since I’m about to tell you it’s silly to pay for their product) that allows you to choose all the ingredients you want in your own personal box of cereal — and even lets you pick a name for your new creation! Too fun!

BUT. I realized when I read Mrs. Humble’s candy bar post that it didn’t make any sense to pay for one kind of customized cereal (that was just like going to the grocery store), or even for eight kinds of customized cereal . . . what would really make sense is to make your own fully customizable cereal buffet — one that would allow you to have a different flavor every day if you wanted to!

A dream was born. I scrounged up recipes for homemade granola and nutty bran flakes (I’ll gush about these in a minute). And as if to emphasize that making homemade cereal was indeed my destiny, the folks at Oh! Nuts emailed to ask if I’d like to review some of their products. Uh, YES, NUT PEOPLE, YOU READ MY MIND. Pounds of nuts and dried fruits later, I was in the cereal-makin’ biz.

If you’re about to post a comment calling me a hippie for making my own bran flakes, hold it right there. This recipe is super easy, super cool, and super rewarding. You feel like a superhero (who makes their own cereal?! I MAKE MY OWN CEREAL! I AM CEREAL WOMAN!), you know exactly what healthy ingredients went into said cereal, and — this is the best part — you have bran flakes that don’t taste like a cardboard box. Every time I opened the jar they were stored in, I got a whiff of delicious nuttiness. They had texture! They had taste! Yes!

The granola is the flavor that really carries the cereal, though. I chose a Double Coconut Granola from Opera Girl Cooks that I’d heard a ton about. Once it cooled, it lived up to the hype — buttery, slightly sweet, coconutty, with a hint of salt to really amp it up.

Once you’ve made some flakes and granola, the fun starts. Possible add-ins are endless: dried fruits, fresh fruits, toasted nuts (do make sure to toast them — MUCH more flavor), seeds, chocolate chips, peanut butter or cinnamon chips, candy, marshmallows . . . be creative! Add a little, add a lot.

My favorite bowl was a straight-up combination of all my options: bran flakes, double coconut granola, dried cherries, dried blueberries, cinnamon pecans, and toasted walnuts. If you have just 2 dried fruits and two nut options along with your flakes and granola, you’ll have 48 possible breakfast cereal varieties — that’s a lot of options!

The Oh! Nuts products were a success in terms of taste — the blueberries had a pronounced, wonderful blueberry flavor, and the cinnamon pecans were so addictive that I almost ate my stash before I got my cereal made! The sour cherries did have an odd, slightly fishy flavor (I know, weird), but I still enjoyed eating them. Maybe a flavor compound of the cherries came out that isn’t as pronounced when they’re not dried?

To be honest, including the price of shipping, I probably wouldn’t spend the extra money to buy regular nuts or fruit from Oh! Nuts, but would just head to the grocery store. That being said, for specialty items or rare nuts/fruits/candies, they’re the place to go. The selection is huge, and the products are high quality.

If you, like me, love a big ol’ bowl of hearty, nutty, earthy, crunchy, chewy, flavorful, delicious breakfast cereal — and one that can change with whatever mood you’re in — I hope you’ll make your own personal cereal buffet! Or perhaps fix a cereal buffet in pretty jars as a gift for a friend. Even better, have a breakfast party: set up a cereal buffet for family and friends where each person can make their own cereal combination, perhaps supplemented with juice and muffins on the side. Have fun!

Oh, by the way, I did have to branch out a little in homage to my original inspiration. How about some S’mores Cereal?

Below you’ll find the recipes for granola and nutty bran flakes. I even included nutritional info so you can make healthy breakfast choices! Round up some of your favorite add-ins and place all the components in separate jars for storage. Enjoy!

5 from 1 reviews
Homemade Nutty Bran Flakes
 
Prep time
Cook time
Total time
 
These flakes are SO MUCH BETTER than the stale boxed kind, you'll be amazed. The only downside is that this recipe uses two full baking sheets and only makes 3-4 bowls of cereal. If you have the stamina for an all-day baking project, I'd grab out all your baking sheets and make a day of it, doubling or tripling the recipe. They really are delicious!
Author:
Serves: 3-4
Ingredients
  • 1/2 cup bran
  • 1/2 cup whole wheat flour
  • 1/3 cup almond flour (or other finely ground nuts)
  • 2 tablespoons sugar
  • 1/4 teaspoon baking powder
  • 1/4 teaspoon salt
  • 1/3 cup milk
  • 1/4 cup water
Instructions
  1. Preheat oven to 350 degrees. Sift all dry ingredients into a large mixing bowl and add milk and water. Stir to mix well. The resulting mixture will be a very wet “dough” (so wet, you can hardly call it a dough). Cut two sheets of parchment paper to fit two baking sheets, and set one sheet of parchment paper on the counter where you’ll be rolling — you won’t be able to transfer it without this!
  2. Glop half of the “dough” out onto the sheet of parchment paper and flatten it by hand. Place a piece of plastic wrap over the dough and “roll” it out (your rolling pin will almost just be smooshing it out into place) EXTREMELY THIN, almost transparent in some places. It will look like a giant bran flake — super fun!
  3. Remove the plastic wrap and transfer the parchment carefully to a baking sheet. Cook for 10 minutes, but check often after just 5, because such a thin dough can easily burn. You’re looking for a thin, leathery cracker that is crunchy at the edges. When it’s done, remove it and allow it to cool completely. While it cools, repeat the process with the other half of the dough.
  4. After both giant bran flakes have finished their first bake, reduce the oven temperature to 275 degrees. Tear the first, cooled bran flake into regular bran flake-sized pieces (about 3/4 of an inch), spreading them out on the parchment-covered baking sheet.
  5. Bake at the reduced temperature for 20 minutes, flipping and stirring the flakes around every 5 minutes. Repeat process with the second cooled, giant bran flake. Then allow all bran flakes to cool completely. Store well in a sealed container for up to two weeks.


Now that I’ve shared my favorites with you, I’m anxious to know: What sort of breakfast cereal would you make for yourself? Piña colada cereal with toasted coconut and dried pineapple? Cherry crumble cereal with dried cherries and cinnamon granola? A luscious combo of dates, coconut, and chocolate chips?

5 from 1 reviews
Double Coconut Granola
 
Prep time
Cook time
Total time
 
An absolutely delicious granola to supplement your bran flakes. Again, don't be shy about doubling this recipe!
Author:
Serves: 6
Ingredients
  • 3 cups rolled oats
  • 1 scant cup unsweetened shredded coconut
  • 1/4 cup clover honey
  • 1/6 cup virgin coconut oil (half of a 1/3 cup measure)
  • 1 tablespoon vanilla extract (I used almond because I was out of vanilla)
  • 1 teaspoon kosher salt
  • optional: I toasted another 1/2 cup of sweetened shredded coconut to add in for sweetness, but that was before I’d tasted the cooled batch. It’s probably unnecessary.
Instructions
  1. Heat oven to 300 degrees F. Combine oats and shredded coconut in a large bowl. In a small saucepan over medium heat, cook honey, coconut oil, vanilla, and salt until just simmering.
  2. Pour honey mixture over the oat mixture, stirring well with a wooden spoon until fully combined. Spread this mixture out over a large sheet pan, place in oven, and bake for 10 minutes before stirring the granola. Repeat 10 minute baking time, followed by stirring, until granola is well-toasted (takes about 4 cycles, or about 40 minutes).
  3. Cool the granola on the baking sheet, stirring occasionally. When cooled, you can store granola in an airtight container in the refrigerator for a few weeks, or at room temperature for two.


Other delicious breakfast ideas floating around the internet right now: Beer Waffles with Cinnamon Cardamom Apples, S’mores Oatmeal, Oatmeal Pancakes, Pecan Sticky Buns, and of course, from yours truly, Carrot Cake Waffles.

Note: I received the above mentioned products from Oh! Nuts free of charge to create these recipes.


Old-Fashioned Burger Stand Burgers & Easy French Fries

I wish I were gymnastically inclined. If I could do a cartwheel or two or three hundred, maybe I could express how excited I am about sharing this recipe with you. Instead, I am the girl who, in middle school, somehow body-slammed herself onto the hard gym floor mid-cartwheel-attempt. They make gymnastics mats for a reason, gym teachers.

I will not be trying that again. You’ll have to trust me when I say I’m flipping around the room in spirit. Because these. burgers. are. amazing.

They are not gourmet burgers. They’re not sporting Gruyere, truffle oil, shallots, or mushrooms — not that those ingredients wouldn’t be tasty on some burger, somewhere. Just not this one.

They are not Texas-sized steakburgers. You do not need to dislocate your jaw to take a bite, they do not include exotic spices or a pile of complementary toppings — though you know I love a burger like that on occasion. It’s just not this burger’s style.

These are the burgers your fast food burger could taste like (you guys know the Old Spice commercial, right?). The burgers they’re trying their hardest to replicate in every establishment that owns a drive-thru.

These are thin, fall-apart tender, juicy, salty burgers with a slight crisp crust, smothered in melty cheese, onions, and tangy burger sauce before being smooshed into a pillowy, sweet, toasted potato roll. Swoon.

Imagine the best 1950s burger stand — one that carefully wraps its burgers in wax paper and sends them out dripping in burger sauce with a side of crispy fries. Maybe via a roller skating waitress. These are those burgers. Christopher Kimball called them something like the “ultimate indulgence burgers” — exactly!

In case you’re nervous about the fact that you grind your own meat for this burger, I need to tell you that they’re also easy. I would stick these babies on the menu any weekend without a second thought. You can also make the patties and freeze them sandwiched between sheets of waxed paper, making this recipe perfect for weeknights as well (thaw for 30 minutes at room temperature before using).

The basic method is as follows: cut chunks of meat, freeze it for a bit, grind it in a food processor, gather your patties loosely, season, cook in hot skillet, melt cheesy goodness on top, and place on sauced, toasted bun. I made my sauce and sliced my onions the night before, and so the whole process was quick as a whip.

The burgers stay super tender because you don’t pack them into patties with your hands the way you might form other burgers. After grinding the meat, you try not to touch it much at all, gathering it into piles with your spatula and only then gently pressing it against a sheet pan or tray into a loose patty with plenty of crevices. You want it where it’s only just sticking together.

Heavy salting and a smoking hot pan make for a nice crisp crust on the patty. You don’t need to worry about cooking it to medium rare or medium or any of that — as Kenji from America’s Test Kitchen said, because of the way you form the patties, there’s no way to overcook this burger into toughness. No matter what, it’s tender and perfect.

Grab your glass bottles o’ coke and some roller skates, and let’s make some burger magic!

Old-Fashioned Burger Stand Burgers


Recipe by: Cooks Illustrated
Yields: 4 burgers

Ingredients:
10 ounces sirloin steak tips, cut into 1-inch chunks (look for meat that has a striated texture to be sure you have the right cut. Flank steak may be substituted)
6 ounces boneless beef short ribs, cut into 1-inch chunks
Kosher salt and ground black pepper
1 tablespoon unsalted butter
4 soft hamburger buns (potato rolls)
1/2 teaspoon vegetable oil
4 slices American cheese (don’t substitute! American cheese has the perfect texture for this recipe)
Thinly sliced onion

Classic Burger Sauce Ingredients:
2 tablespoons mayonnaise
1 tablespoon ketchup
1/2 teaspoon sweet pickle relish
1/2 teaspoons sugar
1/2 teaspoon white vinegar
1/4 teaspoon ground black pepper

Directions:
1. Mix ingredients for burger sauce and refrigerate it until you’re ready for it.
2. Place chunks of meat onto baking sheet about 1/2 inch apart. Freeze until very firm, hard around the edges, but still pliable (15-25 minutes).
3. Grind meat in a food processor in two batches, using 10 to 15 one-second pulses and redistributing meat in the processor as necessary. Transfer the meat to a tray or baking sheet without touching it — just overturn the processor bowl onto the tray. You want to touch the meat as little as possible from here on out. Discard gristle or hunks of fat.
4. Gently separate ground meat into 4 equal mounds using a spatula. Shape each mound gently (without picking it up) into a patty about 4 inches in diameter and thin (about 1/4 inch thick), leaving edges ragged and crevices in the burger. Season top of each patty liberally with salt and pepper. Use a spatula to flip patties and season the other side. Stick them in the refrigerator while you toast the buns.
5. Melt 1/2 tablespoon butter in a 12-inch skillet over medium heat until it foams. Toast 4 buns, tops and bottoms, in batches until golden brown. Set aside and wipe out the skillet.
6. Put skillet on high heat. Add oil and heat until just smoking. Using a spatula, put all 4 patties into the skillet and cook without moving for 3 minutes. Flip burgers over gently and cook for 1 minute. Top each with a slice of American cheese and cook for another minute.
7. Place patties onto bun bottoms and place sliced onions on top. Spread burger sauce on each bun top, cover burgers, and serve immediately.

Oh yeah, and those fries! They’re crisp and lovely, and just as easy as the burgers, if not easier. You’re talking to someone who inevitably burns the first batch of anything she’s trying to fry, and often doesn’t get a single usable piece of food out of the entire experience. Nevertheless, these were simple even for me. You don’t even need to measure the temperature of the oil!

To make fries super simple, Cooks Illustrated starts them in cold oil. Surprisingly, they don’t get soggy or absorb oil. You’re then supposed to bring them to a boil, leave them for 15 minutes without touching them, make sure none are stuck to the bottom, and cook for a few minutes more until golden brown. The times were a little off for me and I feared 15 minutes left alone would be too long, so I started scraping them off the bottom a tad earlier and they didn’t break apart. I’d just recommend keeping your eye on them. If you can watch a pot, you can make these fries.

You may have noticed that I went a little crazy with my food stylin’ for this photo shoot. I couldn’t help it! I love these little burgers so much, I wanted to give them the star treatment. It added so much fun to the meal.

I bought some coke in glass bottles, sweet little mustard and ketchup dispensers, and food-grade checked wax paper. A lot of these great materials were on sale after Independence Day. I then downloaded and adapted the template for the burger tray and little fry pouch from Bakerella, who used it for her adorable faux-burgers.

Want to present a meal to your family in these sweet little checkered trays and fry pouches? Download the template here, print it on cardstock, cut around the outside borders, fold the tabs over and glue them. If you’d like to change what the fry pouch says, just crop out my logo and paste in your own.

Easy French Fries


Recipe by: Cooks Illustrated
Yields: about 2-3 servings

Ingredients:
2 1/2 lbs Yukon Gold Potatoes (about 6 medium), scrubbed, dried, sides squared off, and cut length-wise in 1/4 inch by 1/4 inch batons (strips)
6 cups peanut oil
1/4 cup bacon fat, strained, optional
Kosher salt

Belgian-Style Dipping Sauce Ingredients:
5 tablespoons mayonnaise
3 tablespoons ketchup
1 medium garlic clove, minced
1/2 teaspoon hot sauce
1/4 teaspoon table salt

Directions:
1. Mix all ingredients for Belgian-Style Dipping Sauce together and refrigerate until needed.
2. Put potatoes, oil, and bacon fat (if using) into a large Dutch oven or stock pot. Cook over high heat about 5 minutes or until the oil reaches a good rolling boil. Cook without stirring until potatoes are limp but their exteriors are firm enough to scrape stuck ones off the bottom without breaking. The original recipe says 15 minutes, but keep an eye on them and try a little early (gently).
3. Using tongs, stir potatoes, gently loosening any that are sticking to the bottom, and continue to cook, stirring occasionally, until golden the fries are golden brown and crisp, about 5 to 10 minutes longer. Use a slotted spoon to transfer fries onto a bed of paper towels over a baking sheet. Salt and serve immediately, while hot, which Belgian-Style Dipping Sauce.

If you liked this post, please:
Subscribe to Willow Bird Baking
Follow Willow Bird Baking on Twitter
Follow Willow Bird Baking on Facebook
Give this post a thumbs up on StumbleUpon


ShareOther ways to share this post with friends!

Croissant Masters Round 2

Most of the dishes I post on Willow Bird Baking are things I’ve just made for the first time. The first attempt at a recipe can be scary, but you can reap huge rewards in terms of your kitchen confidence.

More Willow Bird Baking readers have taken my Croissant Challenge to heart, and without fail, they’ve been proud of the results they’ve achieved! If you’ve never made croissants in your own kitchen, will you commit to croissant? When you pull them out of the oven, the excitement you feel will be well worth the effort. Go get the recipe for yourself! You can also see the first round of Croissant Masters.

Here are the lovely pastries of the latest Croissant Masters!


Maranda: “I’m not sure Julie over at Willow Bird Baking understands the impact she has made on my life through her baking…So naturally, when she threw the gauntlet and challenged other bakers to commit to croissant, I was literally first in line. ”

(Can we just have a round of applause for Maranda, whose printer is on the fritz? She had to write out the entire recipe by hand. Not to mention the fact that her croissant post made me get all teary eyed! You have to see!)


[see more of Maranda’s croissants here.]


Amanda: “They were amazing (and didn’t last very long around my house)! We ate them with local wildflower honey from our farmer’s market.”


Black Rose: “Would you believe it? I showed someone I know the slideshow of croissant-making and they’re actually paying me to make them some for Saturday, so now I get to make croissants again for the second time in a week! “


Cortney: “I don’t mean I made crescent rolls. I didn’t pop a can of anything. I mean, I made, from scratch, over two days, real live actual butter-and-pastry croissants. It’s tempting to end that statement with the phrase ‘so, suck it…'”


[see more of Cortney’s croissants here.]


If you liked this post, please:
Subscribe to Willow Bird Baking
Follow Willow Bird Baking on Twitter
Follow Willow Bird Baking on Facebook
Give this post a thumbs up on StumbleUpon


ShareOther ways to share this post with friends!

Black and White Croquembouche

One of the key components to elegance is often simplicity. An elegant science experiment is one that arrives at a significant conclusion using a simple, clever process. An elegant math proof is one that uses straightforward logical turns to simplify what seems to be a complicated concept. An elegant dress is classic, easy, timeless. An elegant dessert is . . . the cream puff. Dressed in chic black and white for our elegant occasion, of course.

Cream puffs are the sort of thing people buy in tubs from the freezer section. I actually love those icy little things, but they pale (and shiver) in comparison to these homemade, creamy little clouds. The distinct taste difference isn’t the only reason you should make some cream puffs, though.

You should make them because they’re easy. They look fancy, they’re classy enough for company, they’re impressive — but they’re easy! Not just the cream puffs, either, but the actual mounted cream puff tower (the croquembouche) is easy, too! If you can put some cookie-like dollops of batter in the oven, if you can pipe some cream, if you can dip something in chocolate . . . you can make this recipe.

Imagine the look on your husband’s (or wife’s, or sister’s, or dog’s) face when you carry this beauty to the table, calmly announcing, “Dessert’s ready!”

Cream puffs are made with a simple cooked dough called pâte à choux. It’s quick as a whip to make, and then it’s simply piped onto parchment paper, the little peaks are dabbed down with a wet finger, and the dough is egg washed. After a bit in the oven, the puffs are ready for action. I always make my puffs the day before and freeze them, baking them for a few minutes out of the freezer the next day and cooling them before filling (and serving immediately). It may seem odd to freeze the puffs for just one day’s storage, but they’ll get soggy otherwise, so it really is best.

This here lovely tower of creamy puffiness is suffering from a delicious identity crisis. I opted for two flavors of puffs: puffs filled with vanilla cream and dipped in chocolate, and puffs filled with strawberry cream and dipped in white chocolate. They were both delicious and cute, but the consensus was that the vanilla cream puff was best. Feel free to make just one flavor, both flavors, ten different flavors — maybe even a rainbow croquembouche? You go for it!

For my last croquembouche, I used caramel as the building glue. It stuck a lot quicker and was easier to work with in that way, but cooled off too quickly and became too viscous. This time I used melted chocolate, and had the opposite experience. It didn’t harden quickly and was a little shakier during the build, but stayed melty throughout the entire process.

I think the best of both worlds is using chocolate but refrigerating the structure periodically to harden, so that’s what I’ve written into the recipe below.

If you love cream puffs but are used to defrosting them first, it’s time to step out on a limb, get into your kitchen, and construct something beautiful! Tell me: what’s the most elegant dessert you’ve ever made?

Black and White Croquembouche


Recipe by: Willow Bird Baking, with help from: Mike’s Table (strawberry pastry cream), Chef Lou Jones (vanilla pastry cream), Peter Kump and Nick Malgieri (cream puffs)
Yields: 45-50 puffs

Pâte à Choux Ingredients:
1 1/8 cups water
9 tablespoons unsalted butter
3/8 teaspoons salt
1.5 tablespoons sugar
1.5 cups all-purpose flour
6 large eggs
Egg wash (1 egg yolk and 1/2 cup heavy cream, lightly beaten)
chocolate for dipping (I used white chocolate bark for the white puffs and a combo of bitter- and semisweet chocolate for the brown puffs — the bark hardened faster, but you can use whatever you like)

Vanilla Pastry Cream Ingredients:
2 1/4 cups whole milk
6 large egg yolks
2/3 cup sugar
1/3 cup cornstarch
1 vanilla bean, split lengthwise (or 2-3 teaspoons vanilla extract)
2 cups heavy cream

Strawberry Pastry Cream Ingredients:
1/2 recipe of vanilla pastry cream (above)
scant 1 cup strawberries, hulled and chopped
1/16 cup sugar (half of a 1/8 cup measure)

Directions:
I love to watch this video from Martha Stewart anytime I begin a croquembouche, to visualize the process of making pâte à choux, filling puffs, and constructing the tower — take a look at it before you begin.

Make vanilla pastry cream: In medium bowl, whisk together milk, egg yolks, sugar, and cornstarch.

Put remaining 1 3/4 cups milk in a heavy, medium saucepan. Scrape in seeds from vanilla bean; add pod (or add vanilla extract here). Sprinkle remaining 1/3 cup sugar over the milk, letting sugar sink undisturbed to bottom. Set pan over moderate heat and bring it to simmer without stirring.

Temper the egg yolk mixture by adding 1/4 cup of the hot milk mixture to it while whisking. Then, while whisking, gradually whisk egg yolk mixture into the hot milk. Cook over moderate heat, whisking constantly, until pastry cream simmers and thickens, about 1 minute. Remove from heat, discard vanilla pod (if used), and whisk cream until smooth. Transfer to bowl, removing half to another bowl for the strawberry pastry cream, and press plastic wrap directly onto surface (I let it cool a moment first).

Make strawberry pastry cream: toss sugar with strawberries and set aside for 15 minutes. Then simmer them over medium heat for 10-15 minutes, until they begin to thicken a bit. Let cool. Add into 1/2 recipe of pastry cream set aside above and stir to combine well. Press plastic wrap directly onto surface of both bowls of pastry cream, chilling until cold, about 4 hours.

After chilling, whip heavy cream into soft peaks. Add about 1/2 cup of whipped cream into each pastry cream to lighten. Now carefully fold the rest of the whipped cream into the pastry creams (about half into each). NOTE: Pastry cream can be made in advance and refrigerated, wrapped well with plastic wrap on surface, for up to 3 days.

Make the pâte à choux: Combine water, butter, salt and sugar in a saucepan over medium heat. Bring to a boil and stir occasionally. At boil, remove from heat and sift in the flour, stirring to combine completely.

Return to heat and cook, stirring constantly until the batter dries slightly and begins to pull away from the sides of the pan. Transfer to a bowl and stir with a wooden spoon 1 minute to cool slightly.

Add 1 egg. The batter will appear loose and shiny. As you stir, the batter will become dry-looking like lightly buttered mashed potatoes. It is at this point that you will add in the next egg. Repeat until you have incorporated all the eggs.

Pipe the batter using a pastry bag and a plain tip. Pipe choux about 1 inch-part in the baking sheets. Choux should be about 1 inch high about 1 inch wide. Using a clean finger dipped in hot water, gently press down on any tips that have formed on the top of choux when piping. You want them to retain their ball shape, but be smoothly curved on top. Brush tops with egg wash while trying not to drip the wash down the puffs onto the pan (which could somewhat inhibit rise).

Bake the choux at 425 degrees F until well-puffed and turning lightly golden in color, about 10 minutes. Lower the temperature to 350 degrees F and continue baking until well-colored and dry, about 20 minutes more. Remove to a rack and cool (tip from a pro: poke each puff with a toothpick while cooling to release the steam inside. It shouldn’t cause your cream to leak, but will help the puffs stay crisp). Can be stored in a airtight box overnight, but I recommend, if you aren’t using them right away to create your croquembouche, that you freeze them. When you’re ready to use them, bake them at 350 degrees F for 5-6 minutes to refresh and recrisp them.

Fill your puffs: When puffs are cool, use a thin, plain tip to fill them generously with plain or strawberry cream (the strawberry cream will have chunks, so use a wider tip).

Assemble your croquembouche: Melt chocolates in the microwave per packaging instructions (chips are usually melted on half power in increments of 30 seconds, stirring after each). I run a bit of hot water into a large bowl and set my bowl of chocolate down into the larger bowl to keep it melty, but be careful not to get water in the chocolate, which would cause it to seize.

Dip each puff’s head into the chocolate (white or brown as desired), setting them right-side up on wax paper to dry. After you’ve dipped all of the puff tops, begin with the largest puffs, dipping the bottoms and/or corners as needed to build the base of your croquembouche on a plate. After building each level, stick the croquembouche into the refrigerator to harden the chocolate a bit before moving on. Sudden temperature changes aren’t ideal for chocolate and may change the color a little (though it didn’t for me), but I find this preferable to my tower collapsing!

Once the tower is built, serve immediately. I refrigerated mine for a few hours and was fine with the texture, but it’s better served as quickly as possible so the puffs don’t get soggy. Enjoy!


Need to start simpler? Try one of these shortcuts:
-Filling puffs with just one flavor of pastry cream instead of two.
-Filling cooled puffs with simple whipped cream instead of pastry cream.
-Serving puffs on a platter instead of mounted.
-Only using one kind of dipping chocolate.


If you liked this post, please:
Subscribe to Willow Bird Baking
Follow Willow Bird Baking on Twitter
Follow Willow Bird Baking on Facebook
Give this post a thumbs up on StumbleUpon


ShareOther ways to share this post with friends!

1 104 105 106 107 108 127